Tuesday, May 6, 2014

Fresh Regional Cuisine at Horseradish Grill

With the sun just starting to lower in the sky, we arrived at the venerable Horseradish Grill on a busy Tuesday evening. As you walk up the path to the restaurant, the lush backdrop and country-style cottage reminiscent of an old horse stable evoke quiet charm and seclusion from the hectic Buckhead traffic just yards away.

Moments after I entered the front door, I was holding a "Buckhead Bow Tie," a refreshing cocktail using Jack Daniels Tennessee Honey as the main ingredient, along with a topping of fresh chocolate mint. This is the newest cocktail being served at the bar that was once a quaint country store. The Buckhead Bow Tie is Horseradish Grill’s entry into the “Battle of the Bottles” sponsored by the Atlanta’s Visitor and Convention Bureau with the theme "What would Rhett Butler drink today?" As I sipped my drink, I was introduced to Steve Alterman, Horseradish Grill’s owner, who immediately made me feel at ease and welcome as though I had entered his own home.
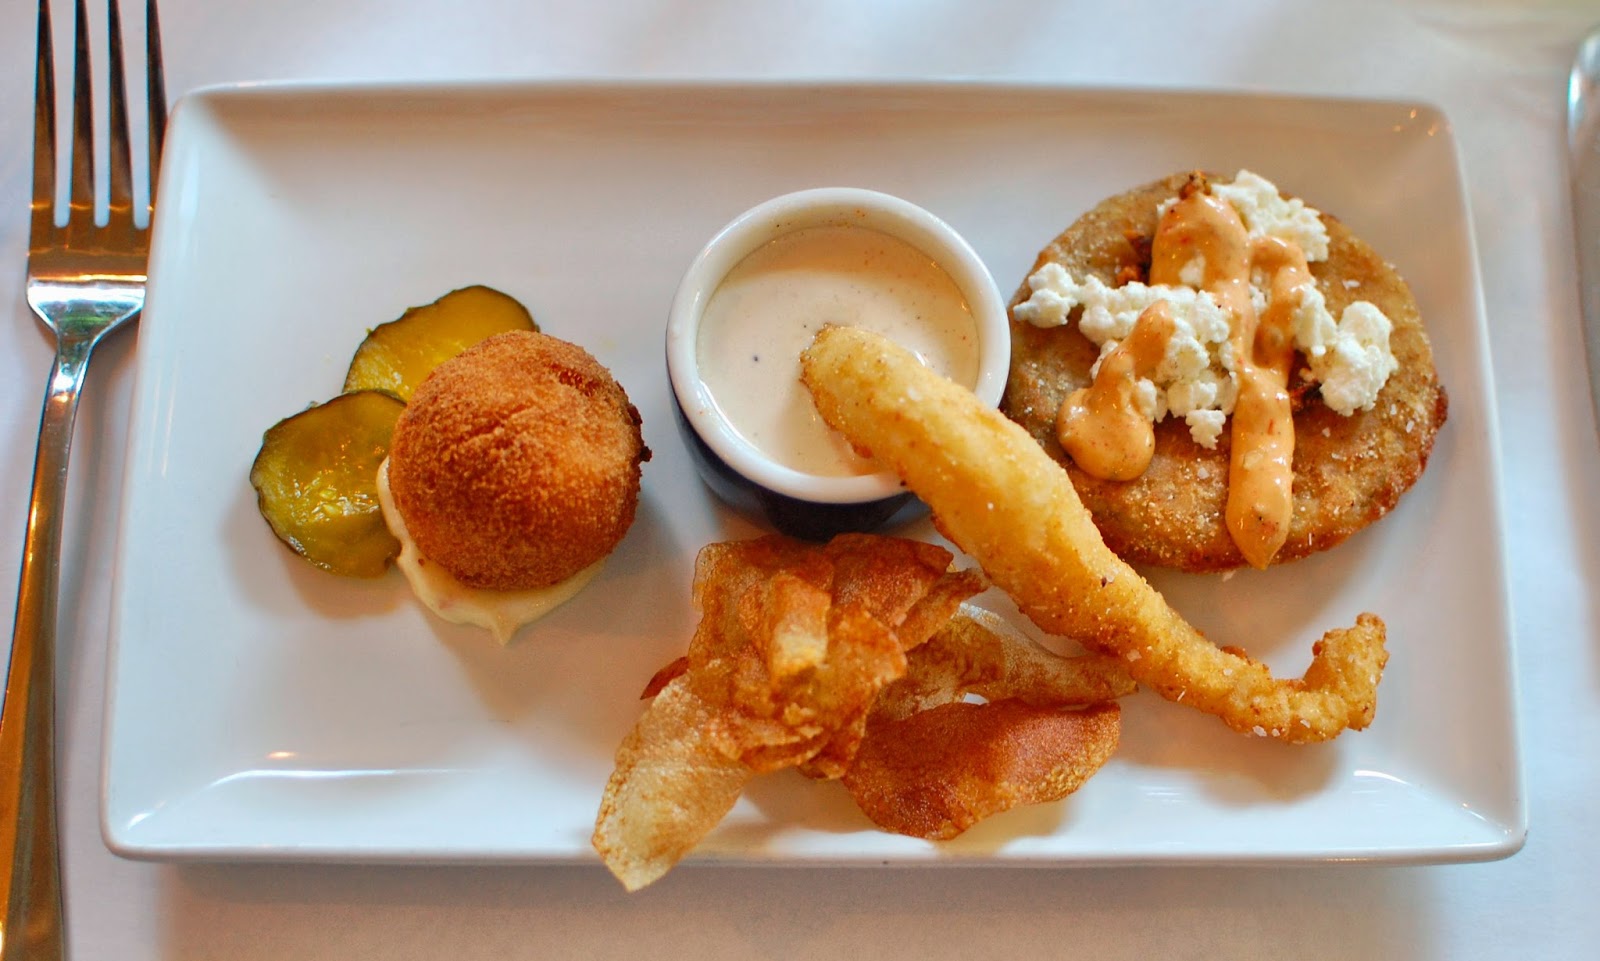
Along with the other members of the Atlanta Food Bloggers’ Society, I was seated in a private dining area that resembled a front porch. We all sat and chatted as an appetizer sampler was brought to the table. The plate included a pimento cheese grit fritter sitting on a dollop of country ham aioli with homemade bread & butter pickles; a delicate strip of fried fish with served with Alabama white sauce and crispy garlic chips; and, a fried green tomato topped with goat cheese and spiced pecan remoulade. A crisp un-oaked Chardonnay was a wonderful pairing.


As the plates were cleared, plates of shrimp and creamy grits followed. Roasted red peppers and caramelized onions braised in a spiced sherry cream sauce accompanied the plump fresh shrimp and flawlessly prepared Logan Turnpike Mill grits. Executive Chef Dave Berry who has rejuvenated the HRG menu while remaining true to historic recipes, came in and described the dishes, listened earnestly to our comments, and cheerfully answered questions. With few exceptions, all dishes on the menu are made from scratch.

Chef Berry and Steve Alterman then led a tour of their full garden located behind the kitchen which included a healthy stand of (yes, you guessed it), a healthy stand of horseradish. As we nibbled on fresh strawberries and leaves of chocolate mint, Alterman explained, “Atlanta’s concept of Southern farm-to-table cuisine originated at Horseradish Grill. When we started, people told me I was crazy. At the time, Southern food was just a caricature like mushy black-eyed peas cooked with fatback. Today, there is a plethora of sophisticated Southern restaurants.”

We returned to the table to find plates of braised pork belly served atop cornmeal pancakes with a rhubarb-red onion jam and a glass of lovely dry Cabernet Sauvignon which offered a nice contrast. Each plate was garnished with a beautiful chive flower fresh from the garden.
Still licking our chops from the tender pork, dishes of pan-seared sea scallops with Carolina Gold rice “middlins” topped with fried Savoy cabbage, black-eyed “peanuts” and drizzled with a barbeque vinaigrette. Middlins are a by-product of milling Carolina Gold rice. The broken pieces of the fragile long-grain rice result in a creamy, risotto-like texture. I must admit that this was my favorite dish of the evening.

All of us were getting full and loosening our belts as yet another course was delivered to our table. Perfectly wood-grilled ribeyes which had been rubbed down with HRG’s own dry rub sat in a puddle of smoked garlic and corn puree crowned with Parmesan fries. Feeling satiated, we all pushed our chairs back as the conversation continued. Looking down the table, it was genuinely refreshing to see the owner fully engaged and enjoying himself as he sipped on his martini.

When plates of dessert samplers arrived, we all gave a collective sigh, but no one could resist the trio of treats set before them which included homemade pecan pie, Kentucky oatmeal spice cake topped with caramel ice cream, chocolate-chocolate layer cake served with fresh crème and sliced strawberry, and Berry’s signature sweet potato crème brulee.

We extend our sincere thanks to Steve Alterman, Executive Chef Dave Barry and the amazing team at Horseradish Grill for showing us the true meaning of Southern hospitality.

While the menu items we sampled were complimentary, the opinions included herein are honest and unsolicited.


Yum

Monday, May 5, 2014

Garnish & Gather Spanish Chicken and Rice

The minutes slowly ticked by until the 3 o'clock pick up time for our Garnish & Gather delivery at Highland Wine and Crystal. We had received a personal reminder from the Garnish & Gather girls that morning although no reminder was necessary; we were already counting down the minutes. Resisting the urge to unpack the signature gray bag in the car, I impatiently read the meal card that said I would be cooking "Spanish Saffron Chicken with Rice and Local Chorizo."

At home, I unloaded our meal provisions which included a one pound package of frozen Heritage Farm boneless chicken thighs, a plump link of handmade chorizo from the Spotted Trotter, a container with roughly chopped onions and two squished cloves of garlic labelled “chicken starter,” fresh green peas, green Spanish olives, 2 bouillon cubes, a small bag of short-grain brown rice, a small container of saffron threads and a beautiful Meyer lemon. A small brown bag lay in the bottom of the bag which held a recipe card and a card with a conversation starter for the table. The frozen chicken thighs served as an ice pack to keep the other goodies in the bag cool during transport.

I thoroughly read the instructions ahead of time to understand how much time and effort was involved in preparing the meal. Because the preparation for the brown rice was a creamy risotto style, the instructions indicated that it would take about 40 minutes so I arranged my afternoon plans accordingly, leaving the chicken out to thaw in time to cook the meal.

Because the cooking instructions did not include a photograph of the finished dish, it occurred to me that I was not sure whether the chicken thighs should be chopped or left whole for this dish. I first visited the Garnish & Gather web site in hopes I would find a picture there. While I did not find a photo, I found some excellent advice on the G&G blog on how to sear meat which would come in handy for cooking the chicken when the time came. I also found that the G&G web site has a weekly update with wine pairings for each week’s menu items. With a little more surfing, I found several similar Spanish chicken preparations on our blog sites, all of which called for the chicken to be cut into bite sized pieces. And so I began to cook...

  • 1 cup short grain brown rice
  • 3 cups water
  • 2 bouillon cubes
  • 1/4 cup olive oil
  • 1 lb. chicken thighs
  • 1/2 cup onion, coarsely chopped
  • 2 cloves garlic, minced
  • ¼ cup white wine
  • 1 (4 oz.) link chorizo sausage
  • 1/4 cup Spanish olives, pitted
  • 3/4 cup fresh Spring peas
  • 2 pinches of saffron threads
  • 1 lemon
  • 2 tablespoons fresh parsley, finely chopped (optional)

In a medium pot, combine 2 cups water, one of the bouillon cubes, half the saffron threads, 2 1/2 tablespoons of olive oil, salt & pepper and bring to a boil. Add the rice to the boiling mixture and stir, and then cover, reduce heat to low and simmer for 40 minutes, stirring occasionally.

While the rice is cooking, slice olives in halves or thirds and dice or crumble chorizo, and set aside. Since I was cutting the chicken into smaller pieces, I did that at this time as well to complete the mis en place. For the record, these were not the pale pink chicken thighs you might find in most grocery stores; these were deeply hued with little or no visible fat.

In a large pot, heat 2 tablespoons of olive oil on medium heat. The G&G recipe card recommends salting the oil before adding the chicken to the pan to prevent sticking. Cook the chicken for 3 - 4 minutes per side depending on thickness. (While the instructions called for the chorizo to be added with the broth, I prefer mine to caramelize a bit, so I added the chorizo to the pan and continued to cook to brown the sausage a bit.) Add in the onions and garlic to the pan and cook for an additional 2-3 minutes. When the garlic is fragrant and just starting to brown, add the white wine to the chicken scraping up any browned bits and cook another 3 - 4 minutes until all the liquid is evaporated. Next add 1 cup water, 1 bouillon cube, sliced olives, spring peas, remaining half of saffron threads, salt & pepper. Bring to a boil then reduce heat to low and simmer for 20 minutes.

To plate the meal, place a scoop of the cooked rice on each individual serving plate and top with chicken mixture. Serve with a lemon wedge. G&G suggests that when feeding the kids, you might cook some chicken on the side and add in some peas, butter and Parmesan cheese along with a dollop of rice.

The final dish was quite similar to a deconstructed paella with a heavy influence of Spanish spices including very fragrant cumin from the chorizo and a wonderful bouquet of saffron. The olives added an earthy depth to the full rounded flavors while the spring peas added a tender “pop” to the otherwise creamy texture of the chicken and rice. The final spritz of lemon tied the whole meal together lending a tart brightness to the dish. The recommended crisp white wine paired well and accentuated the freshness of the meal.

Overall, this was a wonderful dining experience which took me outside my regular recipe rut. The ingredients were uber fresh and the instructions were easy to follow. My only recommendation to G&G might be to have a picture of the prepared dish available for less confident cooks to view before attempting the dish.

To order your meal provisions from Garnish & Gather, simply visit garnishandgather.com, and order a ready-to-took meal from the weekly menu by Wednesday night and get delivery the following Monday afternoon. Meals for two cost $35 and members save $5.00 each week.

While the menu items we sampled were complimentary, the opinions included herein are honest and unsolicited.


Yum

Thursday, May 1, 2014

Healthy Choice Chuice

We entered the Studio Kitchen with an open mind. We, members of the Atlanta Food Bloggers’ Society, had been invited to a dinner and tasting by Chuice partners, Ladell Hill and Dr. Sujit Sharma. The unique blend of naturally grown fruits, vegetables, herbs, nuts and seeds had been described as juice that you chew, but we still not sure what to expect. It is not a juice you would normally serve at breakfast, nor could it be classified as a smoothie.

As Ladell, chopped fresh mushrooms for a superfood salad, Sujit sliced vegetables for a quick sautee of shrimp and vegetables. While they assembled their dishes, we tasted both flavors of Chuice currently available: “The Forest,” (green) which cleanses internal organs, and “The River of Life,” (red) which balances the blood’s pH levels.

With a back to basics approach, Hill who has an extensive background as an herbalist, fitness trainer and molecular health specialist, has cultivated a product that serves as a full raw food meal in a bottle that helps to slow the aging process. Hill credits his curiosity and development of  Chuice to his Native American grandfather, who lived off the land his entire life. Hill’s upbringing led him to study the benefits that plants can provide the human body.

He wanted to create something new that began with chewing. Chewing releases enzymes that are the natural start of the body’s digestion process. Chuice has a comprehensive nutrition profile, containing all the elements of a healthy diet: complex carbohydrates, essential fatty acids, protein, minerals and fiber. It is all natural, fresh, unprocessed and unpasteurized. The nutrient-dense ingredients found in Chuice including kiwi, kale, flaxseeds, apples, carrots, walnuts and sunflowers seeds which give your body everything it needs to sustain itself.

We continued to chat as a spinach and kale salad with mushrooms, walnuts and a vinaigrette of apple cider vinegar, olive oil and a splash of green juice, and a papaya salad with mint, rosemary, cinnamon, cayenne pepper and another splash of green choice were passed around and sampled.

Ladell explained, “Papayas contain the digestive enzyme, papain, which is used like bromelain, a similar enzyme found in pineapple, to treat sports injuries, other causes of trauma, and allergies. They are also are rich in antioxidant nutrients such as carotenes, vitamin C, B vitamins, folate and pantothenic acid as well as potassium, copper, and magnesium and are high in fiber.”

Plates of shrimp sautéed with onions and bell peppers and another splash of green chuice were handed around as Sujit described his original skepticism of the benefits of Chuice. Being a physician, he wanted to see data that confirmed Ladell’s claims.


So the team did a 14-day, scientifically-relevant study with members of the Emory School of Public Health which proved Ladell’s assertions definitively. Now they work together as Taste of Earth, LLC, and hope to re-ignite interest in natural foods by offering a product that is tasty, convenient, and truly good for you.

After a very laid back evening in the company of these two highly committed and enthusiastic health proponents, we left feeling that we had formed a special bind with the creators and their product. Chuice is available at many local health food stores and will be on the shelves of Whole Foods later this month.


Yum

Sunday, April 27, 2014

Celeriac Remoulade with Chef Ian Winslade

The sun is shining brightly and a cool morning breeze tickles the gathering crowd as Chef Ian Winslade of Murphy’s restaurant peels and chops an little known vegetable for his Celeriac And Golden Beet Remoulade.  On this sunny Saturday, Chef Winslade has stepped out of his kitchen on the corner of Virginia Avenue and North Highland Avenue to demonstrate how to cook with fresh, organic vegetables at the Morningside Farmer’s Market.

Chef Winslade is a major advocate of the farm-to-table movement and strives to cook with locally-sourced ingredients as much as possible. He currently works with four local farms to provide fresh produce for the restaurants explaining that the further the ingredients must travel, the less healthy they are due to the processes used to prolong their shelf life. Chef Winslade plans his menus around four distinct seasons and likes the challenge that working with what is available locally each week, “It forces me to constantly be flexible and think about workable flavor combinations.” He continues in his velvety British accent, “Last year was particularly challenging due to the unseasonably wet Spring. We had planned for a glut of zucchini and tomatoes that never really came in, and our menu reflected those shortages.” Current menu items for Spring include fresh peas, fava beans and morels.

Celeriac and Golden Beet Remoulade 
  • 3 cups celeriac root, julienned
  • Juice of one lemon half
  • 4 tablespoons mayonnaise
  • 2 tablespoons Dijon mustard
  • 2 tablespoons crème fraiche
  • 2 tablespoons parsley, chopped
  • 1 teaspoon pecans, toasted and chopped
  • ½ cup golden beets, cooked and diced
  • 3 tablespoons champagne vinegar

Remove the tops from the celeriac, these can be chopped and added in lieu of/in addition to the chopped parsley. Rinse and peel the celeriac and then julienne. The shreds should not be too fine, nor should they be thicker than a matchstick. Chef Winslade suggests using a mandolin the thinly slice the celeriac then slice again into matchstick-sized pieces. Toss them immediately with the lemon juice in a large mixing bowl. Cut the beets into a small dice and add to celeriac.

In a separate bowl, combine mayonnaise, Dijon mustard, crème fraiche, and chopped parsley (and celeriac tops if using.) Fold dressing into celeriac and beets. Season with salt and pepper to taste and set aside for 30 minutes to marinate. Chef recommends serving the salad with slices of thinly sliced prosciutto.

To read my full interview with Chef Ian Winslade, please visit http://vahi.org/catching-up-with-murphys-chef-ian-winslade.


Yum

Friday, April 25, 2014

Scaling Up Healthy Portions

Over the last few months, we have been working diligently to adjust our eating habits which has necessitated the more regular use of a kitchen scale, so it was extremely fortuitous when Surpahs™ contacted us and asked us to review and compare two of their popular digital kitchen scale models. Surpahs™ works directly with the manufacturers to provide high quality home products at an innovative price points.

Americans are generally unaccustomed to weighing ingredients, but weighing is essential for precision baking. Many European cookbooks list ingredients by weight, and professional bakers on both sides of the Atlantic weigh ingredients to achieve the best results. Handy as they are, measuring cups will never measure up to the accuracy of a digital scale. One example proves the wisdom of weighing. Depending on the way that flour is packed into a measuring container, one cup can weigh less than four ounces or more than five ounces. An ounce may not seem like much. However, in a recipe with three cups of flour, the difference could be as much as three ounces which is nearly an extra cup. And what about dieters? More and more of us are trying to control portions. If that's your goal, you need a scale that can distinguish between four and five ounces of meat.

Digital kitchen scales rely on a "capacitive" system for measuring weight. These scales have two plates that are clamped at a fixed distance. The bottom plate is stationary; the top plate is not. When food is placed on the platform attached to the top plate, the distance between the plates changes slightly as the platform is depressed. The movement of the top plate (no more than a thousandth of an inch) causes a change in the flow of electricity in the scale's circuitry. This change is translated into a weight and expressed in numbers displayed on the face of the scale.

First and foremost, a scale must be accurate. We initially used pre-measured weights to judge accuracy and found both scales to be accurate. Each scale measures in a variety of units: grams, fluid ounces, pounds, and milliliters. Both of the electronic scales that we tested have a tare function (a small button) that resets the scale to zero. This is very important feature because it allows you to remove the weight of the measuring vessel as well as to accurately add ingredients to the vessel by weight. Scales with greater capacity (up to eleven pounds) are preferred over scales unable to measure the weight of a chicken or roast. Additionally, scales with large measuring areas are preferable since it is easier to weigh a large piece of meat or use your own bowl to hold loose ingredients. Both scales have an 11-pound capacity; large, clear readout displays; sensitive, accessible buttons; and, are compact enough to be stored in a drawer.


The stainless steel scale (model STT-864) is sleek and attractive with a roomy deck that measures 6 ¼ by 9 inches which allows room for weighing larger items. The backlit LCD display which is large and bright which was very easy to read without glasses even when shadowed by a large dish. The wrap around stainless edges make for easy clean up and the stainless and black design makes it compatible with the décor of most popular designer kitchens.


The white glass scale (model STT-1040) is smooth and eye-catching with a slightly smaller deck that measures 5 ¾ by 8 inches which still allows room for weighing larger items. While the LCD display has no backlighting, the black digits are easy to read. The one-piece glass top makes for quick and easy cleaning. The slim, clean profile of this particular scale makes it attractive enough to leave out on the counter top in full view.

Both of these scales were impressive for their weight capacity, larger than average top decks and range of measuring units, both metric and standard. Both scales are very reasonably priced and can be purchased from the Surpahs™ Shop on Amazon.com.


Yum

Sunday, April 20, 2014

America's Best Cook(s) from the South Cookbook Giveaway

Among the many things that define the United States, food tops the list. Every region has its specialty, whether it is lobster rolls from the East, chili from the North, tacos from the West, or shrimp and grits from the South. On the Food Network’s new series America’s Best Cook which airs Sundays at 9:00 EST, home cooks from the four corners of the country are mentored by FN chefs and battle it out for a chance at winning the title of America’s Best Cook.

The Team for the South is comprised of two Atlanta foodies: Nikki Bell and Ben Portman. Nikki, of Nikki Can Cook, was back in Atlanta recently for her book launch party and we were fortunate enough to receive a copy of her new cookbook Nikki Can Cook: “A Bit of This, A Bit of That” to share with one lucky reader. The first round ingredient for the Team South was shrimp. Nikki's grilled jerk shrimp with garlic mashed plantains & mango salsa elevated her to round two. Her Trinidadian macaroni and cheese saved Nikki from the "pressure cooker" challenge involving cooking a plain chicken breast to impress the indomitable Anne Burrell.  

Enter to win below and be sure to tune into the Food Network on Sunday to watch America’s Best Cook and cheer for Cat Cora and Team South!


Yum

Thursday, April 17, 2014

Hot Cross Buns - A Good Friday Tradition

For some, hot cross buns are synonymous with Good Friday. Hot cross buns have a long history that goes back hundreds of years. These special sweet buns, marked with a symbolic cross in celebration of the resurrection of Jesus Christ, are a fixture on many Easter tables and are historically considered to be blessed.

Many believe that sharing a bun with a friend will bring both the giver and receiver good luck and continued friendship for the following year. These lightly-sweetened, fruit-filled treats were sold in the streets of England during the nineteenth century to the cries of "hot cross buns; hot cross buns; one a penny; two a penny; hot cross buns!” With such a diverse past, it it clear that hot cross buns are a lovely and meaningful Easter tradition.

  • 1 cup warm milk
  • 5 teaspoons (2 packets) active dry yeast
  • 1/2 cup granulated sugar
  • 4 cups all-purpose flour
  • 1 1/2 teaspoons ground allspice
  • 1/2 teaspoon cinnamon
  • 1 teaspoon salt
  • 1 1/4 sticks (1/2 cup plus 2 tablespoons) cold unsalted butter
  • 2 large eggs
  • 1 large egg yolk
  • 1/2 cup dried currants
  • 1/3 cup golden raisins
  • 2 teaspoons finely grated fresh orange zest
  • 2 teaspoons finely grated fresh lemon zest
  • 3 tablespoons confectioner’s sugar
  • 2 teaspoons lemon juice or water

In a small bowl, stir together milk, yeast, and 1 teaspoon granulated sugar. Let mixture stand 5 minutes, or until foamy. In a separate large mixing bowl, combine flour, spices, salt, and remaining granulated sugar and mix together with a whisk. Using a pastry cutter or two knives, cut butter into bits and blend into flour mixture until the mixture resembles coarse meal.

Lightly beat 1 egg with the egg yolk. Make a well in center of flour mixture and pour in yeast and egg mixtures, currants, raisins, and orange and lemon zest. Stir mixture until a dough is formed. Transfer dough to a floured surface and knead until smooth and elastic, about 10 minutes. Transfer dough to an oiled large bowl and coat lightly with oil. Let the dough rise, covered with plastic wrap, in a warm place until doubled in bulk, about 1 1/2 hours.

Preheat your oven to 400°F and butter 2 large baking sheets. On a floured surface with floured hands knead dough briefly and form into two 12-inch-long logs. Cut each log crosswise into 12 equal pieces. Form each piece into a ball and arrange about 1 1/2 inches apart on baking sheets. Let buns rise, covered, in a warm place until doubled in bulk again, another 45 minutes.

While buns are rising, lightly beat the remaining egg with confectioner’s sugar to make an egg glaze. Brush buns with egg glaze before baking them in upper and lower thirds of oven, switching position of sheets halfway through baking, until buns are golden brown, about 12 minutes. When done, transfer buns to a rack to cool slightly.

In a small bowl, mix together confectioner’s sugar and lemon juice or water. Use a spoon to drizzle the glaze over the buns in a criss-cross pattern. Serve buns warm or at room temperature with softened butter and your favorite preserves. These delicious buns can be made one week ahead and frozen before being frosted, wrapped in foil and put in a re-sealable plastic bag. Thaw buns and reheat before serving.


Yum

DiningOut at Fork & Juniper

DiningOut Magazine Atlanta, the premiere epicurean magazine for food, wine and spirits in the Southeast , held the celebration of their Spring 2014 Issue launch at Fork and Juniper. The signature restaurant of the brand new Hyatt Midtown hotel features a seasonal menu of reimagined Southern classics. Chef Paul O'Shea prides himself on using the best ingredients available. "Not just the best tasting, but what is best for the health of our community and economy." Party attendees snacked on Coca-Cola-glazed brisket sliders, Caramelized-onion and Gruyere tarts, and mini chicken and waffles which were perfect examples of Chef O’Shea’s home-style dishes. 

Don’t miss the hotel’s new Juniper Bar, where gin gets the royal treatment. However, that doesn’t mean Southern staples like Bourbon and beer take the backseat. There is a full bar of premium spirits, refreshing brews, and award-winning wines. Thanks to DiningOut Magazine Atlanta and Fork & Juniper for hosting this event.


Yum

Tuesday, April 8, 2014

Soba Noodles Salad with Ginger Peanut Dressing

We are always looking for alternatives to the same-old, same-old pasta salad especially as the weather starts to warm up and we fire up the grill for cookouts and other outdoor gatherings. We first had this salad years ago from the deli counter at the DeKalb Farmer’s Market. We brought it back because it is relatively healthy compared to many other pasta salad recipes. The whole wheat pasta is easier to digest, the dressing is low fat reasonably low in fat and the peanut butter provides a protein punch.

This salad is delicious warm or cold and is actually better when made in advance. It holds up well at a picnic because the ingredients are not quick to spoil as afternoon temperatures climb. Be the hit of your next potluck with this tasty, unique salad.

  • 2 tablespoons soy sauce
  • 1 tablespoon mirin
  • 2 tablespoons creamy peanut butter
  • 2 tablespoons honey
  • 1 tablespoon minced fresh ginger
  • 1 small garlic cloves, roughly chopped
  • 1 tablespoon black sesame seeds, toasted
  • 2 tablespoons peanuts, chopped and toasted
  • ½ pound soba noodles, cooked

Mix soy sauce, mirin (which is seasoned rice wine vinegar), peanut butter, honey, ginger and garlic in a small mixing bowl and whisk together until smooth and creamy.
Toss the dressing with cooked soba noodles (or you can substitute whole wheat spaghetti which is what we have done here) pasta that has been allowed to cool. We sometimes use pasta leftover from another meal. Make sure that the pasta is well coated with dressing but not swimming in it. Place the coated pasta in the refrigerator until ready to serve.

Before serving, top the salad with toasted sesame seeds and chopped peanuts. This salad is especially tasty when garnished with freshly chopped cilantro.


Yum

Saturday, April 5, 2014

Colorful Curried Cauliflower

Waiting for Spring produce to appear at markets and grocery stores each year requires extreme patience. This is the time of year that I crave a garden fresh cucumber or tomato. I start to feel that if I eat one more Brussels sprout that I will turn into one! Adding a bit of flavor and flair to the ordinary cruciferous vegetables available this time of year helps to stave off the pre-spring boredom.

Additionally, members of the cabbage family have a very low glycemic index making them a healthy choice for those of us who are still trying to stick to our New Year’s resolution to lose weight, especially with swim suit season looming large. The most attractive aspect to this recipe is that the curry-flavored cauliflower makes a good snack as I find it as just as appetizing when eaten cold as hot.

  • 1 head cauliflower, cut into florets
  • 3 tablespoons olive oil
  • 1 tablespoon honey
  • 2-3 teaspoons curry powder
  • ½ teaspoon garlic powder
  • ½ teaspoon Kosher salt
  • Black pepper, to taste
  • Paprika for dusting

Preheat your oven to 425 degrees F. In a large bowl combine the olive oil, lemon juice, curry powder, garlic powder, salt and pepper. Whisk together until combined. Add the cauliflower florets to the bowl and toss with the curry dressing.

Once the cauliflower is fully coated with dressing, arrange the florets on a parchment-lined baking sheet and roast in the oven for 20-25 minutes. Check for your desired level of char. If you like your cauliflower a little more caramelized, pop it back in the oven for another 5-10 minutes until browned to your liking.

Once roasted, season with more kosher salt and black pepper if needed, and dust with paprika before serving. Chopped parsley or cilantro makes a pretty fresh garnish with a contrasting color as well. I spritzed a little lemon juice on mine too since I like it a bit tangy.


Yum

Monday, March 31, 2014

Mayonnaise: It’s What’s for Dinner?

Every good Southern cook has a jar of mayonnaise in their refrigerator. It is an absolute for making macaroni salad, potato salad, and slaw. In fact, it is hard to imagine preparing an Easter dinner without it. Except. Dom loathes mayonnaise. I am not sure that he ever recovered from his first mayo-induced trauma. While on a hunting outing at a quail plantation (another very Southern custom,) the luncheon buffet included pear salad: canned pear halves with dollops of (what he thought was) sour cream with a pinch of grated cheddar on top. Dom popped the pear in his mouth only to discover that the dollop was not sour cream, but in fact was a generous spoonful of mayonnaise. To this day, he still gets a little shiver when he is reminded of the episode.

Unlike Dom, our youngest Sonny who was born and raised in Atlanta, loves mayonnaise-laden foods like deviled eggs and pimento cheese and has even been known to slather mayo on his burger. There have been times after a track meet that Sonny has even eaten mayonnaise right out of the jar!*

Mayonnaise is a thick, creamy sauce or dressing that is an emulsion of oil, egg yolks, lemon juice or vinegar, and seasonings. Emulsifiers are liaisons between the two liquids and serve to stabilize the mixture. In mayonnaise, the emulsifier is egg yolk, which contains lecithin, a fat emulsifier. Salad dressing, unlike mayonnaise, does not contain egg yolks and is generally sweeter than mayonnaise.

Mayonnaise is commonly used as the base for other dressings and sauces, such as honey-mustard, horseradish, and tartar sauce. Another popular emulsion is hollandaise which is basically a cooked mayonnaise. Mayonnaise (along with its sibling, hollandaise) is one of the five mother sauces, which also include sauce espagnole, tomato sauce, béchamel and velouté. Mayonnaise was invented in 1756 by the French chef of the Duc de Richelieu. After the Duc beat the British at Port Mahon, his chef created a victory feast that included a new sauce called "Mahonnaise" in honor of the Duc's victory.

Blenders, mixers and food processors make it easy to make homemade mayonnaise, which many gourmets feel is far superior in taste and consistency to commercial mayonnaise. Since homemade mayonnaise is uncooked, it is important to use the freshest eggs possible. Homemade mayonnaise will last three to four days in the refrigerator.

2 egg yolks
1/4 cup red wine vinegar
1 teaspoon Dijon mustard
Kosher salt
1 1/2 cups olive oil (or any neutral oil you choose)

Place the egg yolks, vinegar and mustard in the bowl of a food processor and season with salt, to taste. Turn the machine on and VERY slowly start to drizzle in the oil. Drip, drip, drip until the mixture starts to thicken and look like, well, mayonnaise.

You can add the oil a bit faster at this point until it is all incorporated. If you add the oil too quickly, it will keep the two liquids from combining (emulsifying). If the mayonnaise is too thick add a few drops of water or if it is not thick enough, with the machine running, add a little more oil.

Once it has reached your desired consistency, seasonings can be added. For example, the ever-popular “aioli” is just another name for garlic-flavored mayonnaise. Other popular variations include adding paprika for patas bravas and curry to complement Indian dishes.

*Oh and by the way... April Fool! While it is true that Sonny does enjoy pimento cheese and the occasional deviled egg, he has never eaten mayonnaise straight from the jar. Knowing Dom’s mayo aversion, we saved a jar (for quite a long time actually) and added vanilla pudding. The look on Dom’s (and Nic’s) face was PRICELESS! Possibly one of the best April Fool’s jokes we have ever attempted!


Yum

Sunday, March 30, 2014

Scandinavian Rädisa Dip

Radishes are such happy little vegetables with their cheerful little orbs protruding from the ground and their top heavy leaves reaching impossibly to the sky. The word radish comes from the Latin word “radix” meaning root. These edible root vegetables, available in a brilliant array of vibrant colors ranging from deep purple to pure white, are grown and consumed throughout the world. Radishes are rich in ascorbic acid, folic acid, and potassium and are very low in fat content. They can be sprouted from seeds to small plants in as little as 3 days. Radishes are commonly used in Nordic cooking since they are known to grow well in their cooler climates.

Our favorite way to eat these crisp, spicy roots is to pair them with softened, salted butter on a thin-sliced, toasted baguette; this archetypal Scandinavian preparation is a close second. The creamy, slightly peppery dip goes well with crudité or crisp, traditional Swedish knäckebröd.

1/2 cup sour cream
1/4 cup feta cheese, crumbled
1/3 cup radishes, washed and finely diced
2 sprigs fresh dill, chopped

Combine sour cream and feta in a small mixing bowl and mash together with a fork until smooth and well mixed. Add the chopped radishes and dill, and mix until the fully radishes are fully coated incorporated. We purposely left out the salt in this recipe because the feta provides plenty of saltiness.

Refrigerate the dip for at least two hours for radish flavor to permeate the dip. Expect the dip to firm up in the refrigerator. If the dip is too thick, add a tablespoon of milk to thin it a bit. Serve with crostini, pita chips or even sliced radishes. Glad Ätande!


Yum

Wednesday, March 26, 2014

Atlanta Food & Wine Festival 2014 Sneak Peek with Chopped Chicken Liver on the Side

In few two short months, the Atlanta Food & Wine Festival will once again take over Midtown. In its fourth year, the three-day festival will offer guests over 100 cooking and cocktail demonstrations, technique labs, food and beverage tasting seminars and panel discussions. Each activity has been carefully designed by the Festival co-founders and their Festival Advisory Council and Curators to put the national spotlight on the food and beverage traditions of the South and to establish Atlanta as the gateway. I recently attended a “pot luck” luncheon hosted by co-founders Elizabeth Feichter and Dominique Love and catered by Advisory Council Chefs to get a special behind-the-scenes look at AFWF14.

The Festival’s Advisory Council is made up 70 (give or take a few) food industry “rock stars.” These award-winning chefs, sommeliers, mixologists are personally invested in celebrating and protecting our region’s rich culinary traditions and collaborate to create the weekend’s programming. After tasting their amazing dishes, I can exclaim that this was no ordinary “pot luck!” If the Lunch-and-Learn was an example of what revelers can except at AFWF14, no one will be disappointed! Our menu included:
  • Corned Duck, Sauerkraut, Pickles Apples by Zeb Stevenson of Parish  
  • Braised Short Ribs, Roasted Root Vegetables and Finglering Potatoes by Oliver Gaupin of Eleven at Lowes Atlanta Midtown
  • Chopped Liver and Pimento Cheese with Toast by Shaun Doty of Bantam+Biddy  
  • Curry Roasted Cauliflower by Gerry Klaskala of Aria 
  • Baby Beet Salad, Argula, Country Ham, Cheddar, Cornbread, Truffle by Chris Hall of Local Three  
  • Mediterranean Bulgur Salad by Pano I. Karatassos of Kyma  
  • Mixed Salad by Steven Satterfield of Miller Union  
  • Bourbon Roasted Banana Pudding with Pastry Creme by Todd Richards of The Shed  
Needless to say, the delicious fare made it difficult to focus, especially after my first bite of Chef Shaun Doty’s Chopped Liver Salad, (more about THAT in a hot minute) but here is the scoop on this year’s festival:

WHO: The Atlanta Food & Wine Festival boasts a roster of more than 250 epicurean superstars that represent the South’s best talent from James Beard Best Chefs and legendary beverage distillers to award-winning winemakers and cutting-edge mixologists.


WHAT: The Festival will have numerous venues and formats to appeal to every guest including seminars, demonstrations, panel discussions, tasting experiences as well as themed dinners & connoisseur events. To see a full listing of ALL the AFWF14 offerings, please visit http://atlfoodandwinefestival.com/planning-tools.

WHEN: Thursday, May 29 – Sunday, June 1, 2014

WHERE: Every great city has a defining district; the heart that pumps life into the city. In Atlanta, it is Midtown which has become the epicenter of work, play, culture, art, shopping and dining. The Loews Atlanta Hotel will again be the Official Host Hotel of the weekend’s activities with the Festival Learning Experiences taking place in the hotel’s conference center. This year’s Tasting Tents will move to a new location being transformed by Selig Properties which will become a permanent green-space for the community.

HOW: One-Day and 3-Day passes are available as well as tickets to tasting tents and individual dinners and events at http://atlfoodandwinefestival.com/tickets. Want to do it ALL? Become a connoisseur at http://atlfoodandwinefestival.com/connoisseur-lounge/connoisseur-experience. Proceeds from the Festival go to charity.

Now about that Chopped Chicken Liver Salad… since we are a food blog, we were able to get the recipe from Chef Doty to share with you are patient readers.

Chef Shaun Doty is a one of the founding chefs of the Atlanta Food & Wine Festival and is currently the co-owner and executive chef of Bantam + Biddy and Chick-a-Biddy. A graduate of Johnson and Wales, Chef Doty spent his formative years working in Charleston, Dallas, New York, and spent time in Europe. Here in Atlanta, he worked with renowned Chef Guenter Seeger at The Ritz-Carlton in Buckhead and Mumbo Jumbo before opening his own restaurants: MidCity Cuisine (2005) and Shaun’s (2006) which was voted Esquire Magazine’s Best New Restaurant in 2007.

Photo Credit: Angie Mosier 
Bantam & Biddy Chopped Chicken Liver Salad
  • ¼ pound bacon
  • 1 pound chicken livers, trimmed
  • Salt and pepper to taste
  • 1 cup all-purpose flour
  • ¼ cup vegetable oil
  • 2 hard-boiled eggs, roughly chopped
  • 1 shallot, finely diced
  • ½ cup mayonnaise
  • 1 tablespoon parsley, finely chopped
  • Toast for serving

Preheat oven to 350 degrees F. In a sauté pan over medium-heat, cook bacon until crispy. Drain bacon on a paper towel before chopping into bits. Transfer cooked bacon pieces to a mixing bowl and set aside. Season livers with salt and pepper and dredge through the flour.

Add vegetable oil to the sauté pan with remaining bacon fat to cover the bottom of the pan and heat over medium heat. Place the flour-coated livers in the pan and cook until they become crispy on one side.  Flip livers over and place the entire pan in the pre-heated oven for 5 minutes.  Remove livers from the pan and place on paper towel -lined plate to cool.

After livers have cooled, chop into ½-inch pieces. Put chopped liver, bacon bits, chopped hard-boiled egg, shallots, mayonnaise (Chef Doty prefers Hellman’s), and parsley in bowl and lightly mix together. Adjust salt and pepper if necessary. Serve with or on toast.


Yum

Friday, March 21, 2014

Soul-soothing Pasta Fagioli

Like many traditional Italian dishes including polenta or even pizza, pasta fagioli started as a peasant dish made with leftovers and other ingredients commonly found in an Italian pantry. Pasta e fagioli, (pronounced "pasta fazool"), simply means "pasta and beans" in Italian and makes a hearty, belly filling, and inexpensive meal,

Pasta fagioli is commonly made using cannellini beans or borlotti beans and some type of small pasta such as elbow macaroni or ditalini. The base is generally olive oil, garlic, minced onion, and spices, along with stewed tomato or tomato paste. Some variations do not include tomatoes at all, and are made from a broth. While this meatless bean soup is a good dish to serve during Lent, this is true comfort food and is a year-round go-to in our house.


  • 2 tablespoons extra virgin olive oil
  • 1 yellow onion, finely chopped
  • 2 cloves garlic, minced
  • 2 1/2 cups chopped tomatoes
  • 1 teaspoon oregano
  • Pinch of red pepper flakes
  • Salt and freshly ground black pepper
  • 2 cups chicken or vegetable stock
  • 1 ½ cups cooked white beans
  • 2 cups cooked pasta (ditalini or elbow)
  • Freshly-grated Parmesan cheese

In a medium-sized pot over medium heat, warm the olive oil and then add the onions Sauté the onions until they are tender and translucent, about 10 minutes.

Add the garlic to the pan and sauté for a few minutes until garlic is fragrant, and then add the tomatoes, oregano, red pepper flakes, salt and pepper to taste. Simmer for 10 or so minutes before adding the cooked white beans (or a 15 oz. can of beans hat has been drained and rinsed) and chicken stock before simmering for another 20 minutes more.

While the soup simmers, cook the pasta according to package directions. To make 2 cups of cooked pasta, cook 1 cup dry pasta. Add the pasta to the soup about 5-10 minutes before serving to let the flavors meld.

Ladle the soup into individual bowls. Top with a zesty generous amount of grated Parmesan cheese and serve with some crusty bruschetta. Enjoy!


Yum

Sunday, March 16, 2014

Irish Potato Drop Scones & Giveaway

Saint Patrick was a 5th century Irish bishop who purportedly used the Irish shamrock to explain the holy Trinity (Father, Son and Holy Spirit) to the originally pagan people of Ireland. Legend has it that St. Patrick combined the traditional Christian cross with the circle of the sun used by the pagans of Ireland and created the Celtic Cross. He is also credited with driving snakes out of Ireland.

While potatoes are commonly associated with the Irish, the staple crop was not introduced to Europe by the South American Spanish until the second half of the 16th century. This means that St. Patrick likely never ate or even saw a potato in his lifetime, yet the tuber played a major role in the European population boom during the 18th and 19th centuries. As one would imagine, the Irish incorporated potatoes into many Irish recipes (as in lots) including breads and cakes.

Scones, originally made with oats and shaped into round cakes, and griddle-baked over an open fire. They are related to Welsh yeast cakes and were named either from the Gaelic word “sgonn” meaning a shapeless mass or large mouthful or the German “sconbrot,” for fine or beautiful bread (or maybe both.) No matter what they were named after, they are an appealing addition to any Irish meal. They even make a quick, improvised shortcake for a dessert served with berries and whipped cream.
 
  • 1 cup mashed potatoes
  • 3 tablespoons unsalted butter, melted
  • 1 egg, beaten
  • 1/2 cup all-purpose flour, plus more for rolling
  • 1/4 teaspoon baking powder
  • 1 teaspoon salt
  • 1/4 teaspoon pepper
  • Oil for frying


Stir together mashed potatoes, butter and egg until combined well. Combine dry ingredients in a separate mixing bowl, and then stir into potatoes with a wooden spoon until just combined. Turn dough out onto a lightly floured work surface.

Heat a griddle or a large cast-iron skillet over medium heat, and brush with oil. Drop spoonfuls of dough on the heated surface. Smash the dough with a spatula to make the scones about 1/4” thick. Cook for 1-2 minutes, turn the scone over, and cook the other side for another 1-2 minutes. Both sides should be a pretty golden brown. Serve warm with bangers and eggs.


To celebrate St. Patty's Day, we are hosting the

Luck of the Irish FLASH Giveaway
~ Win a $50 Amazon Gift Card ~


Use the form below to enter and remember, this giveaway ends in 24 hours, at 11:59 pm on March 17, 2014!
Now, the question is, do you feel you are lucky?


Yum

Wednesday, March 12, 2014

The Great Grilled Octopus Experiment

The phone rings. After a brief salutation, Dom asks, “How do you feel about octopus?” To which I replied, “the entire species or on a dinner plate?” Given that this is a food blog, I think you know his response. Thus began the octopus experiment.

Dom arrived home with the 5-foot-long beast. Thank goodness it had been cleaned at the market, so that part of the adventure was preempted. Feeling like Captain Nemo and his crew battling the poulpe (French for "octopus”), we managed to wield the cephalopod into a giant stock pot filled halfway with water, and adding three wine corks, brought the creature to a boil. Why the corks? Many theorize that tartaric acid (cream of tartar) collects on wine corks as wine ages in the bottle. This is a naturally occurring substance that is part of the wine fermentation process. Admittedly, we are quite skeptical on the whole cork thing , but both Mario Batali and Lidia Bastianich swear by them so at least we are in good company.

Surprisingly, the simmering octopus smelled wonderful; kind of like fried shrimp or scallops. They are what they eat as the maxim supposes.  When it was time to drain the water from the octopus’ boiling bath, it was interesting to see that it had become more firm, had shrunk considerably, and had dyed the water a deep shade of lilac. What was even more notable was how much more the octopus shrank before it was served. The original weight of the cleaned octopus was approximately 10 pounds and we estimated that grilled octopus yielded about 2½-3 pounds of meat; succulent and well-worth-the-effort meat.

1 octopus, cleaned
2 tablespoons butter
1/2 cup water
1/4 cup teriyaki sauce
1/2 teaspoon black pepper, ground

Place octopus in cold water with a cork and bring to a boil. Lower heat and simmer at a low boil for 30 minutes to tenderize.


Drain the octopus and place in a French oven or covered baking dish with the butter and ½ cup water and braise in a 325°F oven for one hour.

Once the octopus pieces are cooled enough to handle, toss with the teriyaki and marinade until the grill is ready. Place the octopus on the grill and cook for about 5 minutes. The octopus should be crispy and slightly charred. Allow to cool before slicing into bit-sized pieces and serving.


Yum

Friday, March 7, 2014

Out Like a Lamb Keftas

In like a lion out like a lamb. That is the old expression used to describe the month of March and its frequently unreliable weather. March also brings with it other harbingers of Spring like daffodils, asparagus and robins. Lamb is a common ingredient in many vernal recipes and meals, but none more versatile than the kefta. Keftas are made with ground meat, usually lamb, mixed with Moroccan spices such as cumin, paprika, coriander and parsley. Cinnamon, chili pepper, and mint leaves are optional additions.

As the days get longer and warmer, these spicy sphereoids make the perfect excuse to break out the grill. Served with naan, tzaziki, feta and cucumbers, this meal hits all the flavor notes. Economical and easy to prepare, these skewered meatballs make a great option for party food, but be prepared to double the recipe because your guests are likely to gulp these skewers down before you can blink twice.

  • 1 ½ pounds ground lamb
  • 1 medium onion, finely chopped
  • 2 teaspoons ground cayenne pepper
  • 1 teaspoon paprika
  • 1 teaspoon ground ginger
  • ½ teaspoon ground cumin
  • ½ teaspoon ground cloves
  • ½ teaspoon ground allspice
  • ½ teaspoon ground cardamom
  • ½ teaspoon ground cinnamon
  • ½ teaspoon ground nutmeg
  • ½ Kosher salt
  • 2 tablespoons fresh mint, chopped  

Prepare grill for cooking over medium-hot charcoal. In a large bowl, combine lamb with chopped onions, spices and mint. Mix until well blended. We use our hands to thoroughly combine all the ingredients. Form lamb mixture into meatballs about 2 inches in diameter.

Thread 5 or 6 meatballs onto each skewer. Now, you may be wondering how you are going to thread these keftas on a skewer and get them onto the grill without them falling into the coals. When skewering the meat, squeeze them onto the skewer. Refrigerating the meat will firm them up a bit. Use care when transferring them onto the grill where they will firm up quickly as they cook through.

When the coals are ready, lay the skewered meat on the grill and cook until lightly charred on the outside and the juices run clear when pierced with a knife or fork. Transfer to a platter and serve with assorted salad ingredients, minty yogurt dressing, feta cheese and pita bread or naan for a surprisingly satisfying and healthy meal.

And for those days that are still more like that proverbial lion and grilling is out of the question, the keftas can be broiled on baking pans set about 5 inches from the heat. Broil for about 3 minutes each side until golden brown and just cooked through.


Yum

Monday, March 3, 2014

Mardi Gras Recipe Round-Up

The Mardi Gras season (or Carnival season) officially begins on January 6th and ends on Fat Tuesday. Many people do not know that the term Mardi Gras actually means “Fat Tuesday.”

Fat Tuesday is the last day of the Carnival season that begins the twelfth day after Christmas, (yes, like in the song). Many Christians also know January 6th as "Epiphany" which is a holy day commemorates the visit of the Magi (three wise men) to the Christ child.

Fat Tuesday is the last opportunity to celebrate before Lent which begins on Ash Wednesday. This pre-Lenten carnival has Roman Catholic origins and is celebrated in New Orleans, as well as Brazil, France, Germany.

Here is our collection of Cajun and Creole dishes worthy of celebrating!

And what Mardi Gras celebration is complete without some Zydeco music?

Cajun Playlist:
File – 2 Left Feet (as seen at the Maple Leaf!!)
Beausoleil – Cajun Conja
Buckwheat Zydeco – Where There’s Smoke There’s Fire
Wayne Toups – ZyDeCajun
John Delafose - Heartaches and Hot Steps
BooZoo Chavis – American Explorer Series


Laissez les bon temps roulez!


Yum
Powered by Blogger.

footer social

ShareThis