Saturday, December 28, 2013

To Bean or Not To Bean Vanilla Extract

Somewhere between the second batch of pizzelles and the panetonne, the last drop of vanilla trickled sadly from the little brown bottle sending me rummaging for more. I came across some vanilla beans received as a gift a month or so earlier, however, these were not entirely helpful because they were not liquid in form and I had no idea how to use them in a recipe. Then I remembered that Dom’s Aunt Rose always substituted bourbon in a pinch. So I finished the recipe with a dribble of bourbon.

Later I did a little research and found that vanilla beans can be substituted for extract by using one whole bean (split and scraped) in place of one tablespoon of pure vanilla extract. For those of you who can do simple math, I think you can see where this post is heading… You guessed it: homemade vanilla extract. Pure vanilla extract is made by macerating vanilla beans in alcohol. Clearly I had the two key ingredients needed to make extract and with the four beans in the pantry and a cup of bourbon, I could make 16 tablespoons of extract – quadrupling the utility of my beans. Since there are ONLY two essential ingredients, they should be of the best quality you can get.

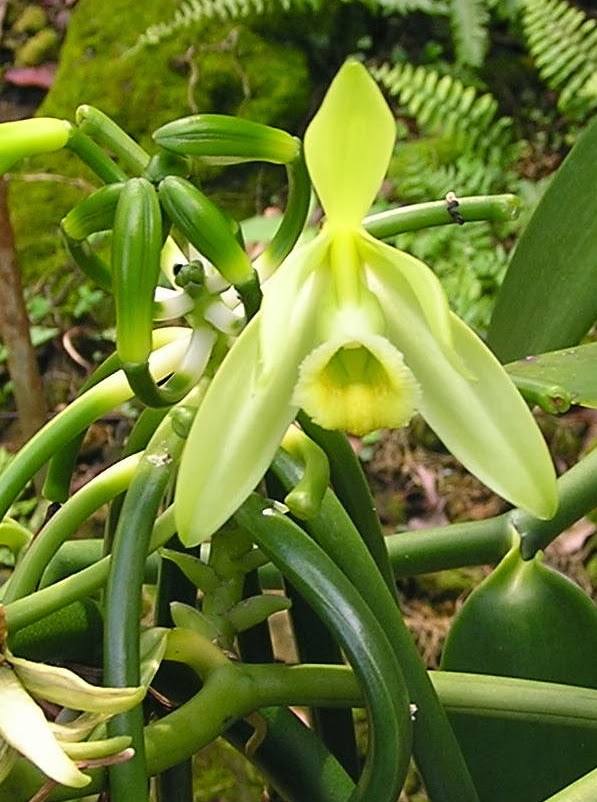
Pure vanilla extract is made by macerating vanilla beans in alcohol. Natural vanilla beans come from a beautiful species of yellow orchid native to Mexico but is also grown In Madagascar, Tahiti, and other tropical regions. After pollination the orchid’s flowers die, and long, green seed pods grow in their place. The pods are picked when they're 6" to 9" long at which time a six-month curing process begins. Cured vanilla beans are dark brown, fragrant, and have a thin white coating of vanillin crystals. Vanilla beans should be plump and supple and smell -  well, like vanilla.

The choice of steeping alcohol is a matter of preference, but here too, it is better to use a high quality selection. If you wouldn't drink it, you probably would not want to cook with it either. We find the warm, honeyed flavor of bourbon to be the most complimentary option, but vodka, scotch or even rum would make excellent extracts as well.

It takes about 6 weeks for the alcohol to be fully infused with the flavor of the vanilla beans. If you are thinking about it, you might give it a healthy shake every week or so. Now, if like me, you just cannot resist tasting it after the first week, I can tell you that it still smells and tastes mostly like bourbon. The longer you let your vanilla steep, the better it will be.

4 good vanilla beans
1 cup high-quality bourbon (our favorite is Four Roses Bourbon)
½ teaspoon brown sugar (optional)

Clean and sterilize bottle(s.) Carefully slice the vanilla beans in half lengthwise to expose seeds inside.  Scrape out the moist seeds and place them in a clean bottle.  Add the scraped vanilla bean pod to the bottle as well.  Fill the bottle with the bourbon (or vodka, rum or brandy) making sure that liquid is covering beans. Add the sugar if desired.

Place the lid on the bottle and give it a good shake.  Allow the beans to steep for at least 6 weeks before using the resulting extract.  Vanilla extract can be stored indefinitely if kept airtight in a cool dark place.

It should be noted, too, that you can also make vanilla sugar by putting a split vanilla bean into a jar of white, granulated sugar. Vanilla sugar works well in any cookie recipe, but is best in a cup of cappuccino.


Yum

Sunday, December 22, 2013

Crazy-Moist Gingerbread Cake

The mention of gingerbread typically evokes images of little men with appendages begging to be bitten, but in our house it meant my grandmother’s gingerbread cake. Understated and straight-forward, this outrageously flavorful cake is by no means the prettiest cake you'll ever make, but is by far the tastiest. The top forms a burnt-caramel crust while the cake is dark and dense with a bit of attitude.

The heavenly scent of aromatic spices signaled a dessert of super-moist fragrant cake with big plops of whipped cream. This bold and zesty cake seemed a perfect choice for Dom’s birthday especially given his well-known aversion to ordinary, innocuous birthday cake, and it got the best compliment he has ever given to any cake ever; “it tastes like pumpkin pie.” And, we ALL know how much Dom loves pie!

  • 3/4 cup light brown sugar 
  • 3/4 cup melted shortening
  • 2 eggs
  • 3/4 cup dark molasses
  • 2 ½ cups flour 
  • ½ teaspoon baking powder 
  • 2 teaspoons baking soda
  • 1/8 teaspoon salt
  • 2 teaspoons ground ginger
  • 1 ½ teaspoons cinnamon
  • ½ teaspoon ground cloves
  • ½ teaspoon ground nutmeg
  • 1 cup boiling water

Preheat oven to 350 degrees F. Cream together shortening and sugar, then add eggs and molasses.

In a separate mixing bowl, combine dry ingredients and slowly add to creamed mixture. Once all the ingredients are incorporated, add boiling water. The water will make the batter quite thin.

Pour the batter into a greased 9 x 13 inch baking pan. Bake for approximately 30 minutes until a straw poked into the middle comes out clean.

Cut cake in large squares and serve with freshly whipped cream. You can also add a fruit topping like candied cranberries or poached pears.


Yum

Saturday, December 14, 2013

Stout and Spicy Brown Mustard

You know all know we hate to waste ingredients in our house, so when we opened a can of Guinness stout for our holiday pub cheese recipe and only used a quarter of the can, we looked for another use (because 9:00am seemed a bit early to just drink the remainder.)

We are big fans of mustard, but are somewhat picky about the flavor. As a point of reference, Dom recently tossed a bottle of Creole mustard because it was “just hot with no depth.” So, like many (or perhaps I should say most) of the condiments we use are homemade to suit our taste. Why should mustard be any different? An added bonus is the cost savings. Not sure if you have been shopping for a coarse, German-style mustard lately, but yowza, it’s expensive.

We found (inexpensive) brown and yellow mustard seeds at an ethnic market. Mustard seeds are the small round seeds of various mustard plants. Mustard seeds have been mentioned in a variety of religious parables throughout history. The 1-2 mm seeds may be colored from stark black to pale yellow and are a rich source of protein and oil. Interestingly, mustard seed production exceeds the demand for cooking oil in South Asia, so the surplus mustard oil is being used experimentally as an alternative to diesel fuel. The leftover pressed meal has been found to be a very effective pesticide ensuring that nothing goes to waste.

This homemade version has a nutty, vaguely sweet flavor and a nice mouth feel. It is surprisingly easy to make and it was fascinating to watch the seeds expand as they absorbed the liquid.

  • 1 cup Stout
  • 3/4 cup brown mustard seeds
  • 1/4 cup yellow mustard seeds
  • 3/4 cup white balsamic vinegar
  • 2 teaspoons kosher salt
  • 1/2 teaspoon black pepper
  • Pinch ground cinnamon
  • Pinch ground cloves
  • Pinch ground allspice
  • Pinch ground allspice

Combine ingredients in a nonreactive mixing bowl. Cover and set aside at room temperature for 2 days to allow flavors to meld and seeds to soften.

Pour contents into the bowl of a food processor or blender. Process until seeds are coarsely ground and the mixture thickens, stopping occasionally to scrape down the sides.

This step requires patience. The mixture will look loose and you will wonder if you made a mistake along the way, but continue to let the mustard mixture puree until emulsified. The mustard should be set after about 3 minutes of blitzing.

Transfer the mustard to a jar (or jars) with a tight fitting lid. Refrigerate for 24 hours again to let flavors completely develop and the mustard to fully thicken. The mustard should keep up to 6 months in the refrigerator, if it lasts that long.


Yum

Wednesday, December 11, 2013

Happy Holiday Pub Cheese

The holiday season at our house is incredibly chaotic and we wouldn't have it any other way! With friends and neighbors dropping in for impromptu parties, it is imperative to have quick go-to noshes for guests to nibble. In these instances, it is easy to follow the examples of restaurants and bars by putting out nuts, popcorn, chips and dip. Unfortunately, most dip options are the same-old-same-old recipes that have been offered many times in the past.

So taking a custom from British taverns, this year we've opted for a traditional pub cheese; a cheese spread commonly set out in ramekins alongside some “crisps” on the bar for thirsty patrons to encourage them to stay longer. It is a spicy, creamy concoction that goes well with chips, crackers or crudités, and even makes an amazing addition to a hamburger.

The best thing about this cheese blend is that it improves with age, thus making it in advance is not only an option, but a recommendation. Using pre-shredded cheddar cheese from Kraft simplifies this recipe markedly, so that it is fabulously easy to prepare, and Kraft is making it easy to save money this holiday season by offering $20 in coupons available at Target.com.

  • 1 (8 oz.) package of Kraft Sharp Cheddar
  • 1 (8 oz.) package cream cheese (Philadelphia brand)
  • 1/3 cup stout
  • 3 teaspoons dry mustard 2 teaspoons Worcestershire sauce
  • ½ teaspoon Kosher salt
  • ¼ teaspoon cayenne pepper
  • ¼ teaspoon paprika
  • Freshly ground pepper to taste


Place all ingredients in the bowl of a food processor and blend until smooth. Season with additional salt and pepper as desired. Place the spread in a serving bowl or crock, cover and chill for at least 4 hours. Do not worry if the spread seems a little loose as it will thicken a bit as it rests in the refrigerator. Sprinkle with a little more paprika or freshly chopped chives and serve with crackers and crudités.


From shopping for gifts to planning family dinners, it’s hard to keep up with all your holiday to-do’s. This year, Kraft is helping out with great weeknight meals and entertaining ideas to make the season a little bit easier. Plus, Kraft is offering up to $20 in coupons, redeemable exclusively at Target, to make food shopping easier and to help you have a happy holiday season.

This is a sponsored conversation written by me on behalf of Kraft. The opinions and text are all mine.


Yum

Sunday, December 8, 2013

Mulled Cranberry Zinfandel Conserve

Cranberry sauce can be so banal. Guests at your holiday table might be surprised to see a homemade variation because they are so accustomed to the tubular, semi-opaque, gelatinous mass with a flavor far from that of actual cranberries.

Pairing cranberries with currants amplifies their sweetness. A full-bodied red wine adds depth and toasted hazelnuts add an unexpected crunch that will surprise and please your guests.

The recipe is for a conserve which is simply a jam or preserve that includes nuts. Many different kinds of nuts shine in this combination: almonds, cashews, walnuts and pecans are all superb, retaining their crunch after even months in the jar. Make sure the nuts are fresh and toast them to ensure the deepest flavor.

Because the tart bitterness of the conserve is mellowed by the wine and raisins, not only can it liven up leftovers as a sandwich spread, complement sharp artisanal cheeses, but it can also find wider use as jam, paired with English muffins or toast made with crusty bread. If you have the time or inclination, tuck it into jars, process it in a hot water bath and you’re ready for holiday gift-giving.

  • 1/3 cup packed brown sugar 
  • 1/3 cup butter 
  • 2 teaspoons cider vinegar 
  • 2 large onions, coarsely chopped 
  • 4 cups fresh or frozen cranberries 
  • 1/2 cup currants (or raisins) 
  • 1/3 cup Zinfandel red wine
  • 1/2 teaspoon mulling or apple pie spice 
  • 1 3/4 cups granulated sugar 
  • 1 cup toasted hazelnuts, coarsely chopped

In a large skillet over medium-low heat, melt the butter and add the onions. Stir or shake the pan to prevent sticking or burning. The onions will get soft and then translucent. Sweating the onions concentrates their flavor and enhancing conversion from starch to sugar. Heating the onions releases their aroma and reduces the chemical bitterness they exhibit when raw.

Stir in the brown sugar and vinegar and cook uncovered, over low heat for about 5 minutes or until the sugar is dissolved and the onions are fully incorporated. The mixture should look jammy. Set aside.

In a large saucepan combine cranberries, currants, wine (a full-bodied red wine such as a Beaujolais or Merlot can be substituted if a Zinfandel is not available) and mulling spices. Bring these to a boil over medium heat, stirring occasionally. Continue to cook, uncovered, over medium heat for 5 minutes. Don’t over stir or you will break up the cranberries which will pop open as they heat through.

Gently stir the onion mixture and granulated sugar into the mulled cranberry mixture. Return to boiling and then reduce the heat to low and simmer softly, uncovered, for another 10 minutes, stirring frequently and gently.

Remove from the heat and gently stir in hazelnuts. Allow to cool and transfer the conserve to airtight containers or jars. Serve immediately or cover and chill until ready to serve. Any unused conserve can be stored in the refrigerator through the holiday season. Extras can be processed in a hot water bath for holiday gift-giving.


Yum

Thursday, December 5, 2013

Semolina Couche-y-Coo

It always surprise me how tastes change over time. Years ago, the only artisanal bread we bought was a hearty Country French, then we switched preferences to the airy, crusty Ciabatta loaves so named because they resemble a women’s slipper. Nowadays our loaf of choice is a golden, seeded semolina, however at nearly $5 per loaf, it is a pricey choice indeed.

So, yet again, we have embarked on another of our culinary quests to develop a manageable work-a-day recipe for semolina bread to accompany our favorite Italian antipasti and meals. The first obstacle was finding the right semolina flour and the second was forming the loaves into an appropriate shape.

A couche (pronounced “koosh” is a cloth used to proof dough or used to cover the dough while it is rising. Couche is from the French word coucher, meaning to lie down (unless you listen to Ella Fitzgerald in which case “Coochi-coochi-coo means I love you.”) A baker’s couche is not just floured fabric, it is usually a hard wearing canvas to which the dough will not stick. It is used to allow the dough to breath, hold its shape, and the crust to dry slightly. A dry crust makes it easier to handle and bakes slightly crispier. A couche is typically used for longer loaves, such as baguettes. Lean doughs are best for proofing in a couche to prevent the absorption of oils and impurities that can contaminate the cloth. Lean doughs are those that do not include eggs, milk and only have a minimal amount of oil. (A washable cotton canvas couche is best for richer dough.)

To condition a new couche, dust liberally with flour and work it into the weave of the fabric to prevent the dough from sticking. If dough sticks, allow to dry and scrape off. The cloth is left unwashed between uses to let yeast and flour collect in them which aids in the proofing process. Once you are done with the couche, allow it to dry completely and shake out any excess flour before rolling it up for storage. Storing the couche in an airtight bag or container will keep bugs from being attracted to it.

When hard wheat is milled, the endosperm is separated from its bran and germ. Semolina is made from the endosperm of durum wheat, while typical white bread flour is made from the endosperm of common or bread wheat. The cream-colored semolina contains the gluten protein that gives it unique properties for making good pasta and Italian-style breads. However, despite a very high protein content, semolina is low in the gluten needed to form a glutinous web necessary for bread to rise making it necessary to add white flour to the dough for a springy loaf of semolina bread.

  • 1 ½ cups warm water
  • 1 tablespoon yeast
  • 1 teaspoon honey
  • 1 tablespoon olive oil
  • 2 cups semolina flour
  • 2 cup all-purpose flour
  • 1 tablespoon kosher salt
  • 2 tablespoons sesame seeds
  • 1 teaspoon aniseed (optional)

Dissolve the yeast in 1 cup of the warm water in a large measuring cup or small mixing bowl and add honey. Allow a few minutes for the yeast to proof before adding the olive oil to the liquid. In a separate mixing bowl or the bowl of your mixer whisk together the flours and salt and then slowly add in the yeast mixture. Keep working until the dry and liquid ingredients are fully incorporated.  If the mixture is too dry and tough, add in more water one tablespoon at a time until the dough is supple and sticks together.

Turn the dough out onto a work surface floured with a little more semolina and knead it for 5 to 8 minutes, until smooth. You can also accomplish this in a mixer with a dough hook attachment.

Grease a bowl, set the dough in the bowl, turning to coat all sides, cover with plastic wrap, and let the dough rise until doubled in bulk, about 1 hour or more.

Punch the dough down, turn it out of the bowl, and shape it into one long loaf or two shorter loaves.  If you are coating the crust with seeds, lay the seeds out on a baking sheet and brush the loaf with a little water. Gently roll the loaf into the seeds before laying the dough on your prepared couche. Roll the sides up to keep the loaf(ves) from spreading and losing their shape. Cover dough with the remaining length of couche and let rise until doubled in bulk again, about 45 minutes.

Roll the dough off the couche onto a peel or a flat baking sheet (used the bottom  side of a half sheet pan) and bake in a preheated 450°F oven and bake for 40 minutes.  If you are using a baking stone, transfer the loaf(ves) to the stone using a peel bake at 450°F for the same 40 minutes. When done, the bread should have be a light golden brown and should sound hollow when thumped. Place the loaf on a rack to cool. Let cool thoroughly before slicing.

This recipe made a nice golden-yellow, dense sandwich-style bread. As with any recipe, it serves as a good starting point. We would have preferred lighter, airier bread and will keep making adjustments until we get it just the way we like it. You should too.


Yum

Monday, December 2, 2013

Snowy Cranberry Almond Tart

This quasi-French, frangipane-style tart reflects not only the flavors, but the colors of the holidays. Served warm, a slice of tart with a scoop of vanilla or cinnamon ice cream makes an ideal Thanksgiving dessert. The color of the red berries and snow-like dusting of powdered sugar also make it a beautiful addition to your Christmas dinner table.

Frangipane is a classic European pastry filling made with almonds, butter, eggs and sugar which is traditionally topped with pears or apples. As the tart bakes, the filling puffs up and surrounds the fruit. Because they need to be softened and sweetened slightly, the cranberries are first candied in a sugar cook separately.  The snappy tartness of the cranberries is the perfect foil for the rich, sweet frangipane. A dusting of confectioners' sugar and a dollop of lightly sweetened whipped cream cap off this tart that is literally bursting with flavor.

Tart Shell 
  • 1 stick unsalted butter, softened 
  • 1/3 cup sugar 
  • 1 large egg yolk 
  • 1/4 teaspoon almond extract 
  • 1/4 teaspoon salt 
  • 1 cup all-purpose flour 
  • ¼ cup almond meal (or additional flour)

In a standing mixer fitted with the paddle, beat the butter with the sugar at medium speed until light and fluffy, about 3 minutes. Add the egg yolk, vanilla and salt, scrape down the side of the bowl and beat at low speed until smooth. Gradually add the flour, beating until the dough just forms a ball. Pat the dough into a disk and cover with plastic wrap. Refrigerate the dough for at least 1 hour or overnight.

Roll out the dough between 2 sheets of parchment paper into a 12-inch round. Carefully peel off the top layer of parchment paper and invert the dough onto a 9-inch fluted tart pan with a removable bottom. Peel off the parchment paper and gently press the dough into the pan. Trim the dough flush with the rim. Patch any cracks with the dough trimmings. Lightly prick the bottom with a fork. Refrigerate the tart shell until firm, about 30 minutes, or freeze for 10 minutes.

Preheat the oven to 350°. Line the tart shell with foil and fill with pie weights or dried beans. Bake the tart shell for about 30 minutes, until the rim is lightly golden. Remove the foil and weights and bake the tart shell for about 5 minutes longer, until it is lightly golden all over. Set the tart pan on a baking sheet. Increase the oven temperature to 375°.

Cranberry Filling
1 1/2 cups granulated sugar
1/4 cup water
2 cups (10- oz.) cranberries

In a medium saucepan, combine the granulated sugar with the water and cook over moderately high heat, stirring, until the sugar dissolves. Add the cranberries, cover and cook over moderate heat for 3 minutes, stirring once or twice. Remove the pan from the heat and let the cranberries cool to room temperature. Drain the cranberries well; reserve the cranberry syrup.

Almond Custard
  • 2 large eggs
  • 1/2 cup brown sugar
  • 1 1/2 teaspoons all-purpose flour
  • 1/4 cup plus 2 tablespoons half-and-half
  • 1/8 teaspoon pure almond extract
  • Confectioners' sugar, for dusting
  • Lightly sweetened whipped cream, for serving

In a medium bowl, beat the eggs with the brown sugar and flour. Whisk in the half-and-half and the almond extract. Spread the cranberries in the tart shell. Drizzle 1 tablespoon of the reserved cranberry syrup over the cranberries, and then pour in the almond custard.

Bake the filled tart in the lower third of the oven until a skewer inserted in the center comes out clean, 16 to 18 minutes. Transfer the tart in the pan to a rack to cool completely, at least 2 hours. Dust the tart with confectioners’ sugar. Cut the tart into wedges and serve with whipped cream.


Yum

Wednesday, November 27, 2013

Founder of the Feast Brown Bread

We always thank the pilgrims for our Thanksgiving, yet we might be equally indebted to another sturdy New Englander: Sarah Josepha Hale, editor of the popular Victorian magazine Godey's Lady’s Book. Her decades-long campaign to extend a New England custom to a growing nation reached from the frontier reader of Godey's right up to the President. In 1863, at her prompting, Abraham Lincoln proclaimed a national Thanksgiving event now marking its 150th anniversary, and coincidentally Sarah's 225th birthday.

George Washington set aside the last Thursday in November 1789 to honor the newly minted Constitution (Sarah would later point to this date and the precedent.)  However, since even the Pilgrims themselves didn't regularly repeat their famous feast, its subsequent observance continued by local customs and whims. One year, when a molasses shipment was delayed, a Connecticut town casually postponed its holiday until the pie makings arrived.

Boston Brown BreadWidowed just before the birth of her fifth child, Sarah took up a pen and began writing to make ends meet. After several successful books of poetry (one of which included her best known poem Mary Had a Little Lamb), and a novel about slavery, the successful novelist was asked to edit a women's magazine which would later merge to become Godey's Lady's Book which featured original, American writing including leading writers such as Hawthorne, Longfellow, Emerson, and Poe to whom she paid 50 cents a page.

As the editress antebellum America's most widely circulated magazine, Sarah began her campaign for a national day of Thanksgiving. In her editorials, she explained how to celebrate with seasonal recipes for chicken pies, ducklings, vegetable platters, gravy, pickles, preserves, cakes, and a "variety of sweetmeats." As the nation sprawled westward and rifts between North and South grew deeper, her editorials stressed the holiday's "moral and social reunion of the people of America" - a point she pressed in thousands of letters through the decades to governors, senators, and influential personages, as well as Presidents from Zachary Taylor on.

Her Thanksgiving campaign took a new turn in 1863, in the war weary aftermath of Gettysburg. That summer her editorial called not to governors, but for a Presidential edict. On October 3, 1863, Lincoln issued a National Thanksgiving Proclamation setting aside the last Thursday in November. Lincoln's graceful proclamation held to Hale's New England traditions, stressing “a fruitful land and healthful skies," with a conciliatory note asking "interposition of the Almighty Hand to heal the wounds of the nation.”

However, the war dragged painfully past Lincoln's second proclamation in 1864; the following spring, an assassin's bullet took him. Hale pressed her cause with President Johnson and, later, with Grant. Their yearly proclamations, following Lincoln's lead, addressed to a reunited country, firmly established the custom of our annual Thanksgiving, and answered one of the many prayers of Sarah Josepha Hale. On December 26, 1941, President Roosevelt signed a bill, some 62 years after Hale’s death and for the first time the date of Thanksgiving became a matter of federal law and fixed the day as the fourth Thursday of November.

One of the earliest recorded Thanksgiving recipes was for brown bread made with cornmeal and molasses. Puritans did not use white flour because it was expensive and “too fancy,” while whole wheat, rye & corn flours were cheap and plentiful.  The Brown bread was steamed since cooking was generally done over an open fire as New England homes of the period were crudely thatched cabins and few had ovens. Steaming is an effective way to make bread without an oven. This traditional and rustic bread is very hearty and quite delicious, especially when toasted and served with cream cheese and homemade marmalade.

  • 1/2 cup all-purpose flour
  • 1/2 cup whole wheat flour
  • 1/2 cup finely ground corn meal
  • 1/2 tsp. baking powder
  • 1/2 tsp. baking soda
  • 1/2 tsp. salt
  • 1/2 tsp. allspice
  • 1/2 cup molasses 
  • 1/2 cup sour cream
  • 1 egg, beaten
  • 1/2 cup raisins

This batter makes one round loaf steamed in a metal can that is 6-inches tall by 4-inches diameter. The one I used formerly held ground espresso powder.

Preheat the oven to 325° F and bring a medium pot of water to a boil. Grease the coffee can with cooking spray or line the can with parchment paper.

In a large bowl, whisk together the all-purpose flour, rye flour, corn meal, baking powder and soda, salt and allspice. In another bowl, mix together the sour cream, egg and molasses. Pour the wet ingredients into the dry and stir well with a spoon. Pour the batter into the coffee can taking care that the batter not reach higher than 2/3 up the sides of the container.

Cover the coffee can tightly with foil, and put  it into pot with water in one third up the side, and then place the pot into the oven. Steam the bread for at least 2 hours and 15 minutes (yes, really). Check to see if the bread is done by inserting a toothpick into it.

Remove from the oven and let cool for 10 minutes before putting the can on a rack. I know you are anxious to see how it came out, but don't try to remove the bread from the can yet! Let the bread cool for 1 hour before turning out of the container.


Yum

Monday, November 25, 2013

No Fancy Potatoes at the Kids' Table

Thanksgiving is a time for reflection, and over the last few days I have been recalling big holiday meals with my family over the years. As a young girl, we would travel each year to Fairfax, Virginia where my paternal grandparents lived to spend Thanksgiving or Christmas. For the most part, I enjoyed these trips. My grand parents’ home was a funky, 1960s, A-frame with a dumbwaiter and spiral steps that led to my grand-father’s “inner sanctum” of trophies from his African safari adventures.

My grandmother had a large, open kitchen with a huge fireplace that would be commonplace today, but was a rarity in that decade. I loved that kitchen, not for its style or size, but because it was a temple of good food. Yet, there was always one exception to my adoration of that culinary citadel; the kids’ table. The “grown-up” table would be set with silver and china, and beautiful centerpieces in the dining room, while our table would be a flimsy card table with schlock dishes and lesser versions of the meals prepared for the “big table” in the kitchen.

The only redeeming feature was the frequent presence of Doris Peterson who vastly preferred the company of youngsters and would study issues of Tiger Beat magazine in advance of our visits to be able to chat with us about “current events.” When Doris wasn’t present, we sat in complete silence hanging on every word we could decipher of the adults’ conversation even though we had been told that it was just boring stuff like news about people we didn’t know and their health issues. 


I distinctly remember the first year that I was old enough to help Grams in the kitchen while my mom entertained my little sister. The menu included beef Wellington, asparagus, and fancy little potatoes. I was “allowed” to clean the mushrooms for the duxelles with a damp paper towel and to meticulously peel the petit spuds. Yet when it came time to serve the perfectly executed meal, I was relegated to the kiddie table to babysit two five-year-olds and a three-year-old. Needless to say, I was livid. At the last minute, one of the guests was unable to attend, leaving an unoccupied seat at the grown-up table. With a bit of lobbying (Thanks Mom!), I moved into the vacated spot. I felt like Cinderella! 

That very evening, I vowed that I would never have a child’s table in my own home. I remembered that oath nearly 30 years later when a surprise visit from 3-year-old twins and their mother took the last available inches at an already heaving dining table. I stood nibbling my Easter dinner from a plate in the kitchen, content that the two little girls at the “big” table felt like princesses at the feast.


The moral of the story (a.k.a. the soapbox): lose the kids’ table and make room for everyone at the “big” table. Holidays are a time for the whole family to be together and share a meal. When you sit together as a family, you’re creating better dinner and better memories for years to come. Besides how are children going to learn to behave at a table with adults if they're not allowed the exposure? It is a great opportunity for children to learn to be well-mannered enough that the grown-ups forget not to tell the really good family stories in front of them. There's a great deal of family history I wouldn't know if I never had a chance to sit with the grown-ups. If you just can’t seat everyone at the same time, serve dinner in shifts.

Oh, and about those fancy potatoes… Potatoes Fondantes are a classic French side dish and a traditional accompaniment to beef Wellington. While you can prepare them in a saucepan on the stove, Grams preferred to bake hers.These artfully moist potatoes have a crisp exterior and a creamy center coated in a caramelized glaze.

  • 2 lbs. Yukon Gold or Red Bliss potatoes
  • 2 cups chicken broth
  • 1 sprig of fresh thyme
  • 1 tablespoon unsalted butter
  • 1 1/2 tablespoons chives, finely chopped
  • 2 tablespoons olive oil
  • 1 teaspoon kosher salt

Preheat an oven to 375 degrees F. Wash and peel the potatoes making sure to remove eyes or damaged areas of the potatoes. Trim the potatoes into uniform, egg shapes about 2” in length (this allows for even cooking) and arrange them in a single layer in the bottom of a baking dish.

Bring broth with thyme, oil, butter and salt to a boil in medium saucepan, and then pour over the potatoes until it comes about halfway up the sides of the potatoes. Place in oven and cook for about 40 minutes, basting frequently with stock in the pan to build up a nice gloss. The potatoes are done when they are golden brown on top and the broth is almost completely reduced.

Let the potatoes rest for 5 minutes before transferring them to a serving platter. Sprinkle with a pinch of kosher salt and the chopped chives and serve immediately.


Yum

Thursday, November 21, 2013

Colonial Cream of Peanut Soup

Peanuts are a favorite nibble that can also add savor to a variety of dishes. Whether the main component or a subtle enhancement, they span the gastronomic spectrum - literally from soup to nuts.

Brazil is the native home of the peanut, the "ground nut” that sailed with Portuguese explorers to West Africa, where they became a staple crop for native farmers. Peanuts then arrived in Virginia by way of the slave trade. Along with black-eyed peas, and yams, peanuts were intended for consumption by slaves during passage to the New World who grew and used the nutrient-rich peanuts in a variety of foods.

In 1794, Thomas Jefferson recorded a yield of sixty-five peanut hills at Monticello. The cultivation of peanuts increased in the South in the nineteenth century, but it was not until after the Civil War that they gained national acceptance. During the Civil War, Union troops fighting in the South discovered that peanuts were a fortifying and tasty source of protein. As peanuts became a staple crop in Virginia, peanut soup became popular as well.  Many historians claim George Washington enjoyed the soup so much that he ate it every day.

When planning your traditional Thanksgiving meal, consider serving this kid-friendly colonial soup that is as American as the celebration itself.

  • 1 medium onion, minced
  • 2 ribs of celery, minced
  • 2 tablespoons butter
  • 4 cups chicken broth
  • 1 cup peanut butter
  • ½ cup sour cream
  • ¼ cup roasted peanuts, chopped (optional)
  • Salt and pepper to taste

In a medium sauté pan, melt the butter and sweat the minced onion and minced celery over low heat for 10 minutes until the vegetables are soft. Remove the pan from the heat and stir in one cup of chicken stock. Using an immersion blender (or food processor), puree vegetables in the broth. Pass the mixture through a fine sieve reserving broth and discarding excess solids.

Add remaining the chicken broth and peanut butter, and return to medium heat. Simmer the mixture for 15 minutes.  Remove the pan from the heat and whisk in the sour cream and add salt and pepper to taste. Ladle the soup into heated bowls and garnish each serving with I tablespoon chopped roasted peanuts, a dusting of paprika and/or celery greens. This soup can also be served chilled if you prefer.


Yum

Tuesday, November 19, 2013

Cornmeal Commemoration Hasty Pudding

Cornmeal occupies a prominent place in American culinary history. It has been praised by native reporters and poets, berated by foreign writers no less illustrious than Charles Dickens and Alexandre Dumas. Cornmeal cookery provokes considerable regional controversy, and consequently occupies considerable space in a vast number of our cookbooks. Variations in a corn bread recipe, for example, may cause small-scale domestic warfare. Arguments arise between one town and another over the correct name for a mere lump of meal, and names may vary even within a small town. Cooks become wildly possessive about their "definitive" versions of spoon bread or corn sticks, and disputes still arise over the superiority of yellow or white meal in certain dishes.

For "corn bread" one dialect dictionary lists as synonyms; scratchback, hoecake, ashcake, journeycake, johnnycake, and corn dodger, explaining that all are corn breads in their simplest form and as truly American as corn itself. "In their simplest form" implies a "bread" of meal, water, and sometimes salt. Simple fare indeed, but a lifesaver to the first Colonists, who learned basic preparation from the Indians. The maize that the Indians cultivated was a spectrum of red, blue, pink, and black kernels, as well as the more common white and yellow. Indians also supplied popcorn for the first Thanksgiving meal. In fact, "Indian" or "Injun" was the early American name for cornmeal, distinguishing it from wheat, which was (and still is) often called "corn" by the British. Rye -n' injun was a bread devised by the Pilgrims, who found that with its low gluten content, cornmeal had to be mixed with other grains to rise with yeast.

The hundreds of varieties of corn grown in America fall into five main families: flint corn, a fine but easily damaged strain that grows in cool regions; flour corn or soft corn, the predominant type grown in Andean regions and favored by the Indians; dent corn, the main commercial variety: sweet corn, the sort that is eaten fresh off the cob or canned; popcorn, the mainstay of the movie industry and the only poppable kind. White and yellow meals from dent are most favored today, and those obtained from water-powered stone-grinding, as opposed to the more common dry milling, are generally considered superior in taste and texture. Water-ground meal retains the germ, which makes it not only more flavorsome but also more perishable, hence the prevalence in markets of the germless, long-keeping variety.

Almost all cornmeal dishes can be made with either yellow or white meal, but the finished product will vary slightly: color, when indicated in the recipe, should therefore be observed. In baking, white meal gives a pleasantly uneven texture, a crisper outside, and a softer inside, whereas yellow meal gives a drier, more even-textured, slightly granular result. Lovers of cornmeal, however, tend to be rather fierce in their preferences. Below Mason and Dixon’s line, it is widely considered that white corn is for folks and yellow for critters. Indeed, stone ground white cornmeal is the keystone to soul food, and white meal is also the only type considered suitable for the Rhode Island specialty; johnnycakes.

Because it was such an important part of the Colonial diet and because it was unique to the Americans, corn became an informal symbol of our country. The literature of America is filled with chat of homely hot mush, but no one can match Joel Barlow's all-time commemorative to this dish. In 1796, Barlow wrote an extended hymn to cornmeal appropriately dedicated to Martha Washington and tracing corn from its planting through the preparation of what he considered to be its most perfect form “The Hasty-Pudding," the poem's title.

Hasty pudding is simply sweet cornmeal mush (cornmeal and water), the staple of every corn-growing people. Cooked until "thick enough to stand a pudding-stick," it was known variously as loblolly, stir-about pudding, cornmeal porridge, and samp.  The popular New England dessert is mentioned in the original "Yankee Doodle” and included in Amelia Simmons's American Cookery which was the first cookbook written in the United States (and published the same year as Barlow’s tribute.) Sweetened with molasses or syrup and perhaps enriched with eggs and milk, corn mush becomes a tempting dessert.

  • 2 cups whole milk
  • 2/3 cup yellow cornmeal
  • ¼ cup butter
  • 2/3 cup brown sugar
  • 1 tablespoon maple syrup (or molasses)
  • ½ teaspoon salt
  • ¼ teaspoon cinnamon
  • ¼ teaspoon nutmeg
  • ¼ teaspoon ginger
  • pinch of allspice
  • pinch of cloves
  • 1 egg, beaten
  • ¼ cup dried fruit or nuts (optional)

Preheat oven to 325°F.  Grease a quart-sized baking dish or 4-6 ramekins with cooking spray or butter.

In a heavy skillet, heat milk until is scalds.  Stirring continuously with a wooden spoon, gradually sprinkle in cornmeal.  Keep stirring rapidly to keep lumps from forming.  Bring mixture to boil.  Reduce heat and keep stirring until it starts to thicken.

Remove the skillet from the heat and stir in the butter.  Once the butter is melted, add the brown sugar, molasses, spices, dried fruit or nuts if desired.  Continue to cool for about 5 minutes.

Beat the egg in a small bowl and stir into the pudding mixture. Pour pudding into the baking dish(es) and place in a bain marie (water bath) and add boiling water to within an inch of the rim of the baking dishes. Bake for 50-60 minutes or until the pudding is firm. Serve with warm bourbon sauce, if desired.

Since Bourbon is another American specialty made from distilled corn mash, this bourbon sauce makes for the perfect accompaniment to Hasty Pudding:
1 cup granulated sugar
6 tablespoons butter, melted
1/2 cup buttermilk
1 tablespoon (or more) bourbon (or vanilla)
1/2 teaspoon baking soda
1 tablespoon maple syrup
1 teaspoon vanilla

In a sauce pan mix all ingredients. Bring to a boil for 1 minute. Serve warm over hasty pudding.


Yum

Friday, November 15, 2013

Cooks' Hot Holiday Gadgets 2013

This morning before most folks had finished their first cup of coffee, twelve faithful foodies were seated The Cook’s Warehouse indulging in a delicious repast at the Third Annual Blogger Breakfast hosted by owner Mary Moore and her amazing staff.

Meridith Ford, pastry chef, instructor and former dining critic/food writer for the AJC, was in the test kitchen using the new Kenwood Cooking Chef Mixer to make and proof the dough for her cinnamon rolls and demonstrating the Woll Diamond Nonstick Saute Pan to make a “massive” spinach frittata.

While we nibbled on biscuits, cinnamon rolls and frittata, and sipped orange juice, Thrive Farmers Coffee, and Bloody Marys made in a Mason Jar Cocktail Shaker, Mary regaled us with her Baker’s Dozen (+1) Hot Holiday Gadgets 2013:

After breakfast, Lania from The King of Pops shared seasonal flavored pops such as sweet potato soufflé, pumpkin pie and my choice of Herbs de Provence.  We said our goodbyes and were invited to wander through the TCW flagship store to view many more gift ideas before it opened to the public.


Yum

Monday, November 11, 2013

Drunken Chestnuts for Martinmas

This eleventh day of the eleventh month, is known in many countries of the world as St. Martin's Day or "Martinmas." During the Middle Ages, Saint Martin was the most popular and charismatic saint. In France, he is still a major religious figure whose tomb attracts people who come to be healed as at Lourdes. He became the patron saint of the French monarchy and also of churchgoers, innkeepers, grape growers, and winemakers, and in some places he is also the protector of drinkers. Many stories about him involve wine.

Perhaps the most famous tells of his rescuing a drunken man by taking his own cape from his shoulder, cutting it in half, and then wrapping the man in it to protect him from the cold. That same night he dreamt of Jesus wearing the half-cloak he had given to the poor man and thanking him for his compassionate gesture. It is also said that at the moment he shared his cloak, the sun came out. I am sure many of you have heard the term Indian summer before when referring to a spell of warmer than normal temperatures accompanied by sunshine and dry and hazy conditions. In Italy, these mild days are called “Estate di San Martino.”

St. Martin’s Day marks the end of winter preparations and is the beginning of the natural winter. It is also the time when newly produced wine is ready for drinking. As a result, St. Martin's Feast is much like the American Thanksgiving; a celebration of the earth's bounty. Because it also comes before the penitential season of Advent, it is considered a time of "carnival," with feasting and bonfires before a period of fasting.

In some countries, Martinmas celebrations begin exactly at the eleventh minute of the eleventh hour of the eleventh day of the eleventh month. In others, the festivities commence on St. Martin's Eve with children carry lanterns in the streets after dark, singing songs for which they are rewarded with candy. Bonfires are built and folks make merry drinking mulled wine and eating magosto which are chestnuts that roasted under the embers of the bonfire. Magosto are often left out at midnight as homage to deceased family members to “eat.”

In Piedmont, people celebrated with seasonal produce of chestnuts and wine for San Martino. St. Martin is credited with a prominent role in spreading wine-making throughout the Touraine region and facilitating the planting of many vines. Martin is also credited with introducing the Chenin blanc grape varietal, from which most of the white wine of western Touraine and Anjou is made.

What better way to honor St. Martin than with a recipe for Castagne Ubriache (Drunken Chestnuts) that incorporates both chestnuts and wine. This traditional Tuscan treat is delicious served with artisanal cheeses and Vin Santo or another dessert wine.

  • 2 ½ lbs. fresh chestnuts
  • 1 cup dry red wine
  • ¼ cup granulated sugar
  • Pinch of salt


To roast the chestnuts, preheat the oven to 350°F, and with a sharp knife, make a slit on the rounded side of each chestnut. Arrange the chestnuts in a single layer in a baking pan. Place in the oven and bake for 30 minutes. Remove the chestnuts from the oven.

While they are still warm, remove the hard outer shells and the furry inner skins. In a saucepan over low heat, combine the wine and sugar and stir to dissolve the sugar. Add the chestnuts and cook until the wine is reduced to a thick syrup, about 30 minutes. Transfer the chestnuts to a serving dish and serve hot.


Yum

Tuesday, November 5, 2013

Heritage Chocolate Pecan Pie

Although November isn’t officially “National Pie Month,” it should be. Many Americans look forward to eating pie rather than turkey or green bean casserole. Whether it is sweet or savory, just about every combination of meats, vegetables, fish and fruit imaginable has been baked between two layers of pastry. Of course, no traditional Thanksgiving meal is considered to be complete without the customary pumpkin pie and if you live in the South, pecan pie is also an essential addition to the Thanksgiving table.

Pecans were an important part of the diet of Native Americans before the arrival of the European settlers. Cultivation of the pecan tree was very successful, so much so that the pecan tree is the official state tree of Texas and has official status in New Mexico, Louisiana, Mississippi, Georgia, and Florida as well. Even though pecans have a fairly high fat content, they are composed of 87% unsaturated fatty acids and may actually help to lower blood cholesterol levels. Pecans are also a good source of potassium, thiamine, zinc, copper, magnesium, phosphorous, niacin, folic acid, iron, and vitamin B6, and are a good source of fiber.

Originally historians believed that the French created pecan pie soon after settling in New Orleans, after being introduced to the nut by Native Americans. However, attempts to trace the origin of this dessert have not found any recipes earlier than 1886 when it first appeared in Harper’s Bazaar magazine. Better known cookbooks such as Fannie Farmer and The Joy of Cooking did not include versions prior to 1940. Since the process for refining corn sugar was not developed until the 1880s, early settlers of New Orleans most likely used cane syrup, which was a widely used sweetener of the time. There is no doubt that the producers of Karo corn syrup popularized the dish, and many recipes specify Karo syrup by name as an ingredient.

This recipe for chocolate pecan pie was shared by our friend Amanda and is as easy as it is delicious. Pecan pie lends itself to many variations and flavoring options including maple, bourbon or even bacon. Experiment to find your favorite!

3 eggs
1 cup dark corn syrup
1 cup sugar
½ cup (1 stick) butter, melted
1 teaspoon vanilla
1 cup pecans
¾ cup semi-sweet chocolate chips
Pinch of salt (or more to taste)
Recipe for one deep dish pie shell

Preheat oven to 350 degrees F. Slightly beat eggs and add corn syrup, sugar, butter and vanilla. (Amanda’s tip: spray your measuring cup with cooking spray before measuring, this will allow the corn syrup to drain from the cup without sticking.) Stir the mixture until well blended. Fold in pecans and chocolate chips are stir to thoroughly coat with syrup without breaking up pecans too much.

Prepare your crust and arrange in pie plate. Pour the mixture into the pie shell. (If you have extra syrup, you can pour it into a small baking dish or ramekins for a nice little treat.) Bake the pie for 50-60 minutes. The pecan will rise to the top of the pie forming a caramel coating and the finished pie should be firm, and not giggly. Allow the pie to cool completely and the filling to fully set before cutting. Serve the pie with whipped cream laced with a little bourbon for the perfect Southern delicacy.

Thanksgiving is all about tradition and while you may love your Gram's pie recipes, you may want to try something new and create your own tradition. For some new ideas download the FREE eCookbook, Delicious Thanksgiving Desserts: 11 Easy Pie Recipes from TheBestDessertRecipes.com which includes a wide variety of homemade pie recipes that everyone your family will love. And, be sure to check out page 17 which features our own Sweet Potato Pie!

Everyone has a favorite pie that makes them nostalgic for a special moment in their life. What is yours? Please feel free to share in the comments section.


Yum
Powered by Blogger.

footer social

ShareThis