Tuesday, February 25, 2014

Proud Pecan Pralines

You can barely swing a strand of bead in New Orleans without hitting a shop selling pralines. For the uninitiated, a praline is a caramel-coated pecan confection with a consistency more like fudge than usual chewy caramel one might associate with a chocolate turtle.

The exact origin story of the praline is unclear. The candy was originally called “praslin,” after 17th century French diplomat, Maréchal du Plessis-Praslin, even though it was the marshal’s personal chef who first created the sweet made of almonds and some sort of creamy sugary caramelized coating. Interestingly, in Europe, the treat has evolved to an entirely different candy altogether. In Belgium and France, a smooth paste of cocoa blended with finely ground nuts that is used to fill chocolate truffles is known as a praline.
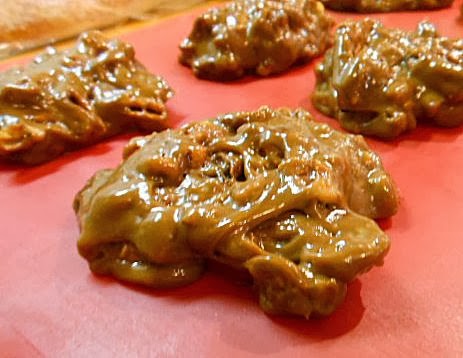
The praline that is familiar to most Americans, especially those that live in the South, is far closer to the original candy with only one major difference: they are made with pecans rather than almonds. Unlike, pecans, almonds are not indigenous to Louisiana. Using ingredients at hand, pecans began to replace almonds in many local dishes like sauces, stuffings, and cakes.

It is believed that pralines were brought from France by the Ursuline nuns, who settled in New Orleans in 1727. Through their evangelical outreach, the nuns took in young girls from unfortunate backgrounds. In the course of their scholastic and domestic instruction, the girls were taught the art of praline making. As these young women married and settled throughout Louisiana and other parts of the South, they spread the tradition of making pralines.


  • 1 ½ sticks unsalted butter
  • 1 cup sugar
  • 1 cup light brown sugar, packed
  • ½ teaspoon salt
  • ½ cup heavy cream
  • 1 cup milk
  • 3 cups pecans, halves and pieces
  • 2 tablespoons bourbon

In a large heavy-bottomed pot, melt the butter over high heat.  As soon as the butter is melted, add both sugars, salt and cream and cook until the sugar dissolves, stirring constantly.  Next, add the milk and 1/3 of the pecans, cooking for 4 minutes more, whisking constantly.

Reduce the heat to medium and continue to cook, still stirring for 5 minutes.  Add the remaining pecans and bourbon and continue cooking and stirring until done, about 15 to 20 minutes more. If the mixture starts to smoke toward the end of cooking, lower the heat.

The trickiest part about making pralines is determining  the exact moment when they are done. Be careful not to get any of the mixture on your skin, as it sticks and can cause serious burns. If you are using a candy thermometer, the pralines will be ready when the thermometer reaches 240 degrees F. When nearly done, the batter will start to form distinct threads on the sides or bottom of the pan.

To test for doneness, make a small test praline every few seconds.  The early test pralines will be somewhat runny, very shiny and only somewhat translucent.  These early pralines will tend to be chewy rather than friable in texture. The ideal praline will be opaque, lusterless and crumbly instead of chewy.

When you think the pralines are done, remove the pan from the heat.  Quickly and carefully drop the spoonfuls of batter onto the cookie sheet using the second spoon to scoop the batter off the first (we use a greased ice cream scoop).  Each praline should be a patty about 2 inches in diameter.  Allow them to cool completely and then store in an airtight container, or wrap each praline in plastic wrap or foil.

Many cooks avoid making pralines because the clean-up can be so daunting. So, once you have made all the pralines and take a good look around your kitchen, inhale deeply! Resist the urge to panic. First take the large pot and fill it with hot tap water, place all caramel-coated utensils and tools in the hot water and let it sit in the sink to dissolve all the sugars while you put everything else away. If you got batter on your counter tops, place a wet sponge or wet towel on the spot and let sit for a minute to melt. Remember that a creamy, nutty, cooled praline is your reward for cleaning the mess!


Yum

Thursday, February 20, 2014

Scampied Pollock & Healthy Solutions Spice Giveaway

Last October, the FDA released a report which stated that 12% of the spices imported by the U.S. are contaminated with insect pieces, rodent hair and other debris which is twice the amount of “filth” found in other types of imported food. While the FDA says that it has increased its inspections of spice facilities and will take further action to strengthen the spice safety net, it is probably wise for those of us who enjoy cooking at home to be more selective about the source of the spices and dried herbs that we purchase. Enter Healthy Solutions Spice Blends™.

Made with no fillers, preservatives or MSG, these recipe-ready spice blends are all natural and come in
16 distinct blends: Crusted Tilapia, Shrimp Scampi, Cajun Seafood, Encrusted Haddock, Lemon Pepper, Sesame Ginger Tuna, Grilled Swordfish, Salmon with Dill, Bold Beef Rub, Authentic Chili/Tacos, Hearty Beef Stew, Italian Meatballs, Perfect Steak, Savory Meatloaf, Ultimate Burger and Pork & Poultry. The spices come in resealable packets which have a transparent window that allows you to see exactly what is inside, and are printed with the ingredients and nutritional information as well as several cooking methods allowing you to choose one that best suits your needs.

We were lucky enough to receive several Healthy Solutions blends to work with. Last evening, we tried the Shrimp Scampi mix with the main ingredients of dehydrated garlic, onion, parsley and sea salt. Instead of going with the standard use, we opted to dust some Pollock fillets with the spices and run them under the broiler. The fish emerged juicy and perfectly seasoned.

4 fresh or frozen Pollock fillets (thawed)
4 teaspoons Healthy Solutions Spice Blends™ Shrimp Scampi blend
¼ cup breadcrumbs
Freshly grated Parmesan for serving

Set your oven rack about 6 inches below the broiler element and preheat broiler. Spray a broiler pan or a foil-covered cookie sheet with cooking spray.

Rinse fillets and pat dry with paper towels. Because thick layers of seasonings will burn under the broiler, lightly sprinkle both sides with the scampi spice blend and lay skin-side-down on the greased pan.

Broil for 10 minutes per inch of fish, based on how wide it is at its widest point. It'll take at least 5 minutes, even for thin fillets, but it is a good idea to keep a close eye on the cooking fish. Because Pollock is fairly delicate, we do not attempt the flip the fish over.

While the fish cooks, place the breadcrumbs in a non-stick pan and toast briefly over medium heat and set aside.

Remove the fish from the oven and pierce with a knife gently separating the flesh to check for doneness. If you see pink or translucent flesh, broil the fillets for a few more minutes. Once done, remove from the oven and plate the pollock. We served the fillets layered on a Caesar salad. Top the fish (and salad) with the toasted breadcrumbs and grated Parmesan.

Want to try delicious these healthy spice blends for yourself? Healthy Solutions Spice Blends™ has generously offered to give one of our readers a chance to sample not just one – but 4 unique spice blends of their choice with an estimated value of $14. Enter to win using the widget below before midnight Friday, March 7th.


Can’t wait to win? Healthy Solutions Spice Blends™ are available in your favorite stores or you can order them online at www.spiceblends.com. Each spice packet retails for $3.29. Connect on them on Facebook and Twitter to keep current with product news, coupons, deals, and more!


Yum

Monday, February 17, 2014

Sinful Salted Caramel Doughnut Sundae

Short, sweet and to the point. As a seasoned blogger, it can be easy to get bogged down in “the rules:” posts should be timely; headnotes should be at least 450 words and be on a topic; tags should be added to optimize SEO; blah blah blah. Tonight, I’m breaking the rules. No hard-to find-ingredients or complicated steps, a recipe so sinfully easy that I am almost embarrassed to post it.

As a teenage boy with a voracious appetite and the metabolism of a hummingbird, our youngest son can eat. A lot. It doesn't help matters that he is currently the captain of his high school track team’s distance squad for which he runs several miles each day making him so wispy that he is at risk in a strong wind.

After what most would consider a nice-sized meal, Sonny hinted that he was still, well, famished. So without hesitation, I proceeded to reheat some leftovers which he downed in moments and still looked a bit peckish. So, I resorted to creating the most debauched and caloric dessert I could dream up:

  • 1 glazed doughnut
  • 1 large scoop vanilla ice cream
  • 2-3 tablespoons caramel sauce
  • 1 generous pinch Kosher salt
  • 1 large dollop whipped cream

Place the doughnut on a plate and heat in a microwave for 20-30 seconds. Place the scoop of ice cream on top of the warmed doughnut.

Drizzle caramel sauce over the ice cream and dust with salt. Top the whole assembly with a liberal amount of whipped cream.

Serve the concoction as quickly as humanly possible so as to avoid grabbing a spoon and eating it yourself!


Yum

Friday, February 14, 2014

Romantic Rack of Lamb

When the boys were little, it was never easy to find a babysitter on Valentine’s Day so we would put the kids to bed early and have an intimate dinner with a good bottle of wine and these amazing mustard-coated lamb racks served rib ends up and gently interlocked on an heirloom silver platter. A simple dessert of fresh strawberries capped off a quiet romantic evening.

The boys are older now and enjoy these lamb chops as much as we do. The racks can be cut into individual servings as well, then coated and roasted in the same manner. which makes serving a bit easier. You may want to have extra napkins handy because it is impossible to resist gnawing the bones to get every last tidbit.

2 racks of lamb about 7 ribs each
2 tablespoons Dijon mustard
2 large cloves of garlic
1/2 teaspoon kosher salt
1 1/2 teaspoon oregano (or rosemary or thyme), fresh or dried
2 tablespoons lemon juice
1/4 cup olive oil
1 cup coarse breadcrumbs, fresh or Panko
2 tablespoons melted butter

Mix the mustard, garlic, salt, herbs, lemon juice and olive oil and whisk together until it reaches the consistency of mayonnaise.

Your racks should be frenched for the best presentation. If your butcher did no French the racks, do this first. Then, score the fat side of the racks lightly by making shallow crisscross cuts. Leave the rib ends free and coat the tops and sides of the racks with the mustard mixture. This can be done up to a day in advance and kept refrigerated until ready to cook.

Melt the butter and mix with breadcrumbs.

Preheat your oven to 500°F. Roast the lamb for 10 minutes at 500°F to sear. Reduce the thermostat to 400°F removing the lamb from the oven to spread the bread crumbs over the top of the lamb racks and return to the oven. Roast the meat for another 20 minutes, to rosy rare. A meat thermometer insert into the center should read125°F. The meat should be just slightly springy when pressed. Remove the racks from the oven and let rest 5 minutes serving.


Yum

Tuesday, February 11, 2014

Where There's a Will, There's Coffee

Must. Have. Coffee. These were the first words uttered after Pax cloaked Atlanta in ice and left us without power before breakfast and for the next 7 hours. We had water, candles, batteries, firewood, yet had completely neglected to prepare for the most important element of the day. How could that be? Why not just go to Starbucks, you ask? Alas, the roads were covered in ice and the coffee shops within walking distance were all closed, that’s why! Leaping from under the toasty covers, I headed to the basement in search of a coffee making vessel. In my desperation, I managed to unearth a fairly wide variety of antiquated brewing equipment.

The glass percolator was immediately dismissed by the spousal unit as the thought of cleaning up exploded glass shards without a vacuum was too frightening. The vintage espresso pot seemed the best choice at the time, so we filled that puppy up and set it on the gas-powered burner and waited for the elixir of life to bubble into existence. And waited, and waited, and waited. Ten minutes later we had enough espresso to fill three 3-oz. cups which were consumed in half the time it took to make them!

Quickly scrambling to make another pot, we discovered that the rubber gasket used to seal the innards of the pot had melted due to age and storage. Arrgh! Okie-dokie then. Next up was the French press which took less than five minutes to set up and steep to make three full-sized cups of lukewarm, weak, bitter coffee with an ample sludge appearing at the bottom of each cup (well, technically only two cups because Nic couldn’t make it to the bottom of his.)

We were rapidly running out of options! We were down to that aforementioned glass percolator and a clunky, dinged aluminum drip pot that I had used in college in the 1980s. Bordering on despair, we added grounds and water and hoped for the best. Several minutes later, we were drinking hot, much-better-than-passable coffee from a hideous, dented tin can! Added bonus, we could reheat the coffee without a microwave. Woo-hoo!

The guys headed out to shovel snow as I cleaned up from our fully-caffeinated breakfast of crispy bacon, fried pepper frittata and jalapeno corn muffins, the whole while thinking of old adages about storm ports, gift horses and unexpected places. On that note; stay warm everyone!


Yum

Friday, February 7, 2014

New Order Jalapeño Cornbread Muffins

A change will do you good. This was confirmed when after 20 years, I decided to try a different recipe for corn muffins. Every good Southern cook has a favorite recipe for corn bread. Our go-to recipe had been Paul Prudhomme’s because the cornbread muffins served at K-Paul’s Louisiana Kitchen in New Orleans were the best we have ever tasted. Yet this recipe had never fully satisfied. It was not quite moist nor was it quite sweet enough. We tried adding more sugar and more butter to no avail.

So yesterday, I googled “best cornbread recipe” and got a proliferation of results. Most had one thing in common: eggs. Not just one or two of the oviparous zygotes, but a generous four or five. Other differences included a lack of milk or buttermilk and the use of oil instead of butter. Armed with these new variants, I embarked on a batch of corn muffins.

I thought back to those moist, mouthwatering little parcels of deliciousness from K-Paul’s kitchen and remembered that they had included whole kernel corn and fresh jalapenos. Such additions had never before found their way into a Romeo corn muffin. The only deviation from the former recipe was the infrequent pinch of cayenne pepper added to the batter. Yet with the creation of a new formula came a new confidence as well. I would stretch beyond my comfort zone and add that corn and those hot peppers.

So how did the new recipe turn out? {Pause to feel the suspense here.} Nailed it! They are super moist, sweet but not too sweet, fluffy, delicate, and just the right amount of kick from the jalapenos. Bite-sized awesomeness! Do not pass go, do not collect $100, go straight to the kitchen and make these muffins. NOW.

  • ¾ cup sugar
  • ½ cup warm water
  • ½ cup vegetable oil
  • 1 ¾ cups all-purpose flour
  • 1 ¼ cups cornmeal
  • 1 tablespoon baking powder
  • 1 ½ teaspoons kosher salt
  • 4 large eggs, lightly beaten
  • 1-2 jalapeño peppers, seeded & chopped 
  • ½ cup whole kernel corn

Preheat your oven to 400° and grease 2 mini muffin pans or a 12-by-4½ -inch loaf pan. In a large mixing bowl, dissolve the sugar in the warm water and then stir in the vegetable oil.

In a medium bowl, sift together the flour, cornmeal, baking powder and salt. If you don’t have a flour sifter, whisk the dry ingredients to combine and fluff. Using an electric mixer beat the dry ingredients into the sugar-oil mixture. Add the eggs, corn and jalapenos and beat until just blended.

Spoon the batter in to the muffin pan. This is a messy business. Bake the mini muffins for about 15 minutes or until they are just golden brown and a cake tester inserted in the center comes out clean. If the tops brown too quickly, you may cover them with foil. Turn the muffins out onto a rack to cool a bit before serving.

If you are using a bread pan, scrape all the batter into the prepared pan and bake for about 45 minutes, until a cake tester inserted in the center comes out clean and the top is golden brown. Same deal with the foil if the top browns too quickly.

The corn bread muffins can be wrapped well and frozen for up to 1 week or kept at room temperature for 2 days.


Yum

Monday, February 3, 2014

Veni Vidi Vici: New Direction, New Friends

We descended upon the midtown restaurant with enthusiasm and anticipation. Fifteen members of the Atlanta Food Bloggers Alliance were invited to downtown Atlanta’s venerable Veni Vidi Vici to explore a sampling of dishes from their new menu. Many of the bloggers in attendance had never met in person, making it an evening of new friends as well as a new focus for the restaurant.

After a fire destroyed the restaurant’s rotisserie station, executive chef Jamie Adams revamped the menu to focus more on regional Italian dishes with an emphasis on seafood. The former rotisserie area will become a charcuterie station featuring artisanal Italian cheeses and hand crafted meats such as prosciutto, soppressata and cacciatorini. Executive Manager, Leonardo Moura, is excited about the change in direction. “Chef Jamie is very earthy and unassuming. His focus is on ingredients and preparation. Just when we think that he has perfected the menu, he kicks it up a notch.”

Moura’s enthusiasm was evident. He chatted with bloggers as plate after plate of antipasti rolled out of the kitchen: crisp calamari and clam strips with sun-dried tomato aioli, plump steamed mussels and clams in a cherry tomato broth infused with saffron, and perfectly prepared grilled octopus cut into tiny medallions with pickled onions served atop baby arugula. Long serving boards of salami, prosciutto, robiola, asiago and dried fig paste were passed around the table and disappeared almost as quickly as they arrived.

With each new service came an accompanying wine selection. Nino Franco Rustico Prosecco with the antipasti and biodynamic Chianti with the pasta, pesci and carni. Then came the pasta course with spaghetti carbonara, orecchiette with a spicy fennel sausage and roasted broccoli, agnolotti filled with roasted chicken, duck and fontina tossed with brown butter, sage and pecans, and a robust saffron risotto with seafood and fennel. The restaurant is serving their pasta in smaller portions and are encouraging sharing. “In Italy, people eat smaller portions of several different dishes, not just one massive bowl of pasta or large piece of braised meat,” Chef Adams says. “It’s more a little bit of this and a little bit of that—a very balanced, healthy way of eating.”

Following the pasta course, we were treated to “Pesci Regionali;” four fish dishes that highlight Chef Adams’ expertise in classic Italian cooking. Each fish dish was prepared simply and garnished modestly as they would be in the varying regions of Italy. Grilled Idaho rainbow trout typifies the Piedmontese served with cipolline, sage, and balsamic vinegar, while the Atlantic flounder prepared with saffron, sweet onions, golden raisins, and Prosecco vinegar was representative of Venetian cuisine. The Ligurian pan-roasted branzino with fresh tomatoes and mixed mushrooms, and the Tuscan baccalá with oven roasted tomatoes, olives, and capers were standout regional representations as well.

As the emptied seafood platters were removed from the table, they were replaced by plates of glistening “carni.” Roman-style chicken breasts with roasted peppers and tomatoes, succulent garlic-rosemary glazed pork ribs, and delicate braised rabbit with fennel and polenta were accompanied by VVV “contori” of roasted Brussels sprouts, broccoli and cauliflower, and a ratatouille-style eggplant Parmigiana. While the rabbit was a clear favorite among the bloggers, each meat dish was outstanding.

As the sommelier poured Michele Chiarlo Nivole Moscato d’Asti, our servers brought out plates of dessert. Although we were all stuffed, we could not resist the temptation of fluffy chocolate tartufo, crusty bomboloni, decadent crème brulee and VVV’s signature “Pizza di Fragole,” a crispy tart with a light coating of strawberry sauce, dollops of mascarpone and fresh strawberries laced with balsamic syrup. We said our farewells over cups of warm cappuccino and waddled out to our cars satiated and content.

Veni Vidi Vici is a delightful blend of casual elegance and intown sophistication. The updated menu features dishes that are less complex and lighter allowing the quality of the ingredients and preparation to shine. Whether it is a special occasion or a meal before the theater, the Buckhead Life Group’s chic Italian trattoria is a perfect place to unwind and enjoy a relaxing meal. Veni Vidi Vici, located on 14th Street at I-75 in the heart of midtown, is classic Italian dining at its best.

Veni Vidi Vici on Urbanspoon

Yum
Powered by Blogger.

footer social

ShareThis