Thursday, June 27, 2013

Doc's Chopped Challenge: Bonito-Crusted Steak & Oat Polenta with Candied Mango Agrodolce

In the past, we have been involved with several food challenges which we have enjoyed immensely. It is always exciting to experiment with new ingredients or to invent new recipes. When our neighbors at Doc Chey’s Noodle House announced that they would be hosting a “Chopped Challenge,” we jumped at the chance to participate!

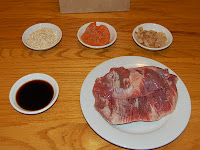
Two weeks ago, I stopped by the restaurant to pick up the bag of secret ingredients and was greeted by “Doc” himself, who seemed intrigued to see what the challengers would come up with. Resisting the urge to open the bag on the spot, I took the goodies home to find five challenge components: beautifully marbled flank steak, quick oats, bonito flakes, candied mango, and Chinkiang vinegar. The flank steak and quick oats were familiar. We also recognized the bonito flakes (dried, fermented and smoked skipjack tuna) as the main ingredient of the Japanese soup base, dashi. The candied mango seemed self-explanatory, but a little nip revealed that not only was it coated in sugar, but in a hint of chili pepper as well. And lastly, the Chinkiang vinegar was a complete mystery. A little research revealed that it is a dark, smoky, slightly sweet black rice vinegar originating from the city of Zhenjiang, China.

Instructional Video - See how we did it!

Our assignment was to create an original recipe using all five of the ingredients. The first step was to decide what type of meal to make. Following the adage “go with what you know,” we immediately thought of Italian cuisine. The dishes were not as obvious as one might suppose since three of the five ingredients are used to make traditional Chinese and Japanese dishes. Initially, we were worried that the Asian ingredients would not complement the ethnic flavors and spices typical of Italian fare, but we were pleasantly surprised with the results. We hope you will be too!

Quick Oat Polenta
1/2 cup quick-cooking oats
1/2 cup cornmeal
2 cups  water
Salt to taste (1/2 to 1 teaspoon)
1 bay leaf (optional)
1 tablespoon unsalted butter
¼ cup freshly grated Parmesan (optional)

In a saucepan, combine quick oats, cornmeal, water and a pinch of salt. Add the bay leaf if you are using one. Set pan over medium-high heat and bring to a boil. You will immediately notice the mixture thickening.  Reduce the heat to the lowest setting and allow to steam while the agrodolce reduces and you prepare the flank steak.

Candied Mango Agrodolce
2 tablespoons candied mango, chopped
¼ cup Chinkiang (Black rice) vinegar
¼ cup water
2 tablespoons honey
Pinch of salt

Chop the candied mango into ¼-inch pieces and add to a saucepan with the black vinegar and the water. Heat over medium-high setting an add the honey and salt to the pan. Stir well to dissolve the honey in the vinegar. Reduce heat to medium and allow to simmer until the liquid is reduced by half and resembles a syrup.

Flank Steak
1 lb. flank steak
3 tablespoons bonito flakes
2 teaspoons freshly ground black pepper
1 teaspoon olive oil (for coating pan)

The first step is to grind the bonito flakes into a powder. We used a small coffee grinder, but a mortar and pestle or small food processor. Because the bonito flakes are quite salty with a mild, earthy fish flavor, it will take the place of salt in this recipe. For those who are still hesitant about putting fish flakes on steak, remember that Italians frequently use anchovies and anchovy paste as a seasoning in savory dishes.

Remove flank steak from packaging and rinse under cold water before patting dry with paper towels. Lay on a plate or cutting board and dust the top with the bonito powder and freshly ground black pepper.  You only need to season one side.

Heat a heavy pan or skillet over high heat and add oil. Swirl the oil to coat the bottom of the pan and heat until tiny wisps of smoke appear above the pan’s surface. Lay the flank steak seasoned side down in the hot pan. Do not be surprised by how loud the sizzling will be. Let the meat sear until the pan side is a crusty-brown. Depending on the thickness of the meat, this should take from 3 to 5 minutes. Turn the meat over and sear the second side until a crust forms. You should not need to cook the second side as long. When seared on both sides, remove the steak from the pan and set aside for 5 minutes to allow the juices to retreat.

While the steak rests, remove the cover from the polenta and check the consistency. If you are adding the Parmesan cheese, now is the time to add it and stir to combine. If the polenta is not cooked to your desired thickness, turn the heat up to medium and cook uncovered until done, stirring constantly. If the polenta is too thick, you can add some more water to thin it to your desired consistency. Drop a pat of butter in and stir in before serving.

This is also the time to double check your agrodolce. As with the polenta, turn up the heat if the sauce is too thin or add a splash of water if it is too thick.

Slice the steak on the bias. Ladle polenta on to serving plated and arrange sliced flank steak on plate. Drizzle the agrodolce sauce over the steak. We chose to serve the candied mango pieces (because they are delicious!), but this is optional. Serve immediately and enjoy!!


We would love to hear how you would have used the secret ingredients. Please comment below with your ideas!


Yum

Sunday, June 23, 2013

A Cheesemonger's Book Club Meeting

There is a book club for readers of every interest. Being an avid foodie, I tend to read food-related books, so you can envision my delight when I found the Atlanta Food Literature book club devoted to food memoirs, food science and food anthropology. For my first meeting, we read Cheesemonger by Gordon Edgar.

The prospect of a memoir from the world of artisanal cheeses might initially conjure visions of an insufferable snob waxing unreadable about the truffles of a lifetime, but happily, none of that is true of Cheesemonger. Instead, it is a funny, big-hearted crash course on the subject of cheese from barn to store to table, this book is also about other things: punk rock, political activism, and the distinctive bond between a grocery store and the community it's rooted in.

What makes Cheesemonger unique is that it's part memoir, part food reference. He weaves a great tale of how he went from a punk rocker and activist to being a "cheesemonger," all while peppering in his cheese knowledge and well-told anecdotes of loopy customers, shady salespeople, and urban foodies. Gritty, opinionated and pragmatic, Edgar discusses the politics of land trusts, the romance and reality of artisan cheese makers, the snobbery that keeps people from exploring cheese and the storytelling that has become a part of the foodie movement where every meal has a back story. Although there is specific information about cheese sprinkled throughout, along with a solid appendix in the back of the book, this is much more than a cheese primer.

And what would a book club be without the accompanying food? Given the topical nature of the monthly book, everyone brought cheese! Along with sliced almonds in honey and fresh grapes, our club’s cheese board included:
  • Pierre Robert – France; aged pasteurized cow’s milk cheese, very soft paste; creamy and faintly sour with a little “sting” at the end.
  • Hervé Mons St. Nuage Brie – France; triple-cream cow; decadent richness with a soft, whipped texture, stinky yet refined balance of flavors.
  • Fourme D’Ambert Lameme – France; pasteurized cow inoculated with Penicillium roqueforti; very mild bleu with creamy texture and a clean finish.
  • Cave-aged Gouda – Holland; pasteurized cow; sharp-caramel taste, almost smoky, but not quite with a little “crunch."
  • Scarmoza – Italy; pasteurized cow, stretched curd; elastic, dense and mild with less moisture than mozzarella.
  • Six-month-aged Manchego – Spain; unpasteurized sheep; firm and creamy with a slight piquancy.
  • Humboldt Fog – California; goat’s milk; edible mold and ash rind are is fairly tasteless; creamy, light, and mildly acidic with a stronger flavor near the rind.
  • Cowgirl Creamery Mt. Tam – California; unpasteurized cow, triple cream; pungent, smooth and buttery with hints of white mushroom.
  • Caly Road Creamery Little Epiphany – Georgia; Crottin-style aged cow; sharp and sour notes with a bright finish.
  • Rogue Oregon Bleu – Oregon; unpasteurized cow; clean, briny flavor, notes of sweet cream and veins of mellow, earthy blue molds.
Since the best book club meetings have a guest speaker or an interview with the author, we are including a video interview with the author, “Gordonzola” Edgar for your viewing pleasure.


And, lastly it wouldn’t be a book club without the questions. So please share with us your favorite cheese in the comments section.


Yum

Tuesday, June 18, 2013

The Long-Awaited Stuffed Squash Blossom Recipe

This is by far the most intimidating post that I have written to date because it is the most anticipated recipe by those who have sampled these transcendent indulgences. Capturing the precise nuances of the process has not been an easy endeavor. For 10 years, Dom has been perfecting his recipe and techniques for preparing fiori di zucca ripieni di formaggio. These mozzarella-and-anchovy-stuffed squash blossoms are our summer addiction. In fact, for the last three years we have planted 15-20 zucchini plants solely to harvest the blossoms with the actual zucchini squash crop as an added bonus.

Prior to transforming our backyard into a large garden plot, we would head to the Morningside Farmer’s Market during the pre-dawn hours on Saturdays to stand at the head of the line to fuel our squash blossom habit for the week. As it happens, one of these mornings Dom was asked by a fellow customer what he was planning to purchase, fully expecting that like everyone else in line, his response would be “Oh, the heirloom tomatoes, of course.” So when he answered, “squash blossoms,” he was met with an avalanche of chatter with one woman telling the line of customers within earshot that “there was a guy who painstakingly stuffed each blossom with cheese and sardines and then dipped them in a magic mixture to fry them.” The woman then turned to Dom and asked him what he was going to do with HIS blossoms, to which he replied, “Umm, I’m the ‘guy.’ And, they are stuffed with mozzarella and anchovies, not sardines,” at which point he stepped up to purchase every blossom in sight before walking home.

There are several secrets to making the fragile, radiantly-orange flowers into an other-worldly delicacy. The first trick is to harvest the male blossoms as soon after they open as humanly possible. Another is to remove the pollen-dusted stamen before stuffing the blossom. This is easiest to do when they are first picked. The blossoms should be immediately refrigerated because they begin to wilt very rapidly. If you will not be using the blossoms the same evening, consider stuffing them and placing them back in the refrigerator for the next day. Fresh blossoms seldom last more than two days.

1 1-lb. package of mozzarella cheese, whole-milk or part-skim
1 small can anchovies packed in oil
Tempura elixir (Below)
Oil for frying

To stuff the blossoms, cut the mozzarella into rectangular pieces (like Jenga blocks) that are about ¼-inch thick and roughly the same approximate length as the blossoms. Fresh mozzarella is not recommended for this recipe because the moisture level is too high.

Next, cut one or two of the anchovy fillets in half lengthwise and again into thirds or fourths. Place one of the anchovy slivers on the end of each block of cheese and place anchovy-side-down into each zucchini flower. Many people simply ignore the anchovy, however, they add a salty, earthy note that enhances the subtle squashy flavor of the blossoms. If you have anchovy-averse diners, make sure you designate the anchovy-free flowers from the anchovy-full ones as they are impossible to differentiate after frying. We suggest a toothpick in the stem, but this hasn't always been foolproof as the toothpick sometimes comes out during frying. (If you come up with a good suggestion, PLEASE include in the comments so we can benefit from your expertise!)

The blossoms can be stuffed in advance. Arrange in a single layer on a plate, cover with plastic wrap and refrigerate until ready to use.

Dom’s Magic Tempura Elixir
1 cup all-purpose flour
½ cup cornstarch
1 tablespoon baking powder
½ teaspoon salt
1 ½ cups VERY cold seltzer water

To make tempura mix, combine flour, cornstarch, baking powder, and salt in a mixing bowl. Whisk the dry ingredients together then stream in one cup of cold seltzer water and whisk lightly just to mix. You can use still water if seltzer is not available. The critical thing is that the water be COLD.

At this point check the consistency, it should be relatively thick like waffle batter (not as thick as cookie dough.) It is better for the batter to be thicker at this point because you may need to add some ice later that will thin the batter some. Use the remaining water to adjust the consistency as needed. Set the bowl of batter in the refrigerator or over a bowl of ice and let sit for 10 minutes or so.

While the batter rests, preheat a large heavy skillet over medium-high heat. Add the oil and heat until tiny wisps of smoke start to appear on the surface. Because olive oil has a very low smoking point, Dom uses a mixture of olive oil and canola oil. The olive imparts a nice flavor while the canola oil has a higher smoking point which gives the battered blossoms a less greasy, extremely crispy coating.

To batter the blossoms, remove the batter from the fridge and give it a good stir. Add a couple of ice cubes to ensure it is hyper-cold. Gently submerge a blossom in the batter and drag it through from stem to petal allowing any excess to drip back into the bowl. Using the same dragging motion, lay the battered blossom in the heated oil. Repeat this process laying battered blossoms at least an inch apart in the oil.

Keep an eye on the first blossom, occasionally peaking underneath with a pair of chopsticks, and turn when the cooked side is light brown; 2-3 minutes and cook until the bottom is light brown; another 2-3 minutes. Do this for each of the remaining blossoms.

Once cooked, drain blossoms on paper towels and sprinkle lightly with kosher or sea salt. (Dom actually dusts them with superfine popcorn salt.) Serve the ultra-crisp flowers piping hot as they tend to get soggy if they get too cool and do not reheat well; (this is an understatement). A chilled glass of crisp Chardonnay, Prosecco or even champagne is the perfect accompaniment.


Yum

Friday, June 14, 2013

Grilled Pecan Pie for Dad's Day

This post was originally written for inclusion on the Virginia-Highland Civic Association website on June 14, 2013:

Given all that our fathers have endured over the years; endless games of catch, Christmas Eves spent assembling a variety of gifts (with instructions in German), forced politeness toward dates with odd hairdos, and teaching us how to parallel park, Dad clearly deserves royal treatment. So on his day, let's give him what he really wants: the chance to relax, have fun and, to top it all off, enjoy a big juicy steak that he has grilled to his exact preference.

So what better Father’s Day gift than grilling tools or even better a new grill. And, what better place to shop for grills and accessories than our neighborhood Intown Hardware? With a selection of Weber grills and grilling equipment, there is something for every Dad. Intown Ace Hardware also carries the full line of Big Green Egg cookers and accessories. Resident grillmaster, Phillip Ramsey, is a proponent of the Big Green Egg for its versatility; “You can cook almost anything on an Egg. You have the ability to control the temperature far better than any other grill on the market.” An added benefit to cooking on a Big Green Egg is that you don’t heat up your kitchen on a hot summer day. His favorite example of the Egg’s flexibility is a grilled chocolate pecan pie:

  • 1 cup dark corn syrup
  • 3 large eggs, beaten
  • 5 tablespoons unsalted butter, melted
  • 1 cup firmly packed light brown sugar
  • ¼ cup bourbon
  • 2 tablespoons all-purpose flour
  • 1 cup semi-sweet chocolate chips
  • 1 cup chopped pecans
  • 1 (9-inch) pie shell

Set the Egg for indirect cooking with the Plate Setter, legs down. Preheat the BGE to 400°F.

Using a wooden spoon, mix the com syrup, eggs, butter, brown sugar, bourbon, and flour in a medium bowl until combined. Add the chocolate and pecans and blend well. Pour the filling into the pie shell.

Place the pie plate on the Plate Setter. Close the lid of the BGE and bake for 45 minutes, or until the filling is set and the pie is golden brown. Remove the pecan pie from the grill and let cool completely, and then refrigerate.


Don’t have a Big Green Egg? Don’t despair! You can bake the pie in a traditional oven for your Dad or you can try pecan hand-pies that can be cooked on a traditional grill.

For tips on selecting the perfect grilling equipment for Dad, head over to Intown Hardware and chat with Phillip or  visit the Ace Hardware’s online Guide to Grills and Outdoor Cooking.


Yum

Monday, June 10, 2013

Roasted Rhubarb Semantic

We enjoy word games. Puns, rhymes, limericks even spelling contests; we love them all. So this recipe represented a challenge for us. We had a lengthy debate about what the resulting fruit conglomeration should be labeled. Is it a conserve or compote? What is the difference between jam and preserves? Is it fruit butter? How about marmalade?

So here goes:
  • Conserves are made by cooking dried fruits and nut and have a very thick and chunky texture. Conserves work very well as a spread and as a condiment for meats and cheeses.
  • A compote is made with whole fruit cooked in water with sugar and spices. The syrup may be seasoned with vanilla, lemon or orange peel, cinnamon sticks or powder, cloves, ground almonds, grated coconut, candied fruit, or raisins.
  • Jam is a thick mixture of fruit, pectin, and sugar boiled gently until the fruit is soft. Recognizable pieces of fruit are still visible in the mixture. Jam can be spread easily and makes a good filling for cakes and donuts.
  • Fruit butter is a smooth and creamy spread that is created by slow-cooking fruit and sugar until it reaches the right consistency; these types of spreads are not always translucent and are often opaque. Fruit butters are best used as a spread and a filling. A jam that has been pureed to be ultra-smooth could qualify as a fruit butter.
  • Preserves are a cross between jelly and jam. Preserves have visible chunks of fruit surrounded by jelly, but are not as thick and opaque as jam.
  • Marmalade is a citrus spread made from the peel and pulp of the fruit. Marmalades are cooked for a long time and have no pectin, and are used as spreads and glazes.
So what is the answer? The sweet fruity goodness would not be considered a conserve because the rhubarb is fresh not dried. It is definitely not a jam or preserve because no pectin is used in cooking, and it is not marmalade because while rhubarb is very tart and acidic, it is a rhizome and does not come from a citrus tree. So the verdict is compote or fruit butter, and since the mixture is smoother than the definition of the word compote connotes, we are officially calling it:


Roasted Rhubarb Butter
  • 2 pounds rhubarb, trimmed, chopped into ½-inch pieces
  • 1 cup brown sugar
  • Zest of one lemon
  • Juice of one lemon

Preheat oven to 350°. Combine rhubarb, brown sugar, zest and lemon juice in a medium baking dish or ovenproof skillet.

Roast until rhubarb is very tender and juices are syrupy, about 45 minutes. Check about halfway through cooking; if the top looks overly dry, stir the rhubarb mixture and return to the oven.

Remove the dish from the oven and allow to cool. The juices will retreat and thicken as the mixture cools. At this point you have two options: place the butter in a jar(s) and refrigerate or you can puree it until completely smooth before moving to jar(s) and refrigerating.

This delicious condiment is amazingly versatile! You can serve it with toasted bread for breakfast or as a topping for cheesecake or ice cream. When mixed with some chilies, caramelized onions and ginger, it makes an amazing relish for roasted pork or chicken.


Yum

Thursday, June 6, 2013

Blogger Dilemma and a Toasted Croissant with Honey Butter

Last evening, I attended my first Atlanta Blogger Meetup at Gordon Biersch. The guest speaker was Dan Morris of Letterswithdan.com. The focus of the session was to “Build a Blog Empire Through the Power of Leverage, Repurposing and Passive Income.”

With comedic timing, Morris explained the importance of viewing your blog through an income-based lens, stating “Bloggers must be repurposing time, systematizing and measuring to grow successfully.” It takes a good use of time to optimize and monetize a blog into a business that's a thriving interest. Morris encourages bloggers to determine their target audience, build a fan base and to post every day to improve your presence in search engine indices.

After spending some time reviewing keywords, updating meta tags and investigating a multitude of SEO options to improve our blog’s authority and page rank, I came to the realization that this could become a full-time job in and of itself. So in considering this dilemma, I had an epiphany: “It’s the content, stupid.”

Before relating the reasoning behind this slogan, however, I am recommending a contemplative snack. My new favorite treat is a pan-toasted croissant served with honey butter and a hot cortado.

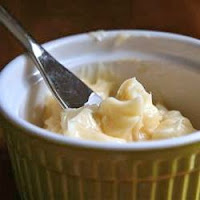
Honey Butter
  • 1 pound butter, softened (but not melted)
  • 1/4 cups honey
  • 1/2 teaspoon ground cinnamon
  • 1/2 teaspoon vanilla extract

Place the butter into a mixing bowl and beat at low speed, using the whisk attachment to whip the butter. Increase the speed to medium and add the honey, cinnamon, and vanilla extract and beat for about 5 minutes until well combined. Remove butter from bowl and spoon onto parchment paper or plastic wrap. If you can wait for it to chill, roll the butter into a log and refrigerate for 2 hours. If not place the butter in the freezer for a few minutes while you toast the croissants.

Pan-Toasted Croissants
Take a good croissant and slice it in half lengthwise (along the equator). Place the croissant halves, cut-side down on a preheated, lightly buttered griddle or heavy skillet and toast over medium-high heat. When the cut-side is toasted to a light golden brown, turn the croissants over and toast the second side.

Now, with snack in hand, I hope you can follow my thought process. First of all, anyone who thinks that blogging is a lucrative occupation is sadly mistaken. Yes, there are a few success stories, but the vast majority of bloggers barely recover their costs (time, internet fees, ingredients, etc.) Food bloggers typically include a recipe with their posts which requires additional time to prepare the dish(es) and take photos.

We started this blog to chronicle our cooking adventures both for ourselves (so we could remember what we did to make a certain dish) and to record recipes and techniques for our two sons. As friends and family learned of the project, the blog snowballed into the site you see today. And while we have received some good publicity and even a few awards, the blog has always been about cooking good food (for Dom) and the catharsis of writing about it (for me).

During Bill Clinton’s 1992 presidential campaign, his campaign manager, James Carville coined the phrase, “It’s the economy, stupid” to keep campaign workers focused on the issue. For our purposes, I have revised the saying to “it’s the content, stupid.” So while Dan Morris advocates the concept that “just because you started your blog as a hobby, doesn't mean you can't make it your full time profession," we have adopted the reverse philosophy. Rather than sacrifice our lifestyle for the blog, the blog must sacrifice for us to maintain our lifestyle. Thus dear readers, we hope you will be content with our blog just the way it is as we continue cooking, eating, enjoying each other’s company and occasionally writing about it.


Yum

Sunday, June 2, 2013

Strawberry Gelato Glee

What is it about strawberries that makes you break into a smile? Is it the vibrant red, heart-shaped fruit or the bright green jester-like cap with its fingers that seem to wave merrily at you?  So perhaps you can envision the ear-to-ear grin when my adorable neighbors arrived at my door carrying a brimming bucket of freshly-picked strawberries!

After gorging myself on the juicy little devils, I decided that the only thing better than fresh strawberries might be strawberry gelato. The word gelato means ‘frozen‘ in Italian, which does little to describe the ultra-smooth texture of the frozen dairy decadence that is authentic Italian gelato.

Gelato usually has less fat than traditional ice cream because the ratio of milk to cream is much higher than in ice cream which results in less taste and texture of fat to coat your palate. Also, traditionally there are no eggs in the gelato base, so the gelato highlights the flavor of what’s been added like chocolate, coffee, or in this case: strawberries.
 
  • 3 cups fresh strawberries, hulled and sliced
  • 2 cups milk
  • 1 cup sugar
  • 2 tablespoons cornstarch
  • 1 cup heavy cream
  • 2 teaspoons lemon juice
  • 1 tablespoon vodka

In a heavy saucepan, add milk and stir in sugar and cornstarch and whisk to make a thin slurry. Heat over medium heat until the gelato base thickens and begins to bubble, about 5 minutes. Pour into bowl and stir in heavy cream. Place the bowl over ice and allow to cool, stirring occasionally. The mix will continue to thicken as it cools.

Place cleaned strawberries in a food processor and pulse to desired consistency. We like to actually see some the fruit in our gelato, so we leave the fruit a bit chunky.  Add the fruit, lemon juice and vodka to the gelato base and chill for 3-4 hours.
The berry picker taste test... 

Add the chilled gelato mixture to an ice cream maker and process according to manufacturer's instructions for the machine. When the gelato is well frozen, transfer it to a container. Cover; freeze until firm, at least 3 hours and up to 2 days. The vodka should prevent the gelato from freezing completely solid, making it easier to serve.

Because the storage freezers used for holding gelato in Italy tend to be kept a few degrees warmer (up to 10 degrees F) than those in U.S., it is better to let the gelato sit out for a few minutes before serving. When gelato is less-cold, your mouth does not get ‘frozen’ and you can taste the flavors even better.

Yum
Powered by Blogger.

footer social

ShareThis