Monday, April 30, 2012

Happy Reveal Day! Goodies Galore!

Last month while drooling over some of our favorite food blogger friends’ creations, I stumbled upon Foodie Penpals hosted by Lindsay at  The Lean Green Bean. Never being one to turn down the opportunity to try new food items, I immediately signed up.

The Lean Green BeanEarlier in the month, I received the name of the pen pal I would be mailing goodies to, while somewhere in the foodie universe someone had gotten my name (kind of like a Secret Santa in April!) I couldn’t wait to go shopping! A day after I sent out my box, one arrived in the mail addressed to me.

A few days before our goodie box arrived, I received and email from my Foodie Penpal Kristina letting me know the box was on the way and an added bonus – a guest blog post explaining one the items she had included in the box. Not being one for delayed gratification, it was with great torture that I waited until the box arrived to read the post she had sent.

It is such a beautiful story and one very similar to ours. Kristina’s writing style is akin to mine as well. I must admit I got a little misty eyed reading the post (which I will share tomorrow for your reading pleasure!).

Oh! I suppose you would like to know what Kristina sent us… Without further ado, our box included a bottle of honey from Jarek Apiary for which Sonny called dibs.  He uses honey on everything, especially his toasted waffle each morning for breakfast because he doesn't prefer maple syrup.

The next item was Dr. Gonzo’s “Garlicmash No. 4;” a pulpy concoction of pureed garlic, olive oil, cayenne pepper, salt and sugar. We can't wait to dive into that jar! We use copious amounts of garlic in all of our food and this will certainly be a huge hit.

It was truly as though Kristina had a crystal ball. All the items she sent are household favorites including her homemade specialty of spicy caramel popcorn. All four of us adore caramel corn in any form (kettle corn, Fiddle Faddle, Cracker Jack), so as you can well imagine, the two Ziploc bags-full disappeared in record time.

And the pièce de résistance, a four-pack of squid ink. Yes, squid ink! Now I know what you are thinking; why would anyone be so excited about receiving squid ink in the mail?

When Dom and I were dating, we would go to this quaint, romantic little Italian restaurant that has since gone out of business called Lindy's Café in Atlanta’s Peachtree Hills neighborhood. They made squid ink pasta with calamari that was his favorite dish. We have always wanted to try to make it at home. As most of our readers know, we frequently make our own pasta and have always wanted to try to make fresh squid ink pasta. We have been searching for squid ink in a package designed for home use, but have only seen it in expensive, industrial-sized amounts. We are thrilled to have some to try and to know where we can get more!! We will definitely share the results when we have the opportunity to try it out.

Do you want to be a Foodie Penpal? You don't even have to be a blogger - just someone who loves food and trying new treats! Visit Lindsay’s blog for program details and to sign-up. And stay-tuned for next month’s Reveal Day!


Yum

Tuesday, April 24, 2012

Technique of the Week: Tossing

To mix the ingredients of a recipe, such as salads or pasta, by using a light lifting and fluffing gesture. The food is gently turned over and mixed together enabling sauces and food items to be seasoned with the flavors of each item without breaking them apart.

Tossing can also refer to the technique of pan tossing in which the ingredients of a sauté pan are quickly mixed in a very efficient action without the use of utensils. This basic culinary technique involves using your wrist to flick ingredients into the air and change the placement of them within a pan. This method is used to combine, coat and distribute ingredients, such as vegetables, spices and sauce. Tossing ensures that the contents of the pan cook evenly and do not stick to the bottom. Tossing saves time and reduces clean-up by eliminating the need for cooking utensils.

To achieve a good toss, grip the handle of the pan and shake the ingredients back and forth to prevent sticking. Holding the handle of the pan, lift the pan about 3 inches above the flame. Tilt the pan slightly toward you and flick your wrist in an upward motion while pulling your arm backward to toss the ingredients to the opposite side of the pan. This gently propels the ingredients into the air and back into the pan. The ingredients in the pan should be tossed every 2 to 3 minutes to provide even cooking of the dish.

Editor's Note: Tossing has several other meanings with regard to consumption, predominantly as it relates to refreshing adult beverages. It can also refer to the inevitable bodily reaction when too many adult beverages have been "tossed" back.


Yum

Thursday, April 19, 2012

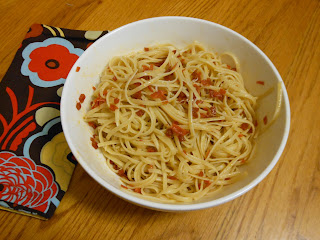
Epically Hectic Pepperoni Noodles

Hectic is a relative term. When our sons were toddlers, I would grouse about being busy with laundry, preschool and play dates. Once they were school age, the pace increased with bus schedules, homework, soccer practices and games, Sunday school, and more play dates. Regardless of how eventful our lives were, we made every attempt to eat dinner as a family every night. As the guys entered middle school, life got even more frantic with more difficult homework, karate practice 4 days a week, Debate and student government meetings, intramural sports, church activities and young ladies with blooming figures, (and believe it or not we also have activities outside our parenting duties.)

I can recall a particularly bad day when the boys were very little; my next-door-neighbor gave some sage advice. She said, “Don’t worry; this is just a phase which will be over soon. The next phase may be better or it may be worse, but at least it will be different.” We have reminded ourselves of that guidance many times over the years, but it did nothing to prepare us for the rigors of high school (and we’re not referring to the curriculum which is rigorous as well.)

Both of our guys are now in high school with REAL homework, high stakes tests, track practice every day, Latin club, Art club, tutorials, driving lessons, marathon track meets, Confirmation classes, SAT prep, AP study groups, research papers, Prom drama, and teenage angst. As you can imagine, our evening meals together can be quite difficult to arrange. On those nights when a quick supper is in order, the guys have only one request: pepperoni noodles.

There is nothing fancy about the title nor is there anything fancy about the dish; they simply love it. The first time I made this spicy pasta was when the boys were about three and five years old. On a frantic evening with little in the pantry, I fashioned a meal out of a pound of linguine, some diced pepperoni and Parmesan cheese. Little did I know that it would become a mainstay of their diets for the rest of their lives. My sister even commented recently, "you were making pepperoni noodles the last time I called, and I think the time before that." What can I say? It's been hectic around here! Coincidentally, it is the one meal that I know both will be able to duplicate once they are on their own.

  • 1 lb. pasta
  • 2-3 tablespoons olive oil
  • 1 clove of garlic, minced
  • ½ cup pepperoni, finely diced
  • 1 mound of Parmesan cheese, grated

In a sauté pan, heat olive oil over medium heat and add minced garlic and cook until lightly brown. Do not overcook garlic or it will taste bitter and ruin the flavor of the oil. Add diced pepperoni and toss around the pan to fully coat with olive oil and to heat the pepperoni through. You do not need to cook the pepperoni for more than a few minutes as it is already fully cured.

Cook pasta in a large pot of boiling salted water which should take about 10-12 minutes. Drain pasta in a colander, remembering to save some of pasta water to help hydrate the pasta if needed. Transfer the cooked pasta to a mixing bowl.

Picture taken pre-cheese and fork to protect all limbs & appendages!
Once the pepperoni is heated (and the olive oil is a fluorescent orange color,) pour over the cooked pasta and toss thoroughly to ensure noodles are fully coated with the flavorful (disturbing-looking) oil. Serve in large bowls with generous amounts of grated Parmesan cheese and be sure to remove your hands quickly else they get gobbled in the ensuing eating frenzy.


Yum

Tuesday, April 17, 2012

Technique of the Week: Simmering

Simmering is a food preparation technique in which foods are cooked in hot liquids kept at or just below the normal 212°F boiling point of water. Simmering provides for a milder action than boiling to prevent foods from breaking apart or toughening up. Simmering is usually a rapid and efficient method of cooking. The technique of simmering is frequently used when making stocks or soups, and starchy items like potatoes or pastas. Food that has simmered in milk or cream instead of water is referred to as creamed. Allowing sauces and soups to simmer even for a short time helps flavors to fully unite before being served.

To keep a pot simmering, bring a pot of liquid to a boil and then reduce the heat to a point where the formation of steam bubbles has almost completely stopped. You should see minuscule bubbles forming and gently rising to the surface of the water, but the water is not yet at a full rolling boil. This typically occurs at a water temperature between 180°F to 205°F. Bear in mind that if you simmer with a lid on the pan, the temperature inside the pan will rise and a simmer can very easily turn into a boil.

Tips and tricks:

  • Your liquid is at a simmer when small bubbles appear (especially around the edges of the pan) but not at a full, rolling boil.
  • Simmering is a good application for making soups as it cooks items slowly which allows flavors to develop without over-cooking, especially proteins.
  • Simmering the liquid for a long period of time breaks down tough fibrous textures such as large, tougher cuts of meat and vegetables like collards or mustard greens.
  • Season with salt after the ingredients are already cooked through and the liquid has reduced to the desired thickness. Seasoning at the beginning is recommended only for dried herbs and spices or add a sachet. Salt and can become overwhelming when the liquid reduces and is difficult to correct after the fact.


Yum

Friday, April 13, 2012

At The Beach With Elizabeth David & Tunny Fish

As mentioned in a recent post, we spent a week on Amelia Island during this year’s Spring Break. While the guys were off fishing, I spent time walking along the shore and enjoying some quiet beach reading. My usual reading stock is comprised of innocuous formulaic crime novels, but on a whim I had grabbed a copy of Elizabeth David’s Italian Food which had been unceremoniously dismissed by hubby because he felt the tone was too patronizing and imperious.

Admittedly, the book is not an easy read. The tenor is one of condescension and disdain, but given her vast experiences in the world of Mediterranean and Arabian cuisine during a time when many of the ingredients she used in her recipes were hardly known in Britain, it is understandable that she would be frustrated at the lack of available ingredients. The book was published in 1954 when there was still war-time rationing in England and most readers could only dream of trying out the crisply instructive recipes. In fact, during that time, olive oil was sold in pharmacies as a treatment for ear maladies. Garlic, eggplant, zucchini and basil were unheard of amid the austerity of 1950s Britain.

Elizabeth David was the British equivalent to America’s Julia Child and her influence went beyond mere ingredients to include her Provencal-style kitchen and its “newfangled” equipment: cast iron pans, terracotta and earthenware pots, peasant pottery bowls of eggs, and artfully arranged fruit and vegetables. Until that point, kitchens had been purely utilitarian and hidden from view. So great was her influence that Le Creuset introduced its cast-iron pans in “Gauloise blue” inspired by the color of her favorite brand of cigarettes. She also changed the way food was depicted in magazines. Mashed potatoes no longer masqueraded as ice-cream. The photographs were taken of the actual food she had cooked; not the food stylists’ replications.

Unlike the cookbook formats we have become accustomed to, each section of the book begins with an essay sometimes with definitions and descriptions and other times with history or opinions which are followed by collections of recipes on a particular topic. With 24 recipes devoted to “tunny fish,” it is clear that this was Ms. David’s preferred ingredient. Tunny fish referred to canned “tuna” or tonno, which prior to industry regulation, could have been any of several varieties of true tuna or tuna-related species. This recipe for a rolled tuna loaf was the most intriguing of the collection.

POLPETTONE DI TONNO (Polpettone of Tunny Fish)

2 small tins of tunny fish of 150 grammes (approx. 7 oz.) each, 2 eggs, a tablespoonful of capers, pepper.

Put the contents of the tins of tunny fish through the food mill with the oil from the tin, or mash the fish if it is easier. Beat in the 2 eggs, season with pepper (and salt if necessary, but it probably won’t be), and stir in the capers so that they are evenly distributed. On a floured board form the mixture into a fat sausage.

Flour a cloth or a piece of butter muslin (doubled), roll the sausage up in it, and tie it with string, as salame sausages are tied, but not too tightly. Lower the marcel into a pan of boiling water. The pan must be large enough to accommodate the sausage lengthwise, or the size of the sausage must be adjusted to the size of the pan. Simmer gently for an hour or a little more. Unwrap the polpettone only when it is cold. Serve on a long dish, cut into thin slices. A potato salad makes quite a good accompaniment.


Tasting Notes:
This tuna loaf was nothing like I had imagined. Once sliced, it looked watery and grainy, so I drizzled some olive oil over the top and added a few capers. Even with the addition of olive oil the end result was watery and very fishy. Perhaps post-war standards were a bit lower than they are today or tunny fish was better in those days, but I will not be adding this recipe to the family recipe cache.


Yum

Monday, April 9, 2012

Technique of the Week: Deveining

Generally speaking, deveining is the process of removing veins from meat. It can also refer to the removal of fibrous or inedible “veins” of vegetables such as peppers or celery. Nikkur is the procedure of removing the sciatic nerve and any forbidden blood vessels and fats from the hindquarters of slaughtered animals to make meat kosher. In Yiddish, this process is called “traibering.”

Goose or duck livers (foie gras) also have veins that are classically removed prior to cooking although some chefs prefer not to devein the foie gras, as the veins can help preserve the integrity of the fatty liver. To remove the veins, unwrap the liver and blot it with a paper towel. The liver should be pale beige in color.

Each liver consists of two lobes, one slightly larger than the other. Remove any pieces of thin, white membrane clinging to the outside. Gently pull apart the lobes with your hands, noting that they are connected by a vein through the center of the two lobes. Cut this vein with a sharp knife. Hold one lobe firmly in your hand and with a pair of flat-end tweezers, grasp the end of the vein that was severed. Gently pull with a slow, even motion. In the best case, the gentle pull will cause the rest of that portion of vein hidden inside the liver to pull free.

Deveining is also a technique used to prep shrimp for cooking which has actually nothing to do with veins. Deveining a shrimp means removing the black threadlike digestive tract that runs along the back of the crustacean. Removing the harmless tract is not necessary but makes the shrimp more aesthetically pleasing especially when larger shrimp are being used. While there are several deveining tools on the market, you can easily make do with a paring knife. Peel the shrimp first, run the tip of a sharp knife along the shrimp's back, and then lift out the delicate black vein, removing any pieces that break off with your fingers.

Recipes that feature deveining:

Yum

Friday, April 6, 2012

View (Almost) of Savannah Red Rice

We spent a week on Amelia Island, Florida for Spring Break this year which is a stone’s throw from the Georgia coast. With a ready supply of fresh shrimp, Savannah red rice was quickly added to our vacation menu.

Savannah red rice is a cultural and gastronomic legacy that has been around for nearly 300 years. This traditional Southern favorite is an adaptation of a similar dish made all over West Africa called “Jollof rice.” Also known as Carolina perlou, similar variations of rice pilaf with tomatoes appear in the earliest cookbooks from Charleston and Savannah. Red rice is a part of every great Southern cook's repertoire which can be served as an entrée (with shrimp, chicken or sausage) of as a side dish (without). On occasion we have made this for pot luck cookouts and it is always the first empty dish on the buffet table!

Making a reputable red rice can be challenging and tricky. The best recipes start with a good quality bacon. The use of long grain rice, which at one time could have been exclusively Carolina Gold rice, is essential to the uniqueness of this dish in that hearty long grain rice absorbs the smoky flavor of the bacon and keeps the rice grains from sticking together too much. 

Carolina Gold rice which originated in Africa and Indonesia, was the basis of the antebellum economy of coastal Carolina and Georgia. Considered the grandfather of long grain rice in the Americas, was first produced in diked wetlands in the Charleston area and eventually planted throughout the South. It was exported worldwide by 1800, and by 1820, over 100,000 acres were producing Carolina Gold Rice.

No red rice should be started without “trinity:” equal parts of chopped celery, bell pepper and onion. High quality tomatoes are imperative as well. We use Italian crushed tomatoes, which have a little bit more texture than a puree, and have a good rich red color. We also add a tablespoon of paprika to enhance the red.

The actual cooking of red rice, on top the stove or in the oven, seems to be the source of much of the debate around what makes a good red rice. A true Savannah Red Rice, as opposed to perlou or New Orleans Jambalaya, is prepared on top of the stove, but finished in the oven where each grain of rice is able to absorb the liquid and fat but still retain its shape.

  • 10 slices bacon, diced
  • 2 cups chopped onions
  • 1 ½ cups chopped green bell peppers
  • 1 cup chopped celery
  • 2 ½ cups uncooked long grain rice
  • 1 (16-ounce) can tomatoes, chopped or crushed
  • 1 teaspoon minced fresh garlic
  • 2 bay leaves
  • 5 cups chicken stock
  • 1 lb. fresh shrimp, peeled and deveined (optional)
  • ¼ cup finely minced fresh parsley

  • Seasoning Mix:
  • 2 tablespoons dark brown sugar
  • 2 teaspoons salt 
  • 2 teaspoons paprika
  • 1 ½ teaspoons white pepper
  • 1 ¼ teaspoons dry mustard
  • 1 teaspoon black pepper
  • 1 teaspoon onion powder
  • 1 teaspoon garlic powder
  • ½ teaspoon dried thyme leaves
  • ½ teaspoon ground cumin

Combine the dry seasoning ingredients thoroughly in a small bowl and set aside. Place the bacon in a heavy 5-quart pot, cover, and cook over high heat until the bacon starts to brown, about 5 to 6 minutes. Add the bay leaves, onions, bell peppers, and celery, cover, and cook, stirring occasionally, until the onions and bacon are golden brown, about 14 to 15 minutes.

Stir in 5 tablespoons of the seasoning mix and then add in the rice. Cover and cook, occasionally scraping up the crust that forms on the bottom of the pot, until the rice is golden, about 5 minutes. Stir in the tomatoes, then add the garlic and the remaining seasoning mix, cover, and cook for 2 more minutes. Add the stock and scrape the bottom of the pot, then cover and bring to a boil. Reduce the heat to low, and simmer for about 25 minutes. Do not lift the lid (not matter how tempted).

The true trick to getting perfect red rice every time is to remove the cover after 25 minutes of cooking, fluff the rice with a fork, remove the bay leaves, replace lid, and let it "dry out" in a preheated 350-degree oven for 10 more minutes before serving. This ensures the rice won't be too wet or sticky. If you are adding shrimp to your rice, stir peeled and deveined shrimp in with the fluffed rice before covering and finishing in the oven.

Remove the rice from the oven and allow to rest for about 5 minutes before serving. This will allow the shrimp to steam and the rice to absorb any remaining liquid. Top with chopped parsley and serve piping hot. A crisp white wine and a view of Georgia’s Golden Isles certainly enhances the meal too!


Yum

Tuesday, April 3, 2012

Technique of the Week: Kneading

This technique is used in bread making. The dough is kneaded to develop the gluten in the flour so that it will hold its shape while rising. The dough is pummeled on a lightly floured board until it is smooth and elastic. Kneading involves a particular technique that uses the heal of the hand to pull and stretch the dough. Kneading can be quite also be quite therapeutic. Kneading can also be done in a free-standing mixer using a dough hook.

Lightly dust your hands with flour to keep the dough from sticking to you. Kneading can be messy, so you should consider wearing old clothes or an apron to prevent flour from getting all over your clothes.

Always keep a measuring cup of flour beside your work area to prevent the dough form sticking to your counter or kneading board.

Place your dough on a well-floured work surface. Grab the side of the dough furthest away from you and fold it toward yourself using your body weight to push the dough into itself. The beginning of the kneading process might require a lot of flour. Be generous to start, but try not to add more than the dough can easily incorporate, or you will throw off the flour-yeast-water-salt ratio.

Pay attention to table/counter height to avoid straining your back. Use a counter or tabletop that allows you to extend your arms to knead the dough while not making you hunch over the table.

When you knead, you will use only the heels of your hands. Push down on dough with your hand heels. Give the dough a quarter turn (90 degrees). Grab the other side and fold it in half. Again, with a lot of weight behind it, push the newly folded half into itself. Repeat this process until the dough is smooth, silky, and elastic, about ten minutes or more. Don't worry about over-kneading your dough by hand, you have to really work to break down the gluten structure.

A well-developed dough should be very smooth, with small air bubbles just below the surface. When you've finished kneading, shape the dough into a loose ball. Place the dough in an oiled bowl, turning it over to coat the surface lightly with oil, and let it rest smooth-side up. Cover the dough with a damp kitchen towel or plastic wrap to keep the surface from drying out.

Most bread recipes call for the dough to be “punched down” after it has risen to twice its size. Punching down means to lightly press the dough to express some of the gas. You don't have to fully knead the dough again between the first and second rise. The best method is to use the fingers of one hand and give the dough a few good pokes. Then replace the damp kitchen towel or plastic wrap and let rise until ready to shape and bake.


Yum
Powered by Blogger.

footer social

ShareThis