Monday, August 20, 2012

Technique of the Week: Sharpening

Sharpening is the process of creating or refining the sharp edge of a cutting implement. Sharpening is done by grinding away material on the implement with an abrasive substance to remove small mechanical deformations and imperfections.

Most culinary implements have a cutting edge which is essentially straight; knives, cleavers and scissors are good examples. The edge of a quality knife does not wear away; it folds over on itself. A knife edge is unbelievably thin; even thinner than a human hair. The impact of cutting causes the edge to fold over on itself. Pieces of the edge can even break off during food preparation. Anyone who loves to cook knows that working with dull knives is an accident waiting to happen. A sharp knife is a safe knife.

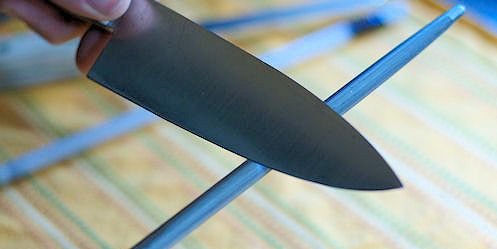
Sharpening straight edges by hand can be divided into three categories: steeling, sharpening and polishing. Edges that are still relatively straight, but need to be refined or touched up may be honed by passing the blade against a hand-held tungsten carbide knife sharpener known as a ”steel." For the record, the steel does not actually sharpen the knife’s edge. It maintains the edge by unfolding it, but the straightened edge can still be weak and quickly fold again. True sharpening removes the old weak edge and reshapes a new stronger edge.

Truly dull or misshapen edges should be sharpened with an abrasive sharpening stone, or a succession of increasingly fine stones, which shape the blade by removing material and reshaping the knife’s edge. The straightened edge is then be polished by “stropping” the edge with a fine abrasive such as jeweler’s rouge or metal polish on a piece of strong leather or canvas. If you have invested in good quality knives, you should consider having your knives professionally sharpened. It extends the life and usefulness of your favorite knives and makes them safer to use, rather than replacing them when the edges are dull or “folded.”


Yum

Friday, August 17, 2012

Japanese Knife Masters Delight

The parking lot behind The Cook’s Warehouse in Decatur was completely packed as a standing-room-only crowd of cooking enthusiasts gathered around three Japanese knife masters demonstrating the hand-forging process used to fashion steel culinary knives.

Kikuichi forging masters Yuso Tani, Akimasa Oe, and Tadashi Enami of Sakai City forged, assembled, sharpened and even engraved their handmade creations. Between them, these artisans have nearly 100 years of experience crafting knives, and each is the second generation in their families to do so.

Sakai City, known for its samurai swords for centuries, has now become Japan’s center for fine kitchen cutlery. “When I visited Sakai City, I was amazed at how the Japanese Forge Masters hand craft one of the most important tools used in the kitchen.  Their expertise and care is incredible.  Through the courtesy of J-CAN and these Japanese Forge Masters, we could see this process right in our stores at these two classes.  It was truly a once in a lifetime experience,” said Mary S. Moore, founder and CEO of The Cook’s Warehouse.

After the class sponsored by Kikuichi knives, attendees had a chance to purchase knives and have them engraved to order. They also had an opportunity to sample Japanese hors d’oeuvres such as hand-rolled sushi and daifuku (soft glutinous rice cake filled with slightly sweetened velvety adzuki bean puree,) and to taste a variety of sakes with Don Hackett, manager of TCW’s Decatur store and resident senior wine educator. Samples of Japanese Ramune sodas, Pocky, and tubes of wasabi were also offered to class attendees.

Even if you missed this informative class, you can still visit The Cook’s Warehouse to see these gorgeous handmade knives. The knowledgeable staff can help you choose just the right knife for you. They even offer knife sharpening services when your knives need a touch-up.

Oh! While you are at The Cook’s Warehouse be sure to purchase your tickets to this year’s Taste of Atlanta, the city’s premier Food+Wine+Beer+Cocktail festival on Saturday, October 6 & Sunday, October 7, 2012. With more than 80 restaurants offering samplings of everything from house-cured BBQ bacon to meatball sliders, there will be plenty of amazing bites to fill your plate. OR buy your tickets online by September 30th to receive $5.00 off by entering the promo code “TASTE”.


Yum

Tuesday, August 14, 2012

Technique of the Week: Coring

Coring is a process that removes the core or center of various fruits, such as apples, pears and pineapple; and vegetables, such as lettuce and cabbage. Coring removes small seeds or tough and fibrous centers from the food items.  While it is not dangerous to eat the core, it is unappetizing.

There are a variety of tools available to remove the core from apples and pears. Only a sharp knife is needed to core an apple in the easiest way. Just slice the apple into four quarters, and use the knife to cut out the core. Just a small V-shaped nick around the central core is all it takes. If the core runs through the slice from stem to bottom, put the slice on end or on its side and use a paring knife to cut the entire core out. Sectioning tools which both core and section the fruit at the same time are also very popular. We prefer an apple corer which slides down through the center of the fruit removing the entire core but leaving the rest of the fruit completely intact. Apples cored in this way are perfect for baking.

Baked Cored Apples:
  • 6 firm-fleshed apples (such as Rome or Arkansas Black)
  • ½ cup brown sugar
  • 1 teaspoon ground cinnamon
  • ¼ teaspoon ground nutmeg
  • ½ teaspoon ground ginger
  • ¼ teaspoon salt
  • 2 tablespoons butter, cut into teaspoon-sized pieces
  • 1 cup apple juice or water

Preheat oven to 350 degrees F. Combine brown sugar, cinnamon, nutmeg, ginger and salt in a small bowl. Set aside.

Core apples with an apple corer or by scooping out the center of each apple with a melon baller. Make sure not to puncture the bottom of the apples so that the juices will remain inside while baking; discard cores. Remove skin from ½” around top of apples at the opening.

Fill each cavity with the cinnamon-sugar mixture and top each apple with a teaspoon of butter. Place apples in casserole dish and pour apple juice or water around them to cover bottoms of apples by about ½ inch. Cover pan with aluminum foil and bake until apples are soft but not mushy; approximately 45 minutes to 1 hour. Remove from heat and serve warm, ice cream optional.


Yum

Friday, August 10, 2012

Back-in-the-Groove Rustic Apple Crostata

It is so hard to get back into a routine! Over the summer months, our schedules are completely upheaved resulting in a serious lack of blog posts. We took full advantage of the stress-free days which included sleeping late, hanging out at the pool, and then staying up late watching stupid movies. We ate loads of delicious food, enjoyed each other’s company, laughed a lot and even took lots of pictures, but the blogging muse was absent from these spontaneous family revelries. Although well intended, blog posts also went unwritten as we managed to sneak in trips to Amelia Island, Raleigh, Iowa City and Charleston where we enjoyed the local attractions (and food.)

School started incredibly early this year which necessitated earlier shopping and preparations. Then the real fun began with scheduling issues, Senior class pictures, sports practices, homework and teenage drama. Today is the last day of the first week of school: while still somewhat chaotic, we have settled into an almost what-is-normal-for-us regime. Thus blog posts should return to their regularly scheduled writing.

When cleaning out the refrigerator this morning (to make room for homemade lunch staples), I happened upon several Granny-smith apples originally purchased to make salad with butter lettuce, blue cheese and pecans. A free-form apple pie (or crostata in the Italian vernacular) prepared by folding the edges of the dough over the top giving it a more "rough" look may be just the thing to complete a first-week-of-school Friday night dinner. Topped with the pecans and blue cheese crumbles, the torta could even be elevated to Saturday date-night status.

  • 1 ½ cups all-purpose flour (plus a bit for flouring your work surface)
  • 1 ½ tablespoons sugar
  • Pinch of salt
  • 1 ½ sticks (6 ounces) very cold unsalted butter, cut into ¼-inch pieces
  • 2 tablespoons ice cold vodka
  • Ice water
  • 3-4 tart, firm apples, peeled, cored and cut into ¼-inch-thick slices
  • 2 tablespoons sugar
  • 2 tablespoons butter, melted
  • Freshly grated cinnamon and nutmeg

Preheat oven to 400˚F. Combine the flour, sugar and salt and then add the chopped, cold butter; the colder the better. Work it with a pastry cutter or 2 knives until all the butter is chopped up into pea sized bits and even distributed throughout the flour mixture. You can use your hands if you wish, but don’t over handle as it will begin to melt the butter. (I have very warm hands and thus use utensils because you really want to avoid melting the butter into the flour as your crust will be chewing instead of flaky and crispy.) Allowing the butter to remain in pieces rather than being fully incorporated into the flour forms air pockets which make for a flaky crust.

Add the cold vodka and mix gently. Vodka in pastry is for crispiness. The biggest factor in creating a crispy crust is drying the dough to, well, a crisp and vodka evaporates quickly; more quickly than water.

Next add ice water in small increments until the dough pulls together into a loose ball. The four should not look at all sticky; just moist. Once it comes together, put it in the refrigerator for at least ½ hour (or more – the longer the better.)

While the dough is cooling, peel, core and slice your apples into ¼-inch slices. Then retrieve your dough and gently roll it out into about a ¼-inch disk. Transfer the rolled dough onto a greased baking pan.

Starting in the center, arrange half the sliced apples in concentric circles on the crust and sprinkle with one tablespoon of sugar. Layer the other half of apples over the first layer and sprinkle with another tablespoon sugar (or two depending on the sweetness of your apples.) Pour the 2 tablespoons of melted butter over the apples and lightly dust the top with cinnamon.

Fold the edges of the pastry over the apples, leaving the middle exposed. Cook at 400˚F for about 45 minutes, or until the crust is golden and the apples are soft and cooked through.  Serve hot, warm or cold with your favorite topping (or not).


Yum

Tuesday, August 7, 2012

Technique of the Week: Grating

In culinary terms, grating is the process of transforming solid, firm food items into small pieces by rubbing the item against a grater. A grater is a hand held metal device that contains numerous raised slots of varying sizes that cut ingredients into small pieces. While applying a bit of pressure, food is scraped along the sharp serrated edges of the grating instrument. This very useful kitchen utensil was invented by François Boullier in the 1540s and is still an essential cooking tool to this day.

There are a dizzying amount of choices of graters available. The basic grater is a flat piece of metal with notches cut in its face and it is the size of the notch that determines the size of the grated threads. Several types of graters feature different sizes of grating slots, and can therefore aid in the preparation of a variety of foods. The standard 4-sided box-grater is commonly used to grate a variety of ingredients like cheese and lemon or orange peel (also known as zesting), and in tropical areas, graters are used to grate coconut meat.

Choose a grate size (the size of the hole in the grater) that works best with the ingredient you will be grating. Smaller grates work well for harder cheeses like Parmesan, and Romano; coarser grates work best with slightly softer cheeses like Cheddar and Jack, vegetables or even chocolate. To reduce the amount of food that sticks to the grater, give the grater a quick spray of oil just prior to grating. Softer cheeses should also be chilled prior to grating to make the process easier.

A food processor fitted with a grating attachment may also be used to grate foods and may be preferred for food items that are difficult to grate on a manual grater or if you need to grate a large quantity of ingredients.

Yum

Friday, August 3, 2012

Glut-No-More Zucchini Bread

Planting sixteen zucchini plants seemed like a good idea at the time… We love having fresh squash blossoms in the early summer, but as the season wears on the proliferation of zucchini squash is truly daunting. For several weeks, we had more zucchini than we could even store in the refrigerator (and we have two of them.)

While there is nothing better than fresh squash simply sautéed with garlic and a little crushed red pepper, we would have to eat it for breakfast, lunch and dinner not to waste any. When searching the internet for new recipes, there seems to be a common thread: all the recipes are meant to deal with a glut of the inexhaustible vegetable.

Since the guys are quite fond of banana bread for breakfast, I thought I should try some zucchini bread. Served toasted with cream cheese; glut no more!

  • 2 cups fresh zucchini squash, grated
  • 3 eggs
  • 1 cup vegetable oil
  • 1 ¾ cups sugar
  • 2 teaspoons vanilla extract
  • 3 cups all-purpose flour
  • 3 teaspoons cinnamon
  • ½ teaspoon nutmeg
  • 1 teaspoon salt
  • 1 teaspoon baking soda
  • ½ teaspoon baking powder
  • ½ cup chopped walnuts or pecans (optional)
  • 1 cup dried cranberries, raisins or chocolate chips or any combination (optional)

Grate the zucchini with a hand grater, and allow to sit over the sink in a strainer to drain access water before use.

Preheat oven to 350°F. Grease and flour two 8×4 inch loaf pans, liberally. Alternately, line 24 muffin cups with paper liners.

In a large bowl, beat the eggs with a whisk. Mix in oil and sugar, then zucchini and vanilla. Combine flour, cinnamon, nutmeg, baking soda, baking powder and salt. Stir dry ingredients into the egg mixture, then add nuts, chocolate chips and/or dried fruit, if using.

Divide the batter into prepared pans. Bake loaves for 50-60 minutes, or until a tester inserted into the center comes out clean. Muffins will bake far more quickly, approximately 20 to 25 minutes. Based on my experience, the loaves and muffins will come out of the pan more easily once allowed to cool completely.


Yum
Powered by Blogger.

footer social

ShareThis