Wednesday, June 27, 2012

Hydrating Agua Fresca

We have all heard the old admonition to drink at least eight glasses of water every day, but few people actually do so. In the summer months, the hot weather serves as a reminder to re-hydrate  but in cooler weather or air-conditioned climates, we don’t feel as thirsty. Because of this, many people can become mildly dehydrated without not even realizing it.

While mild dehydration is not a serious health issue, it can make your daily life a little bit harder. One of the first signs of dehydration is thirst. Unfortunately, your body`s signals for thirst are so similar to its signals for hunger that some people can`t tell the difference. If you are trying to drop a few pounds and they just won`t budge, try drinking at least eight tall glasses of water every day. This will not only quiet false hunger pangs, but staying hydrated also helps to keep your metabolism working properly so that you burn calories more efficiently.

Another sign of mild dehydration is dull skin and hair. All of the exfoliating and moisturizing in the world will not help your skin tone if the cells are not renewing themselves the way they should. Water helps your blood flow more freely, which supports the elasticity and firmness of your skin, giving you a youthful, healthy glow that cannot be duplicated by anything you put on the outside of your skin.

Water also carries nutrients and oxygen through your blood to your organs and to your brain. So, staying well hydrated can improve your mood and help enhance your concentration. Water helps to lubricate your joints, making exercise more efficient and your recovery time a little quicker. Water carries away toxins and waste, which is important for keeping you healthy. The water in your body also helps to regulate your temperature, through your perspiration, which means that it needs to be replaced.

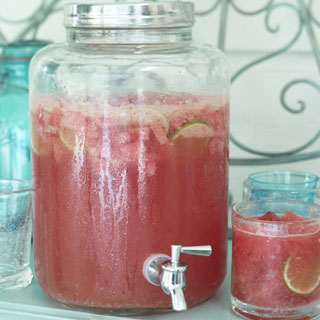
But, not everyone enjoys the taste or lack of taste that plain water has. In many parts of Central and South America the drink of choice is agua fresca. The literal translation is "fresh water", but a true agua fresca is a mixture of water, sugar, fruit, seeds and sometimes rice, oatmeal or other cereals. The simplest way to make agua fresca at home is to choose a fruit such as cantaloupe, pineapple, berries or citrus fruit. Wash the fruit and peel it if necessary. Cut it into chunks, toss them into the blender and whirl until smooth. Strain out the pulp so that you have a clear liquid. Mix your liquid with about twice as much water and 2 to 4 tablespoons of sugar. Serve in a tall glass over ice. Add crushed mint or a cinnamon stick for a little extra spice. A less common, but no less delicious, agua fresca made of cucumbers, lime and mint is a favorite among spa goers in California.

If you are not fond of the tap water in your area and do not want to contribute to the masses of plastic water bottles piling up in landfills, consider purchasing water in refillable containers from an Earth Fare Market close to you.


Yum

Friday, June 22, 2012

Midsummer Nights' Zucchini Fries

The subtle flavor and creamy white flesh of summer squash is a perfect addition to any warm weather meal especially on the longest day of the year. Summer squashes which include zucchini come in many different varieties each with a distinct shape, color, size and flavor. Regardless of variety, all parts of summer squash are edible, including the flesh, seeds, skin and even their flowers.

Recent research studies have underscored just how fantastically healthy summer squash is. While it may not be as rich in the more widely-publicized antioxidants like beta-carotene, summer squashes are a very strong source of other key antioxidant nutrients including the carotenoids lutein and zeaxanthin. Since the outer skin of the squash is particularly antioxidant-rich, it's worth leaving the skin intact.

Summer squashes are considered to be starchy vegetables, but while about 45-50% of the total calories in squashes come from starch-like polysaccharides, the unique polysaccharide composition in summer squash has been linked in studies to protection against diabetes and better regulation of insulin.

Another benefit of summer squash is how easy they are to grow and how singularly productive their plants can be. And, what better way to celebrate the Summer Solstice (from the Latin for sun [sol] and standing still [sistere]) than with the delicious “fruits” (yes, technically they are vegetables) of Summer.


Zucchini Frite
  • 1 medium zucchini, trimmed
  • 1/2 teaspoon salt
  • 1/4 cup olive oil
  • 1 tablespoon all-purpose flour
  • 2 tablespoons cornstarch

Wash the squash before cutting. Trim the ends and halve the zucchini lengthwise, then cut into 1/8-inch-wide slices and cut slices lengthwise into 1/8-inch-thick strips. Degorge the squash by tossing with salt in a large medium-mesh sieve set over a bowl and allow to drain for 30 minutes. Rinse well and dry the squash strips thoroughly.

Heat olive oil in a heavy skillet. Mix flour and cornstarch together in a mixing bowl and toss zucchini to coat. Add coated squash to the heated oil and fry, turning occasionally with a slotted spoon, until zucchini is golden brown, 5 to 6 minutes. Transfer the zucchini fries to paper towels to drain. Sprinkle with salt and serve immediately.


Yum

Tuesday, June 19, 2012

Technique of the Week: Grilling

A well-made fire is the essential first step in the technique of grilling. The right fire makes barbecuing smooth and simple. The temperature of the fire needed depends on the type of meat you are going to cook. For cuts of meat such as steaks, burgers, and kabobs which you intend to cook rapidly, use a relatively hot fire. A moderate fire is fine for roasts and larger pieces of meat. For slower cooking cuts of meat such as pork chops and spareribs, use a slow fire.

Charcoal comes in two forms: lump charcoal and briquets. Lump charcoal is in odd-sized pieces just as they come from the charcoal kiln. It is less uniform in burning quality and more difficult to handle. Briquets are ground, lump charcoal pressed into uniform blocks. They are easier to use, burn evenly, and produce a more uniform heat. They are easier to control and burn longer than lump charcoal.

Pile the charcoal in a pyramid on the firebox of the grill. You don't need much charcoal. Beginner chefs are often too ambitious, build too big a fire. After you've built several barbecue fires, you'll be able to gauge the amount easily. Add liquid lighter to charcoal; wait a minute, then light. Do not use gasoline or kerosene. Let charcoal burn for 15 to 20 minutes until the briquets are about two-thirds covered with gray-ash. Spread the briquets evenly throughout the grill. The bed of coals should be shallow (easy to control) and just a little larger than the area of food you are cooking.

The fastest way to get a bed of cooking coals (about 15 minutes) is with an electric fire starter. Most other methods of fire starting take approximately 45 minutes. A chimney is another secret for fast take off. Make your own from a tall juice can or a 2-pound coffee can. Remove ends from can. Using tin snips, cut out triangles or circles around bottom, 1 inch apart, to allow draft. Or punch triangular holes with a church-key bottle opener and bend down for legs. (While the bottle opener is out, be sure to use it to open an icy cold beverage for Dad while he labors over the hot flames.)

Place a wad of newspaper in the base of the chimney, add 6 to 8 charcoal briquets, and then light the paper from the bottom of the chimney. When the briquets are burning, add more to the top. Allow to burn about 15 minutes, and then lift off chimney (with tongs!) and rake coals where you want them.

Don't start to cook until the fire dies down to glowing coals. Coals are ready for cooking when they look ash-gray by day, and have a red glow after dark. No flames! Don't start cooking too soon. When coals are hot, tap off the gray ash with fire tongs; ashes on the briquets insulate and retard the heat.

An easy way to tell the heat of the fire is to hold your hand over the coals at the height the food will be for cooking. Begin counting "one thousand one, one thousand two", and so on. The number of seconds you can comfortably hold your hand over the fire will tell you how hot the fire is. If you can count to "one thousand two," you have a relatively hot fire; "one thousand three" or "one thousand four" is about a moderate fire, and "one thousand five" or "one thousand six" is a slow fire.

If you are cooking a large piece of meat that requires a long cooking time, plan to replenish the coals from time to time. Add a little extra charcoal around the edges after your fire is ready for cooking. Don't top your cooking fire with cold coals; this will lower the temperature more than you think. To increase heat, add warm coals from the reserve around the fire's edge.

To slow down the fire, move hot coals out to make a larger oval; to increase heat, move hot coals in to make narrower oval. This technique helps maintain the even cooking. Fire is ready only when flames die down. In broad daylight, the coals will look ash-gray and after dark, they'll have a red glow (they burn from outside in).

If drippings do flare up during cooking, sprinkle the fire lightly with water to quench the blaze. Keep handy a clothes sprinkler filled with water close by. Use only enough water to do the trick; don't soak the coals. It will take some time for very wet coals to dry out and begin to burn again. It will also reduce the intensity of the heat of the fire.
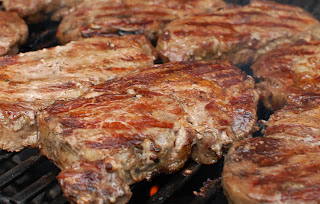
Orders for "rare" go on the grill last. When you see little bubbles on top surface of the steaks, they are ready to turn (heat forces the juices to the uncooked surface). Flip steaks with tongs and a spatula; piercing with a fork wastes good meat juices. Cook the second side a few minutes less than the first since the second side has a head start on heating. Turn only once. For 1-inch steaks cooked medium-rare, allow 13 to 15 minutes total grilling time. It is always a good idea to use a meat thermometer when grilling. Insert thermometer so tip is in center of meat. Tip must not touch bone, fat, or the metal spit.


For charred crusty coat, try this: Sear one side by lowering grill top close to coals for 2 to 3 minutes, then raise grill to finish same side. Turn steak, and sear second side; again raise the grill and complete the cooking.

Wait until you turn the meat to salt it. Salt and pepper the browned side and then season the other side as you take it off the grill. If you salt uncooked meat, the juices will be drawn out and you'll lose good flavor. It is also important to let any grilled meat rest for at least 5 minutes before serving to allow the juices to retreat, otherwise all the flavor drains out of the meat when it is cut.

Yum

Friday, June 15, 2012

Minted Eggplant Insalata

Eggplant appears in some form or fashion on almost every antipasti table throughout Italy. Eggplants are members of the nightshade family of plants and are closely related to tomatoes and potatoes. The fruit is botanically classified as a berry and contains numerous small, soft seeds which are edible, but have a bitter taste because they contain nicotinoid alkaloids which is not surprising given its close relation to tobacco.

Native to India, the eggplant made its first appearance in Italy via Sicily and the southern regions. Easy to grow and abundant, eggplant is very versatile when used in cooking. The raw fruit which can be a tad bitter, but becomes tender when cooked and develops a rich, complex flavor. The fruit is capable of absorbing large amounts of fats and sauces, making it a good ingredient for very rich dishes. The combination of flavors in this particular variation is incredible and makes a fabulous addition to an antipasti table or can be served as a delicate Summer salad.

  • 1 medium eggplant, ¼-thick slices, degorged
  • ¾ cup olive oil
  • 1 fresh chili pepper, seeded and chopped (optional)
  • 3 garlic cloves, minced
  • 1 tablespoon capers, drained, rinsed and chopped
  • 10 fresh mint leaves, torn
  • Salt and pepper to taste

Heat a heavy skillet over high heat. Ensure that the eggplant has been patted dry and brush lightly with olive oil. Add the eggplant slices to the skillet in batches and cook over high heat until golden brown on both sides. Remove to a paper towel and let drain until cool.

Combine the chili peppers, garlic, capers and mint in a bowl and season with salt and pepper. Layer eggplant slices on a serving platter and drizzle with a tablespoon of mint dressing and continue making layers until all the ingredients are used.

Sprinkle the remaining olive oil over the top and let the eggplant marinate in a cool place for at least six hours.

Yum

Tuesday, June 12, 2012

Technique of the Week: Degorging

Degorging is a the process of drawing moisture from vegetables before cooking. It is a method used to soften vegetables and to reduce the amount of fat absorbed during cooking. This technique is most often used in preparing eggplant for cooking to remove the bitterness (and a buildup of toxins which can cause stomach upset.) However, the term can also refer to the practice of adding cornmeal to the soaking water of crustaceans to force them to eliminate the sand in their shells.


To degorge vegetables, cut the vegetable into skinned slices or cubes, then sprinkle salt directly onto the vegetable or soak in heavily salted water, and allow them to “sweat” for at least 30 minutes. The eggplant will give off a brownish liquid. Before cooking rinse the vegetables thoroughly. Due to its spongy texture eggplant can actually be gently squeezed to rinse and remove excess water. Drying the eggplant is also a good idea; we lay the slices on a towel and roll them up to extract rinse water.


Yum

Thursday, June 7, 2012

Antipasti 101: Simple Summer Dinners

Antipasti (plural for antipasto) literally means "before the meal" which is contrary to the common belief that it means “not pasta.” The term and tradition dates back to medieval times in Italy, when diners used to mingle over finger foods, both sweet and savory, before sitting down to eat. Much like French hors d'oeuvres or Spanish tapas, antipasti are a beloved combination of small bites of tasty food, usually accompanied by wine and meant to stimulate the appetite before digging into the main meal.

Early recipes included everything from clotted cream to spiced ham. Modern day antipasto offerings are more often simple, colorful plates of marinated vegetables, salty olives, rich cheeses, thinly sliced cured meats served with slices of rustic artisanal breads.

During the hot days of June and July, there are many evenings when a full meal seems too heavy and indigestible to consume. On those nights, a small selection of antipasti makes the perfect dinner fare. With antipasto, it’s always best to keep things simple. Narrow your choices down to one or two cooked items, then incorporate a few fresh, seasonal fruits and vegetables and you’re set.

Try these simple ideas on for size:


Yum

Monday, June 4, 2012

Low Country Shrimp Salad

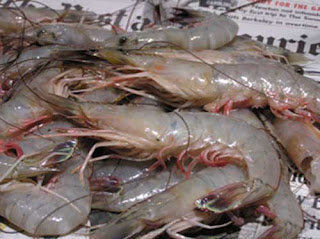
Without a doubt shrimp are probably the most popular and valuable of all seafood. Most people think of shrimp as the pinkish-hued crescents served as a cocktail with horseradish-infused ketchup. However, there is tremendous variation among species. According to local sources the finest shrimp are whitish and come up from South America, North Carolina, the Gulf of Mexico and Texas.

It's easy to be passionate about these “Low-Country” shrimp. They are considered to be more consistent in quality and flavor. When cooked properly, they are sweet, tender and have the fresh aroma of the sea, with no "fishy" taste or smell. Those who have never eaten wild-caught fresh shrimp before are stunned when they eat them.

Shrimp are born in the ocean and are invisible to the naked eye. They ride on top of the waves, inexorably pulled inland to our local marshes, inlets and tidal creeks where they sink to the bottom to feed and grow until they ride out to the ocean again to breed. As they grow, they develop the flavor of the food they eat, the depth of where they live, and the water itself.

When buying “fresh” shrimp always shop at a reliable market and be sure they are firm in texture and smell fresh (don’t be afraid to put your nose to it.) Shrimp are frequently frozen at the source and carefully defrosted for retail. The amount and size you buy depends on how they are to be used. Shrimp are classified by size; the categories are 12 to 15 per pound for jumbos, 16 to 20 per pound for extra-large, 20 to 24 per pound for large, 25 to 32 for small and so on. About 2 pounds of uncooked shrimp will yield slightly more than a pound cooked after shelling and deveining.

This succulent salad which highlights the flavor of local shrimp, is creamy in texture with crunchy bits of celery and corn, and a nice kick is the ideal way to repurpose leftovers from a Lowcountry boil (even the potatoes and sausage could be added.) Served on a croissant or rolled in lettuce leaves, it makes a mouth-watering quick lunch or light supper.

  • 2 cups medium shrimp, cooked, peeled and deveined
  • ½ cup mayonnaise
  • ½ cup celery, chopped
  • ½ cup corn, cut from cob
  • 1 small onion, chopped
  • 1 teaspoon Old Bay® Seasoning
  • 1 tablespoon lemon juice
  • Hot sauce to taste (optional)

If you are not using leftovers, you will need to cook the shrimp: In a medium saucepan, bring 1 cup water to boil. Add unpeeled shrimp. Cover. Cook about 5 minutes or until shrimp are pink. Drain and allow to cool shrimp, then remove shells, devein and coarsely chop.

Combine all the ingredients, except the shrimp, in a mixing bowl. Add shrimp and toss to coat, then cover bowl. Refrigerate salad for 30 minutes or until ready to serve. Serve on a croissant with lettuce and sliced tomato for lunch time flawlessness!


Yum
Powered by Blogger.

footer social

ShareThis