Monday, September 30, 2013

Marcella-Inspired Ribollita (Tuscan Soup)

Italians are legendary for being able to feed hoards of family and friends having spent little or no money. Frugal homemakers grow their own tomatoes and peppers, gather mushrooms and arugula growing along roadsides, and prepare cuts of meat (offal) that in other cultures would be discarded. Italians are also masters of making two or even three meals from one. In fact, we are often surprised at how many dishes in Italian cuisine are made with leftovers.

Take for example arancini; a specialty made with leftover risotto filled with cheese and then deep fried. Not to mention the thousands of recipes that call for stale bread: mollica, panzarella, and Marcella Hazan’s favorite, ribollita. Hazan, the queen mother of Italian cooking in America, was quoted as saying, “I’d be loathed to order pasta in a Tuscan trattoria when a ribollita or any soup with beans or ‘kale’ is on the menu.” Ribollita is a hearty vegetarian stew made with leftover beans, greens, broth and is fortified with the addition of other vegetables such as potatoes, carrots and celery. This is one of Tuscany's most revered dishes. Freshly made, this is a hearty, brothy soup, but when reheated the next day, it becomes a deeply flavorful, porridge-like stew.

What better way to celebrate the life of the famous Italian cook than by using the leftovers from a Saturday antipasti supper which consisted of greens, Tuscan white beans, grilled sausage, Caprese salad and a fresh loaf of ciabiatta to make a meatless- Monday dinner. On Thursday, it doubles back as antipasti again served on crostini.

  • ¼ cup extra-virgin olive oil
  • 1 medium yellow onion, peeled and chopped
  • 1 carrot, peeled and chopped
  • 2 ribs celery, trimmed and chopped
  • 1 large russet potato, peeled and diced
  • ½ cup chopped canned Italian plum tomatoes
  • 1½ cup greens (kale, collards, chard, cabbage), cooked
  • 2 cups vegetable (or chicken) broth
  • 1-2 sprigs of fresh herbs (rosemary, sage, oregano, etc.)
  • 1 bay leaf
  • 1 ½ - 2 cups of Tuscan white beans, cooked
  • 2 thick slices day-old country white bread, cubed
  • Salt and freshly ground black pepper

Heat 2 tablespoons of the oil in an earthenware casserole over medium-low heat. Add onions, and cook until soft, about 20 minutes. Add carrots, celery, potatoes stirring until mixed. If you are using fresh greens, you will need about 3 cups rinsed and chopped greens since they shrink incredibly. Add them to the vegetable mixture and toss to coat with oil. You may need to add the greens in batches until they all fit in the pan. Next add the tomatoes, cover the pot, and cook until the greens are completely wilted, about 20 minutes.

Add the stock, bay leaf and herb,s and then simmer with the lid on until all the vegetables are soft, about 1 hour. Add the cooked beans and cubed bread stirring gently and cover. Return the soup to a simmer, and cook until bread begins to soften, about 10 more minutes. Season the soup to taste with salt and pepper, and serve with a drizzle of olive oil. Remove the bay leaf and refrigerate any leftover soup.

The next day, preheat oven to 375ºF and heat the leftover soup in the casserole in the oven, uncovered, stirring occasionally, until heated through, about 1 hour. For the last 30 minutes, do not stir; let soup brown lightly. Drizzle with another ¼ cup oil, and serve topped with a sprinkling of grated Parmesan cheese.

If preferred, you can use the cold leftover stew as a bruschetta topping served atop crusty, toasted bread with a smattering of cheese or Denise's peppers.

As you might imagine, this is not exact recipe and varies with each batch that you make. It is also contingent on how much you have in the way of leftovers in the beginning. We have even on occasion used leftover rice in place of bread. You can add or subtract, reduce or increase any of the ingredients to your taste.


Yum

Friday, September 20, 2013

The Pulled Pork Definitive

Home cooks seeking flavorful meals that require minimal effort and time in the kitchen should look no further than pulled pork, the ultimate meal solution. Pulled pork has seen a recent surge in popularity, as home cooks and chefs alike discover new ways to prepare and serve this savory favorite. It's not just the flavors that make a dish, but the layering of textures. We love pulled pork because of the contrast between the crispy exterior and the succulent, almost-melting inside.

We start with a pork butt which is a cheap, but flavorful cut with a good amount of fat that renders out during cooking and bastes the meat adding to its caramelized crust. The pork shoulder is the entire front leg and shoulder of a hog. In your grocery store you will usually find this divided into two cuts, the Boston butt and the picnic ham. Contrary to what most of us believe, the butt comes from the upper part of the front shoulder. While a picnic ham is a good option, a Boston Butt is easier to work with, uniform in shape, and contains the right ratio of fat to lean. You should look for a Boston Butt that is rectangular in shape with a layer of fat on one side. The color should be a rich pink to purple and the meat firm to the touch. The key is to start with a cut that has ample marbling and connective tissue so it softens as it slowly cooks, becoming so tender that it easily pulls apart.

Once you have selected your meat, trim off any loose fat and skin. These won't aid the pork much and will tend to just get in the way. With the meat ready, apply a rub to flavor the meat while it smokes and help it produce a crusty surface called “bark.” A typical pork rub will have sugar, salt, pepper (any combination of black, white, or red), and herbs. Work the rub deep into the meat and let it sit on the meat for about an hour to sink into the meat and form a moist paste on the surface. Now you're ready to smoke.

Fill a smoker or kettle grill with charcoal and light.* When the coals are mostly white, spread them out with tongs. Spread ½ cup of the wood chips over the coals (use 1 cup for a kettle grill). The smoke of pulled pork is provided by hickory and/or oak. While you can use any mild wood these are the traditional woods. You will want an even temperature around 225°F. You should try to keep the smoker temperature below 265°F no matter what.  If the temperature is too high, it will make the meat tough. You want to smoke your pork roasts for about 1 to 1½ hours per pound. This means you will be cooking your pork for a long time; low and slow.

Place the pork fat-side down on a rack (over the water pan if possible) in the smoker or on the grill, cover and cook, rotating the pork every hour or so. Add additional coals and water as needed to maintain the temperature and moisture in the smoker. We do not add wood after the first 2 hours of smoking because we think too much smoke gives the meat a bitter taste. You can remove the pork from the heat once it reaches an internal temperature of 165°F, but it won't be ready. You will want to continue cooking at a temperature around 190°F until you can easily shred the meat with a fork. [Of course, if you have trouble maintaining a grill for this long you can use alternative cooking methods after a few hours. Wrap the pork tightly in foil and place it in your oven at 225°F until it is finished.]

When done, remove the meat from the grill and wrap completely with foil. Let stand for 20-30 minutes to redistribute the juices and cool enough to handle. Transfer the pork to a rimmed baking sheet (you'll want to catch all the flavorful juices) and shred by inserting two forks into a chunk of meat and pull in opposite directions to get long, thin shreds. Repeat with remaining meat. Pile the shredded pieces on a platter and pour any juices from the baking sheet on top.

Now the fun begins! You can use this juicy meat in any manner of dishes from traditional pulled pork sandwiches to smoky pork tacos. Try some pulled pork in a spicy Cuban-style wrap or stacked on a salad with grilled peaches and torn fresh mozzarella. The possibilities are endlessly delicious!

*If using a gas grill, preheat to high on one side; put soaked wood chips in a smoker box. Once smoking, reduce the heat to maintain a temperature of about 250°F and cook the pork, covered, on the cooler side of the grill.


Yum

Saturday, September 14, 2013

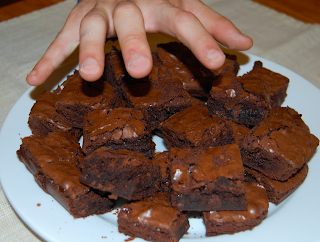
Brownies: Historically Delightful

A chocolate brownie is a flat, baked square or bar developed in the United States at the end of the 19th century. The brownie is a cross between a cake and a cookie in texture. Brownies come in a variety of forms. They can be either fudgy or cakey, depending on their density and they may include nuts, chocolate chips, or can be frosted. Brownies are a common lunchbox addition and are popular in restaurants, where they can be found on many dessert menus served warm with ice cream (à la mode), topped with whipped cream or sprinkled with powdered sugar. The earliest published recipes for both cakey- and fudgy-style chocolate brownies have been traced to The Boston Cooking-School Cook Book, edited by Fannie Merritt Farmer in the late 1890s.

Nineteenth century changes in chocolate form, taste and availability encouraged experimentation in cooking and baking. Boston-based chocolatier Walter M. Lowney debuted the first American-made chocolate bars at the Columbian Exposition held in Chicago, Illinois, in 1893. Many culinary historians believe that it was also at the Columbian Exposition that brownie was introduced. As the story goes, wealthy socialite Bertha Potter Palmer asked her chef to create a dessert that could be tucked into a box lunch for ladies to eat while attending the Columbian Exposition.The resulting treat was a super-rich, fudgy-chocolate confection topped with walnuts and an apricot glaze that was the predecessor to the modern-day brownie.

Regardless of their origin, it is clear where brownies are going… into the mouths of three of their biggest fans. A full batch of brownies rarely lasts a full day in the Romeo house! While I no longer need to refer to this recipe, we are sharing our family’s version is hopes it will become a favorite in your house.

  • 1/2 cup (1 stick) butter, melted 
  • 1 cup sugar 
  • 1 teaspoon vanilla extract 
  • 2 eggs 
  • 1/2 cup all-purpose flour 
  • 1/3 cup cocoa powder
  • 1/4 teaspoon baking powder 
  • 1/4 teaspoon salt 
  • 1/2 cup chopped nuts (optional) 
  • 1/2 cup chocolate morsels (optional)

Pre-heat oven to 350°F. Grease 9-inch square baking pan. Using an electric mixer, cream together butter (or margarine), sugar and vanilla in bowl. Add eggs and beat well. Mix dry ingredients of flour, cocoa, baking powder and salt together and gradually add to egg mixture, beating until well blended.

Stir in nuts and morsels, as desired. Spread batter evenly into a greased baking pan.  Bake 20 to 25 minutes or until brownies begin to pull away from sides of pan.

They are done when a toothpick pricked into the center comes out clean with no batter. Cool completely in the pan on a wire rack. Cut into squares small or large and watch them disappear!


Yum

Wednesday, September 11, 2013

Chicken Paillard in Creamy Mustard Sauce

Chicken Paillard is a classic dish of boneless chicken breasts that have been thinned out using a mallet, rolling pin or merely “butterflied.” The mallet breaks down the fibers in the meat, making it more tender, while the thinner cutlets cooks faster with less loss of moisture. This recipe uses a creamy mustard sauce which complements the flavor of the tenderized chicken perfectly. It goes well with any number of fresh sides like a crisp salad, steamed vegetables or baby new potatoes.

  • 2 chicken breasts, pounded to ¼’ thick
  • 1 tablespoon butter
  • 1 tablespoon olive oil
  • ¼ cup white wine
  • 1 tablespoon whole grain mustard
  • 2/3 cup chicken stock
  • 1/3 cup heavy cream
  • Salt and pepper to taste

Place the chicken breasts between 2 sheets of waxed paper or plastic wrap and hit with glancing blows, working from the center to the edge using a meat mallet or a rolling pin to flatten the cutlets to ¼” thickness.

In a large sauté pan over medium-high heat, melt the butter with the olive oil until almost smoking. Add the chicken and cook, turning once, until golden brown and cooked through, about 4 minutes per side; add more butter and oil to the pan if needed. Transfer the chicken to a warmed plate and cover loosely with aluminum foil.

Reduce the heat to medium and add the wine and deglaze the pan stirring to scrape up the browned bits.  Add stock and mustard and cook until the sauce begins to thicken, 3 to 5 minutes. Stir in the cream and season with salt and pepper and cook until smooth with the consistency of thick gravy.

Add the chicken back to the pan and fully coat the cutlets with sauce. Serve the chicken with additional sauce poured over the top as desired. The sauce is delicious ladled over a side of potatoes as well.


Yum

Friday, September 6, 2013

Harmonious Jalapeno Basil Coleslaw

When it comes to food, people have very definitive opinions about how certain dishes should be prepared; the most controversial among these are pizza, barbecued ribs, potato salad and cole slaw. With the latter, it seems there is even disagreement about the origin of its name. While some historian believe  the name comes from the Dutch kool sla for "cabbage salad," others contend that it is derived from kohl schlagl which is German for “cabbage chopped.”

For the purposes of this discussion, we shall define cole slaw (or coleslaw) to mean chopped or shredded cabbage covered in a dressing that includes at least a splash of vinegar. This is apparently where the friction begins. It seems that slaw purists add only dressing or mayonnaise (which technically is a dressing that contains vinegar), while others are adamant that carrots, raisins, pickles, relish, pineapple and even cheese be included.

Now to my way of thinking, celery seed is the greatest abomination to ever grace a spice cabinet not to mention a bowl of coleslaw, yet Dom is a fan - thus a minor example of the discord that slaw can cause. You all may also recall that Dom is NOT a fan of mayonnaise: this recipe is our matrimonial compromise. It is spicy and full of fresh herbal flavor (with no mayonnaise or celery seeds!)

  • 1 lb. (about 4 cups) red and/or white cabbage, shaved
  • 1/2 red onion, shaved very thin
  • 1-3 carrots, grated
  • 2 fresh jalapenos, seeded and sliced very tin
  • 1/2 cup cilantro leaves, chopped

  • Vinaigrette:

  • 1 cup loosely-packed basil leaves
  • 1 shallot, chopped
  • 2 garlic cloves, pan toasted to
  • 1/2 cup olive oil
  • 2 teaspoons honey
  • 1/4 cup Champagne vinegar
  • 1 teaspoon salt (or to taste)
  • 1/4 teaspoon black pepper (or to taste)

In a large bowl, place cabbage, carrot, jalapenos, and cilantro leaves. If the red onion is too sharp, rinse in cold water before adding to the cabbage mixture. Chill until ready to serve.

In a blender or food processor, place basil, shallot, toasted garlic, and oil. Blend until smooth. Add honey, vinegar, salt, and pepper and pulse to fully combine. Pour over slaw at least 5 minutes before serving. The slaw takes on a different texture (almost like kimchi) when it marinades in the dressing, in some cases we like it better this way. This gluten-free slaw is awesome served alone or with barbecued ribs, on pulled pork sandwiches, and in fish tacos!


Yum
Powered by Blogger.

footer social

ShareThis