Saturday, April 30, 2011

Pucker Up! Japanese Excotic Juices are Here

We are always looking for new ingredients and recipes. We try to use the best and freshest ingredients available and we enjoy experimenting with new elements. On several occasions, Marx Foods has given us the opportunity to dabble in new tastes and flavors. Most recently we received a Japanese Juice Sampler with 12-ounce bottles of Yuzu, Sudachi & Kabosu juices. These juices are all natural, not from concentrate and  pasteurized. These juices come from acid wild citrus types (called "Papedas") growing in the monsoon region and parts of Japan and China. Papedas belong to the most primitive known types of citrus plants.

As with most of our culinary adventures, all four of us participated in the sampling of the exotic Japanese juices. We started with the Yuzu juice. We expected it to be tart, but “Yowza!” After the initial shock, we conferred and decided that the Yuzu juice most resembled grapefruit juice with a hint of kumquat. There was a definite coniferous flavor as well; similar to that of juniper berries.

Next, we tried the Sudachi juice. This juice was also “pucker-city” as one teenager interjected. This juice is very astringent with lemon and orange notes, and had a more medicinal and elemental flavor. This juice would be best used in a marinade or a savory sauce instead of a drinking juice. We could definitely see using this in a ceviche recipe.

At last we tried the Kabosu juice. Before tasting it, I recognized a smell from my youth “orange-flavored baby aspirin.” (Of course, aspirin is no longer recommended for children due to its connection to Reyes Syndrome.) It was the strongest and sharpest flavor of the three juices by far, with a limey flavor, good mouth-feel and a surprisingly pleasant after taste; very herbal and lavender-like. We all agreed that of the three juices, this was the overall favorite.

While several web sites refer to using exotic Japanese juices in drinks, but very few actual cocktails recipes. These are a few we came up with (without the help of our teenage sons!)

Kabosu Seabreeze
1 1/2 oz. premium Vodka
4 oz. cranberry juice
1 oz. Kabuso juice

Mix all ingredients together in a cocktail shaker, shake well and pour into an ice-filled highball glass.

Sudachi Margarita
1 1/2 oz. premium Tequila
1/2 oz. premium Triple Sec
1 oz. Sudachi juice
2-3 oz. ice

Mix all ingredients together in a blender and mix until smooth. Pour into a salt-rimmed, ice-filled margarita glass.

Yuzu Martini
2 1/2 oz. premium Vodka
1/2 oz. Sweet Vermouth
1/2 oz. Yuzu juice
1 teaspoon sugar (optional)
1 twist of lemon peel

Into a cocktail shaker, pour the Vodka, sweet vermouth and Yuzu juice. Add ice and sugar. Shake vigorously for a couple of minutes to make sure the sugar dissolves. Strain and pour the contents of the cocktail shaker into the martini glass, and garnish with the twist of lemon peel.


Yum

Wednesday, April 27, 2011

Paying It Forward with Tollhouse Cookies

Today is International Pay it Forward Day (PIFD). Last year, over 250,000 participants paid it forward in 30 countries. This year PIFD is aiming to inspire over 3 million acts of kindness around the world. For our contribution, we made 3 dozen Toll House chocolate chip cookies and took them to our neighborhood fire fighters at Atlanta's oldest fire station - Fire Station #19. They have been serving the Virginia-Highland community since June 1st, 1925. We also gave a donation to the Station's Renovation fund to help renovate and restore this local landmark.

Every little boy dreams of being a fire fighter! When they were little, our boys loved visiting Station #19. Each evening we would take an evening stroll which invariably took us by the station house. The firefighters would patiently help them climb in the front and answer questions. Once a month on Sundays, the station also offers free ice cream in conjunction with “Storytime.”  

A trademark name for a cookie made with flour, butter, and brown sugar and semisweet chocolate chips, "Toll House" chocolate chip cookies were accidentally created by Ruth Graves Wakefield in 1930. She owned a very popular restaurant,  the Toll House Inn, in Whitman, Massachusetts. She was known to give diners a whole extra helping to take home with her homemade cookies for dessert.

  • 2 1/4 cups all-purpose flour     
  • 1 teaspoon baking soda
  • 1 teaspoon salt
  • ½ teaspoon ground cinnamon*
  • 1 cup butter, room temperature
  • 3/4 cup sugar
  • 3/4 cup packed brown sugar
  • 1 teaspoon vanilla extract
  • 2 eggs
  • 2 cups (12 oz. package) chocolate chips
  • 1 cup chopped nuts (if you want)

Preheat oven to 375o F. Combine flour, soda, and salt in a bowl and set aside. Cream together butter, sugars, and vanilla in a large mixing bowl, then beat in eggs. Gradually add flour mixture to the sugar mixture, and blend well. Fold in chips and nuts. I refridgerate the dough until thoroughly chilled before putting them on the cookie sheet which allows the leavening ingredients to work before the butter flattens out the cookies. Drop the chilled dough by rounded teaspoons onto un-greased cookie sheets. Bake for 8-10 minutes.

*Cinnamon is my secret ingredient and was not included in Ms. Wakefield's original recipe!


20 More Ideas for "Paying It Forward:"
1.    Donate unused cookbooks to a library.
2.    Help the New York Public Library transcribe their historical restaurant menus collection. 
3.    Cheer on your teammate.
4.    Collect canned goods for your local Food Bank.
5     Leave your magazine behind on the bus for someone else to enjoy.
6.    Tip your waitress generously.
7.    Put a quarter in a parking meter that’s about to expire.
8.    Mow your neighbor’s lawn while you are mowing yours.
9.    Be a designated driver.
10.  Take a box of donuts or bagels to the Teacher’s Lounge of your local school.
11.  Next time you leave a Carnival, give all your unused tickets to someone coming in the gate.
12.  Thank a police officer for his service to the community.
13.  Let someone cut in front of you at the grocery store.
14.  Hold the door open for someone.
15.  Take extras vegetables from your garden to a senior citizen living alone
16.  Give up your seat on a crowded train or bus.
17.  Offer the mail carriers and delivery drivers something cold to drink on a warm day.
18.  Give blood.
19.  Return your shopping cart.
20.  Head over to Doc Chey's Noodle House for lunch to celebrate "Pay It Forward" Day!

Yum

Tuesday, April 26, 2011

Jenny’s Royal Chicken Salad

With the upcoming Royal Wedding, I keep remembering the Royal Wedding of Prince Charles to Lady Diana Spencer in July 1981. At the time I was  living with Jenny Thurston, a very special family friend and an Atlanta icon in the field of historic preservation. We got up incredibly early to watch the procession of carriages and the ceremony at St. Paul's Cathedral in London.

Jenny and I had spent the prior afternoon preparing goodies for the big event before heading to Reggie's British Pub for shandies. Thirty years later, I still remember watching her make her signature chicken salad. "I like the tangy-ness of the cornichons and the contrasting crunch of the almonds," she told me. This is my go-to recipe whenever there is leftover chicken in the refrigerator. With every bite, I remember my sweet and wonderful mentor who left this world far too soon!

  • 2 cups cooked chicken, diced
  • ¼ cup cornichons or dill pickles, diced
  • ¼ cup sliced or slivered almonds, toasted
  • 1 small rib celery, diced finely
  • ¼ to ½ cup mayonnaise, to taste
  • Salt and pepper

Combine chicken with celery, pickles, ¼ cup mayonnaise, lemon juice, salt and pepper.  Add more mayonnaise until desired texture is achieved. Stir in almonds and serve on good bread with crisp lettuce.

Trader Joe’s sells the BEST cornichons on the market. They are grown in the Garonne Valley in southwestern France for their company.  They are sour and crisp, and sell for a very reasonable price.

Yum

Sunday, April 24, 2011

Deviled Easter Eggs

In early Christian cultures, both meat and dairy were verboten during Lent. However, since chickens can't turn off their egg laying mechanism, they keep on laying. So eggs laid during Lent were hard-boiled to preserve them until the end of the 40-day Lenten season when they then would become part of the Easter feast.

It's Easter morning, the eggs have all been found - now what do you do with them all? The perfect addition to any Easter brunch table is deviled eggs. This recipe is a little different than the traditional deviled eggs you grew up with. The cornichons and capers add a delicious, piquant flavor to our version!

  • 6 hard-boiled Easter eggs, peeled
  • 2 Tablespoons mayonnaise (we prefer Duke's)
  • 1 teaspoon dijon mustard
  • 2 teaspoons cornichons* or dill pickles, very finely chopped
  • 1 teaspoon capers, finely chopped
  • Salt and pepper to taste
  • Paprika, for garnishing

Once the eggs are peeled, carefully slice the eggs in half from top to bottom. Scoop the yolks into a medium mixing bowl and gently lay the whites aside. Add mayonnaise, mustard, salt and sugar to the egg yolks and using a fork, stir to thoroughly combine.
Place the mixture into a zip-top plastic bag and cut a small hole at one of the corners. Pipe the mixture into each of the white halves. Chill for at least 1 hour in the refrigerator and sprinkle with paprika for decoration before serving.

*Trader Joe’s sells the BEST cornichons (French for pickles) on the market. They are grown in the Garonne Valley in southwestern France for their company.  They are sour and crisp, and sell for a very reasonable price.

Yum

Thursday, April 21, 2011

Easter Eggs 101

Helping the Easter Bunny by decorating eggs is a favorite with most children. In my experience, some non-egg-eaters will even try the eggs after they have helped to decorate them. It is best to use white eggs as the colors are more true (unless you are looking for an antiqued appearance).

6 eggs
Water for boiling

Egg Dye:
1 cup boiling water (you can use the water from boiling the eggs)
2 teaspoons white vinegar
food coloring

It is a good idea to test the freshness of your eggs before boiling them. The best way to test whether an egg has gone bad is to float it in water. As eggs get older, the inside portion of the egg starts to decompose and gases build. Hence it floats. A fresh egg will not float, but lie at the bottom of the glass of water.

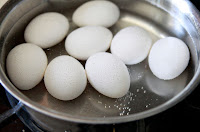
Place eggs into a pot of cold water, and then cover it and bring it to a boil. Once the water is boiling remove the pan from the heat, and let stand for 10 minutes. Then place the eggs in a bowl of cold water to cool as you begin peeling them under cold water.

Before preparing egg dyes, cover your work surface with newspaper to soak up spills. Then, mix boiling water and vinegar and divide into small containers large enough to place one egg covered with liquid. Add food coloring for colors desired using the color chart (or experiment with your own!) McCormick’s now makes neon food colorings too. McCormick's also has an online Color Creator which helps you make the right color no matter what color you’re striving to achieve.

When dyes are ready, place boiled eggs in the containers one at a time. Using a plastic spoon “baste” the egg with the egg dye until the color is as dark as you like. Eggs can be “batiked” by placing stickers or decals on the eggs and then removing them once the dye has dried. Stars, dots, and even hole-reinforcing loops make great designs. Another idea is to use a white crayon to write mystery messages or designs which “appear” when the eggs are dyed.

Allow the eggs to dry on an egg carton (cardboard works better than styrofoam) that has been turned upside down.Paper towels work well but eggs can roll off.

Yum

Sweet Iced Tea: Taste the South in a Tall Glass

There has been a good deal of controversy over the last few weeks about the legitimacy of iced tea. This controversy has been caused by the Royal wedding of Prince William to Kate Middleton. True Anglophiles (those who admire British customs) believe the only way to consume tea is hot with a “spot” of milk.

In the Southern U.S., we take our iced tea very seriously. Maybe it's the veracity with which it is made or perhaps it’s the water; either way Southerners swear by their traditional sweet iced tea and drink it by the gallons any time of year. Iced tea was popularized on a national level at the 1904 World’s Fair in St. Louis. The summer of 1904 was particularly hot so that people ignored hot drinks and went in search of cold ones. Iced tea was readily available and was an inexpensive alternative.

In 2003, Georgia State Representative, John Noel, introduced House Bill 819, proposing that all Georgia restaurants be required to serve sweet iced tea (the term 'sweet tea' meaning iced tea which had been sweetened with sugar at the time of brewing). While the bill was an attempt to bring humor to the General Assembly, the bill’s sponsor stated that he wouldn’t mind if it actually became law. To make traditional Southern “Sweet Tea,” follow these simple instructions:

3 Family size tea bags (Luzianne is a Southern favorite!)
4 cups of cold water
1 cup of sugar (or Xylitol)
a pinch baking soda (completely optional, but worth a try)

Bring 3-4 cups of water to a boil and add a pinch of baking soda to the water. This small amount of baking soda doesn’t change the taste, and even though it darkens the tea a bit, it removes any bitterness. Remove from heat and add 3 family sized tea bags. Allow to steep for about 10 minutes, and then remove tea bags, squeezing out the excess water from the bags. Put your sugar (or Xylitol) in a pitcher and then pour hot tea over the sugar and stir to dissolve. Cover your pitcher with a plate and allow to cool to room temperature.

To serve, fill your favorite tea tumbler with ice and pour sweetened tea or the ice. While it is delicious plain, you can add fresh mint leaves or a lemon slice to add a fresh zippy flavor. If there is any tea left, place the plate back on top of the pitcher and refrigerate.

Given the nature of sweet tea and its solemnity, it did seem a natural candidate for a taste test involving sugar and a sugar substitute. I received a sample of “Xyla” from Emerald Forest. Xyla is Xylitol made from North American birch trees and is a safe, natural sweetener without the side effects of sugar or artificial sweeteners. It has the same sweetness as sugar and is used in place of sugar on a one-to-one ratio. It contains only 2.4 calories per gram and is slowly absorbed as a complex carbohydrate. Xylitol is good for your teeth, stabilizes insulin and hormone levels, and promotes good health.

 We made iced tea using the recipe above pouring steeped tea over equal amounts of regular granulated sugar and Xyla and stirred to dissolve the sweeteners, then added ice. Both glasses looked identical before tasting began. Then each of us conducted a blind tasting of the two versions of sweet tea. When asked which tasted better, my oldest chose the tea with the regular sugar, my youngest chose the tea with the Xyla, and I had a difficult time telling any difference at all.

Then, out of curiosity, we each tasted a little bit of each on a spoon with surprising results. We all liked the taste of Xyla better than sugar. It is hard to describe the sensation, but the Xylitol has a “bright” taste – kind of minty without the mint. While it is a bit pricey, we will definitely be adding Xylitol to the grocery list for special recipes and for guests with health issues to consider.


Yum

Tuesday, April 19, 2011

Breakfast for Dessert? Bacon & Coffee Ice Cream!

Walking through the grocery store it is not uncommon to see carts with coffee, bacon and ice cream. These three items are regular additions to our grocery list too. We start every day with a freshly brewed cup of java while ice cream is an indulgence at the end of a busy day. With two teenage boys, bacon is a frequently used ingredient at our house any time of day: for breakfast (with eggs), lunch (in a BLT) and dinner (in Carbonara.)

In America, bacon is usually made from pork belly and may be smoked, boiled, fried, baked, grilled or used as a minor ingredient to flavor dishes. Bacon is also used for barding (wrapping) roasts and game birds to keep it from drying out while cooking. Less traditional recipes with bacon include bacon chocolate bars, Baconnaise and even a bacon inhaler!

The combination of these three ingredients may sound quirky, but results in a decadent and delicious dessert! This recipe makes about one quart.

Billionaire’s Bacon & Coffee Ice Cream
  • 1 1/2 cups heavy cream
  • 1 1/2 cups milk
  • 3 egg yolks
  • 2 whole eggs
  • 3/4 cup light brown sugar
  • 1/2 cup espresso (or VERY strong coffee)
  • ½ teaspoon coffee or espresso, ground
  • 4 slices Billionaire’s bacon (recipe here)

Combine eggs, yolks, coffee and coffee grounds and brown sugar in a bowl and mix thoroughly with a whisk or electric beater for about 3 minutes. Heat milk and cream in a medium saucepan, but do not let them boil, just “scald” it until it is near the boiling point - a thin skin may form on the surface. Remove from heat and very slowly pour in 1 cup of the hot milk mixture into the egg mixture and beat rapidly with a whisk. Then pour the egg-milk mixture into the saucepan with the remaining milk mixture while beating. Return the mixture to medium low heat, stirring constantly for a few more minutes to thicken the mixture. When it is thick enough to coat the back of a spoon, turn off the heat.

Pour ice cream mixture into a bowl and cover with plastic wrap placed directly on the surface of the liquid and refrigerate until completely cool. Then, pour mixture into ice cream maker (we use a Krups "La Glaciere") and follow your machine’s directions for how long it should churn.

Crumble the slices of Billionaire’s bacon and add to the ice cream machine during the last minutes of churning. Transfer to an airtight container and freeze for 2 hours before serving. Garnish dish with another piece of Billionaire’s bacon and a pinch of black pepper or espresso powder.


Yum

Sunday, April 17, 2011

Ritzy Lavash (Aremenian Flatbread)

As mentioned in my earlier post, we stayed at the Ritz Carlton at Palm Beach for our Spring vacation this year where I was privileged to visit the main kitchen, (thank you Chef Artim!) Surprisingly, the facilities were smaller than I imagined, but an amazing volume of food was being prepared for the three on-site restaurants as well as the Club level and room service. While in the kitchen I met Elizabeth Alfieri who was making fresh lavash (Armenian flatbread) in bulk. Traditionally, lavash dough is rolled out flat and slapped against the hot walls of a clay oven. While quite flexible when fresh out of the oven, the bread dries out quickly and becomes brittle and crispy. Lavash is sometimes used in Eucharist ceremonies by the Armenian Apostolic Church.

It was stunning to see the number of sheets of lavash she was making! I mentioned that we really enjoyed eating lavash with hummus and she graciously shared her recipe with me. Her ingredients were measured in grams, so I converted them to standard measurements and divided the recipe in half, but I think I did Elizabeth’s recipe justice.

  • 2 1/2 cups bread flour
  • 2 tablespoons shortening
  • 1 teaspoon salt
  • 1/2 teaspoon sugar
  • 1 whole egg
  • 2 teaspoons molasses
  • 1 tablespoon unsalted butter, melted, and cooled slightly
  • 2/3 cup water

Place the flour, salt, sugar and shortening into a medium bowl and beat to combine. In a separate small bowl whisk together the water, egg, molasses and butter, then add 1/3 cup water and stir. Add the egg mixture to the flour mixture and mix until the dough comes together, adding up to 1/3 cup more water if the dough is dry. Knead the dough in the bowl 5 to 6 times, then turn the dough out onto the counter, divide into thirds, cover with a tea towel and allow to rest for at least 30 minutes. The longer it rests the better.

Preheat the oven to 350 degrees F. Lightly grease the back of a half sheet pan (yes, the bottom) using cooking spray or butter. Working with one ball at a time, roll the dough out to an even 1/8-inch thickness. I found it easier to roll if I flipped it over every minutes.

Gently stretch the dough over the greased upside down sheet pan. The dough should fall slightly over the edge of the pan and will hold the dough in place. Dock the dough to allow air to escape by using a fork to gently pierce the dough, and then lightly brush the dough with an egg wash (one beaten egg) and sprinkle toppings over the top. Elizabeth uses grated Parmesan at the Ritz. You can also try sesame or poppy seeds.

Place on the middle rack of the preheated oven and bake for 10 to 15 minutes or until golden brown. Remove the lavash to a cooling rack. Repeat this process with the remaining dough using a cooled sheet pan each time. Break each sheet of lavash into shapes and sizes as desired. Once completely cooled, you can store the lavash in an airtight container for up to 5 days.

Yum

Tuesday, April 12, 2011

Lolly like a Pop Rock Star!

Spring Break is a much needed respite after the hibernation period of winter. The warmer weather outside and the longer days due to Daylight Savings Time (originally implemented to conserve coal during wartime) cause students’ (and adults’) attention to wander. For our Spring Break this year, we vacationed at the Ritz-Carlton in Palm Beach, Florida.
Club Room nibbles

The hotel is absolutely gorgeous with a sumptuous lobby area, three upscale restaurants and a pool overlooking incredibly blue water of the Atlantic Ocean. We treated ourselves and opted to stay on the Club level to take advantage of continental breakfasts, lunchtime nibbles, hors d'œuvres during the cocktails hours and dessert and cordials after the dinner hour.
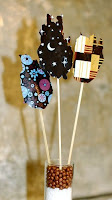
Vivian's Lollies
One evening, we ate at the hotel’s anchor restaurant “Angle,” where we had delicious meals, excellent service and a surprise treat for dessert. Our waitress brought out what looked like a table decoration that turned out to be free-form chocolate lollipops. These treats were made with dark chocolate served on skewers. “Don’t just gobble them down,” the waitress hinted, “you need to savor them.” That’s when we noticed it – subtle at first, but a sparkling sensation. Rice Crispies? No, Pop Rocks!

The next day, I wheedled my way into an invitation to the hotel’s main kitchen with the main goal of finding out how to make those pops. (Thanks Phillip!) I felt like a celebrity with a back stage pass! (Thanks Chef Artim!) Surprisingly, the facilities were far smaller than I imagined, but an amazing volume of food was being prepared for the three on-site restaurants as well as the Club level and room service.

I was introduced to Vivian Hussein who patiently explained the steps she took to temper the chocolate, when to add the pop rocks and how to assemble the lollies. So armed with her recipe and tutelage, we headed home. The next day, I headed straight to the one store I knew would have Pop Rocks – Michael’s. Pop Rocks are a carbonated candy made by heating the ingredients until they melt into a dust, and then exposing the mixture to pressurized carbon dioxide gas and allowing it to cool. This process causes tiny, high-pressure bubbles to be trapped inside the candy so that it creates a “fizzing” reaction when it dissolves in your mouth.

Vivian’s explanation of how to temper the chocolate made the process sound easy, however, I was still quite intimidated by the idea of actually doing it myself. While at Michael’s I also found bags of Wilton’s melting chocolates which needed no tempering -  Jackpot!! I quickly paid the cashier and dashed home to play!

Chocolate Pop Rock Lollipops
  • 1/3 cup Wilton Dark Cocoa Candy Melts® 
  • 1 pack Pop Rocks (or more!)
  • Chocolate transfer sheets (if available) or parchment paper
  • Microwave safe bowl
  • Bamboo skewers

Before you begin, make sure all of your utensils are dry. Water causes melted choclate to harden and streak. Lay your chocolate transfer sheets (or a piece of parchment paper) on a cookie sheet. We used the back of a half sheet pan so the skewers lay flat. Then in a Ziploc bag, microwave the chocolate at half power or the defrost setting for 30 seconds. Massage the chocolate in the bag (if you can – after the first 30 seconds, ours were still too solid to stir.) Continue to microwave at 30-second intervals and mix until the chocolate is smooth and completely melted. When ready, the chocolate should be the consistency of cooked pudding.

Next, add the pack of Pop Rocks to the melted chocolate in the Ziploc bag and and mix gently so you don’t crush the rocks. When mixed together thoroughly, cut one of the corner of the bag to form a makeshift pastry bag. Make the cut large enough to allow rocks to pass through but not too huge because, unlike frosting, the chocolate will flow pretty quickly from the bag. Use the bag to make tablespoon-sized shapes on the transfer/parchment paper. You can also use a teaspoon to drop spoonfuls of the chocolate on the transfer/parchment paper. Use the spoon to gently (again not to crush rocks) spread the chocolate upward to make your desired shape.

Lay a skewer in the back of the pop and press gently; rotating slightly to make sure it is coated in chocolate and well attached. Then set the sheet pan aside until the chocolate is set. Resist the urge to place in the freezer since pops may weep and cause rocks to fizz. Gently remove the lollipops from the transfer sheet or parchment.

Lay a skewer in the back of the pop and press gently; rotating slightly to make sure it is coated and well attached. Then lay the sheet pan in the freezer until the chocolate is set. Gently remove the lollipops from the transfer sheet or parchment.

The lollies were then placed in a flower vase and served at a dinner party. Laughter arose from the table when everyone figured out the mystery ingredient!


Angle on Urbanspoon

Yum

Thursday, April 7, 2011

Pot Roast Po'Boys

As you can tell from a number of our posts, we have always loved the customs, traditions and food (especially the food) of Louisiana and New Orleans. The spicy convergence of Cajun, Creole and Southern cultures that gives such dishes as crawfish étouffée, muffaletta, beignets and of course, the po’boy sandwich. Po'Boys are the perfect accompaniment to an ice cold beer, particularly our new favorite, New Belgium's Mighty Arrow Pale Ale.* (As members of the Foodbuzz Tastemaker program, we received a stipend to try New Belgium brand beer.)

During the extremely intense streetcar strike in 1929, 1,100 New Orleans railway workers walked off their jobs. A family of onetime streetcar workers pledged to feed their former colleagues at their sandwich and coffee stand. Whenever they saw a striking worker, they would say “Here comes another poor boy.” The sandwiches took on the name in the vernacular “po’boy,” and soon became a New Orleans favorite.

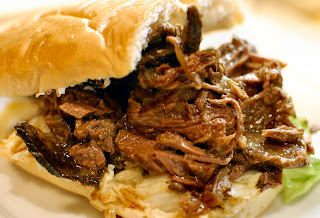
There are many variations of po’boy sandwiches: fried seafood, chicken, ham, and the ever popular roast beef, also known as a "debris" (pronounced DAY-bree) po’boy. Roast beef is made into debris by cooking the beef roast until it "falls apart with a hard look," and then cutting it into shreds. The shreds are placed back in the pot to absorb every bit of liquid and seasoning imaginable and flavor the ever-important gravy that drowns the sandwich when assembled and trickles down to your elbow when eaten!

  • 1 3-4 lb. beef roast (chuck, bottom round, or rump)
  • 1 teaspoon salt
  • 1 teaspoon black pepper, ground
  • 1 teaspoon fennel seeds, crushed
  • 1/2 teaspoon dry mustard
  • 1/2 teaspoon cayenne pepper, ground
  • 1/2 teaspoon thyme
  • 1/2 teaspoon sugar
  • 3 tablespoons olive oil
  • 1 medium onion, coarsely chopped
  • ½ cup carrots, chopped
  • ½ cup mushrooms, chopped (optional)
  • 4 cloves garlic, smashed and minced
  • 1 small bay leaf
  • 1 cup beef broth
  • 1 12-oz. bottle of full-bodied beer (We used a bottle of New Belgium’s Mighty Arrow Pale Ale!)

  • 2-3 crusty French bread loaves, cut into 6-8” lengths
  • 1 head crisp lettuce, finely sliced or shredded
  • Mayonnaise (we use Duke’s)
  • Louisiana Hot sauce (as desired)

Using a mortar and pestle, crush the fennel seeds and pepper together. Add to the salt, sugar and other spices in a small bowl. Rinse the beef roast and pat dry with paper towels, then coat the roast with spice mix. Next, in a large pot or Dutch oven, heat the olive oil on high heat. Place the meat in the hot pan and sear on all sides in the hot oil until a nice brown crust is formed. Transfer the roast to a pan or platter.

Reduce heat to medium and add the onions, carrots and mushrooms stirring frequently, for about 2 minutes. Add the garlic and cook for 1 minute longer. Add the bay leaf, broth, and beer, and bring to a boil. Add the roast back to the pot, cover and place the Dutch oven in a 325o oven for 2 to 2 1/2 hours, or until the beef is very tender.

Carve the meat into very thin slices, or pull apart with a large fork. Add all of beef back  into the cooking liquid and skim the fat from the surface. Bring the gravy to a full boil to reduce the broth a bit. Let the meat simmer is the juices until ready to assemble your sandwiches.

Cut the French bread 3/4 of the way through leaving a hinge and slather both sides of the loaf with mayonnaise, stack on the debris (roast beef) using tongs and drown with gravy. Cover the beef with a pile of shredded lettuce and close the top (if you can.) Grab a bottle of hot sauce, a stack of napkins, cold beer and devour voraciously!

*Mighty Arrow Pale Ale was created as a tribute to the beloved pet of New Belgium Brewing’s CEO Kim Jordan. Arrow was an Aussie/Border Collie mix that literally “ran” New Belgium for 12 years. In tandem with the release of Mighty Arrow in its third year as the New Belgium’s spring seasonal, the New Belgium and Outside magazine have launched a Facebook application that offers dogs something to wag their tails about. Facebook friends and visitors can post pictures and videos of their pups with the opportunity to win great dog-centric incentives at http://www.facebook.com/newbelgium?v=app_120904631311748. Meanwhile, New Belgium Brewing and Outside Magazine will donate a dollar for every participant (up to $10,000) to the Humane Society of the United States. Here is the picture of our dog we posted to the New Belgium Might Arrow FB page!


Yum

Sunday, April 3, 2011

Simply Roasted Cauliflower

As the days are getting longer and warmer, they seem to get even busier. Having a few fast and simple recipes in your arsenal is a necessity. Cauliflower is one of the most readily available and easily adaptable vegetables that we know of. Roasting cauliflower brings out the natural sugars and can eaten right out of the oven or used in a variety of other dishes. Try tossing roasted cauliflower with homemade gnocchi with browned sage butter and sautéed bread crumbs for a wonderfully rustic dish, or as a part of an antipasti platter. We particularly like to add a floret of roasted cauliflower to crostini with roasted red peppers spread.

  • 1 medium head cauliflower
  • 2 tablespoons extra-virgin olive oil
  • Salt and pepper

Put oven rack in middle position and preheat oven to 450°F. Cut cauliflower into 1 ½- inch florets and toss with olive oil and salt in a large bowl. Spread florets in 1 layer in a large shallow baking pan or cookie tray and roast, stirring and turning occasionally, until tender and golden brown, 25 to 35 minutes. If you prefer a little char, move tray to upper rack in your oven for the last 5-10 minutes of roasting. That’s it! Simple, huh?


Yum

Saturday, April 2, 2011

Homemade Ricotta from Buttermilk

We love to entertain! That said, I prefer a little advance notice when guests are invited to dine at our house so that I can be sure to have a little nosh prepared when the guests arrive (and run the vacuum!) So, I was caught off guard the other day, when my hubby announced that he and his buddy were on their way to the house for dinner. Quickly scrambling for something to put out, I found crackers, red pepper spread (made the day before), and ….. You guessed it a few carrots, an orange, a variety of hot sauces, but no cheese of any sort, no sour cream, not even yogurt. Then came the “Aha” moment - there was buttermilk and milk. Remembering a Martha Stewart segment with the Lee Brothers, I immediately pulled out a saucepan to make buttermilk cheese.

Buttermilk cheese is a form of ricotta cheese. Ricotta cheese, which literally means "recooked" in Italian, is a soft cheese made from the whey remaining after mozzarella or yogurt is made. When the ricotta cheese is made from whole milk (as in this recipe), it will be virtually same as Indian Paneer which is the soft cheese made by curdling heated milk with a food acid such as lemon juice.

  • 1 quart whole milk
  • 1 1/2 cups whole or low-fat buttermilk
  • 2 teaspoons coarse salt

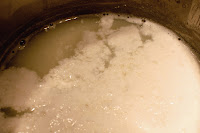
Combine milk, buttermilk, and salt in a large heavy-bottomed saucepan, and heat over medium-high heat until the mixture has separated into white curds and translucent whey. This should take about 8 minutes. (It will be obvious when this happens.) If you use lowfat buttermilk, the separation starts at about 180 degrees and the curds will stick together readily. If you use whole buttermilk, separation occurs closer to the boiling point at about 212 degrees, and the curds are finer-grained. When using whole buttermilk, let the mixture cool for about 3 minutes after separation to let the curds form.

Lay flour cloth or multiple layers of cheesecloth in a colander or medium strainer, Set colander in your sink. Ladle the contents of the saucepan into the prepared colander and let the whey drain out for about 1 to 2 minutes. Lift the four corners of the cheesecloth gathering them together, and gently twist the gathered cloth over the cheese and press out any excess whey.

The buttermilk cheese can be unwrapped immediately and served warm, or cooled to room temperature. The marvelous thing about this recipe is that you can add spices, herbs and flavors to suit your tastes. Try black pepper, fresh herbs or even vanilla!

Yum
Powered by Blogger.

footer social

ShareThis