Friday, September 30, 2011

Cookbook Signing Salad With A Southern Twist

Dom and I joined a crowd of Southern foodies at The Cook’s Warehouse in Ansley Mall to congratulate Virginia Willis on the national release of her new cookbook, Basic to Brilliant, Y’all; 150 Refined Southern Recipes and Ways to Dress Them Up for Company. Atlanta-based celebrity chef Virginia Willis is a classically trained French chef with a Southern accent to her recipes and cooking. Beginning at her home teaching kitchen, the book signing fundraiser for the Atlanta Community Food Bank was the first stop on the Chef’s 10-city tour.

Guests were treated to samples from Chef Willis’ new collection of recipes served by Les Dames d’Escoffier International. Nibbles included fried pork skins, fennel flat bread, garlic-stuffed prime rib sliders, skewered okra, accompanied by Woodford Reserve, super-premium, small-batch Kentucky bourbon mixed with Coca-Cola Classic.
Fried pork rind in a pork rind serving bowl
The freshly made brownies were also difficult to resist as the gracious Cook’s Warehouse servers passed through the crowd. The arugula salad with quintessential Southern ingredients of country ham, and pecans was the stand-out preview of the evening. The zesty cider vinegar dressing and aged white cheddar crumbles completed the ensemble of regional flavors.

Arugula Salad with Country Ham and Pecans
8 cups (about 6 oz.) arugula, dandelion, or frisee
3 tablespoons apple cider vinegar
1/2 teaspoon firmly packed light brown sugar
Coarse salt and freshly ground black pepper
2 tablespoons canola oil
3 thin slices country ham, cut into lardons
1/2 onion, preferably Vidalia, thinly sliced
1 small clove garlic, finely chopped
1/2 cup (about 2 oz.) crumbled aged white Cheddar cheese
1/4 cup chopped pecans

Place the greens in large bowl. Set aside. Stir together the vinegar, brown sugar, salt, and pepper in small bowl until the sugar dissolves. Set aside.

Heat the oil in a skillet over medium-high heat. Add the ham and cook, stirring occasionally, until crisp, 5 to 7 minutes. Using a slotted spoon, transfer the ham to a plate lined with paper towels.

Add the onion to the skillet and cook over medium heat, stirring frequently, until translucent, 3 to 5 minutes; add the garlic and cook until fragrant, 45 to 60 seconds. Add the vinegar mixture, then remove from the heat. Working quickly, scrape the bottom of the skillet with a wooden spoon to loosen any yummy browned bits. Set aside to cool just slightly.

Pour the warm dressing over the reserved greens, add the ham, and toss gently with tongs until the arugula is slightly wilted. Taste and adjust for seasoning with salt and pepper. Divide among chilled serving plates. Sprinkle over the cheese and pecans. Season with freshly ground black pepper and serve immediately. Wonderful crisp arugula with seasonal Southern flavors - Yum Y'all!


Yum

Wednesday, September 28, 2011

Pleasantly Bitter & Spicy Wherewithal

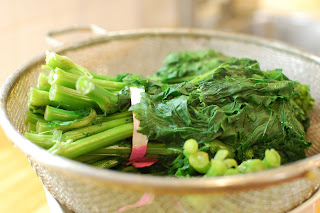
This classic Italian recipe is a perfect seasonal dish for the cooler weather of fall through late winter when broccoli rabe, or rapini, is at its best. This is a regular meal at our house, made with readily available ingredients; it has a mild bitter tang that is an appealing contrast to the spicy pork sausage served with carb-loaded pasta that is  a hit with always-starving teenagers.

Broccoli rabe, which is not technically related to broccoli at all, is an unusual and healthy addition to any meal. When young and tender you can eat it all, from stems to the florets and even the delicate yellow blossoms. We blanch the rabe to tenderize the stalks (with the added benefit of enhancing the brilliant green color.)

This dish is a masterpiece of textures and flavors with crisp spicy meaty, earthy pleasantly bitter greens, and piquant creamy cheese. As you toss the ingredients with the orecchiette (Italian for "little ears,") the juices and flavors are captured in the hollows of the concave pasta. It’s a forgiving recipe which can withstand variations in ingredients and types of pasta; a successful compilation on all levels which explains its long-standing popularity in Italian cuisine.

  • 2 Ibs. broccoli rabe, stems removed
  • 1 lb. hot Italian sausage
  • 1 Ib. orecchiette pasta (or penne)
  • ¼ cup extra-virgin olive oil
  • 7 cloves garlic, peeled and minced
  • 1-2 teaspoons crushed red pepper flakes (optional)
  • Salt and freshly ground black pepper
  • Pecorino-Romano, grated

Bring a deep saucepan of salted water to a boil, and then place broccoli rabe in the boiling water. Allow water (and rabe) to return to a boil and simmer until bubbles appear. Remove from the pot from the heat and drain water from greens. Plunge broccoli rabe into cold water to stop the cooking process and drain again. Extract as much water as possible by patting rabe dry. We use a towel to roll greens and blot dry and then and set them aside.

Cook orecchiette in a large pot of boiling salted water until al dente which should take about 10-12 minutes. We use the blanching water whenever feasible to retain the flavor and nutrients of the rabe. Remember to save some of pasta water to help hydrate the sauce if needed.

Remove sausage from casings and cook in a large sauté pan until done (about ten minutes) turning every few minutes and breaking into bite-sized pieces while cooking. When the sausage is cooked through, remove meat to a plate leaving juices and crispy bits in the sauté pan.

Add olive oil to the reserved sausage juices and heat over medium heat. Add garlic and sauté until fragrant and just golden, (about 3 minutes.) Then add broccoli rabe and sausage back to the pan and season to taste with salt, and red and black peppers. Cook together until warmed through, about 5 minutes. Reduce the heat to low and keep warm until pasta is ready.

Drain pasta in a colander, then add to broccoli rabe and sausage, and toss to mix well. Add reserved pasta water as needed to allow the sauces to fully coat the pasta giving it a creamy, smooth consistency.  Transfer to a large serving plate and top with grated Pecorino-Romano. Remember to stop and savor the aroma and flavors that have been satisfying Italian appetites for centuries.


Yum

Friday, September 23, 2011

Fabulous Favas of Fall

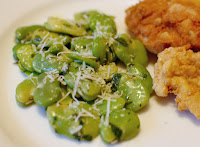
Nothing says Autumn like… fava beans? It is true that most people associate favas (also known as broad beans) with Spring, but in reality these legumes are most widely available in the late Summer and fall in most parts of the U.S. When we see favas available at the market, we load the basket and prepare to feast.

Fava beans were eaten in ancient Greece and Rome and are one of the oldest plants under cultivation. Despite the name, fava beans (from the Italian word fava, meaning "broad bean") are actually a member of the pea family. Fava beans have a distinct flavor and creamy texture that makes them a great addition to a wide variety of dishes.

Favas are high in fiber and iron, and low in sodium and fat. They have no cholesterol but so much protein that they are called the” meat of the poor.” As a matter of fact, Italians credit the fava bean as the key factor in saving the Sicilians from starvation during a great famine. Since then, the fava has been considered good luck; in fact some people believe that if you carry a fava bean, you will never be without life’s essentials.

Fava beans should be shelled and peeled before eating. The outer peel on the beans, while technically edible, is very woody in texture and detracts from the buttery taste of the inner bean. Fava beans can be served fried and salted, mashed, or added to hearty stews and soups. We love to eat them simply boiled and tossed with olive oil, mint and cheese. Sometimes the guys don’t even wait for the >mint and cheese, popping them down like beer nuts.

  • 4 cups shucked fresh fava beans
  • 1/4 cup olive oil
  • 2 tablespoons finely chopped mint
  • ½ cup Parm or Romano cheese, shaved
  • Salt and pepper to taste

Start by removing the beans from the large green pods. Then blanch beans in a large saucepan in plenty of salted boiling water until tender, about 3 to 5 minutes, depending on the size of the beans and number in the pot. This will soften the outer shell for easy removal.  Drain well and rinse with cold water to cool. This prevents overcooking and mushiness, as well as makes the skin easier to remove from the favas.

Once cool enough to handle, use a paring knife to pierce and peel away the outer grayish-white, waxy shells of beans revealing the bright green bean inside. Place shelled peeled beans in a bowl. Drizzle beans with olive oil, season with salt and pepper, add mint and toss gently to mix.  Place beans in a serving dish and top with the grated cheese. You can also use a vegetable peeler to shave slices of Parmesan-Reggiano cheese making large “curls” to garnish the salad in place of the grated cheese. These dress the dish up for company!

Favas are also delicious served mashed. Following the instructions above blanch and peel favas, and mash beans adding butter and a splash of cream. We also add one boiled potato to the bean mash to improve the consistency (and stretch the beans!)

Thanks for reading our 200th post! We hope you will keep coming back for 200 more.

Yum

Sunday, September 18, 2011

Nitty Gritty Start To The Day

The season of sniffles is upon us and few things offer morning comfort like a bowl of creamy, steamy grits. Grits* are historically known as a food of the South, but they’ve been around much longer in one form or another. Grits are a traditional breakfast food made of ground dried corn kernels. In consistency, they are rather like the “Cream of Wheat” which is more popular in Northern states.

Rockahominie (hominy) dates back at least 5,000 years, and was one of the first foods that Native Americans shared with European colonists. This sturdy staple of dried corn kept many settlers alive during those first cold winters. Hominy is the dried kernel of corn that has been threshed to remove the hull and germ and soaked in a weak lye solution to make the kernels swell. To make grits, the dried hominy is ground to one of three grinds, fine, medium or coarse and is simmered with water until a thick porridge is formed. “Quick grits” (a very fine grind that has been pre-steamed) are available in supermarkets, but to quote the famous line from the movie My Cousin Vinny, No self-respectin’ Southerner uses instant grits.”

It should also be noted that the Italians, got their corn meal for polenta by way of these same Native Americans, so contrary to Dom’s theory that all foods originated in Italy, grits has at least a 4,500-year head start on polenta.

Grits were also a vital part of the Southern diet during the Great Depression since they were inexpensive and required only water and lard or butter to make. During the same time period, the equally Southern expression, "nitty-gritty," originated as a derogatory term and was used as secret slang by segregationists. Southern politicians and campaigners adopted the phrase to refer to "back to basics" campaigns based around fundamentalist values and beliefs.

A proper bowl of grits has butter, salt and black pepper for seasoning. They are more savory than sweet. People have their individual tastes in grits. Some prefer a thinner consistency like polenta, while others like their grits thick and creamy.

  • 3 cups water
  • 1 teaspoon salt
  • 1 cup regular grits (we prefer stone-ground, white)
  • 2 tablespoons butter

Bring water to a boil in a saucepan and add grits to water reducing heat to medium. The grits will be very watery at this point, but they will thicken nicely in a few minutes as the water is absorbed.

Grits should be allowed to simmer slowly so they don’t get lumpy. If they appear to be boiling excessively, turn the heat to medium-low. Stir consistently to ensure they cook evenly and do not stick to the sides of pan. Continue cooking and stirring until the grits thicken to just a littler thinner than your desired consistency as they will continue to thicken as they cool. Stir in the butter until completely incorporated. The grits should have a creamy, silky texture. Serve with freshly ground black pepper. For cheese grits, add ¼ - ½ cup of your favorite grated cheese.

To make grit cakes (great for leftovers), layer grits in a moistened baking dish, cover with plastic wrap and refrigerate. When the grits are chilled and firm, cut them into desired pieces, (moistened cookie/ biscuit cutters work wonderfully.) Fry in a lightly greased pan until both sides have a crispy brown crust.

*GRITS is also the acronym for "Girls Raised In The South."


Yum

Tuesday, September 13, 2011

Milk Blanket and Nutmeg Dreams

I know it sounds so smarmy, but the bed is too big when my sweetie (Dom) is out-of-town. So after tossing and turning, I am warming some milk and wondering whether there is a scientific reason it makes me sleepy…

Most of us have heard of tryptophan, the essential amino acid responsible for that unavoidable nap after a big turkey dinner on Thanksgiving day. As it turns out, there are traces of tryptophan in milk too. The human body converts tryptophan to the sleep-inducing hormones serotonin and melatonin. However, the amount of tryptophan in any food, turkey and milk included, is not great enough to boost hormone levels to a level that would induce sleep.

So, am I wasting my time waiting to see the little bubbles that mean the milk is perfectly heated and not on its way to being scorched, making the pan impossible to clean? Maybe it is the psychological association with warm milk and infancy; reminiscent of the times "I slept like a baby." Obviously, we associate milk with our mothers and their love and care. These comforting feelings and remembrances can produce serotonin in the brain that actually create a sensation of well-being and relaxation which promotes drowsiness.

Milk also coats and soothes the stomach. Most people sleep best when their tummies are full.  Milk can also calm heartburn or digestive pangs caused by stress and may provide sense of relief for these symptoms.

Or perhaps, it is because a nice glass of warm milk warms the body. People sleep better when they are warm because their muscles tend to relax more. The few degrees that the drink might raise your body temperature are often enough to trigger the slowdown response. This slowing of bodily responses normally precedes sleep.

It is quite possible that it is not the milk at all, but the fresh nutmeg grated on top. Nutmeg is known to calm anxiety and muscles spasms. It can eliminate nausea (unless taken in large amounts in which case it can actually cause nausea.) Nutmeg can also lower blood pressure, reduce diarrhea, and has even been cited as an effective anti-inflammatory for joint pain and gout.

No, it definitely has something to do with the way the hot mug feels in my palms, the way the light aroma of nutmeg wafts past my cheek, and the way the warmth wraps around me like a toasty blanket. Not quite like a snuggly hubby, but it will do for tonight.

1 cup milk (I used 2%, but I like whole best!)
1 dash freshly grated nutmeg

Scald milk in a saucepan by heating over medium heat. Watch for tiny bubbles to form on along the sides of the pan and stir while simmering another minute or two. Do not let the milk scortch or it will taste weird and the "skin" will be very difficult to remove from the pot.

Pour the magical elixir into your favorite mug and grate (or sprinkle) nutmeg over the top. Sweet dreams!

ZZzzzzzzzzzzzz.............

Yum

Tuesday, September 6, 2011

SALT: The Flavor of Necessity

For many families, Labor Day weekend is the last chance to get away for a visit to the beach; a last opportunity to enjoy the salty sea air and surf. But, few people realize the importance of salt and water to their everyday lives.

Water and salt are essential for maintaining extra cellular and intracellular cell growth in all plant and animal life. Cells may endure periods of lack of food, but without salt and water, the cells would perish from dehydration. Sodium chloride maintains the electrolyte balance within and around our cells. The human body contains approximately 6 ounces of salt to maintain the correct the balance of water in cells and tissues. Salt comprises about 1% of a human’s blood volume which is also the concentration used in saline solutions to clean wounds.  The body’s nerves and muscles need salt for proper functioning.
 
Active Salt Mine, Cardona, Spain
Since our bodies cannot manufacture salt, we must consume it daily because it is quickly eliminated by the kidneys. Salt is so important to human survival that our tongues are sensitive to its taste. While salt enhances the flavor of our food, it triggers the production of saliva and gastric juices required for food digestion.

Salt (most commonly the chemical compound of sodium chloride.) Salt naturally occurs in many parts of the world as a mineral or is mixed in bodies of water. All culinary salts are produced by evaporation. Table salt is made by driving water into a salt deposit (like a mine). This process forms a brine which is then evaporated leaving dried cubical crystals similar to granulated sugar. Kosher salt is made in a similar fashion except that the brine is raked continually during the evaporation process. The resulting product has a light and flaky texture. Sea salt is evaporated from sea water. Even though sea salt has trace amounts of minerals not found in mined salt, all salts are nutritionally the same.

Sodium chloride has been important in the history of just about every culture since Adam and Eve.  The Bible mentions it at least 30 times. Salt is still an important compound in all parts of the world. From preservation, to seasoning salt is used in most things we use today.

Evidence of salt usage goes back more than 8,000 years ago. While Neolithic tribes strategically settled near salt springs, it is believed that the Assyrians were the first to truly harvest it. In China, a major portion of writing in the Peng-Tzao-Kan-Mu, the earliest known document on pharmacology, was devoted to more than 40 uses of salt. It also had descriptions on extracting and putting it into usable forms that are similar to the way we process it today.

Salt was equally important to the Egyptians who used salt for mummification and preservation of food. In Europe it is well documented that salt was of great importance to the economy. Markets in Greece involved the exchange of salt for slaves which gave rise to the expression, "not worth his weight in salt."

In the Roman times, salt symbolized spiritual health, because it was a major ingredient in many medications including use as a coagulating agent. Special salt rations given to the Roman legion were known as "salarium argentum," or "salary." In the Roman Coliseum, salt was put in the floor so that when the gladiators would fall to the ground it would “encourage” them to get back up.

It was recorded that thousands of Napoleon’s troops died in his retreat from Moscow because their wounds would not heal because they lacked sufficient salt for good health and convalescence.

American colonists refused to pay inflated prices and taxes for tea and salt from Great Britain which resulted in them being tossed in the Boston Harbor. Some historians believe that salt was the true cause of the protest, but that “The Boston Tea Party” just sounded better.

Not only do our bodies need salt, but salt has many amazing uses. In cooking it seasons, cures, preserves, and whip cream faster. It is also used for getting more heat out of boiled water so you can boil things like pasta and vegetables more easily. In medicine it cleans, treating sprains, sore throats, earaches and acts as an antiseptic. It also can glaze the outside of pottery, remove rust, seal cracks, remove spots on clothes, put out grease fires, melt ice, and kills poison ivy. It is claimed that there are 14,000 different ways for salt to be used.

Salt comes in many different types and colors including Alaea (red salt enriched with  iron oxide from Alaea clay), Hiwa Kai (black, solar-evaporated Pacific sea salt with activated charcoal), and Bolivian Rose (pink, highly-mineralized salt from volcanic deposits of the Andes Mountain range in Bolivia). Also, because salt is derived from an evaporation process, it is very easy to infuse with a variety of flavors.

On our recent trip to Amelia Island, I had the distinct pleasure of touring the kitchens of the Ritz- Carlton on Amelia Island including Salt, an entire restaurant devoted to seasonal menus (created by Chef de Cuisine Rick Laughlin) that showcase brilliantly-flavorful foods paired with a variety of salts. They have also perfected the art of infusing salts and have a wide-variety of infused salts. A last stop in the Salt Gift shop provided the opportunity to taste their amazing salinized creations that are truly wonderful enhancements to any dish, as well as Chef Shelton’s luscious handmade salted caramels.


Crisp roasted potatoes are the perfect vehicle for adding flavorful salt just before serving. These delicious potatoes are a faultless accompaniment to almost any roasted meat. Salt draws the moisture from potatoes, so they should not be salted before cooking as it will prevent the potatoes from developing a nice crispy crust. Try this recipe with fleur de sel, smoked sea salt, or any finishing salt you like.

4-6 large potatoes (we use Idaho), peeled and cut into chunks
2 tablespoons olive oil
½ cup of Kalamata olives, pitted and sliced lengthwise (optional, but SO good!)
Finishing salt, to taste (We used Mediterranean black garlic)

Preheat oven to 350°F (convection preferred). In a large roasting pan, toss potatoes with olive oil and then spread out in a single layer. Roast potatoes, stirring every 15 minutes or so, until potatoes are crispy, browned and tender. This usually takes about 1 hour to 1 ½ hours. If you are adding olives, add them to the roasting pan and toss with potatoes about 15-25 minutes before potatoes are done. Transfer potatoes to a serving dish, sprinkle with finishing salt (and pepper) and serve.

And what better meal than crispy roasted potatoes with grilled leg of lamb! This is one of our favorite Sunday dinners. Homey, earthy comfort food: a perfect meal for the beginning of the Autumnal season.

5 lb. boneless leg of lamb
Olive oil
Salt and pepper
Finishing salt (we used rosemary-infused)

Carefully trim the lamb removing the layer of tough connective tissue and fat. Be sure to remove all visible fat and silver skin (the thin, grayish membrane). Use a thin utility or carving knife for this job. You may be tempted to skip this step, but poorly trimmed meat can develop a gamey flavor. Allow lamb to come to room temperature. Lamb may be cut into smaller "chunks" to hasten cooking time. It also allows for more crispy outside pieces! Rub lamb leg with olive oil and season with salt and pepper.

Prepare a charcoal grill with hot coals. If using charcoal, light 50 briquettes and let them burn until they are covered with gray ash. Push them into 2 banks on either side of the grate. Place a drip pan between the coals and replace the grill grate. Brush the grill with oil to keep the lamb from sticking. Grill lamb, turning and grilling evenly on both sides until an instant-read thermometer inserted into the meat registers 120 to 125 degrees for warm red center or 140 degrees for medium. This will take 40 minutes to 1 hour, depending on how hot the coals are.

Rainy-day method: Trim the lamb as above, and then set the leg of lamb on a rack in a roasting pan and place in a 325° F oven for 1 1/2 to 2 hours or until the internal temperature reaches 125 degrees for rare.

Remove the roasted lamb to a cutting board and tent with aluminum foil. Allow the meat to rest for 15 minutes before slicing. Before serving, sprinkle with a bit of finishing salt to enhance the delicious flavor of the meat. This allows the meat to relax and the juices to redistribute, ensuring you won't lose the flavor and moisture on your cutting board.


Yum
Powered by Blogger.

footer social

ShareThis