Tuesday, January 29, 2013

Technique of the Week: Acidulating

Acidulating is a fancy term for a water mixture that has been made acidic. This method is usually used to prevent cut fruits (pears, apples, avocados) and vegetables (artichokes) from discoloring and turning brown from exposure to oxygen.  Any form of ascorbic acid (Vitamin C) will work including lime juice, orange juice, cream of tartar, a crushed vitamin C tablet dissolved in water, or even ground chili pepper. The acid lowers the potenz hydrogen (pH) levels on the surface of the food, which also will slow the browning process. When using an acidulated water soak, the food should not be saturated, or it will taste soggy, and it should be patted dry before being eaten or used.

Acidulating liquid can impart a sour flavor to fruits, so a pinch of sugar is recommended to reduce the pucker. Since salt also slows browning, a pinch of salt added to soaking vegetables will add flavor and aid against discoloration. Additionally, vegetables (such as green beans) can be cooked in acidulated water which will help them to retain their color instead of graying or browning when they are cooked. This can make cooked vegetables look much more appetizing, and the faint hint of acid will add to the flavor.

Acidulated water also is used in poaching because the lower pH of the water will help the proteins in ingredients such as eggs and fish to cook thoroughly. When poaching eggs, a couple of teaspoons of white vinegar are all you need. Bring the water to a boil, then turn down to simmer. The vinegar water should have tiny bubbles that stick to the bottom of the pan, NOT a rolling boil. Crack your eggs into a bowl, and then slowly tip the eggs from the bowl into the water.

Additionally, fresher eggs will hold a better, rounder shape. The whites in fresher eggs are usually tighter and more congealed. After about three minutes in the water, the eggs will be poached medium. Remove from the acidulated water with a slotted spoon and serve.


Yum

Sunday, January 27, 2013

Dutch Baby, Baby

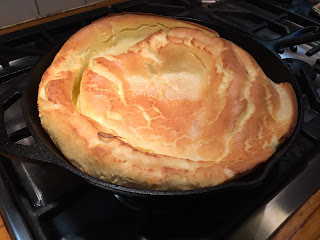
It is a chilly, dreary morning and a warm Dutch Baby will be just the thing to serve for breakfast! This sweet German-style pancake is similar to Yorkshire pudding and is best served with lemon and confectioner's sugar. The name is derived from the German word pfannkuchen (pfanne and kuchen meaning "pan" and "cake").

In Southwest Germany, sliced pancake strips (flädle) are often served in soups. In the Netherlands, pancake restaurants are popular with families and serve many sweet, savory, and stuffed varieties. Like the Dutch baby, these egg-based pancakes (or pannenkoeken) are usually quite large (12" or so in diameter) and are filled with sliced apples, cheese, ham, bacon, stroop*, and candied ginger, alone or in combination.

  • 3 Tablespoons butter
  • 3 eggs
  • 3/4 cup flour
  • 3/4 cup milk
  • 1/4 teaspoon salt
  • 1/4 teaspoon vanilla
  • Lemon wedges
  • Confectioner’s sugar for dusting

Preheat oven to 425 degrees F. Place butter in a 10" - 12" skillet or heavy baking dish and place in oven while preheating. Remove the pan before butter starts to brown. In the meantime, beat eggs until foamy; add milk, flour, salt and vanilla and blend together until just mixed. Pour into hot skillet and return to oven for approximately 15 - 20 minutes until golden brown and puffed.

Remove the pancake from oven and dust with confectioner’s sugar. Don't be disappointed if the pancake falls soon after being removed from the oven. Serve immediately with lemon wedges and extra pats of butter. When the lemon juice mixes with the confectioner's sugar it makes a creamy lemony sauce that is perfect. Make sure you eat it while still warm; it is not nearly as good when it is cold!

*Stroop is a thick molasses-like, fruit-based syrup which is popular especially in combination with bacon.


Yum

Tuesday, January 22, 2013

Technique of the Week: Steaming

Steaming is a wet cooking method that transfers heat to food via conduction, (i.e. from direct contact with the water vapor,) and convection, (i.e. from the upward motion of the water vapor.)  Steaming is a highly effective method of transferring energy.  Steaming doesn't leach away nutrients like immersion methods do since the food is not surrounded by roiling liquid.  Steaming is ideal for more delicate meats and vegetables which would be damaged by the greater agitation and disruptive force of boiling or simmering water. Steaming and “health food” are practically synonymous making it the cooking method of choice for dieters everywhere since there is no fat employed whatsoever.
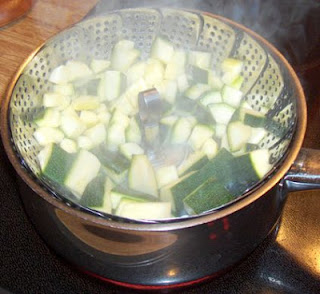
There are a number of equipment options for steaming.  The first is the classic bamboo steamer, traditionally used to make a variety of Asian dishes.  They can be stacked on top of each other thus allowing the simultaneous steaming of multiple items.  Then, there is the traditional steaming pan which is basically a sauce pan with holes in the bottom that sits snugly on top of another saucepan which holds the steaming liquid. The most popular folding steamer insert, designed to conform to the diameter of any pot within its particular range.  Our personal favorite is a silicone version of the steamer insert, but a colander set inside a larger pot of simmering water is an inexpensive, make-shift version.

Regardless of the vessel, the concept is that food placed in the upper section of a steamer is cooked by the heat and vapor of the liquid boiling in the lower section. A well-fitting lid, to keep the steam in, is important. Careful timing is essential as steamed food is tasteless if even slightly overcooked. Steaming is pretty straightforward.  Bring the water to a gentle boil and place the food in the steamer and cover.  Just make sure the food is not in direct contact with the liquid water.  If you’re steaming something that takes an extended amount of time, you may need to add a little hot water during the process to compensate for evaporation.

Basic steaming is obviously performed with water, but you can use a flavored liquid and impart additional flavor to the food.  Court-bouillon is a broth made from water, wine, vinegar and/or citrus juice, aromatics and herbs.  Traditionally it is employed for poaching but you can use it as a steaming liquid as well.  Moreover, when the item is done steaming you can utilize what’s left of the Court-bouillon as a sauce.  For more intensity, boil some of it down for a richer sauce.

Potatoes are great candidates for steaming. The advantage of this method, especially with floury potatoes, is that none of the starch is lost in the water and there is no violent agitation to break up the potatoes. Cut the potatoes to a uniform shape and size and place in the top half of a steamer with the water below set to boil vigorously.

Most vegetables can be steamed in about five minutes.  Do not over-steam or your green vegetables will start to lose their vibrant hues.  Vegetables can be steamed in their own juice. Spinach, for example, may be put, wet from washing, into a covered pan and shaken over moderate heat for about 5 minutes. It will then be soft, bright green and much reduced. Press to extract excess moisture, add a tablespoon or 2 of butter and season. Green beans are another vegetable that lend themselves to steaming.
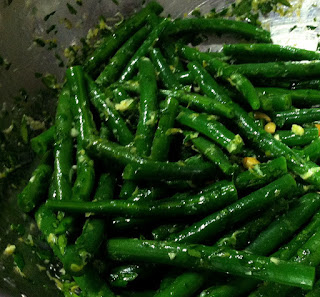
Steamed Green Beans Gremolata
  • 1 lb. green beans, trimmed
  • 1 tablespoon lemon zest
  • ½ cup fresh parsley, minced
  • 2 garlic cloves, minced
  • ¼ cup extra virgin olive oil
  • 1 teaspoon lemon juice
  • ¼ teaspoon salt

Bring water to a boil and place steamer over water. Place the beans in the steamer basket and allow to steam for 8 minutes and test one of the beans for doneness. The beans should be until tender but still crisp and bright green. If they if they are not yet done, check again at 12 minutes. Remove beans from steamer and turn out into a mixing bowl.

Gremolata is an Italian herb condiment typically made of lemon zest, garlic, and parsley. Combine zest, parsley, garlic in a small bowl and slowly drizzle in olive oil stirring until well blended.

While the beans are still hot, toss them with two tablespoons of Gremolata and sprinkle with lemon juice. The lemon juice is added just before serving to keep the beans from turning brown (so, do not do this ahead of time).  When ready to serve, place the beans on a serving plate and sprinkle with salt and garnish with a bit more chopped parsley. Serve hot or at room temperature.

These beans are delicious cold too. They can be kept covered in the fridge for up to 3 days. Toss them in a salad or just eat with your fingers.


Yum

Thursday, January 17, 2013

Andouille Po'Boys in the 'Hood

Excerpted from the post originally appearing on the Virginia-Highland Civic Association website on January 16, 2013 :

Many people do not know that the term Mardi Gras actually means “Fat Tuesday.” Fat Tuesday is the last day of the Carnival season that begins January 6th which is the twelfth day after Christmas, (yes, like in the song). Fat Tuesday is the last opportunity to celebrate before Lent which begins on Ash Wednesday. This pre-Lenten carnival has Roman Catholic origins and is celebrated in New Orleans, as well as Brazil, France, Germany and…Atlanta!

The Virginia-Highland neighborhood of Atlanta is known for its great restaurants and bars, several of which  have annual Fat Tuesday celebrations, but few more energetic than the festivities at D.B.A. Barbecue. This chef-owned, casual restaurant located behind the community post office goes all out with plenty of beads, Cajun-inspired menu items and specialty drinks like hurricanes and Louisiana pints to add to the authenticity of the evening.

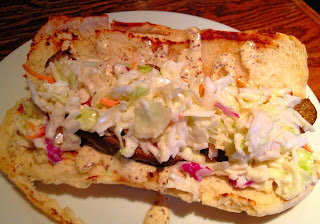
According to Assistant Kitchen Manager George Jewell, in addition to their regular Southern barbecue menu, the evening’s offerings will include fresh oysters, gumbo and several po’boys including battered shrimp, fried oyster and Andouille sausage. With a little prodding, George, an Atlanta native who has worked at D.B.A. for three years, shared the technique for assembling the perfect Andouille po’boy including the formula for making Creole mayonnaise:

  • 1 hoagie roll
  • 2 links of Andouille sausage
  • 2 tablespoons Creole mayonnaise*
  • ½ cup coleslaw

Cut the Andouille links lengthwise and place on a hot griddle to sear and heat through. Place cut bread on the griddle to warm as well.

*Make Creole mayonnaise by mixing equal parts Creole mustard and mayonnaise together until fully combined. Add salt and pepper to taste and add a drop or two of Tabasco sauce if you like a little kick.

Spread both sides of heated bread with a generous amount of mayo and then lay seared sausage cut side up on bread. Top the sausage with coleslaw and serve with Cajun-spiced fries or a side of red beans and rice.

If you are in the Atlanta area you can experience this amazing sandwich first hand, head on over to D.B.A. Barbecue for beads, live music and delicious food on Tuesday, February 12th.
D.B.A. Barbecue on UrbanspoonDBA Barbecue on Foodio54

Yum

Friday, January 11, 2013

Humble Corn Soufflé

Many people assume that because we cook and write about food that we are food snobs. Sometimes we are asked “Do you eat like this all the time?” Like what? Yes, we cook and eat at home, but not every dish or meal that we serve is chichi. Cooking at home is more about creating an environment that keeps everyone coming back for more than pretentious dining. Simple roasted cauliflower or a quick tomato salad graces our table as often or more frequently than haute cuisine.

We try to use fresh vegetables when they are in season, but during the winter months it can be a challenge to find freshly-picked ingredients. Corn is one of the few vegetables that maintains good flavor and consistency when canned. A co-worker introduced Dom to this soufflé-like casserole when we were first married and after many years, we revived the forgotten recipe. This casserole is wicked quick to make and is quite tasty.

  • 1 (15 oz.) can whole kernel corn, undrained
  • 1 (15 oz.) can cream-style corn
  • 1 cup sour cream
  • 1/4 cup sugar
  • 2 eggs, beaten
  • 1/2 cup butter, melted
  • 1 fresh jalapeno, seeded and diced
  • 1 (8 oz.) box Jiffy corn muffin mix (or recipe below)
  • {or 1 2-oz. can of diced green chilies}, (optional)
  • 1/2 teaspoon coriander, (optional)
  • Pinch of cumin, (optional)

Corn Bread Mix: (8 oz. mix equivalent)
  • 2/3 cup flour
  • 1/2 cup yellow cornmeal
  • 3 tablespoons sugar
  • 1 tablespoon baking powder
  • 1/4 teaspoon salt

Preheat oven to 350ºF. Mix corn and other wet ingredients together and combine well.  Add muffin mix and stir until completely combined. Pour batter into a greased 9 X 13 baking dish or casserole pan.

Bake the casserole for 50-60 minutes until completely set. The casserole should not jiggle at all when shaken. The top of the casserole should be nicely browned and cracked. Let dish stand for about 5 minutes before serving.


Yum

Tuesday, January 8, 2013

Technique of the Week: Deglazing

Deglazing is the technique of dissolving the caramelized tidbits of seared foods is dissolved with a liquid in order to make a “pan sauce,” which will maximize the flavor of the finished dish. Most often the seared item is meat, but it could also be vegetables, either as a main dish or as a building block of another dish.

Deglazing can be done with any liquid. Alcohol or stock is most frequently used, but water works just as well.  The method of choice to achieve the best flavor is alcohol followed by some type of stock. While wine is most commonly used (red wine with red meat and white meat with white wine), but options include brandy, cognac, Marsala, sherry, port, or even vodka.  The type of alcohol chosen is determined by the nature of the dish and the flavor profile desired.  For example, for a sweeter sauce you would use a port.  For a more complex, earthy and aromatic sauce, you might try a good cognac. And, in the case of fajitas, tequila works best.

Before deglazing, drain any excess fat from the pan being careful not to dislodge and toss any of the browned bits. If you are adding aromatics (shallots, onions, garlic), simply sauté them with some salt and pepper in the leftover pan drippings.  Depending on how little drippings you have, you may even need to add some oil and/or butter to the pan.  Once the aromatics are sautéed you’re ready to deglaze.

Carefully add alcohol since it can self-ignite, especially brandies and hard liquors creating a flambé effect. The traditional warning is to remove the pan from the stove when adding the alcohol but spontaneous combustion is still possible. If your goal is to flambé the alcohol and it did not self-ignite, tip the pan so it touches the flame or use a match. Once the alcohol is added, or once the flames have subsided if you’re flambéing, bring it to a boil as you scrape the fond off the bottom of the pan.  A straight edged wooden spatula is the most effective tool for this job.  You are now deglazing.  All of those intensely flavored little bits will invitingly melt into the sauce, creating a complex web of flavor.  Usually the alcohol is reduced to at least half and sometimes even further.  Vaporizing it down to a syrupy glaze is a key flavor enhancing technique.

Once the alcohol is reduced add the stock.  Continue to boil and scrape, reducing the stock to at least half.  If you are not using alcohol simply add the stock from the get-go and deglaze accordingly.  Once the stock is added, season with salt, pepper, herbs, zest, etc.  Or, if not using stock, (such as when making a sauce based solely on wine), add the seasoning after the initial deglazing with the alcohol. Once the alcohol and/or stock has been reduced to the desired thickness, the final step is to add cream or butter. Add cream and simmer for a few minutes to concentrate it or if using butter, add a tablespoon or two of cold butter and remove the sauce from the heat the instant it has melted.  Strain the sauce and serve.

The same procedure is used for making a sauce for roasts. If making a gravy, after you add flour to the drippings and cook it to make a roux, deglazing occurs when the stock is added.  Whisk the stock into the roux scraping up the fond as you go.

Sautéed vegetables can be deglazed by adding vegetable or chicken stock. For tomato sauce, deglaze the garlic and/or other sautéed aromatics with wine, reduce, and then add the tomatoes.  For rice pilaf and risotto, deglaze the aromatics and rice with wine before adding the stock. Deglazing the fond will also boost the flavor of soups and stews.  Virtually anything that can be seared or sautéed can be deglazed.


Yum
Powered by Blogger.

footer social

ShareThis