Saturday, December 31, 2011

Don't Pop Your Cork: Opening Champagne Correctly

You have splurged on a nice bottle of champagne (or sparkling wine)* and opening the bottle seems a bit intimidating. The correct method for opening a bottle is probably not the way you think; the cork should not go soaring through the air spewing the golden elixir everywhere. Instead, here are a few tips to ensure safety and optimum enjoyment:

1. Make sure your bottle is well chilled (42°F to 50°F) for at least 30 minutes in a bucket with ice and water before opening.

2. Remove the foil surrounding the cage and cork.

3. Keeping one hand firmly on the cage and cork, use your other hand to unwind and loosen the cage. Leave the cage on for a better grip on the cork.

4. Hold the bottle at a 45-degree angle, pointing away from anyone or anything breakable. The amount of pressure in a champagne bottle is very high, and it can easily send the cork flying unexpectedly.

5. With one hand still firmly holding the cage and cork, grip the bottom of the bottle with your other hand. Gently twist the bottle from the bottom while keeping a firm grip on the cage and cork. At the same time, rock the cork very slightly to get it moving. You are turning the bottle, not the cork.

6. You'll feel the cork begin to move and press up against your hand. Keep a firm grip on it. The amount of pressure you use determines how loud the pop is when the cork finally comes out. You should actually rock the cork slowly while twisting to ease it out so the bottle releases a small sigh. This way the pressure is taken off and you keep the sparkling wine from spilling everywhere.

However, if you must make a big production of opening your bottle, then you'll want to saber your champagne. Sabrage (the method of opening a bottle with a saber) became popular in France during the time of Napoleon who preferred to celebrate his victories by having his bottles of champagne sabered open. Sabrage involves swinging a specialized sword over the tip of the bottle; this method cleanly removes the glass lip along with the cork. This method is not recommended for home use (Duh!)

Regardless of the way you open your champagne or sparkling wine, please enjoy it responsibly. If you are not celebrating in your own home, please designate a sober driver or take a taxi cab to get home safely.

*True French champagne blends three grapes―Chardonnay (white), Pinot Noir (red), and Pinot Meunier (red) from the Champagne region of northern France. However, sparkling wine is made all over the world. As a general rule, méthode champenoise (Champagne method) is the phrase you're looking for on the sparkling wine's label. This means that among other things, the wine has undergone a second fermentation in the bottle, producing millions of tiny bubbles.


Yum

Wednesday, December 28, 2011

Sweet Potato Gnocchi with Sage and Pecans

Sweet potatoes are readily available during the cooler months and are a delicious accompaniment to all sorts of dishes. Sweet potatoes are low in calories and contain no saturated fats or cholesterol. They are a rich source of dietary fiber. They are also an excellent source of the powerful natural antioxidants beta-carotene and vitamin A. Vitamin A is also required by the body to maintain integrity of healthy mucus membranes and skin and is a vital nutrient for vision. These amazing tubers are jam-packed with essential vitamins such as pantothenic acid (vitamin B5), pyridoxine (vitamin B-6) and thiamin (vitamin B-1), niacin, and riboflavin as well as gracious amounts of minerals like iron, calcium, magnesium, manganese, and potassium that are essential for metabolism.

We always seem to have sweet potato leftovers. Perhaps we subconsciously make extras as an excuse to make gnocchi (or pie!) This recipe has it ALL: sweet, savory, cheesy... (need we say more?) The wonderful flavors and textures of this dish will make you a sweet potato enthusiast too. 

Gnocchi Dough:
  • 2 cups sweet potatoes, mashed
  • 1 1/2 to 2 cups wheat flour
  • 1 egg
  • 1/4 cup Parmesan cheese
  • 1 teaspoon kosher salt

  • Sauce & Serving:
  • 20 large fresh sage leaves
  • 2 tablespoons olive oil
  • 1 teaspoon kosher salt
  • 1/3 cup pecans (or walnuts), chopped
  • Grated Parmesan for serving

If you are not using leftover sweet potatoes, first you must cook some sweet potatoes. We normally have leftovers so this step is not usually part of the recipe for us. The microwave works wonderfully for the potatoes in this recipe. Prick the sweet potatoes with a fork and then microwave until cooked all the way through. In our microwave this takes about 20 minutes on high. In our microwave this takes about 20 minutes on high. They are done when a knife inserted into the center goes through with little resistance. Alternatively, you can bake them in a 450°F oven for 40 minutes.

Once the potatoes are cool enough to handle, scoop the flesh from the skins and place in a mixing bowl. Mash the potatoes until smooth, and then add egg, 1/4 cup Parmesan cheese, 1 teaspoon kosher salt, and about 1 1/2 cups wheat flour. All-purpose flour works just fine as a substitute if wheat flour is not available. Mix with a spoon and then kneed until a soft dough forms. Then gradually add additional flour until the dough is not sticky.  Depending of the moisture level of your potatoes and egg, you may have to add a fair amount more flour to get the dough to a workable condition. If it’s too sticky to roll out, add more flour. Don’t overcompensate though; the dough should be soft – not dense.

Now for the fun part! Divide the dough in four parts, and using your hands, roll out each piece into a very long, skinny roll (our boys call them “snakes.”) Then cut off small parts of the dough to form little pillows. Each “snake” makes about 20 gnocchi. If you want them to look fancy, you can use a fork to make indentations on the top of each piece. Place the gnocchi on a parchment lined baking sheet.

Bring large pot of salted water to boil and working in batches, boil gnocchi for 3-5 minutes until tender. The gnocchi will float on the surface when done. Don’t over- boil or they turn to a gluey mush!

While there are lots of sauces that go well with gnocchi, the simplest is the best. In a large saucepan, heat a tablespoon or two of olive oil. Add chopped sage and a bit of kosher salt and heat for about a minute before adding gnocchi to pan. Transfer gnocchi from the boiling pot with a slotted spoon directly into the pan with the sage-infused olive oil. Toss gnocchi to coat well and cook for several minutes until slightly browned. Cook remaining gnocchi in same fashion, transferring to the pan once boiled.

Serve immediately, topped with chopped pecans (or walnuts), freshly grated Parmesan and a bit of fresh ground pepper.

Note: Any uncooked gnocchi can be frozen for up to 1 month. We freeze them in a single layer on a cookie sheet and then store them in a freezer bag. Do not thaw before cooking; simply boil them right out of the freezer so that they thaw as they cook.

Yum

Friday, December 23, 2011

Meet the Original Tom & Jerry

This very potent variant of eggnog which is served hot with brandy and rum was a popular drink in the U.S. and England from the mid-1800s until the Eisenhower administration. “Thomas and Jeremiah” was a jokingly-highfalutin’ name for the frothy hot drink once every bit of piece of American Christmas iconography as mistletoe and roasted chestnuts. In the 1880’s, the New York Sun reported that the most fashionable barrooms would place a huge ornamental and costly punchbowl midway on the bar at Christmas time. It was vulgarly called “dope.” The stylish martinis and “wallbangers” of the swinging 60’s instigated the demise of the Tom and Jerry craze. We first encountered this heady libation at a neighbor’s home several years B.K. (before kids.) We were very excited to find the recipe in our first cookbook “The Joy of Cooking” copyrighted in 1975 (which has been adapted below.) We’ve been told that later versions of the cookbook do not include this recipe, so truly it must be an outdated concoction.

Contrary to popular belief, the drink’s name is not related to the popular MGM cartoon nor was it the brain-child of famous bartender "Professor" Jerry Thomas who authored of one of the first bartender's guides “How to Mix Drinks” in 1862 either. Instead, it is a reference to Pierce Egan's book, “Life in London” and the subsequent stage play “Life in London” (“Tom and Jerry”) circa 1821. To publicize the book and the play, Egan introduced a variation of eggnog by adding ½ fluid ounce of brandy and rum calling it a "Tom and Jerry." The additional fortification helped popularize the drink.

The drink also features prominently in Damon Runyon's 1932 short story "Dancing Dan's Christmas" beginning with the passage: “This hot Tom and Jerry is an old time drink that is once used by one and all in this country to celebrate Christmas with, and in fact it is once so popular that many people think Christmas is invented only to furnish an excuse for hot Tom and Jerry, although of course this is by no means true.” Runyon’s story, which inspired the Broadway musical “Guys & Dolls,” introduces the drink and a group of New York street characters who, after having a few “cracks” of Hot Tom and Jerry, embark on a goofy adventure to spread holiday cheer while tarnishing the image of Santa Claus in the process.


Tom & Jerry Batter:
  • 3 eggs
  • Pinch of cream of tartar
  • 1/4 cup powdered sugar
  • 1/4 teaspoon ground allspice
  • 1/4 teaspoon ground cinnamon
  • 1/4 teaspoon ground cloves

Wash the eggs in their shells with mild dish soap before cracking* and separate the egg whites from the yolks. In a large bowl, beat the egg whites with cream of tartar until they are stiff but not dry. In another bowl, beat the egg yolks with sugar, allspice, sugar, cinnamon, and cloves. Gently fold the yolk into the egg whites trying not to deflate the whites. This is the batter which can be stored in the refrigerator for up to a week or it can be frozen.

For each drink:
2 tablespoons of Tom & Jerry batter
½ jigger (3/4 ounce) of brandy
1 jigger (1½ ounces) of dark rum

Dollop batter into a mug and add brandy and rum. Top off the mug with the hot water, milk or coffee and gently stir to mix thoroughly and dust each mug with freshly grated nutmeg. To quote Dancing Dan, “you will never taste anything so soothing in your life.”


*The original recipe in “The Joy,” the eggs are used raw. To avoid the threat of salmonella, use the freshest eggs possible and wash the shells before using. You can use pasteurized eggs or you can prepare the batter over a double-boiler if you wish to be extremely cautious.


Yum

Sunday, December 18, 2011

Busy Hands Cinnamon Dough

Busy hands are happy hands (and make happy Moms!) While this dough is not comestible in the true sense of the word, it is made from edible ingredients to form non-toxic, kid-friendly craft dough is undeniably perfect for the holidays. It gives the kiddles something to do while you work, makes the house smell wonderful and makes adorable holiday gifts and tree ornaments. This was always a great way for the kids to experiment with shapes using cookie cutters and plastic utensils to create their own masterpieces. One year we used alphabet cutters to make gift tags for packages. They were almost as well received as the actual presents!

Cinnamon Dough
  • 3 cups (25 oz. jar) of unsweetened applesauce
  • 1 cup ground cinnamon
  • ½ cup ground clove
  • ½ cup ground nutmeg
  • 1 tablespoon corn starch (or non-toxic school glue)

Pour applesauce into a sieve and place over a bowl. Drain overnight. Mix together ingredients and roll out dough on adding more cinnamon if needed to roll out dough without it sticking to your work surface.

Roll the dough between waxed paper until it's between 1/4" thick and 1/2" thick. And then cut out desired shapes. Gently place the shapes on a piece of clean wax paper or parchment paper. You can use a straw to punch a hole for the ribbon to hang. The circle of dough will pull out with the straw.

The ornaments will take about 4 days to dry completely depending on their thickness. You should plan to turn them over a couple of times or the edges will curl. (The thicker they are the longer it takes for them to dry, but the less they will curl.) Don't be surprised if the ornaments shrink a bit during the drying process. You may wish to keep this in mind when picking out the cookie cutters for your designs.

When dry, thread a piece of ribbon or yarn through the hole to hang. Enjoy the wonderful scent all season long.

Yum

Friday, December 16, 2011

Waste-Not Want-Not Rice Pudding

Anyone who has ever tried to cook for their children knows that it is nearly impossible to judge how much food to prepare on any given evening, which in this difficult economy can be very frustrating as we don’t want to waste food.

Rice is a wonderful accompaniment to countless meal options. It is also a rich source of dietary energy and a good source of thiamine, riboflavin and niacin. Rice provides 20 percent of the world’s dietary energy supply, while wheat supplies 19 percent and corn only 5 percent. Luckily, rice also keeps well as a leftover and can be used in a variety of salads, casseroles and, my personal favorite, rice pudding.

Not only is this recipe simple, but it makes a great, soothing dessert and is especially delicious served with a dollop of whipped cream. It makes a great breakfast treat too (but perhaps without the whipped cream.)

  • 2 cups leftover cooked white rice
  • 2 cups whole milk
  • 1 cup half and half
  • 2/3 cup sugar
  • ¼ teaspoon salt
  • 1 teaspoon vanilla extract
  • 1 large egg, beaten
  • ½ teaspoon cinnamon, optional
  • Pinch of nutmeg, optional
  • ½ cup raisins, optional
  • 2 tablespoons of brandy or rum, optional

Combine cooked rice, milk, half and half, sugar and salt in a medium saucepan. The mixture will look very thin and you may think the proportion of rice to liquid is off, but it’s not. Bring to a boil, and then lower the heat to a simmer and stir in the vanilla and raisins.

Simmer the pudding-to-be uncovered for 30 minutes, until the rice is very soft and just about all of the milk is absorbed. Stir often, particularly toward the end. The mixture should still be a littler thinner than you want the finished product to be because it will continue to thicken as it cools. Stir in cinnamon and/or nutmeg, if using and then slowly stir in the beaten egg and continue to cook for 1 minute.

Remove from heat, and add the brandy (if using) and stir well to mix. Pour into a bowl and place a piece of plastic wrap directly on top of the pudding to prevent a skin from forming. Serve warm or chilled with whipped cream.


Yum

Tuesday, December 13, 2011

Technique of the Week: Mulling (for Cycling Santas)

Mulling is a centuries-old practice in which various spices and fruit essences are infused into heated juices, wines, ciders or brandies. The ingredients used in this infusion are known as mulling spices. The recipes for mulling spices may vary somewhat, but in general they include allspice, nutmeg, cloves, cinnamon, star anise and various dried fruit peels. The essences of the mulling spices create a complex undertone of spicy and citrus flavors which complement the basic fruit elements of the mulled beverage.

The process of mulling was first used with wines which prior to refrigeration and modern bottling techniques, went bad pretty quickly. To delay spoilage (and make spoiled products taste less disgusting,) spices began to be added during the Renaissance period. Since young wines were commonly bottled during the early fall, “mulling” was necessary by Yuletide as some were beginning to reach the undrinkable stage, hence how the consumption of “mulled” beverages became a holiday tradition. Apple cider was another autumnal product which lent itself to mulling. Physicians of the period also believed that mulled beverages were curative acting as a kind of vaporizer and conduit of other foodstuffs to every part of the body, and the addition of fragrant and exotic spices would make it even more wholesome.


These “therapeutic” properties made mulled cider the perfect choice for celebrating the 5th annual Atkins Park Santa Ride benefiting The Leukemia & Lymphoma Society last Wednesday. Cyclists dressed in Santa suits and bikes decked out with trees, lights and tinsel rode through the streets of the Virginia-Highland neighborhood braking several times en route to revel and share some holiday cheer.

We were very excited to be part of this year’s festivities. Dom and other members of the Morningside Dads’ group hosted a “holiday cheer” station near Piedmont Park featuring hot mulled cider for the merrily-clad riders. Using a small camp stove, the mulled cider was steaming hot as riders stopped to imbibe and socialize.

Cheerful Mulled Cider
  • 1 gallon apple cider
  • 2 cups dark rum
  • 1 cup light brown sugar
  • 2 teaspoons allspice, ground
  • ½ teaspoon nutmeg, ground
  • 1 apple, sliced
  • 1 orange, thinly sliced
  • 3-4 cinnamon sticks
  • 2 teaspoons whole cloves

Wrap cinnamon sticks and whole cloves in cheese cloth and tie tightly. Place apple cider in a stock pot with the wrapped cinnamon and cloves, and apple and orange slices and bring to a boil. Add the brown sugar and ground spices and stir to dissolve sugar. Reduce heat and simmer for 10 minutes before adding rum. Ladle into mugs and make merry!


Yum

Saturday, December 10, 2011

Bacon-Braised Brussels Sprout Love

Brussels sprouts are one of those vegetables that you either love or hate. There is very little middle ground where they are concerned. Our family falls into the “love” category. In fact, I have been known to order Brussels sprouts as my main course at our favorite restaurant.

Brussels sprouts are now known to top the list of cruciferous vegetables. While all cruciferous vegetables contain glucosinolates (the chemical starting points for a variety of cancer-protective substances), Brussels sprouts have been shown to have greater amounts of  glucosinolates than those found in mustard greens, turnip greens, cabbage, kale, cauliflower, or broccoli.

These Brussels sprouts are very hearty and smell delicious, and go very well with pork dishes. Take care not to overcook the sprouts because not only will they lose their nutritional value and flavor, but they will begin to emit the unpleasant sulfur smell that is so often associated with overcooked cabbage.

  • 1 1/2 pounds Brussels sprouts
  • 4 ounces (about ½ cup) bacon, chopped
  • 1-2 cloves garlic, peeled and smashed
  • Kosher salt
  • Freshly ground black pepper
  • Crushed red pepper flakes (optional)
  • ½ cup water
  • 2 tablespoons cider vinegar
  • ¼ cup grated Parmigiano-Reggiano

Wash, trim and cut the Brussels sprouts in half. Next, place a large pan over medium-high heat. Cook bacon turning, until crisp and until fat renders (about 2 to 3 minutes.) Transfer to paper towels to drain.

While bacon is cooking, prepare Brussels sprouts by removing brown and damaged outer leaves and trimming the bottoms. To help Brussels sprouts cook more evenly (and quickly), cut each sprout in half. Add the smashed garlic clove, crushed red pepper (if you are using) and Brussels sprouts to the rendered bacon fat in the skillet and cook over moderate heat, stirring occasionally (and gently) until slightly caramelized (about 3 minutes).

Add water to the pan and gently scrape the caramelized bits from the bottom of the pan. Then simmer, covered, for approximately 5 minutes until sprouts are fork tender but not mushy. Remove lid and add a splash of vinegar and reduce until syrupy, another 2 to 3 minutes.

Crumble bacon over the Brussels sprouts and toss with salt and pepper to taste. Serve with a sprinkling of shaved or grated Parmigiano-Reggiano.

Yum

Thursday, December 8, 2011

Torrone - Italian Nougat Candy

Every year one of Dom’s friends would bring a box of La Florentine Torrones from Rulli Brothers in Youngstown for the holidays. Our friend did not go home this year, so Dom found himself “torrone-less.” I researched and found this recipe. The first batch did not set up properly; I don’t think I beat it long enough. But, the second batch was a huge success and received rave reviews from all our local connoisseurs.

Torrones are a traditional Italian Christmas treat. According to legend, the nougat confection originated in the 15th century when a sweet made with honey, egg whites, and almonds were offered at a wedding of Italian nobles. The nougats were made in the shape of the Torrazzo of Cremona in Lombardy, Italy. The Torazzo is the bell tower of the Cathedral of Cremona, and the source of the candy’s name “torrone.”

  • ½ cup honey
  • 1 cup sugar
  • ¼ cup light corn syrup
  • 2 large egg whites, room temperature
  • ¼ teaspoon cream of tartar
  • 1 teaspoon pure vanilla extract
  • 1 ½ cups toasted almonds, whole

Combine honey, sugar, and corn syrup in a saucepan. Cook over medium heat, stirring occasionally, until mixture the sugar has dissolved and a candy thermometer registers 300 degrees F in temperature. Remove from heat immediately. Watch very closely because once the caramel reaches 300 degrees it can scorch easily.

Meanwhile, put egg whites and cream of tartar into the bowl of an electric mixer fitted with the whisk attachment. Beat on medium-high speed until stiff peaks are formed, then raise speed to high. Slowly pour in a thin stream into egg white mixture, and beat until mixture has cooled and thickened and begins to stick to whisk, about 10 minutes. Reduce the mixer speed to medium-low and beat in vanilla and almonds. Working quickly, spread mixture into a greased and floured 9” x 13” baking dish.* To spread evenly, I grease a sheet of parchment and place it greased side down on the top and push the nougat flat in the dish.  Let cool on wire rack at least 3 hours, or overnight.

Cut around edges of torrone to loosen. Remove from baking dish and transfer to a cutting board. Trim edges to be straight. Using a long, sharp knife, cut the candy crosswise into 3/4-inch blocks. Torrone can be stored between layers of parchment in an airtight container up to 2 weeks.

*You can use edible rice paper when available on the top and bottom of the torrone. This prevents sticky fingers when eating and adds a professional touch.


Yum

Tuesday, December 6, 2011

Technique Of The Week: Peeling & A Giveaway!

Means “to strip or tear off an inedible or undesirable outer layer, especially as it relates to a fruit or vegetable.” The term “peel” refers to the protective outer layer (exocarp) of a fruit or vegetable which can be peeled away to reveal the edible portion of the produce.

Depending on the thickness and taste, fruit and vegetable peels are sometimes eaten, such as with apples. In some cases the peel is unpleasant or inedible, in which case it is removed and discarded, such as with bananas or potatoes. In the case of citrus fruits, the peel is bitter and generally not eaten raw, but may be used in cooking. The outermost, colored part of the peel is called the zest, which can be peeled off and used in recipes for its tangy flavor.

Like every budding chef who starts out with the routine task of peeling, my peeling career began with an ancient swivel-blade peeler and some carrots. The peeler of my youth is still the most commonly available, is still inexpensive (I even saw one recently at the Dollar Store!) and is still perfectly designed for the job it's meant to do. It was a simple tool with a contoured metal handle, which is really an open, easy-to-grip frame that provides a stable holder for the steel rod that, in turn, secures the blade. The curved blade is point¬ed at the top, the better to carve out unwanted potato eyes, and has a slit down the center. Since both sides of the interior slit are sharp, the peeler works equally well for righties and lefties. And since the blade is mounted on a steel axis, it rotates just enough to ride up and down the hills and valleys of a bulbous potato or craggy squash.

I was 23 before I realized that there were other types of peelers. I was intrigued by the top-bladed “harp” peeler, but quickly relegated it to the yard sale heap because I could never master the proper motion and ended up with a frustrated pile of mutilated potatoes. I reverted back to the rickety prehistoric pivoting version of my formative years.

Then I found it. The only peeler I will use forevermore. The stationary-blade peeler is as close as you can get to a knife and still have the convenience of the curved, slit-down-the-center righty or lefty blade. On this no-nonsense tool, the blade is mounted straight up on a handle that can be made of any manner of high-tech materials or the standard metal, plastic or wood. I prefer the indomitable straightforward movement of the immobile blade to the clanky swivel variety.

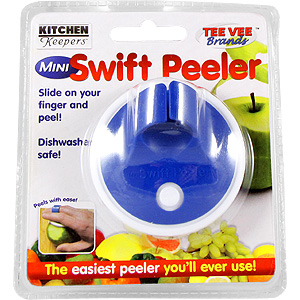
Recently, I got 2 handheld “Swift Peelers” made by Kitchen Keepers. One for us and one for YOU! The compact peeler slips over your middle finger allowing you “to run your palm naturally all over your fruits and vegetables for the easiest most efficient peeling ever.” We can experiment together to see if it lives up to its sales pitch. Now, here is what you have to do to WIN this handy little devil!

Ways to Enter (3 possible entries):

1. "Like" We Like To Cook! on Facebook and leave us a comment in the comment section below this post letting us know you did so = 1 Entry


2. Leave us a comment in the comment section below this post telling us what kind of peeler you prefer to use = 1 Entry

3. Share this giveaway on your Facebook page and tag @weliketocook and then come back and leave a comment below to let us know you did so = 1 Entry 

**Make sure you leave a separate comment for each entry and list a valid email address so that we can contact the winner!**

This Giveaway will close on Sunday, December 18th at midnight EST and a winner will be randomly selected using random.org and announced no later than Monday, December 20th.

*I have not received any monetary compensation for this product mention nor is it sponsored or endorsed by Kitchen Keepers or Facebook. We have purchased these products on our own.


Oh Yea! The technique part...

How to Peel Produce:

The peel fruits or vegetables using a vegetable peeler, firmly grasp the produce in one hand and hold the peeler in your other hand. Slant the peeler downward and slowly peel the skin away. Rotate the item and continue the peeling.

Continue the process with the top and bottom of the produce making sure to remove all unwanted skin. Using the pointy tip of the peeler, extract any unwanted blemishes or growth (like a potato’s “eyes”) by simply gouging the tip into the produce and twisting with your wrist. Remember to save the peels that can be used to enhance broth or soup or add them to your compost pile.

Yum

Saturday, December 3, 2011

Food, Wine & Cars: A Tour of Discovery

On Saturday, the multi-city Buick Discovery Tour rolled into the Loews Hotel in midtown Atlanta offering locals the opportunity to mingle with celebrity chefs, attend cooking demonstrations, participate in a wine tasting and get a first-hand look at Buick’s 2012 line. Buick, in partnership with FOOD & WINE magazine, gave Atlantans the chance to “discover” gourmet cuisine, fine wine and luxury vehicles.

Our tour began with a cooking demonstration by Chef Hugh Acheson, one of Food & Wine’s Best New Chefs of 2011, current judge on Bravo’s “Top Chef Texas” and owner/chef of the popular Atlanta restaurant Empire State South. Chef Acheson showed us how to prepare a roasted carrot and beet salad with feta cheese and cumin vinaigrette while encouraging the audience to savor seasonal ingredients and local produce. We all sampled the fresh simple salad and marveled at how well the cumin complemented the carrots
.

Next we were treated to an exhibition of molecular gastronomy (the application of both scientific and artistic principles in cuisine) by Chef Ben Roche, Executive Pastry Chef of Chicago’s Moto restaurant and co-host of “Future Foods” on Discovery’s Planet Green Network. Toting a huge canister of liquid nitrogen, Chef Roche prepared a batch of bacon ice cream flavored with bacon, maple syrup and sage, and beaten in a mixer with liquid nitrogen. He then re-created his signature “S’mores Bomb,” a caricature of the traditional ice cream bombe, complete with an Asian glass noodle ”wick” that he actually lit.

We were then escorted to the hotel parking lot which was packed with a fleet of 2011 Buicks including the Regal Turbo, Lacrosse, and Enclave. Informative product presenters and a legion of personal driving concierges provided information about the vehicles while guiding drivers around a 2-mile test-drive course. Special thanks to my ride-along partner Tamara who was a great chaperon in demonstrating the luxurious amenities of the new Buick LaCrosse.

Wine Consultant Michael Green, owner of Liquid Assets Consulting Group, gave a captivating and  animated lecture, condensing a 32-week wine seminar into a 20-minute lesson and tasting. Attendees tasted a pouring of Rodney Strong 2010 Charlotte’s Home Sauvignon Blanc and compared its flavor alone and after a bite of lemon noting that the lemon’s acidity altered the drinker’s perception of the wine’s flavor. His best advice is that “if a particular wine tastes good to you, then it is a good wine.”


The grande finale featured charismatic Chef Ming Tsai (producer of  the Emmy-nominated public television cooking show, “Simply Ming,” and owner of Blue Ginger restaurant in Wellesley, MA) slicing, dicing and cajoling his way through his favorite chicken and tri-bell pepper chow mein and sweet and sour mango pork recipes; offering comic relief while proving to the crowd that Asian food is approachable for the home cook. Each attendee was also were presented with a signed copy of Ming Tsai’s Simply Ming One-Pot Meals to take home as a reminder of the amazing event!

And, as if that weren’t enough - for every attending guest, Buick will make a donation to The FEED Foundation, a non-profit organization dedicated to improving the global food system, starting with ensuring nutritious school meals for all children.


Yum

Thursday, December 1, 2011

Be A Good Cookie: Join the Virtual Swap For A Cause


We all have favorite cookie recipes. By the time the holiday season arrives, however, ours are spread far and wide between a variety of bookmarked cookbooks, archived emails, and batter-stained scraps cut from an age-old magazine. Wouldn’t it be fabulous to have them all in one place?

And since, hosting a cookie swap is a great way to get together and exchange gifts with friends during the busy season, we thought a virtual cookie swap would be the perfect way to connect, compile a library of delicious baked goodies and support a wonderful cause!

Through the Cookies for Kids’ Cancer™, you can join in the fight against pediatric cancer by raising funds and awareness through bake sales and cookie exchanges. For each cookie exchanged or sold this holiday season (November-December), GLAD® will donate $.10, up to $100,000. To sweeten the pot, we will donate an additional $.10 for each cookie recipe contributed to this virtual cookie swap! 

We all have that one recipe, whether it's for the viscots your Gram used to bake, that special kolache Aunt Rose served on Christmas morning, or the gingerbread cookies decorated by you and your Mom, right? Share that special experience with us in your blog post along with your special recipe. Please don't forget to include the VCS badge in the body of your post so we can include it in the linky party!

Grab badge code here:


Don't have a blog, but want to participate? Simply add your story and recipe in the comments section below, and the recipe will be counted in our donation list!

Yum
Powered by Blogger.

footer social

ShareThis