Monday, May 30, 2011

The Birthday Epiphany With A Strawberry On Top (Or Bottom)

This post is not meant to be a shameless self-promoting attempt to solicit birthday greetings, but a commentary on the timing of my inner reflection. Everyone has a calling; a compulsion fueled by our own creative juices. Our artistic outlets provide us with a true catharsis. Dom’s is his cooking and mine is writing.

Lately, I have noticed that I have been writing what I think I should write; what I think people will want to know about or read. I entered recipes in quite a few food contests that actually received good reviews (including having 2 recipes chosen as Editor’s picks at Food52.com and one recipe chosen for Foodbuzz’s Flavor of the Month) which drove traffic to the blog, but they seemed hollow to me; devoid of personality. I now realize the problem was that I had gotten away from my true love which is writing about food. Not just recipes and trite blurbs of historical facts or nutritional benefits, but the experiences and revelations that make the recipes sing.

The Mind Purge
While some unfortunate souls have RLS (Restless Leg Syndrome), I suffer from RBS (Restless Blogger Syndrome). I find I create my best posts while cooking, cleaning, toiling in the garden, or when I finally lay my head on the pillow at the end of the day. I feel the uncontrollable impulse to empty my head of all thoughts in the way Dumbledore removes the memories from his mind with the elder wand and places them in the pensieve. The feeling of a fresh start after a mind purge is liberating; a brain dump resulting in a blank page.

Grams cooking in 1948
(in the sun, not the kitchen)
Perhaps it is even hereditary. My paternal grandmother (who was an exceptional cook trained at Le Cordon Bleu and may have even encouraged Julia Child to attend as Julia and my grandfather both worked for the OSS and traveled in the same social circles during the late 1940s.) Grams was known for two things: her art deco, ivory cigarette holder and the very audible, full-length conversations she would have with herself while she prepared dinner each night.

My undocumented pieces of literary genius always have Scrabble-winning vocabulary and segues that are smoother than hand-spun Tibetan silk which disappear into a misty vapor the millisecond I sit down in front of my laptop. Looking for inspiration, I log into the font of fodder known as Facebook and immediately get lost in the dizzying array of notions for blog posts. My mind sprints ahead from one potential post to another like a chess player thinking 5 moves ahead. Alas, no posts magically appear in the editing pane.

For this post, I employed a new tactic. While wiping down the kitchen counters, inspiration struck. Thinking quickly, I grabbed my cell phone and recorded my thoughts. Fourteen voice memos later, I had a clean kitchen, a clear mind, and the respectable makings of a blog post!

While this exercise in self-actualization has given rise to the epiphany about my writing which in the future will reflect more of my own personality, this is still a food blog. Thus, I feel compelled to include a recipe at this juncture; something simple and delicious (with a beat you can dance to.)

Since my birthday is usually heralded by the seasonal return of chimney swifts, gardenia blooms, and fresh strawberries, we should celebrate the sweet yet tart berries by accentuating them with sour cream and brown sugar. Chef James Haller, author of Cooking Brilliantly Without Recipes, is credited with first serving strawberries this way at his restaurant the Blue Strawberry in Portsmouth, New Hampshire.*

1 pint fresh strawberries
½ cup sour cream
½ cup brown sugar

Quickly and gently rinse strawberries (don't let them get soggy!) and place them in a bowl, and place sour cream and brown sugar in (separate) bowls. First dip the strawberries into sour cream and then in the brown sugar. Clear your mind and let the flavors drift over you like a gentle zephyr!

*See, I even managed to work in a little history too. 

Yum

Friday, May 27, 2011

A Jaunt to the Atlanta Urban Picnic

Peaches. An impromptu call from Sonny (while I was at the vet’s office with not one, but two cats) with a request for peaches, started the produce hunt. So, when I saw the post  this morning that there were peaches at the Sweet Auburn Curb Market, it was with great delight that I remembered that every fourth Friday is the Atlanta Street Food Coalition’s “Urban Picnic.” We had never been, but had been dying to check it out!

The Atlanta Urban Picnic is like a small-scale food festival. Popular Atlanta food trucks surround the Sweet Auburn Curb Market on Edgewood Avenue offering a smorgasbord street food delicacies. This is not your typical collection of bloomin’ onions and funnel cakes, instead there are treats like handmade tamales, gourmet hotdogs, homemade ice cream, and Caribbean treats. Yumbii, the Pup Truck, Arepa Mia, Westside Creamery, The Good Food Truck, Blue Tailed Lizard and Just Loaf’N were all booming with business.
The Chihuahua

The guys decided on loaded hot dogs from the Pup Truck. Dominic got a Chihuahua (gourmet dog topped with Velveeta, Rotel, onions, jalapenos and even more cheese! He gulped it down with relish (No, not the pickle kind) declaring it “a heart attack in a bun in a good way.” Teenage speak for “totally awesome!” Sonny got the Bulldog; a classic Southern variation with melted Velveeta cheese, onions, mustard, chili and again more cheese, grated. He said very little, but it must have been scrumptuous because he was wearing as much as he ingested! Several napkins later…
Pumpkin Cheese Cake

As we headed through the door to the Market, Miss D’s was passing around fresh cheese popcorn which was mighty tasty, while the Sweet Auburn Bakery offered samples of their New York and Sweet Potato cheesecake. Sonny grabbed a bite of the New York style extolling its creamy-rich texture, and I was tempted by the decadent-looking pumpkin variety which melted in my mouth leaving a wisp of cinnamony goodness behind.

Griddled Arepas
We did a quick turn through the market noting all the delectable-looking meats, sausages and organic veggies. We settled on three nearly-ripe peaches and headed in the direction of the car. After all that was the entire reason we began this adventure wasn’t it? But wait, why was there a line over in the corner? Aha! Arepa Mia! (Venezuelan for “Mama Mia” – not really but I almost had you!) Lis and Amber explained that arepas are traditional Venezuelan snacks. I ordered a Vegetarian made with grilled cornmeal patties stuffed with a roasted vegetable ragu of zucchini, bell peppers, onion, mushrooms, cauliflower, collard greens, and black beans topped with queso blanco and cilantro jalapeno salsa as well as…(Okay, I was so distracted by the smell of the cooking arepas that I didn’t hear what was in the other sauce), but the combination of flavors was incredible. Steamy toasted corn and vegetables with cheese and cilantro were simply too die for!

A half-eaten Vegetarian Arepa

And, quite filling as it turned out, thus I had no room for ice cream from Westside Creamery (Boo hoo.) However, I quickly made a note that next Urban Picnic will be held on Saturday, June 11th. Be sure to mark your calendars for the second Saturday and fourth Friday of every month for the Urban Picnic at the Sweet Auburn Curb Market!

Yum

Sunday, May 22, 2011

Classic Provençal Clafoutis

Like natives of Provence (the area of southern France and northern Italy,) we have learned the simple pleasures of foraging for wild foods and edibles in our backyard and public green spaces. One man’s weeds are another man’s salad! Even in urban areas there are many wild treats if you know what to look for. Mulberries are frequently ignored by neighbors as are dandelion greens, crab apples and even nettles. (Although we know there are edible mushrooms in the region, we have never attempted to harvest any as the potential for disaster is too great.) Imagine our surprise to find a cherry tree dripping with bright red ripe cherries overhanging the street in our neighborhood. What better way to celebrate tis find than with a traditional Provençal dish from the Limousin region of France.

The classic clafoutis is a French delicacy. Freshly picked cherries in a batter, flavored with brandy and sugared. The name “clafoutis” originated from clafir a verb in Provencal dialect meaning to "to fill” as in to fill the pan with batter. Clafoutis became quite popular throughout France during the 19th century. Other fruits can be used to create this pancake-like confection, but when other fruits are used it is properly called a “flaugnarde.”

  • 3/4 cup all-purpose flour
  • 2 tablespoons granulated white sugar
  • 1/4 teaspoon salt
  • 2 large eggs
  • 3/4 cup milk
  • 1 tablespoon brandy
  • 2 cups fresh sweet cherries, pitted
  • 1 tablespoon unsalted butter

Preheat the oven to 375 degrees F and place the rack in the center of the oven.  Combine flour, sugar, salt, eggs, milk and brandy in a mixing bowl and beat until the batter is completely smooth, let it rest for about an hour while you prepare the fruit.

While Provençal purists claim that cooking this dish with the pits still intact gives it more depth and flavor, we recommend that you rinse the cherries and remove the stems and pits. In a large 9-inch non-stick ovenproof skillet melt the butter over medium heat and coat the bottom and sides of the pan. When the butter is bubbling, add the pitted cherries, cooking the cherries for 2 to 3 minutes until they have softened a bit and are coated with butter. Shake the pan gently to evenly distribute cherries in the bottom of the pan trying not to just eat them right out of the pan!

Pour the batter over the cherries and bake for about 20 minutes or until the clafoutis is puffed, set, and golden brown around the edges. Remember not to open the oven door until the end of the baking time or the clafoutis may collapse similar to a soufflé. Serve immediately with a dusting of confectioners’ sugar and plenty of forks.

Posted on http://www.countertopconfections.com/2012/04/12/whats-cookin-thursdays-4/

Yum

Friday, May 20, 2011

Spring Goat Cheese and Squash Blossom Frittata

Rialto Market in Venice, 2005
Italians never let anything go to waste (a perfect example is offal). Since squash plants are monoecious, they have separate male flowers and female flowers appearing on the same plant.The female flowers turn into squash plants while the male plants wither and die, thus making them a guilt-free treat. We first sampled these tantalizing delicacies at Piperno in Rome. They are widely available throughout Italy.

Frittatas (and omelets) are made by swiftly cooking beaten eggs with butter or oil. They can include a combination of fillings such as cheese, vegetables, or meat. We have always told our boys that knowing how to cook an omelet or frittata is the best way to impress a date!

To produce a fluffy consistency, whole eggs (or sometimes egg whites) only are beaten with a small amount of milk or cream. This creates water vapor bubbles trapped inside the quickly cooked eggs. These bubbles are what make a frittata light and airy. Spring vegetables work particularly well in a frittata because they require very little cooking and benefit from the steam created by the water vapor trapped in the eggs. We especially enjoy using fresh-from-the-garden, brilliant orange squash blossoms for their subtle and squashy flavor.

  • 1 tablespoon butter or margarine, melted
  • 4-6 freshly picked squash blossoms, cleaned
  • 4 eggs, lightly beaten
  • 2 teaspoon Parmesan cheese, grated
  • 2 teaspoons light cream (or whole milk)
  • 1/4 cup favorite cheese (Chevre, Gouda, Gruyere), grated
  • Salt and pepper to taste

Clean the squash blossoms by gently brushing off dirt; we use a paint brush (designated for kitchen use only.) Do not rinse blossoms! Rinsing turns them to mush and dilutes their essence. 

In a mixing bowl, whisk together eggs, cream, butter, and salt & pepper.

Melt ½ teaspoon butter in a 12-inch nonstick pan over medium heat, swirling the pan to coat it with the butter. Place squash blossoms in the pan and gently pour egg m mixture over the top. If you are using goat cheese, gently place dollops among the blossoms. Cook for about 3 minutes, gently stirring with a non-metal spatula or spoon to lift the cooked egg off the bottom of the pan and allow the uncooked portion to heat. Be careful not to over stir the frittata or break up your squash blossoms.

When the underside of the frittata is set on the bottom of the pan, scatter the top with the grated cheese. Run the pan under the broiler and cook for about 1 minute, or until the eggs are set on top and the cheese has melted. Using the non-metal spatula, loosen the frittata from the pan, slide it onto a platter to serve. Serve hot with toasted crusty bread and enjoy the amazing texture of the whisked eggs and delicate squash blossoms! Aaah, Spring is here!

Note: You would use the same techniques for cooking a squash blossom omelet. The amount of time under the broiler might be a bit less since the eggs would continue to cook once folded. When removing the omelet from the pan after broiling, slide half of the eggs out of the pan and use the edge of the pan to fold into the traditional half-moon shape. Garnish with cheese or parsley to serve.


Yum

Wednesday, May 18, 2011

Must-try Zippy Pickled Okra

Once regarded as strictly a Southern vegetal, vitamin-rich okra has increasingly gained national distinction for its unique flavor and texture. Sprightly green okra pods embody the taste of summer. When combined with spices and a light vinegar brine, these crunchy, quintessentially Southern pickles are part and parcel of a fine old culinary heritage. The perfectly balanced, sweet-sour flavors and characteristic textures complement everything from charcuterie and cheese to a well-dressed hot dog. Zippy okra pickles also make a fabulous addition to vodka martinis and Bloody Marys. The chili peppers give these okra pickles a pleasant kick. If you prefer spicier pickles, add another chili or two to each jar.

  • 1 pound fresh okra, stems trimmed
  • 1 clove garlic, thinly sliced
  • 1 chili pepper, fresh or dried
  • 1 teaspoon black peppercorns, cracked
  • 1 teaspoon coriander seeds
  • 1/2 teaspoon fennel seeds
  • 2 whole cloves
  • 2 cup cider vinegar
  • 2 cup water
  • 2 tablespoons kosher salt
  • 1 tablespoon sugar

Wash and sterilized jars and set aside. Rinse okra and trim stems. Pack jars with okra, garlic, chili pepper, peppercorns, coriander seeds, fennel seeds, and cloves.

In a large pot over high heat, combine vinegar, water, kosher salt, and sugar and bring to a boil. Ladle the hot brine over the okra and then seal the jar. Allow jar to sit for a minimum of 1 week to marry the flavors before using. Refrigerate the pickles after opening (if there are any left!)

And, given the popularity of fried pickles (and because Sonny and I are bona fide pickled-okra-aholics,) we recently tried frying pickled okra. We can imagine that it would appeal to some, but neither of us really liked the result.


Yum

Sunday, May 15, 2011

Dom's Magical Shrimp & Cheese Grits

Outside of the Southern states, a lot of folks have never eaten grits; some have never even heard of them! Known as the "Southern oatmeal," grits were favored over oatmeal before air conditioning was invented because they could withstand the heat and humidity better. Three-quarters of the nation’s grits are still sold in the "Grits Belt;" the Southeastern coastal states stretching from the Carolinas to Louisiana.

Grits are coarsely ground (dried) corn that are traditionally cooked with butter and served as a side dish for breakfast or dinner. Their name comes from the Italian word "gruzzi" which means crushed corn. Grits are very similar to other thick maize-based porridges including the Italian polenta. Grits, however, tend to be made from white corn and are more coarsely ground than the yellow corn used in polenta.

To a true Southerner nothing compares to warm, cheesy grits topped with succulent, sweet seafood, except maybe the addition of a magical, spicy bacon sauce.

  • 8 slices of bacon
  • 2 lb. medium shrimp, peeled and brined
  • 1 tablespoon olive oil
  • 1 medium onion, chopped
  • 1 teaspoon salt
  • 1 teaspoon black pepper
  • 1 teaspoon crushed red pepper flakes
  • 1/2 teaspoon cayenne pepper
  • 1/4 teaspoon oregano
  • 1/8 teaspoon dried thyme
  • 1 12-oz. bottle of beer*, room temperature
  • ¼ cup ketchup
  • 1 teaspoon Worcestershire sauce
  • Salt and pepper to taste

  • 1 cup stone-ground grits
  • 1 cup cheese, grated (Dom uses Gouda)
  • 2 tablespoons of Denise's peppers (optional)

Rinse shrimp in cold water and peel. Brine shrimp in salted water until ready to cook.

Cook bacon in a large skillet over medium heat until crispy, about 6-8 minutes. Transfer bacon to a paper towel to drain. Add chopped onions to the bacon grease in the pan. Depending on the amount of grease left from the bacon, add up to 1 tablespoon of olive oil as needed to coat the onions. Sauté onions until soft and translucent, about 5-7 minutes. The term “until translucent” is commonly used to describe onions sautéed in butter or oil.  Raw onions are fairly opaque, but as they cook they slowly become almost transparent. When this happens, add spices to the pan and stir to mix.

Next, add the beer, ketchup, and Worcestershire sauce, stirring to combine. Coarsely chop the cooled bacon and add to the pan. Cook until the pan juices are thickened and syrupy. 

Drain shrimp and add to the pan, tossing gently to completely coat shrimp. Bring sauce back to a boil, then cover pan and remove from the heat letting the shrimp rest for about 3-5 minutes to allow shrimp to steam and fully cook.

Meanwhile, cook grits according to package directions, stir in cheese and peppers until fully melted and incorporated. Serve immediately on a platter with a mound of cheese grits with the shrimp (and the magical sauce) in the center.

And now the really magical part… watch as all the shrimp and grits disappear!

*A while ago we received a stipend to try New Belgium beers as members of the Foodbuzz Tastemaker program. Now, they are our favorite brewery. We used a bottle of Somersault Golden Ale for this recipe.


Yum

Friday, May 13, 2011

Have Ziti, Will Travel

Baked ziti falls into the category of comfort food for many Italian families. The hot saucy pasta and melted cheeses promotes a deep-felt contentment and the smell fills the kitchen making you feel at home even if you're not. It is a dish that is easy and delicious to make (and take). It can easily be made from scratch or can be assembled from leftover sauce and pasta for a completely different meal. It can be eaten immediately or made ahead and frozen. It makes a wonderful house warming gift, new baby meal delivery, care package for a college student to take back to school, or even pot luck fare. Simply put, this dish is infinitely versatile!

This vegetarian version makes use of all the fresh Spring vegetables available markets this time of year. Roasting the vegetables gives the pasta a rich, smoky flavor that is a good compliment to the pomodoro sauce.

  • 1 pound ziti or penne pasta, cooked
  • 3 cups Pomodoro sauce
  • 2-3 cups roasted vegetables of your choice
  • ½ cup mushrooms, sautéed (optional)
  • 2 cups mozzarella (or a mixture of Italian cheeses)
  • 1 tablespoon fresh parsley, finely chopped
  • 9” X 13” baking dish (disposable works best for travel!)

Place uncooked ziti in a large pot of salted boiling water and cook for 10 minutes. Do not overcook or pasta will be soggy and break apart when tossed. Drain the pasta without delay in a large colander. Do not rinse the pasta before combining with about 2 cups of the sauce in a large mixing bowl. Add roasted vegetables (broccoli, cauliflower, zucchini, squash, carrots, peas, and/or green beans) and toss gently to cover pasta and vegetable completely with pomodoro sauce. Cover the bowl and set let stand for at least 5 minutes.

If freezing over serving later in the day, allow to cool completely. Transfer pasta to the baking dish and blanket the top of the pasta with cheese(s) and sprinkle with chopped parsley and cover with aluminum foil. Refrigerate or freeze until ready to reheat.

You can either re-heat from the ziti frozen or thawed state. From frozen will take much longer, so we recommend taking the dish out of the freezer at least 24 hours in advance and let it defrost in the fridge.

Preheat oven to 350 degrees F. If you are reheating in an aluminum pan, be sure to place a cookie sheet underneath the pan. Leaving foil on the dish, cook for about 30-40 minutes if completely thawed removing the foil. Cook for 45-50 minutes if partially thawed or allow to bake for an hour (or more) if still frozen. It is ready when the sauce is bubbling to the surface. If the cheese is not browned and melted enough, remove the aluminum foil and let it cook for a little longer or put it under the broiler for a few minutes. Serve with crusty bread and a fresh Caesar salad for an Italian dinner worthy of an Emperor!

Cooksnaps

Yum

Monday, May 9, 2011

Pomodoro Sauce for Now (or Later)

Tomato sauce is the foundation of most Italian dishes, and thus a mainstay of our family diet. All the names and terms for different sauces can be quite confusing; fra diavalo, amatriciana, arrabiata, puttanesca to name a few.

All of these start with a basic sauce, either marinara or pomodoro. Marinara (Italian for Mariner's sauce) is a meatless sauce made from roughly chopped fresh tomatoes, olive oil, and garlic. All of these ingredients are placed in a saucepan and allowed to simmer for about 20 minutes. Since the sauce doesn’t cook very long, it retains much of its bright red hue, and the olive oil adds a sheen to it. By adding capers, olives, anchovies, and red pepper flakes to the marinara you will have a quick and delicious puttanesca sauce.

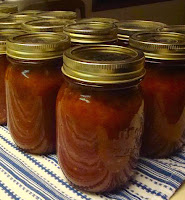
Like marinara sauce, pomodoro sauce is also meatless and made from tomatoes, garlic, and olive oil, however, pomodoro sauce is somewhat thicker and smoother than marinara sauce. This is because the tomatoes are crushed and the sauce is simmered over a longer period of time. Pomodoro sauce can easily put up in canning jars and saved for later use in numerous recipes including baked ziti, amatriciana, or used for making homemade pizza! This recipe makes enough to cover 4 pounds of pasta (or 3 pounds of pasta generously). You can also toss the leftovers in the freezer if you're not up to a canning project.

  • 2 Tablespoon extra-virgin olive oil
  • 3-5 cloves of garlic, minced
  • 1 106-oz. (#10) can San Marzano tomatoes
  • 1 cup carrots, grated (optional)
  • 1 tablespoon salt
  • 2 teaspoons sugar
  • 1 tablespoon paprika
  • 1 tablespoon dried oregano
  • 2 teaspoons red pepper flakes, crushed
  • 1 teaspoon ground black pepper
  • 3 Parmesan/Romano cheese rinds

Add olive oil to a large saucepan, and warm over medium heat. Add minced garlic and cook until lightly brown. Do not overcook garlic or it will taste bitter and ruin the flavor of the sauce. Remove pan from heat and add tomatoes. Wash hands and hand crush tomatoes until they are the consistency you prefer. Don’t be afraid to get your hands messy!

After crushing tomatoes, add salt, paprika, peppers, sugar, and oregano, and stir together. If you prefer a smoother sauce, you can use a hand mixer or immersion blender to puree the sauce further. Place saucepan back on medium heat and bring the sauce to a boil, then turn heat down to a simmer. Add cheese rinds (or ½ cup grated cheese) to the sauce and allow to simmer for 30 minutes to one hour.

Turn sauce off and allow to cool fully. Letting the pomodoro sauce cool allows the flavors to meld. Bring the sauce back up to a boil before serving. To serve, place cooked pasta of your choice in a large serving bowl and add about 2 cups of sauce stirring to coat and set let stand for 5 minutes. Serve pasta in bowls with additional sauce and copious amounts of grated Parmesan cheese.

To be safe, it is always a good idea to sterilize your jars and lids. Wash jars in hot soapy water and rinse well, and then place in a large pot of water and boil gently for 10 minutes. Remove and drain on a clean towel until ready to fill.

Fill a large pot with enough hot water to cover the jars with 1 to 2 inches above the tops of jars. It is always a good idea to have extra hot water in case you underestimate.

Pour hot pomodoro sauce in clean jars and wipe rim clean of any excess. Place the lids on your jars of sauce and hand tighten. Place in the pot of boiling water and cover with 1 to 2 inches of water and the pot lid. When the water comes to a rolling boil, start to count the processing time (which differs for the size of the jars you use, so follow package directions). Reduce heat slightly and boil gently for the time recommended for the food being processed. When the cooking time is up, remove jars at once and place on a rack or on towels away from heat and away from any draft. Keep jars separated to allow air space for cooling.

After jars have cooled, test the seals by pressing down on the center of the lid. The lid should be concaved and not move when pressed. Be sure to label canned jars with contents and processing date. Store jars in a cool dark, dry place.


Yum

Thursday, May 5, 2011

Chicken Enchiladas Verde

Like most families, we really enjoy Mexican food. The combinations of spicy and zesty flavors are hard to resist. Making Mexican-style dishes at home is easy and allows you to incorporate the fresh ingredients that your family likes best; chicken/beef, lime, cilantro, and chili peppers - especially chilies! So what better way to celebrate Cinco de Mayo than with homemade Chicken Enchiladas!

We prefer salsa verde (tomatillo salsa) to salsa de tomate rojo (red tomato salsa) in homemade Mexican dishes. With tomatillos readily available in most grocery stores it is easy to make at home. (If you are pressed for time HERDEZ® salsa verde is the next best thing.)

The first step is to roast the chili peppers, you can either roast them in the oven, or if you have a gas stove, you can roast them directly over the flame, (see video). Roasting will deliver more flavor. boiling may be faster and use less energy. Either way works, though boiling is a more common way to cook the tomatillos.

Salsa Verde
  • 2 tablespoons olive oil
  • 12 whole tomatillos
  • 1/2 cup chopped white onion
  • 2 garlic cloves, unpeeled
  • 1 cup chicken broth
  • 2 chili peppers, roasted and cleaned
  • 2 tablespoons fresh lime juice
  • ½ teaspoon cumin
  • Salt to taste
  • 1/4 cup cilantro leaves
  • 1/4 cup parsley leaves

  • Enchiladas
  • Salsa Verde (above or HERDEZ® salsa verde)
  • 12-20 corn tortillas
  • 1 22-oz.bag Tyson® Grilled & Ready™ Fully-Cooked Chicken Breast Strips
  • or (2-3 cups cooked chicken, sliced)
  • 1 cup white beans, cooked (optional)
  • 2 cups grated Mexican-style cheese(s), grated
  • Lettuce, shredded
  • Sour cream or Guacamole (or both!)

Remove papery husks from tomatillos, rinse well and chop coarsely. In a saucepan, sauté onion and garlic in olive oil until soft. Add tomatillos, cumin, broth and salt. Bring to a boil, reduce heat and simmer covered for 20 minutes. Remove from the heat and allow to cool slightly (or longer if making ahead).

Meanwhile, place the chili peppers (we like to use a variety of jalapeno, Serrano, Cubanelle, and/or Anaheim for a depth of flavors) directly over the flame on a gas stove and cook, turning with tongs, until the skin is charred and blackened. (Or, if you have an electric stove, put the chilies on a baking sheet and broil, turning with tongs, until the skin is blackened.) Remove the skin, seeds and core of the roasted chili peppers. Place tomatillo sauté, roasted chili peppers, lime juice, cilantro and parsley in a food processor (or blender) and pulse until all ingredients are finely chopped and smooth. Season to taste with salt.

Preheat oven to 350 degrees F. Pour the salsa verde into a shallow bowl or baking dish. Dip each tortilla in the salsa to soften it. Lay dipped tortilla flat in an ungreased 9” X 13” baking dish and fill each with about a teaspoonful of white beans, a tablespoon of cheese(s), and several slices of Tyson® Grilled & Ready™ Fully-Cooked Chicken Breast Strips down the center. As members of the Foodbuzz Tastemaker program, we received a free sample of  Tyson®'s Grilled and Ready™ chicken which is fully cooked, 98% fat free and has no preservatives, making it a perfect addition to this healthy homemade dish.

Fold the tortilla in thirds over the filling and place seam-side-down in the dish. Repeat with more tortillas until the baking dish is full. Then pour the remaining salsa verde over the top. Cover the top of the enchiladas with cheese.

If you are making enchiladas to freeze, cover and freeze at this point. To cook (thaw to room temperature) and bake covered at 350 degrees F for 30 minutes, until heated through. Remove the foil and cook for a few more minutes to let cheese topping get brown and bubbly. Serve one or two hot enchiladas on a plate and top with shredded lettuce and sour cream and or guacamole. La buena comida!

Yum

Tuesday, May 3, 2011

Deconstructed Puttanesca Pasta

We were recently introduced to O&CO. (Oliviers & Company), a wonderful online food merchant specializing in Mediterranean products ranging from high quality olive oils, vinegars, preserves and spreads to organic bath and skincare products. We received samples of their Basil Specialty Olive Oil, Lemon Specialty Olive Oil, and White Balsamic with Oregano. The basil oil was begging to be opened and since O&CO. currently has a Mediterranean recipe contest, it seemed the perfect opportunity to conjer up  an assertive and fragrant dish. 

Traditionally, Puttanesca sauce is an aromatic tomato sauce known as “whore’s pasta” because it is quick and easy! We sometimes refer to it as “pungent pasta” because it has a strong aroma and bold earthy flavors. But, broken down to its basic elements it is a very flavorful and hearty condiment. This is less a sauce and more a saute of  ingredients in olive oil that coats the pasta in Italian goodness!

  • ¼+ cup O&CO. Basil Specialty Oil
  • 3 cloves garlic, peeled and minced
  • 2 anchovy filets, minced
  • ¼ cup sundried tomatoes, coarsely chopped
  • ¼ cup Kalamata black olives, pitted
  • 2 tablespoons capers, rinsed and drained
  • 2 tablespoons “Denise’s Peppers” 
  • (or 1 small red chili pepper, chopped)
  • ¼ cup red wine
  • Salt
  • 1 lb. spaghetti (homemade)
  • Freshly grated Parmigiano-Reggiano
  • 1 tablespoon fresh parsley, chopped

Heat basil oil in a large skillet over medium-high heat. Add garlic and anchovies and sauté for 30 or so seconds. Add sun-dried tomatoes, olives, capers, and red peppers, wine and season taste with salt. Continue to simmer, stirring occasionally for 5 minutes more until liquid is reduced and the flavors have melded. Cover and remove from heat.

Meanwhile, cook pasta in a large pot of boiling salted water until al dente, 10-12 minutes. Drain in colander, and then add to pan sauce, tossing until well mixed. Serve the pasta with grated Parmesan cheese and fresh parsley. Take a minute to take in the aroma (especially basil!) of this amazing dish!

Yum

Sunday, May 1, 2011

Key-Lime-Style Kabosu Pie

In addition to making wonderful cocktails, the Japanese juices (available from Marx Foods) make fabulous key lime-style pies! Because of the increased acidity of the juices, they react with sweet condensed milk which causes the pie filling to thicken on its own without requiring baking. However, since the filling contains raw eggs, it should be baked for a short time. Baking gives the pie a smoother texture than the chemical reaction alone. We used Kabosu juice to make our pie.

The true testament of the deliciousness of pies made with exotic juices is the speed with which they disappear. With two teenagers and a pie-a-holic in the house, the pie vanished into thin air!

Pie Crust:
1 1/2 cups graham-cracker crumbs
6 tablespoons unsalted butter, melted and cooled
3 tablespoons sugar

Filling:
  • 1 14-oz. can sweetened condensed milk
  • 4 large egg yolks
  • 1/2 cup Kabuso juice
  • 1 tablespoon grated lime zest

Topping:
1 1/2 cups heavy cream, chilled
2 tablespoons sugar

Heat oven to 375 degrees F. Combine graham-cracker crumbs, butter, and sugar in a medium bowl; mix well. Press into a 9-inch pie plate, and bake until lightly browned, about 12 minutes. Remove from oven, and transfer to a wire rack until completely cooled.

Lower oven temperature to 325 degrees F. In a medium bowl, gently whisk together condensed milk, egg yolks, Kabuso juice, and zest, and then pour into the cooled graham cracker crust.

Return the pie to the oven, and bake until the center is set but still quivers a bit when the pan is nudged, about 15 to 17 minutes. Let cool completely on a wire rack. Shortly before serving, combine cream and sugar in the bowl and beat with a mixer on medium speed until soft peaks form; about 2 to 3 minutes. Spoon whipped cream over the cooled pie and garnish with more zest or sliced limes. Serve immediately.


Yum
Powered by Blogger.

footer social

ShareThis