
Tuesday, January 12, 2010
Happy Hands
Yum

Sunday, January 3, 2010
Homemade Hot Italian Sausage
Everyone is a little stir crazy. So yesterday on a wild hair, the guys went to one of their favorite hangouts, Bass Pro Shops. They came home with #32 Lem meat grinder. A large metal monstrosity designed to grind 5 to 6 pounds of meat per minute. Eee Gad!
 We spent the rest of the day researching sausage recipes and contemplating the sausage making fiesta that would take place today. Dom called his Aunt Rose to get his grandmother's sausage recipe as well. Before bed, we set out a pork shoulder from the freezer to thaw.First thing this morning, Dom went to Costco to purchase 2 pork butts and then to DeKalb Farmer's Market to buy some fresh spices for the seasoning mix. We spent the rest of the morning chopping the pork and mixing the spices.
First Run Recipe:
 Then we ground the meat using the coarse grinding plate. We made a patty with some of the ground spiced meat and fried it to do a taste test. It was darn good! We added a little more coriander and cayenne to the ground meat.I soaked the pork casings (pig intestines) in water and rinsed them out. Ick!
We then put the medium grinding plate on the grinder along with the sausage stuffing attachment. I loaded the casings on the stuffing nozzle. It was actually quite fascinating to watch the meat fill the casing and come out looking just like the Italian sausage you see in the grocery store. Twenty five pounds of pork makes a lot of sausage! We put several large links in the refrigerator for dinner and packaged the rest for the freezer. It should last a LONG time.
 We spent the rest of the day researching sausage recipes and contemplating the sausage making fiesta that would take place today. Dom called his Aunt Rose to get his grandmother's sausage recipe as well. Before bed, we set out a pork shoulder from the freezer to thaw.First thing this morning, Dom went to Costco to purchase 2 pork butts and then to DeKalb Farmer's Market to buy some fresh spices for the seasoning mix. We spent the rest of the morning chopping the pork and mixing the spices.
First Run Recipe:
- 25 lbs. pork
- 7 Tablespoons salt
- 4 Tablespoons fennel seed, crushed
- 1 Tablespoon coriander, crushed
- 10 Tablespoons paprika
- 1 Tablespoon crushed red pepper
- 2 teaspoons cayenne, ground
- 2 teaspoons black pepper
 Then we ground the meat using the coarse grinding plate. We made a patty with some of the ground spiced meat and fried it to do a taste test. It was darn good! We added a little more coriander and cayenne to the ground meat.I soaked the pork casings (pig intestines) in water and rinsed them out. Ick!
We then put the medium grinding plate on the grinder along with the sausage stuffing attachment. I loaded the casings on the stuffing nozzle. It was actually quite fascinating to watch the meat fill the casing and come out looking just like the Italian sausage you see in the grocery store. Twenty five pounds of pork makes a lot of sausage! We put several large links in the refrigerator for dinner and packaged the rest for the freezer. It should last a LONG time.
Yum
Sunday, December 27, 2009
Rulli Brothers
You all know I grew up in the South from my earlier post. My husband grew up on the opposite side of the food world! Dom and our youngest flew out to Dom's hometown of Youngstown, Ohio this morning for a birthday party. I was remembering that my first trip to Youngstown was a cultural experience. At first, nothing seemed dramatically different from Atlanta. After visiting with relatives, Dom and took me on a tour of Youngstown. We drove by the Sparkle Market where he used to work, then took a scenic tour of Mill Creek Park. We sat on the hood on Dom’s car while we ate chocolate pecan ice cream from Handel’s. Then we headed to Rulli Brother’s Italian Market to pick up a few things to take back to Atlanta.
 As I stepped through the doors, I realized this was no ordinary store. Meats and cheeses hung from the ceiling. The deli case was loaded with capicolla, mortadella and soppressatta. Shelves were stocked with cans and jars of exotic sounding delicacies like giardiniera, caponata, and cipollini onions alongside a huge selection of olives. The bakery section had all sorts of fascinating goodies like foccacia, panettone and pandoro, mustaccioli, and biscotti. They had the boxes of torrone candy that Dom received each year at Christmas from a friend's Mom. Then there was the produce area with escarole, endive and cardoons. This was a veritable wonderland of food! They even had the equipment to make pasta, pizzelles, and cannollis at home, and the espresso pots did not have an electrical cord. My head was spinning!
Dom ordered mortadella, capicolla, prosciutto, as well as a ball of the butter provolone hanging from the ceiling. We bought one of the stove-top espresso pots and a few biscotti to nibble on the drive back to Dom’s Aunt’s house. I reluctantly left the store, frequently glancing back to permanently imprint the vision on my brain. Even years later, there is nothing in Atlanta that compares to that Italian paradise known as Rulli Brothers!
 As I stepped through the doors, I realized this was no ordinary store. Meats and cheeses hung from the ceiling. The deli case was loaded with capicolla, mortadella and soppressatta. Shelves were stocked with cans and jars of exotic sounding delicacies like giardiniera, caponata, and cipollini onions alongside a huge selection of olives. The bakery section had all sorts of fascinating goodies like foccacia, panettone and pandoro, mustaccioli, and biscotti. They had the boxes of torrone candy that Dom received each year at Christmas from a friend's Mom. Then there was the produce area with escarole, endive and cardoons. This was a veritable wonderland of food! They even had the equipment to make pasta, pizzelles, and cannollis at home, and the espresso pots did not have an electrical cord. My head was spinning!
Dom ordered mortadella, capicolla, prosciutto, as well as a ball of the butter provolone hanging from the ceiling. We bought one of the stove-top espresso pots and a few biscotti to nibble on the drive back to Dom’s Aunt’s house. I reluctantly left the store, frequently glancing back to permanently imprint the vision on my brain. Even years later, there is nothing in Atlanta that compares to that Italian paradise known as Rulli Brothers!
Yum
Wednesday, December 23, 2009
Christmas Eve Feast of Seven Fishes
On the night before Christmas in our house, strains of Louis Armstrong’s “Zat you, Santa Claus?” or Kurt Elling’s “Cool Yule” resound in the background while the smells of garlic, toasting bread crumbs, and lemon fill the air. The anticipation of the coming feast is only eclipsed by the anticipation of the following morning of ripping paper and opening presents. Italians usher in Christmas Day with ‘Cena della Vigilia’, the dinner of the vigil; the meal that breaks a daylong fast, at least in theory. Over the centuries, however, fasting obligations were relaxed, rules of abstinence from eating meat became the standard. Today, in our family, the birth of Christ is celebrated with one long, delicious (almost meatless) feast.
Dom's ancestors, the Warino (Guarino) family, originally emigrated from Calabria - a region of Puglia that borders the Adriatic Sea. There, La Vigilia means seven different kinds of seafood, cooked seven different ways. According to his Grandma, the number seven is important because it represents the seven sacraments. The number is also said to allude to the seven virtues, the seven hills of Rome, and the seven days of the week.
After an afternoon at church, we usually start the evening at our house with champagne and raw oysters. We also put out a platter with smoked salmon and white fish with olives and crostini. It may not be exactly Italian, but everyone likes it, and it works. Fried smelts follow close behind. It depends on the year which friends and family are in attendance. Some years it is a house-full and others it is just the four of us. While I cook, friends chat in the kitchen, help set the table, or share pictures of recent travels. We have tried several different dishes over the years to comprise the seven fishes and do not always adhere to the strict interpretations that each fish must be prepared differently. Frito Misto is the perfect solution to preparing several of the fishes in our feast at one time. Gumbo is another family favorite that accommodates more than one fish. If we still need a fish to add to round out our repertoire, we add some anchovies to the pasta with olive oil, crushed red pepper and Parmesan that we serve on the side.
The custom of “La Vigilia” is revitalized whenever a new generation takes it on. We have tried to introduce the custom to our boys and family friends to keep the practice alive. As it is carried on into the future, we remember our ancestors who have added their imprint on the tradition, and it is if they are dining with us each Christmas Eve.
Dom's ancestors, the Warino (Guarino) family, originally emigrated from Calabria - a region of Puglia that borders the Adriatic Sea. There, La Vigilia means seven different kinds of seafood, cooked seven different ways. According to his Grandma, the number seven is important because it represents the seven sacraments. The number is also said to allude to the seven virtues, the seven hills of Rome, and the seven days of the week.
 |
| Romeo boys as Nativity shepherds. |
The custom of “La Vigilia” is revitalized whenever a new generation takes it on. We have tried to introduce the custom to our boys and family friends to keep the practice alive. As it is carried on into the future, we remember our ancestors who have added their imprint on the tradition, and it is if they are dining with us each Christmas Eve.
Yum
Monday, December 21, 2009
Winter Solstice Tweet Hearts

The longest night of the year also falls during the coldest part of the year. There is very little food available for wildlife to forage on, so to show our appreciation and concern for nature and its inhabitants we put out bird seed, berries, suet and bowls of water for our outdoor friends!

½ cup peanut butter
1 cup birdseed
2 ½ cups cornmeal
½ cup melted shortening (or suet)
muffin tin (greased or lined with paper cups)
pencil-sized sticks (popsicle sticks work fine)
yarn, string or ribbon
Combine the first four ingredients in a mixing bowl and stir together. Press mixture into a heart-shaped tin or cookie cutter. To create the hole for hanging stand a stick in the center of your bird cake and let the cakes stiffen, then remove sticks and thread string through muffins. Muffins can then be tied to a branch outside your favorite window.
*The yule log is the counterpart of the midsummer bonfires, which are held outdoors on Summer Solstice to celebrate the shortest night of the year.
Yum
Thursday, December 10, 2009
Gingerbread 101
The tradition of making treats with the pungent spice, ginger, dates back through many centuries and across several continents. Ginger was a plant native to China and India where much of the world’s supply is still grown. The ancient Romans used ginger as a remedy for the plague. During the thirteenth century, the English made medicinal ginger candies called ”gingerbrati.” During the following century, gingerbrati changed to gingerbread as breadcrumbs were added to the candy mixture. It was the fourteenth century Germans who really began to take gingerbread seriously. They formed guilds of gingerbread artisans, distinct from existing baking guilds. Although Queen Elizabeth is credited with first presenting gingerbread likenesses to her guests, the notion of edible figures is considered to have originated as substitutes for live sacrifices. Throughout the nineteenth century, finely crafted ginger-bread was used to express greetings, recognition, affection and celebration. The heart-shaped gingerbread Valentine was especially popular. In English villages, maidens would eat a gingerbread “husband” on Halloween to ensure that they would find a real mate. In the United States gingerbread has been popular since colonial days. George Washington’s mother was famous for her spicy gingerbread. Ginger was also included in the rations of Revolutionary soldiers, both for its medicinal value and to add flavor to their bland meals. Several children’s books have been written which carry out the gingerbread theme: The Gingerbread Boy, and the Brothers’ Grimm Hansel & Gretel are good examples. A tradition as long-standing as the baking of gingerbread yields great rewards: filling your home with a wonderful aroma; satisfying appetites; and, passing time with utter delight.
Gingerbread Dough:
½ cup butter or margarine
 ½ cup shortening
1 cup sugar
1 egg
½ cup molasses
2 Tablespoons lemon juice
3 cups all-purpose flour
1 cup wheat flour
1 ½ teaspoon ground ginger
1 ½ teaspoon ground allspice
1 teaspoon baking soda
½ teaspoon salt
Preheat oven to 375o. Beat sugar, shortening and butter together until creamy. Add egg, molasses, and lemon juice; beat well. Combine dry ingredients and gradually add to butter mixture; beat well. Divide into to portions, wrap in plastic and chill three hours. Roll out dough to 1/8 inch thickness. Place pattern for house and cut with a sharp knife or use cookie cutters. Place on greased cookie sheet and bake for 10 to 12 minutes. Assemble house or decorate cookies with Royal icing.
Gingerbread House Construction:
Upside down ice cream cone covered in green frosting and decorated makes a great Christmas tree; use “Golden Graham” cereal for shutters, green lifesavers or green “Fruit Loops” for wreaths; red licorice for bows, roping, outlining windows and doors; brown, black and white “Neco” wafers for stone walls and lighter colored wafers for roof shingles, flecked jelly beans make good rocks; coconut flakes make great snow for landscaping and cinnamon sticks cut in half make a great log pile. Let your imagination run wild!! (Cheater’s version: Use Royal icing to “glue” together a graham cracker house and decorate.)
Gingerbread Dough:
½ cup butter or margarine
 ½ cup shortening
1 cup sugar
1 egg
½ cup molasses
2 Tablespoons lemon juice
3 cups all-purpose flour
1 cup wheat flour
1 ½ teaspoon ground ginger
1 ½ teaspoon ground allspice
1 teaspoon baking soda
½ teaspoon salt
Preheat oven to 375o. Beat sugar, shortening and butter together until creamy. Add egg, molasses, and lemon juice; beat well. Combine dry ingredients and gradually add to butter mixture; beat well. Divide into to portions, wrap in plastic and chill three hours. Roll out dough to 1/8 inch thickness. Place pattern for house and cut with a sharp knife or use cookie cutters. Place on greased cookie sheet and bake for 10 to 12 minutes. Assemble house or decorate cookies with Royal icing.
Gingerbread House Construction:
Upside down ice cream cone covered in green frosting and decorated makes a great Christmas tree; use “Golden Graham” cereal for shutters, green lifesavers or green “Fruit Loops” for wreaths; red licorice for bows, roping, outlining windows and doors; brown, black and white “Neco” wafers for stone walls and lighter colored wafers for roof shingles, flecked jelly beans make good rocks; coconut flakes make great snow for landscaping and cinnamon sticks cut in half make a great log pile. Let your imagination run wild!! (Cheater’s version: Use Royal icing to “glue” together a graham cracker house and decorate.)
Yum
Monday, November 30, 2009
It's Begining to Look a Lot Like Pizzelles

Classic Pizzelles
3 eggs
¾ cups sugar
½ cup margarine, melted
4 Tablespoons anise extract
1 ¾ cups of flour
2 teaspoons baking powder
2 Tablespoons anise or fennel seeds, optional
Preheat pizzelle iron. Cream together eggs and sugar, then add melted margarine that has been cooled and anise extract. Add flour and baking powder and mix until smooth. Add anise seeds and mix well. If batter is too thick add water a tablespoon at a time until it is the desired consistency. Using a teaspoon, drop one spoonful of batter on iron for each cookie. Makes about 3 dozen cookies.
Hint: I place the batter in a Ziploc bag and snip off one small corner (like a pastry bag) and squeeze out a teaspoon-sized dollop on the iron for each cookie. It gives you better control and is MUCH less sticky. And clean-up, well... much easier!
Yum
Sunday, November 22, 2009
Turkey Shopping
It seems that Dom’s Grandma sent his Grandpa out shopping one day for the coming week’s provisions. So after a long night of working, Grandpa headed to downtown Youngstown to all his favorite grocery stores for a day of shopping. Having collected all his canned goods and non-perishable items, Grandpa stopped at the meat shop on East Federal, to buy a turkey. The store owner bundle the live turkey with twine and handed it over to Grandpa for his journey home. After walking just a few blocks the turkey became restless, too restless to handle along with all of the other bags of groceries. Dom’s Grandpa decided to stop and reassess the situation. Grandpa then unwrapped the twine from around the turkey and carefully crafted it into a collar and leash. He then put the collar on the turkey, picked up his groceries, and walked the turkey home! One can only imagine the look on his Grandma’s face as she watched Grandpa walking down Trusedale Avenue with a turkey on a leash! When Dom’s Grandpa got home after walking with the turkey home, he said: "Sumna bitch, the turkey lost 2 pound!"
Yum
Friday, November 20, 2009
Very Corny Holiday

Corn is a truly American commodity and has been found in North American fossils of pre-Ice age. Even before Columbus landed in the New World, corn was the staple grain of Native Americans who called it “mais” which meant “our life.” In Plymouth, Native Americans taught the Pilgrims how to cultivate corn by planting a fish among the seeds and how to harvest. They also taught the newcomers how to cook with corn by adding a pinch of ash to release more nutrients. In the early years of most colonies like Plymouth and Jamestown, corn was the key to survival. While colonists originally ate corn out of necessity, it later became the food of choice in most Colonial recipes and meals because of its vast versatility.
Spoon bread made with corn meal is a traditional Thanksgiving side dish. Its pudding like consistency will make it a favorite with the entire family. This was always the recipe our boys would ask us to make for school Thanksgiving celebrations; it was always a big hit.
 Spoon Bread:
2/3 cup yellow cornmeal
1 Tablespoon sugar
1/4 teaspoon salt
2 cups milk
2 Tablespoons softened butter
2 teaspoons baking powder
3 eggs, separated
Preheat oven to 350o F. Heat milk in a saucepan but do not boil. Mix together cornmeal, sugar, and salt and slowly stir into heated milk. Continue stirring over low heat. Add butter to the mixture and stir. Remove from heat and allow to cool. In a separate bowl, beat egg whites to soft peaks and set aside. Stir egg yolks which have been lightly beaten and baking powder into the cornmeal mixture. Then gently fold egg whites into cornmeal batter. Stir lightly so as not to deflate the egg whites. Pour mixture into a greased 1½ quart baking dish. Bake for 30 to 35 minutes, until the top is golden. Serve immediately.
*To appeal to younger palates, add a little maple syrup.
Yum
Saturday, November 14, 2009
Italy's Fifth Quarter
The weather is getting colder and I headed to the market to buy some oxtails. Eating tails, feet, kidneys, tongues, or even fried blood is not as strange as it sounds. Italians are known for their love of organ meats, also known as offal (or awful to those who are not fans.) For the last two hundred years or so, Rome's offal cuisine has been known as Quinto Quarto, or fifth quarter. Roman butchers, called "vaccinari" (cow workers,) were very skilled and famous for their ability to refine any cut of meat. At first, the cows were split in half, and then in four quarters. What was left (inner organs, hooves, heads, tails, glands, brains, sweetbreads, even testicles) was called the fifth quarter; hence the "fifth," meaning useless or worthless, as in "the economy's fifth wheel." Coincidentally, the offal weighs about one-quarter of a slaughtered animal's total weight.

In the days before refrigeration, organ meats were difficult to keep. Because they were the first things to spoil, slaughterhouse workers received them to round up their meager pay. This gave rise to scores of recipes, mostly for beef parts. Over a fifty year period, the “inferior” cooking of the vaccinari became renowned citywide and evolved into dishes for connoisseurs. Once considered meat of poor quality, the offal are now considered delicacies that Italian restaurants and their patrons eagerly pay for.

In the days before refrigeration, organ meats were difficult to keep. Because they were the first things to spoil, slaughterhouse workers received them to round up their meager pay. This gave rise to scores of recipes, mostly for beef parts. Over a fifty year period, the “inferior” cooking of the vaccinari became renowned citywide and evolved into dishes for connoisseurs. Once considered meat of poor quality, the offal are now considered delicacies that Italian restaurants and their patrons eagerly pay for.
Yum
Thursday, November 12, 2009
Fried kidneys
Dom's telephone calls to his Aunt Rose are always enlightening and somehow always include food! During the most recent call, Aunt Rose said that when she was growing up, her father (Dom's Grandpa) would bring home calf kidneys and Grandma would have to boil them FOREVER to make make sure that they were clean before she would fry them with peppers. Aunt Rose said the house would stink so horribly that one day she realized that it was pig "pee." She didn't like the fried kidneys even before she had this revelation! Aunt Rose continued saying that her sister Mary loved fried kidneys. Once Aunt Mary ate a dish that his Grandma made and encouraged her to try but didn't tell her what it was. After eating and liking it, Mary asked what it she was eating and her father (Dom's Grandpa) told her it was the goiter of a cow. Needless to say his Aunt Mary wasn't happy while Grandma and Grandpa laughed and laughed! Some things never change. People love to tell stories about their siblings.
Yum
Sunday, November 8, 2009
Dutch Baby
It is a chilly morning and a warm Dutch Baby (also known as a German pancake) will be just the thing to serve for breakfast! This sweet treat is similar to Yorkshire pudding and is best served with lemon and confectioner's sugar. Don't be disappointed when the pancake falls soon after being removed from the oven. Make sure you eat it while still warm; it is not nearly as good when it is cold!
3 Tablespoons butter
3 eggs
3/4 cup flour
3/4 cup milk
1/4 teaspoon salt
1/4 teaspoon vanilla
lemon wedges
Confectioner’s sugar for dusting
Preheat oven to 425oF. Place butter in a 10" skillet or heavy baking dish and place in oven while preheating. Remove the pan before butter starts to brown. In the meantime, beat eggs until foamy; add milk, flour, salt and vanilla and blend together until just mixed. Pour into hot skillet and return to oven for approximately 25 minutes until golden brown and puffed. Remove the pancake from oven and dust with confectioner’s sugar. Serve immediately with lemon wedges and extra pats of butter. When the lemon juice mixes with the confectioner's sugar it makes a creamy lemony sauce that is perfect.
3 Tablespoons butter

3 eggs
3/4 cup flour
3/4 cup milk
1/4 teaspoon salt
1/4 teaspoon vanilla
lemon wedges
Confectioner’s sugar for dusting
Preheat oven to 425oF. Place butter in a 10" skillet or heavy baking dish and place in oven while preheating. Remove the pan before butter starts to brown. In the meantime, beat eggs until foamy; add milk, flour, salt and vanilla and blend together until just mixed. Pour into hot skillet and return to oven for approximately 25 minutes until golden brown and puffed. Remove the pancake from oven and dust with confectioner’s sugar. Serve immediately with lemon wedges and extra pats of butter. When the lemon juice mixes with the confectioner's sugar it makes a creamy lemony sauce that is perfect.
Yum
Thursday, November 5, 2009
Pumpkin Cranberry Bread
When I was in high school, I clipped the original recipe for pumpkin bread from the Atlanta Constitution and have kept it since. I have finally typed it up as the original is quite yellowed (and a bit sticky.) Over the years, I have added some spice and dried cranberries. This spicy, moist, breakfast bread is perfect for this time of year. The house smells so wonderful while it is baking! We like it best toasted with whipped cream cheese.

Preheat oven to 350 degrees F. In a mixing bowl, beat pumpkin, sugar, milk, eggs and butter until creamy and completely smooth.
Whisk together dry ingredients and add to the pumpkin mixture blending until fully combined. Fold in walnuts and cranberries. Pour into a greased 9x5x3" loaf pan. Bake at 350 degrees for 70 minutes or until toothpick inserted in center comes out clean. Cool in pan for 10 minutes; remove to a wire rack to cool completely.

- 1 cup canned or cooked pumpkin
- 1 cup sugar
- 1/2 cup milk
- 2 eggs
- 1/4 cup butter or margarine, melted
- 2 cups flour
- 2 teaspoons baking powder
- 1/2 teaspoon baking soda
- 1/2 teaspoon ground nutmeg
- 1/2 teaspoon ground ginger
- 1/2 teaspoon cinnamon
- 1 cup chopped walnuts
- 1 cup fresh or dried cranberries (optional)
Preheat oven to 350 degrees F. In a mixing bowl, beat pumpkin, sugar, milk, eggs and butter until creamy and completely smooth.
Whisk together dry ingredients and add to the pumpkin mixture blending until fully combined. Fold in walnuts and cranberries. Pour into a greased 9x5x3" loaf pan. Bake at 350 degrees for 70 minutes or until toothpick inserted in center comes out clean. Cool in pan for 10 minutes; remove to a wire rack to cool completely.
Yum
Sunday, November 1, 2009
Days of the Dead Bread
The Mexican Days of the Dead are held on November 1st and 2nd; a two-day celebration of death. In this ritual observance which is rooted in a bizarre blend of pre-Colombian and Roman Catholic practices, Mexican families make merry with the souls of their dearly departed. Because this celebration occurs immediately after Halloween, the Day of the Dead is sometimes thought to be a similar holiday, although the two actually have little in common. The living mingle with the dead at midnight picnics in cemeteries, they leave once- favorite foods as offerings such as sugar skulls and marigolds at homemade altars, and welcome back the dead for a day on earth feasting on tamales, spicy molès, and the most special treat of the celebration, Pan de Muerto, or “Bread of the Dead.” This bread dough is rolled out into strips shaped to resemble bones:
Dough Recipe:
1/2 cup butter
1/2 cup milk
1/2 cup water
5 to 5-1/2 cups flour
2 packages dry yeast
1 teaspoon salt
1 tablespoon whole anise seed
1/2 cup sugar
4 eggs
In a saucepan over medium flame, heat the butter, milk and water until very warm but not boiling. Meanwhile, measure out 1-1/2 cups flour and set the rest aside. In a large mixing bowl, combine the 1-1/2 cups flour, yeast, salt, anise seed and sugar. Beat in the warm liquid until well combined. Add the eggs and beat in another 1 cup of flour. Continue adding more flour until dough is soft but not sticky. Knead on lightly floured board for ten minutes until smooth and elastic.
Lightly grease a bowl and place dough in it, cover with plastic wrap and let rise in warm place until doubled in bulk, about 1-1/2 hours. Punch the dough down and shape into loaves resembling skulls, skeletons or round loaves with "bones" placed ornamentally around the top. Let these loaves rise for 1 hour. Bake in a preheated 350 F degree oven for 40 minutes. Remove from oven and paint on glaze.
Glaze Recipe:
1/2 cup sugar
1/3 cup fresh orange juice
2 tablespoons grated orange zest
Bring to a boil for 2 minutes, then apply to bread with a pastry brush. If desired, sprinkle on colored sugar while glaze is still damp.
Dough Recipe:

1/2 cup butter
1/2 cup milk
1/2 cup water
5 to 5-1/2 cups flour
2 packages dry yeast
1 teaspoon salt
1 tablespoon whole anise seed
1/2 cup sugar
4 eggs
In a saucepan over medium flame, heat the butter, milk and water until very warm but not boiling. Meanwhile, measure out 1-1/2 cups flour and set the rest aside. In a large mixing bowl, combine the 1-1/2 cups flour, yeast, salt, anise seed and sugar. Beat in the warm liquid until well combined. Add the eggs and beat in another 1 cup of flour. Continue adding more flour until dough is soft but not sticky. Knead on lightly floured board for ten minutes until smooth and elastic.
Lightly grease a bowl and place dough in it, cover with plastic wrap and let rise in warm place until doubled in bulk, about 1-1/2 hours. Punch the dough down and shape into loaves resembling skulls, skeletons or round loaves with "bones" placed ornamentally around the top. Let these loaves rise for 1 hour. Bake in a preheated 350 F degree oven for 40 minutes. Remove from oven and paint on glaze.
Glaze Recipe:
1/2 cup sugar
1/3 cup fresh orange juice
2 tablespoons grated orange zest
Bring to a boil for 2 minutes, then apply to bread with a pastry brush. If desired, sprinkle on colored sugar while glaze is still damp.
Yum
Sunday, October 11, 2009
Dom's Grandmother's Bread Recipe
 25 lb. bag of flour, less one soup bowl
2 cakes of yeast
water
That's it, good luck!
Note: Dom remembers the soup bowls, but I don't have any idea how much flour would hold. It was probably just enough to flour the work surface as she rolled out the dough.
Yum
Tuesday, October 6, 2009
Happy Italians (and Dog)!
Beef marrow bones are often included in the French pot-au-feu broth; the cooked marrow being traditionally eaten on toasted bread with sprinkled coarse sea salt. Diners in the 18th century used a spoon especially designed for eating called a "marrow scoop" which was typically silver with a long thin bowl. Marrow bones are also the highlight of the Italian dish ossobuco (braised veal shanks). To keep our adorable dog, Kahlua, happy at dinner time and to keep her from begging at the table, we started giving her a roasted marrow bone each evening while we ate dinner. The marrow is a great source of protein and the chewing the bone helps to keep a dog’s teeth clean. To roast marrow bones you will need:

12-24 raw marrow bones
Place bones marrow side up on a cookie sheet lined with aluminum foil. Place in a 350 oven and roast for 20 minutes. If the marrow bones are still frozen (the butcher sometimes gives them to me right out of the freezer case,) then roast for 30 minutes. The marrow should look cooked, but not have receded from the inside of the bone. If you are serving as an appetizer, plate one marrow bone with two pieces of good bread that has been toasted and parsley salad:
1 small buch Italian (flat-leafed) parsley
2 Tablespoons lemon juice
2 Tablespoons olive oil
 Serve with parsley salad (chopped parsley, shallot and capers tossed with a bit of lemon juice and olive oil.) The marrow is spread on the toast with the parsley salad on top.
For your pampered pooch, let the bones cool to room temperature and then place in the freezer. This keeps them fresh and makes them last longer when given to your dog as the marrow will be more solid.
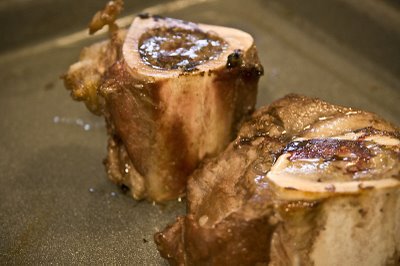
12-24 raw marrow bones
Place bones marrow side up on a cookie sheet lined with aluminum foil. Place in a 350 oven and roast for 20 minutes. If the marrow bones are still frozen (the butcher sometimes gives them to me right out of the freezer case,) then roast for 30 minutes. The marrow should look cooked, but not have receded from the inside of the bone. If you are serving as an appetizer, plate one marrow bone with two pieces of good bread that has been toasted and parsley salad:
1 small buch Italian (flat-leafed) parsley
2 Tablespoons lemon juice
2 Tablespoons olive oil

For your pampered pooch, let the bones cool to room temperature and then place in the freezer. This keeps them fresh and makes them last longer when given to your dog as the marrow will be more solid.
Yum
Sunday, September 20, 2009
Homemade Pasta
My husband enjoys cooking. In fact, he probably cooks more often than I do. More and more I notice that he makes simple dishes more in line with those he grew up eating.He always says, "We had pasta EVERY Sunday, then again on Tuesday and likely one more night during the week." He recalls that there was some sort of meat floating in the sauce more for flavor than for sustenance. Often, the meat was rabbit caught by one of the uncles.
His Grandmother would sit at the kitchen table with a cup of coffee and hand press 1,000's of handmade cavatelli at a time for Sunday dinner. She made it look so easy, and they would all be gone by evening's end! We have never been able to master cavatelli. Dom has tried making eggless pasta but the method eludes him.
We make homemade pasta with a little Atlas hand crank machine which is quite good and well worth the mess it makes of the kitchen. We have made ravioli with the hand cranked pasta sheets as well. Homemade ravioli is SO much better than anything you can buy, but it is a labor of love. Here is our recipe:
 Homemade Pasta
3 large eggs
5 cups flour
1 Tablespoon olive oil
1 cup cold water
On a clean counter top or pastry board, form a mound of flour. Make a well in the mounded flour and break in eggs and add oil. Slowly add in water. With hands (or a fork) gently start mixing together working from the inside out until all flour is incorporated. If dough feels to dry and a few drops of water if dough feels too sticky add a small amount of flour until the correct consistency is achieved. If using a pasta machine, divide the dough into thirds add start feeding through the machine. Follow the directions for your pasta machine. If making by hand, roll out dough with a rolling pin onto a floured surface until pasta is about 1/8" thick. Slice into “noodle” lengths with a knife or use cookie cutters to make fun noodles. To cook pasta, plunge noodles into boiling water and check 30 seconds after water returns to a boil. Do not cook for more than a minute.
His Grandmother would sit at the kitchen table with a cup of coffee and hand press 1,000's of handmade cavatelli at a time for Sunday dinner. She made it look so easy, and they would all be gone by evening's end! We have never been able to master cavatelli. Dom has tried making eggless pasta but the method eludes him.
We make homemade pasta with a little Atlas hand crank machine which is quite good and well worth the mess it makes of the kitchen. We have made ravioli with the hand cranked pasta sheets as well. Homemade ravioli is SO much better than anything you can buy, but it is a labor of love. Here is our recipe:
 Homemade Pasta
3 large eggs
5 cups flour
1 Tablespoon olive oil
1 cup cold water
On a clean counter top or pastry board, form a mound of flour. Make a well in the mounded flour and break in eggs and add oil. Slowly add in water. With hands (or a fork) gently start mixing together working from the inside out until all flour is incorporated. If dough feels to dry and a few drops of water if dough feels too sticky add a small amount of flour until the correct consistency is achieved. If using a pasta machine, divide the dough into thirds add start feeding through the machine. Follow the directions for your pasta machine. If making by hand, roll out dough with a rolling pin onto a floured surface until pasta is about 1/8" thick. Slice into “noodle” lengths with a knife or use cookie cutters to make fun noodles. To cook pasta, plunge noodles into boiling water and check 30 seconds after water returns to a boil. Do not cook for more than a minute.
Yum
Friday, September 4, 2009
Reviving Stale Snacks
Sometimes snacks get stale before you have finished the container. Especially if you live in a house with teenagers who never fully close the container! You can bring them back to an edible state by heating them in the oven. This works wonderfully for snacks like crackers, Chex mix, tortilla chips, pretzels and even whole loaves of bread. (If you have stale sliced bread you are better off making toast, crostini or bruschetta.) Spread the stale snacks out on a cookie sheet and place in a 350o F oven. Let them bake for about 10 minutes and then remove from the oven and let cool completely. Once cooled the snacks should be crispy and refreshed.
You can use this method with fresh nuts like almonds, peanuts, walnuts, etc. However, because nuts have a high unsaturated oil content, they can oxidize quickly on exposure to heat, light and air which creates rancidity that makes them smell and taste bad. Roasted, chopped, and ground nuts go rancid much rapidly than whole raw ones. Always smell nuts before you eat them or add them to recipes to be sure they are fresh. (I store nuts in the freezer until I need them.)
You can use this method with fresh nuts like almonds, peanuts, walnuts, etc. However, because nuts have a high unsaturated oil content, they can oxidize quickly on exposure to heat, light and air which creates rancidity that makes them smell and taste bad. Roasted, chopped, and ground nuts go rancid much rapidly than whole raw ones. Always smell nuts before you eat them or add them to recipes to be sure they are fresh. (I store nuts in the freezer until I need them.)
Yum
Sunday, August 2, 2009
Metro hummingbirds
Each August since we moved into our house, we have seen hummingbirds in our yard. I put a feeder in the yard after the first sighting and they return every year and stay until sometime in October when all their buddies are in town for the big autumn migration to Mexico.
Okay, I know that technically this post isn't about food, but watching these amazing little creatures from my kitchen window certainly makes cooking more enjoyable! To make up for my digression, I will explain how to feed the little guys.
 The first order of business in feeding hummingbirds is selecting a feeder. There are many different varieties. An important factor in your selection is ease of cleaning and filling. It doesn't really need a perch since hummingbirds can hover and eat. My favorite is the Droll Yankee Little Flyer.
Feeders can be filled with a homemade mixture of:
1/4 cup sugar
1 cup boiling water
Stir until sugar is dissolved and allow to cool before placing in your feeder. Never use honey because it can kill hummingbirds! Even though hummingbirds are attracted to the color red, do not add red food coloring to the sugar water because it could harm the little birds. Instead try tying a red ribbon around the branch where the feeder hangs. When the ribbon blows in the breeze it will attract your hummer friends! Place your feeder near flowers that are attractive to hummingbirds and try to place the feeder where it will be shaded and protected from the wind.
Feeders should be cleaned every three to four days. The sugar water solution is very susceptible to mold, fermentation and a variety of other bacteria and pathogens. Feeders should be cleaned with hot water and a few drops of vinegar or for really tough spots use a tiny amount of bleach. You can use a bottle brush, pipe cleaner or cotton swab to clean hard to reach places. I actually saved and cleaned the cap and brush from an old tube of mascara which works perfectly for cleaning the feeding ports!
Enjoy watching!
Okay, I know that technically this post isn't about food, but watching these amazing little creatures from my kitchen window certainly makes cooking more enjoyable! To make up for my digression, I will explain how to feed the little guys.
 The first order of business in feeding hummingbirds is selecting a feeder. There are many different varieties. An important factor in your selection is ease of cleaning and filling. It doesn't really need a perch since hummingbirds can hover and eat. My favorite is the Droll Yankee Little Flyer.
Feeders can be filled with a homemade mixture of:
1/4 cup sugar
1 cup boiling water
Stir until sugar is dissolved and allow to cool before placing in your feeder. Never use honey because it can kill hummingbirds! Even though hummingbirds are attracted to the color red, do not add red food coloring to the sugar water because it could harm the little birds. Instead try tying a red ribbon around the branch where the feeder hangs. When the ribbon blows in the breeze it will attract your hummer friends! Place your feeder near flowers that are attractive to hummingbirds and try to place the feeder where it will be shaded and protected from the wind.
Feeders should be cleaned every three to four days. The sugar water solution is very susceptible to mold, fermentation and a variety of other bacteria and pathogens. Feeders should be cleaned with hot water and a few drops of vinegar or for really tough spots use a tiny amount of bleach. You can use a bottle brush, pipe cleaner or cotton swab to clean hard to reach places. I actually saved and cleaned the cap and brush from an old tube of mascara which works perfectly for cleaning the feeding ports!
Enjoy watching!
Yum
Saturday, July 4, 2009
Happy Birthday America Sauce!
 Up early this morning to take the guys up to the starting line for the Peachtree Road Race. After a long jog through Piedmont Park, we made it to 10th Street in time to see Dominic and Sonny cross the finish line! Each runner got a timing chip this year so we knew their official times within hours of the end of the race. Dominic ran the 6.1 mile race in 47:03 beating his previous year's time by 4:43! Sonny finished with a time of 53:37 - pretty remarkable for a 13-year-old in his first 10K!
Dom put a pork butt on the grill to smoke while we spent the afternoon at the pool. Then back home for grilled pulled pork sandwiches with grilled corn with chili and lime before heading to Ansley for fireworks.
This recipe for "South Carolina" BBQ sauce is the best we've found. This is our favorite sauce with pulled pork sandwiches. Don't forget the dill pickle slices!
1 cup cider vinegar
6 Tablespoons Dijon mustard
2 Tablespoons maple syrup or honey
4 teaspoons Worcestershire sauce
1 teaspoon hot sauce
1 cup vegetable oil
2 teaspoons salt
Ground black pepper
Mix all ingredients together in a bowl. We use an immersion blender to emulsify the sauce.
Yum
Subscribe to:
Posts (Atom)