Friday, April 1, 2016

Chocolate Salami Tomfoolery

Our faithful readers know that we like to give you a little history lesson along with your recipe. I had intended to give you some information on the origins of April Fool’s Day, however, it seems that the joke's on us. Many believe that the first mention of the “holiday” was in Chaucer's The Canterbury Tales published in 1392, while others debunk this theory. It would take many (many) paragraphs to share what the folks at The Museum of Hoaxes have already done very nicely.

So, regardless of how we got here, April 1st is the day for our loved ones to completely terrorize us and freak us out. I prefer the kinder, subtler form of deception: illusions that will both surprise and delight. And as tomfoolery goes, this chocolate salami is one of the best. Lay these out on a cutting board, perhaps as part of a cheese course, and watch as your guests discover a whimsical and festive chocolate dessert hidden inside the chameleon clothing of cured meat.

In truth, this is not salami at all, but chocolate, nuts, confectioner's sugar and other simple ingredients combined to create a trompe l'oeil illusion of a cured salami. Even after you cut into it, the trickery continues until it is tasted, then all illusions are over. "Salame al cioccolato" is a traditional Tuscan dessert, that is actually a popular Christmas treat.

1 - 12 oz. package of chocolate chips
¾ stick butter
2 tablespoons liqueur (Amaretto, Kahlua, Cointreau)
¼ cup cocoa powder
¾ cup nuts (almonds, cashews, Brazil nuts, walnuts), chopped
¾ cup cookies, crushed
Confectioner’s sugar for dusting


Melt together the chocolate and butter in the microwave on medium for about 1 minute. Remove from the microwave and stir. Repeat heating at shorter intervals, 20 to 30 seconds, stirring in between, until the chocolate is completely melted and has a smooth consistency. Be forewarned, melted chocolate can be messy…

Stir the cocoa powder and liqueur (or extract) into the melted chocolate. We used Amaretto, but if you prefer a non-alcoholic version, simply use vanilla extract or strong coffee instead. Add the nuts, cookie pieces and stir until combined. For the cookies, any dry plain cookie will work. Cover the bowl and refrigerate until it becomes firm enough to form, about 20-30 minutes.

Divide the chocolate mixture in half. Place half of the mixture in the center of a piece of plastic wrap. Using a spatula, form the mixture into a log, about 7 inches long and 2 inches in diameter.


Roll up the log in the plastic and twist the ends to seal. Roll back and forth on a work surface a few times to make the log evenly round. Repeat with the remaining chocolate mixture. Refrigerate the logs until firm, about 1 more hour.

Spread the confectioners' sugar on a baking sheet. Remove the plastic wrap from the logs, then roll them in the sugar until coated. Using a pastry brush, brush away the excess sugar. Let the logs sit at room temperature for 15 minutes. Using a sharp serrated knife, cut the logs into 1/2-inch-thick slices and serve.


Yum

Thursday, March 24, 2016

Happily Eating at The Capital Grille

The Capital Grill is one of Atlanta’s most distinguished steakhouses so you can imagine how thrilled we were to receive an invitation from our friend Milla Williams of Happily Eating to experience the restaurant. As soon as you open the front door, you notice the mahogany paneling and art deco chandeliers which add to the warm, elegant atmosphere.

As we gathered and chatted, the friendly staff came around with glasses of the restaurant’s signature cocktail known as a “Stoli Doli” which is Stolichnaya vodka house-infused with “Dole” pineapples. We were then treated to our choice of other drinks from their exclusive cocktail menu. I selected a Bohemian made with Absolut Apeach vodka, a splash of berry liqueur, and topped with chilled champagne and a fresh raspberry.

Soon plates of pan-fried calamari with fiery peppers, large plump garlic shrimp cooked and served in a small cast iron pans, and exquisite mini tenderloin sandwiches with mushroom duxelles and Boursin cheese arrived at the table. As we all took pictures, Chef Matt Stone ambled around the table describing the ingredients and techniques for each dish. We shared the plates as the attentive staff took our dinner orders. Selecting an entrée proved more difficult than you might think.

The Capital Grille, located at Perimeter Center West in Dunwoody, has a wide selection of steaks to choose from: ribeye, New York strip, filet mignon, and porterhouse. Long before their steaks ever touch the grill, they are meticulously dry aged for at least 18 days to achieve their incomparable flavor and texture. After which, each steak is hand-carved by in-house butchers to exacting standards. An intensive process to be sure. I opted for my favorite cut: a porterhouse which is the best of both worlds; a succulent filet mignon and a tender, meaty, bone-in strip steak.

My steak was a generous 24-ounces which I could have happily shared with a dinner partner! There were several menu options for non-steak-eaters such as the Chilean sea bass in mushroom soy broth, sashimi-grade, sesame-seared tuna and seared citrus-glazed salmon.

Our entrees were served with truffle fries with Parmesan that were crispy and not overly truffled; soy-glazed Brussels sprouts with large chunks of pork belly were nicely caramelized; and, fantastic lobster macaroni and cheese with huge pieces of lobster throughout.


We were still licking our lips from the tender portions of beef as plates of dessert samplers arrived. We all gave a collective satiated sigh, but no one could resist the trio of treats set before them which included classic crème brûlée with seasonal berries, a decadent flourless chocolate espresso cake with cocoa powder and fresh raspberries, and their signature individual cheesecake with a brûléed top served with fresh berries. We were also treated to cups of cappuccino the size of cat’s heads. For a group claiming to be full from their delicious meal, those desserts disappeared faster than a buttered bullet.

We extend our sincere thanks to our gracious hostess Milla Williams for coordinating such a lovely evening and to the staff at The Capital Grille for their courteous and attentive hospitality who showed us the true meaning of Southern hospitality.

While the menu items we sampled were complimentary, the opinions included herein are honest and unsolicited.


Yum

Wednesday, March 16, 2016

First Fresh Toads In The Hole

The name “Toad in the Hole” always conjures images of Arnold Lobel’s besties, Frog and Toad, and their adorable adventures. Two of my favorite stories are “Spring” in which Frog tears off the pages of Toad’s calendar to persuade him to get out of his bed to admire the beauty of spring; and, “The Corner” in which Frog tells the story of his search for Spring around every corner until he finds his parents working in their sunlit, newly-sprouted garden.

This was the recipe that raced to mind when a delivery of First Fresh Chicken Sausages arrived at the door yesterday. The sausages are made using Old World traditions of European sausage combined with the healthy benefits of locally grown, farm fresh ingredients.

While Americans usually refer to “Toad in a Hole” as an egg cooked in the hole cut out of a piece of bread, in England, it means sausages cooked in a Yorkshire-pudding-type batter. The English version is more whimsical, and of course more traditional similar to its playful cousin “Pigs in a Blanket.” With both St. Patrick’s Day and the first day of Spring occurring in the same week, this seems like the perfect time to make this traditional British dish and a great way to feature these amazing products.

6 - 8 links of First Fresh Chicken Sausage links or other breakfast sausage
1 cup of all purpose flour
1 teaspoon Kosher salt
¼ teaspoon freshly ground black pepper
¼ teaspoon dry mustard powder
3 eggs, beaten
1 cup milk
1 tablespoon melted butter
1 tablespoon vegetable oil

The First Fresh Chicken Breakfast Sausage browns
 beautifully in the pan and retained its juiciness
 throughout the entire cooking process. The spicy flavor
 lent itself wonderfully to the delicate batter.


Coat the bottom and sides of a casserole dish (8"x12", 9"x9" or 2 - 5"x8") with vegetable oil or non-stick cooking spray.

Place a rack in the bottom third of the oven. Put the empty dish on the rack. Preheat the oven with the dish in it to 400°F.

In a large bowl, whisk together the flour with the salt, pepper and mustard. Make a well in the center of the flour. Pour in the eggs, milk, and melted butter into the well and whisk into the flour until smooth. Cover and let stand while sausage cooks and oven preheats.

Heat a tablespoon of vegetable oil in a skillet on medium high. Add the sausages and lightly brown them on at least a couple sides.

When the sausages have browned, and the dish in the oven hot, pull the oven rack out a bit, put the sausages in the casserole dish, and pour the batter over the sausages. Cook for about 20-30 minutes. Don’t open the door to the open to prevent the batter from deflating. The batter will rise quite a bit. It is done when the batter is puffed and golden and the sausages are nicely browned.

When done, serve immediately with the knowledge that the dough will collapse as it cools. An assortment of mustards, jams and perhaps a fried egg will be nice accompaniments.

Checkout more delicious recipes using First Fresh Chicken Sausage from my fellow members of the Atlanta Food Bloggers' Society:

Grilled Italian Chicken Sausage - Beef & Chocolate
Chicken Sausage and Fennel Soup - The Sophisticated Caveman
Deep Dish Chicken Sausage Pizza - Shana Was Here
Herbed Biscuits with Chicken Sausage & Pimento Cheese - Happily Edible After
Cojita Omelets with Chicken Sausage & Tomato Hash - Front Porch Gourmet
Chicken Sausage Meatloaf - Atlanta Food Critic
Chicken Sausage & Olives with Wild Rice - Do.Food.Better.
Ricotta Gnocchi with Pesto & Chicken Sausage - The Cardigan Kitchen


Disclosure: We received samples of this product as members of the Atlanta Food Bloggers' Society. 
While the products we sampled were complimentary, the opinions included herein are honest and unsolicited. 

Yum

Friday, March 11, 2016

Irish Chef Cooking “Green” in Downtown Atlanta

Each March, as St. Patrick’s Day approaches, there seems to be intense focus on Irish cuisine. Chef Thomas McKeown, executive chef of downtown’s Hyatt Regency Atlanta, has taken some of his favorite recipes from his home country and added a Southern flair using sustainably-grown ingredients. He has prepared a special menu for diners looking for an authentic St. Patrick’s Day experience.
Source

While Chef McKeown was born and trained in Ireland, his love for all things green goes beyond his Irish roots. He is dedicated to serving local, healthy and responsibly raised ingredients. He has started Community Supported Agriculture Programs (CSA) in Atlanta, spends his free time at the Peachtree Road Farmers Market and serves on the Advisory Board to Southeastern Sustainable Livestock Coalition (SSLC) which promotes the importance of supporting humane and sustainable farming in the Southeast.

Chef McKeown shared one of his favorite “green” recipes. Colcannon is a healthy dish that has a long history in Irish culture including several songs that have been written about it. Interestingly, colcannon (which sounds even better in an Irish brogue) is usually served on Halloween which in Ireland is also known as “Colcannon Night.”


Source
Colcannon with Bangers and Mustard Sauce
2 pounds fresh Irish Bangers (about 8 pork sausages)
2 pounds Yukon Gold potatoes, peeled & diced
4 tbsp. butter, diced
1 cup heavy cream
1/2 cup whole milk
1 tablespoon Kosher salt
1 tablespoon freshly ground black pepper
2 cups baby kale (collards, cabbage or chard may be substituted)
1/2 cup bacon, cooked and chopped
2 teaspoons grainy mustard
Chopped parsley for serving

Preheat oven to 450° F. Heat large pan with medium heat. Coat pan with oil. Once oil is hot, add sausages and sear on both sides until golden brown. Finish in the oven for 10 -12 minutes. Chef McKeown recommends supporting great local butchers like Pine Street Market who use sustainably farmed meats in their products.

Meanwhile, place potatoes in large saucepan with 1 tablespoon of salt and enough water to cover the potatoes. Bring to a boil and simmer for 20 - 25 minutes. Drain potatoes in colander and return to saucepan. Cover for 5 minutes.

Add butter, ½ cup of the heavy cream, milk, and a 1 tablespoon of salt and pepper. Beat the potatoes in the pan with masher until smooth and creamy. Once creamy, fold in the bacon and kale. The greens will wilt from the heat of the potatoes, cooking them perfectly. If you can’t find baby kale, you can use greens that have been lightly blanched in their place. Adjust seasoning accordingly.

Drain excess sausage fat and place the pan over medium heat. Add the remaining 1/2 cup heavy cream and reduce heat, whisk in mustard. Stir until fully combined and thick then remove from heat and prepare to serve. Mound a generous portion of potatoes on plate and top with sausages. Spoon mustard sauce over and sprinkle with fresh chopped parsley.

For those of you who have no interest in cooking on St. Patrick’s Day, head over to Sway Restaurant at the Hyatt Regency Atlanta and let Chef McKeown satisfy your Irish cravings with his Southern Colcannon and Pine Street Market Bangers, Skillet Baked Irish Soda Bread with Kerrygold butter, and Beer Battered Shrimp with Spicy Aioli.


Yum

Thursday, March 10, 2016

Crack the Code with Whole Wheat Kheer

Food truly is a universal language. We have met so many new friends through recipe posts, social media shares and food-related events. It is always fun to follow their culinary adventures and learn from their perspectives. Several years ago, I became Facebook friends with another Atlanta food writer, Nandita Godbole of Curry Cravings, and am excited to have reviewed her newest cookbook (actually the second edition of) “Crack the Code.”

In it, she breaks down Indian cooking using her own secret formula: a six-tier system in which ingredients are organized by the order they are best introduced into the cooking process. Recipes start with tier 1 which includes spices that need to bloom, tier 2 adds ingredients that need longer cooking times, tier 5 brings in the main component (usually the protein), while tier 6 layers on the finishing touches and garnishes. The essential principle is that there is a time and place for each ingredient in every dish.

In all honesty, I have always been very intimidated by Indian cooking, but with easy access to so many of the ingredients used in traditional Indian cuisine, we have been trying more dishes at home especially the hearty dal which is perfect for cold wintery weather. When I gave up sweets for Lent and was searching for a healthy alternative to satisfy my sweet tooth, I turned to Nandita’s cookbook for ideas. Bingo! In it, I found her recipe for cracked whole wheat kheer made with cardamom and almonds which makes for a hearty breakfast or a tasty dessert. I adapted her recipe to use bulgur wheat which requires less cooking time (and patience) and added some dried apricots for a little extra natural sweetness.

Whole Wheat Kheer with Apricots
1 tablespoon clarified butter
1-2 pods of green cardamom
1 cup bulgur wheat, rinsed
¾ cup water
¾ cup whole milk
3 tablespoons brown sugar
2 - 3 tablespoons almonds, chopped
2 - 3 tablespoons dried apricots, raisins or other dried fruit, chopped

Heat the butter in a saucepan over medium heat. Once melted, reduce heat to low and add the cardamom to the pan to bloom. After about one minute the cardamom should be fragrant and have released the flavor into the butter. I left the cardamom pods in the pan to maximize the flavor, but you could take it out here if you prefer more subtle spice. Either way, the pods are not really edible.

Add the rinsed bulgur to the butter in the pan and increase the heat to medium. Stir the bulgur in the butter for 2-3 minutes until fully coated and glistening. Add water to the pan and bring to a boil. Lower the heat, cover the pan, and allow to simmer for about 8 - 10 minutes to fully cook the bulgur.

Uncover the pan and add the milk. Continue to simmer until the milk is reduced. Add the sugar, dried fruit and almonds, and continue cooking until the sugar is dissolved stirring occasionally to prevent sticking. When the dish has reached the desired consistency, ladle into serving bowls and dig in!

To learn more about Nandita and to order her new cookbook, visit her blog, Curry Cravings Kitchen. You can also find her Crack the Code e-cookbook on iTunes.


Yum

Wednesday, March 9, 2016

ATL Airport District Restaurant Week Starts Saturday, March 12th

The first ever Atlanta Airport District Restaurant Week starts this Saturday! The diverse restaurants of the newly rebranded destination marketing organization (formerly Meet College Park and Explore East Point) will feature $9, $19 or $29 prix fixe menus and fabulous discounts.

Throughout the nine-day culinary event, the Atlanta Airport District will offer a glimpse of the variety of charming restaurants and talented chefs that the cities of College Park and East Point have to offer. College Park and East Point are home to Hartsfield-Jackson Atlanta International Airport, the Georgia International Convention Center, more than 8,000 hotel rooms and is the corporate headquarters of Porsche and Delta Air Lines.

Atlanta Airport District Restaurant Week is the perfect time to explore the area’s culinary excellence. Several bloggers were invited for a sneak preview of some of the menu items that will be available during the week. Here is a rundown of the offerings for four participating restaurants:

Our journey began at the Convention Center where the AAD offices are housed. As we arrived, we were greeted by Alexia Ryan, a.k.a. “The Beer Girl” who shared three of her favorite beers on tap from her Hapeville Bottleshop; Creature Comforts’ “Tropicalia,” Reformation Brewery’s “Providence” and Red Brick Brewing’s “Vanilla Gorilla.” We sipped our brews before boarding a posh bus which would take us to our next four stops.

The first stop was Urban Foodie Feed Store which operated as an old-school feed store for 80 years and still shows signs (literally) of its former life has been converted into a hip and stylish restaurant where we were greeted warmly as plates of Kale Caesar salad with grit croutons, fried green tomatoes with red pepper coulis, and black bean hummus along side the crafted cocktail known as “KB Lemonade” an ode to a dear friend, made with fresh lemon juice, rosemary simple syrup, and Tito’s vodka.

Our next stop was The Pig and The Pint where we were greeted by co-owners Dennis Maguire and Chef Michael Broom. Dennis told us a bit about the place and the drinks, while Chef Michael brought out plates with a hat-trick of Southern favorites: saucy smoked ribs, housemade smoked trout dip and tiny red velvet cupcakes topped with Amaretto-pecan buttercream. So good!
Kafenio was our next stop. In Greece, a “kafenio” is a traditional family-owned coffeehouse which usually serves as the social center of a community. That is exactly the kind of establishment that Johnny Gianoulidis was hoping to create when he opened his quirky little cafe in College Park. After sampling his gyro wrap, spanakopita, and baklava, it is easy to imagine this place becoming the favorite spot for pilots to sip some espresso between flights or students to do homework after school.

On our fourth and finally stop, we made our way to the East Point Corner Tavern (the sister restaurant to their Little 5 Points and Edgewood locations). The walk up a flight of stairs gives the bar a speakeasy feel with a full length bar and dark wood tables. Like any good pub, there are pool tables; five regulation pool tables to be exact, and karaoke (rumor has it you might catch my friend Mike singing some sultry John Legend on occasion) on Saturday nights at 10pm. When you go you must try “The Carpetbagger” burger, a bleu cheese stuffed hamburger patty that is battered, fried and dipped generously in Buffalo-wing sauce (What?!). For those who are a little less brave the Turkey Melt with house roasted bird and cheddar on Texas toast is a worthy choice. Of course, what is a bar without its signature cocktail? EPCT has a Bourbon Cowboy made with rye, root beer, bitters, flamed orange and nutmeg that will most certainly wet your whistle. I would definitely go back for that.

With bellies full, we waddled to the bus and headed back to the Convention Center to retrieve our cars. We had one last surprise waiting for us – beer swag!! Yes, the Beer Girl had a bottle of Monday Night Brewing’s “Cinnamon Cocoa Drafty Kilt” waiting in a neoprene cooler from the Atlanta Airport District folks. Sweet! Promising not to drink the jaunty Scotch ale on the way, we headed home, vowing to return very, very soon!

Head over to the Atlanta Airport District starting this Saturday (through Sunday, March 20th) and explore some of College Park and East Point’s fabulous dining destinations just minutes from downtown Atlanta!

Disclosure: Thanks to Phase 3 PR for the inviting me along on this Tweet-up. While the menu items we sampled were complimentary, the opinions included herein are honest and unsolicited.


Yum

Thursday, March 3, 2016

Cheesy Cauliflower, Leek & Mushroom Strata

We aren’t sure what it is about a strata that makes it such a revered comfort food; maybe it’s the added warmth of the oven on a cool day or maybe it is the nostalgia; the yearning for a simpler time when a simple dish made with modest, unpretentious ingredients. Either way this toasty, cheesy casserole with delicate flavors of leek, cremini mushrooms and cauliflower layered with bread and sharp cheddar cheese will make you feel all cozy inside like being wrapped in your favorite blanket.

While we used these particular ingredients in order to compete in the “Chopped At Home” Challenge sponsored by the Food Network and Sargento®, you could use almost any vegetable combination that strikes your fancy. The addition of some sausage or chicken would be quite tasty as well.

Like a bread pudding, there are several types of casseroles based on the technique of soaking leftover bread in broth, milk or custard and then baking until the inside layers are soft and creamy. While the lines between these dishes can be blurry, the main difference lies in the kind of soaking liquid that is used.

A strata is made by layering bread slices and adding eggs and milk (usually more eggs than milk) giving them a consistency and flavor akin to quiche. A panade is a soupy casserole made with chicken or vegetable broth resulting in a savory dish similar in consistency to spoon bread. Panade is sometimes compared to stuffing in which the quantity of liquid is reduced to equal the volume of bread and other ingredients. Lastly, bread pudding is also made with eggs, milk or cream, and bread, but has a denser, softer custard with a milkier flavor (due to a more equal ratio of eggs and milk). Stratas and panades are typically savory, while bread puddings can be sweet or savory. These homey casseroles can be served at breakfast, brunch or as a side at dinner time. They also make the perfect potluck dish.

1 8-oz. package of cremini mushrooms (a.k.a. baby portabellos)
3 cups cauliflower florets
1 large fresh leek, chopped
3 tablespoons unsalted butter
6 large eggs
2 cups milk
1 tablespoon Dijon mustard
1 teaspoon salt
1/2 teaspoon black pepper
1/4 teaspoon freshly grated nutmeg
6 cups crusty stale bread, 1” cubes
1 cup cheddar cheese, grated

Blanch and drain cauliflower removing as much liquid as possible.

Cook mushrooms in butter in a large heavy skillet over moderate heat, stirring for 3-4 minutes. The mushrooms will release a good bit of moisture. When the moisture has cooked off, add the chopped leek and continue to sauté for another 3-4 minutes until leeks are soft and tender. Stir in cauliflower, then remove from heat.

Spread half of the bread cubes in a buttered 3-quart gratin dish or other shallow ceramic baking dish and top evenly with half of the vegetable mixture. Sprinkle with half of the cheddar cheese. Repeat layering ending with cheese on top.

Whisk together milk, eggs, mustard, nutmeg, salt and pepper in a large bowl and pour evenly over strata. I use a sheet of plastic wrap to gently press down on the ingredients (so the bread soaks up the egg mixture) before adding the top layer of cheese. Chill strata, covered with plastic wrap, at least 2 hours (or overnight) for bread to absorb more of the liquid.

Remove the strata from the refrigerator and let stand at room temperature for 30 minutes. Before cooking. Preheat oven to 350°F.

Bake strata, uncovered, on the middle rack of the oven until puffed, golden brown, and cooked through. Depending on your oven this should take from 45 to 55 minutes. Let stand 5 minutes before serving.


Yum

Wednesday, March 2, 2016

Princi Italia Atlanta - Midtown's Italian Gem

Because we so frequently cook and eat Italian dishes at home, it is rare that we go to an Italian restaurant which is why it was a treat to attend a blogger dinner at Princi Italia in Midtown with my fellow food bloggers.

The location is perfectly situated on the corner of Crescent Avenue and 12th Street with large picturesque windows and blonde-wood décor lend a warm Tuscan farmhouse feel to this quaint Italian bistro. We were greeted by friendly staff and immediately seated in the tradition of true Italian hospitality.

Soon antipasti plates of Meatball al Forno and Tomato & Basil flatbread arrived. The meatballs were large and flavorful and the flatbread while simple was expertly orchestrated. Plates of pasta (primi) followed: Fettuccini Di Mare, Tortellini Fonduta and Shrimp Amalfi an Italian riff on the Southern favorite shrimp and grits.

A course of insalata came next with a classic Caprese topped with pesto and a light arugula salad topped with locally made burrata; again simple and perfectly composed.

No sooner had plates been cleared when entrée dishes (secondi) began to appear at the table: a Grilled Chicken Pizza with pears and goat cheese was a surprise, while Chianti-Braised Short Ribs with fingerling potatoes was a hearty addition.  The highlight was the housemade Orecchiette with Italian Sausage (also housemade), rapini and chili flakes generously dusted with Parmesan.

We all loosened our belts as two decadent plates of chocolate were delivered to our table: the first was Princi’s signature Tiramisu with layers of chocolate cake soaked in dark rum and mascarpone cream, chocolate shavings & leghorn sauce; and, the second was indulgent chocolate truffle bars like Kit-Kat bars on steroids with raspberries snow-capped with powdered sugar. Both made excellent finales to a wonderful sampling of Italian dishes.

We said our good byes and headed off into the night with full bellies (and validated parking tickets – a treasure in Atlanta to be sure,) each of us vowing to return in the very near future! Thanks to Princi Italia located at 77 12th Street for a fabulous evening!

Disclosure: I attended this dinner as a member of the Atlanta Food Bloggers' Society. While the menu items we sampled were complimentary, the opinions included herein are honest and unsolicited. 

Yum

Friday, February 26, 2016

Oscar-worthy Almond and Olive Rugelach

This weekend, the Academy of Motion Picture Arts and Sciences (AMPAS) will honor the best films of 2015 at the 88th Academy Awards ceremony. Since the live broadcast begins during the dinner hour for most of the U.S., many of us celebrate with Oscar-themed dishes and parties. A menu of chicken wings and 7-layer dip hardly seem conducive to watching celebrities dressed to the nines walk down the red carpet. This occasion calls for some “highfalutin” snacks and we have just the thing.

The first Academy Award ceremony which was the brainchild of Louis B. Mayer, head of the powerful MGM (Metro-Goldwyn-Mayer) film studio, was held in May 1929. As a kid, I remember dreading the night the Academy Awards were to air. It was an epic telecast of movie stars I had never heard of, nominated for films I had never seen, wearing clothes made by designers I could never afford. With the advent of cable television, DVDs, DVRs, and the internet, I now look forward to the festivities which now begin midday, and go well into the evening with interviews performances and even live-action selfies posted simultaneously on social media accounts.

For a fancy afternoon nosh, we suggest these posh little savory pastries. This variation of rugelach is easy to make and even easier to eat!

1 batch sour cream pastry dough
1/3 cup almond meal (or blanched almonds finely ground)
1/3 cup Italian green olives, pitted and chopped
2 tablespoons Parmesan cheese, grated
1 anchovy filet or ½ teaspoon of anchovy paste (optional)

In a small mixing bowl, combine ground almonds, chopped olives (we used Picholine olives) and anchovy and stir into a paste.

Remove and discard plastic wrap from 1 half of dough, keeping other half wrapped and chilled. Put unwrapped dough in center of 1 sheet of floured parchment paper. Dust dough with flour and cover with another sheet of parchment, then roll out dough into a 9-inch round (about 1/8 inch thick).

Carefully peel off top sheet of parchment and set aside. (If dough is too sticky to remove parchment cleanly, chill until firm, 10 to 20 minutes.) Repeat procedure with remaining half dough.

Cut the dough into long triangles (like the dough for crescent rolls.) I prefer to roll the dough into a rectangle and cut at alternating angles, but you could also roll the dough into a circle and cut the dough pie chart style.

On the wide end of each triangle, place a small dollop (about a scant teaspoon) of the almond-olive paste and then roll the rugelach from the base to the point of the triangle. Repeat until all the dough is used.

Bake until golden, 20 to 25 minutes. For even browning, rotate the sheet from front to back halfway through baking. Transfer the turnovers to a wire rack, and let them cool slightly. Serve while they’re still warm.

Freezing Instructions: You can freeze unbaked rugelach on a baking sheet until they’re firm, then gently transfer them to a resealable freezer bag. Store them in the freezer for up to 1 month. To bake them from frozen, just add a few minutes to the baking time.

Yum

Tuesday, February 23, 2016

Italian Blood Orange Salad & Blog Hop

For those of you who have attended true Italian family dinners, you know that they are usually epic with multiple courses and dishes. To give you an idea of what it is like, several blogger friends have gotten together to bring you a virtual Italian Dinner via Blog Hop. Our contribution to the meal is a salad or “insalata” in Italian.

There are many different thoughts about when a salad should be served in an Italian meal. The typical answer is that “it depends.” It depends on region, the family, or the time of year. In Rome, a salad of mixed greens is commonly served as a side dish for grilled or roasted meats or breaded cutlets. In Northern Italy, salads are served as a course following the main dish (or secondi,) while the custom for Italian-Americans is to eat the salad after the appetizers (antipasti), and prior to the first course (primi).

Blood Orange Salad | We Like To Cook!Regardless of when you choose to serve it, this is the perfect salad to accompany any Italian meal. This recipe relies heavily on the quality of all the fresh ingredients, so be sure to have the freshest citrus, fennel and red onion to ensure the perfect texture and flavors. This super fresh salad takes all of our favorite ingredients and throws them into a vibrant dish that is a treat for your eyes as well as your taste buds! The contrasts of the slightly spicy onion, the crunchy anise and the tart citrus... nirvana.

1 fennel bulb, sliced thinly
1 medium red onion, sliced thinly
2 tablespoons extra-virgin olive oil
1 tablespoon white balsamic vinegar
3 blood oranges, peeled and sliced
Salt and freshly ground black pepper

Slice the onion and fennel as thinly as possible (reserving the fennel fronds for garnish). We use a mandolin on the thinnest setting. Place onions and fennel in a salad bowl and toss with the olive oil and vinegar. If white balsamic vinegar is not readily available, feel free to substitute champagne vinegar or even unseasoned rice vinegar. (In our opinion, lemon juice is just a little too tart.)

Peel the oranges and slice the oranges as thinly as possible with a serrated knife. (The mandolin beats up them up too much.) Can't find blood oranges? You can use Cara Cara or navel oranges. Gently toss the oranges with the fennel and onions before plating.

Garnish the salad with the delicate fronds from the fennel and sprinkle with salt and freshly ground black pepper. The black pepper adds a nice nuance to the dish, so really don't skip it.

Check out the other amazing dishes in our Blog Hop Meal!


Yum

Saturday, February 13, 2016

Aphrodisiacs for a Romantic Valentine's Day

Just in time for Valentine’s Day, Chef Nick Leahy of Saltyard, Flavors Magazine and Springer Mountain Farms teamed up to host "Valentine's Day Cooking" at Bloomingdale's in Lenox Square Mall where Chef Nick taught guests to recreate a romantic Valentine's Day dinner at home. He prepared two aphrodisiac-infused recipes in the Bloomingdale’s Home kitchen.

The chef began the demonstration by explaining the concept behind aphrodisiacs and the varying types. Aphrodisiacs (named for the Greek goddess of love, Aphrodite) are items that inspire lust, improve potency or enhance sexual function and most commonly refer to food. There are three categories of aphrodisiacs (with some overlap):

Visual Enticements – Ingredients that resemble sexual organs. These include phallic symbols such as bananas, cucumbers, carrots as well as oysters, papayas and figs.

Expectation-Setters – Items that set a tone to suggest that a romantic evening is inevitable. These items might be expensive, decadent, rich or meaningful to the couple in some way including champagne, caviar, or chocolate.

Physiological Stimulants – these ingredients are that cause a physical reaction as such warming the blood, lowering inhibitions, or increasing energy levels which include chili peppers, red wine, honey, watermelon and chocolate.

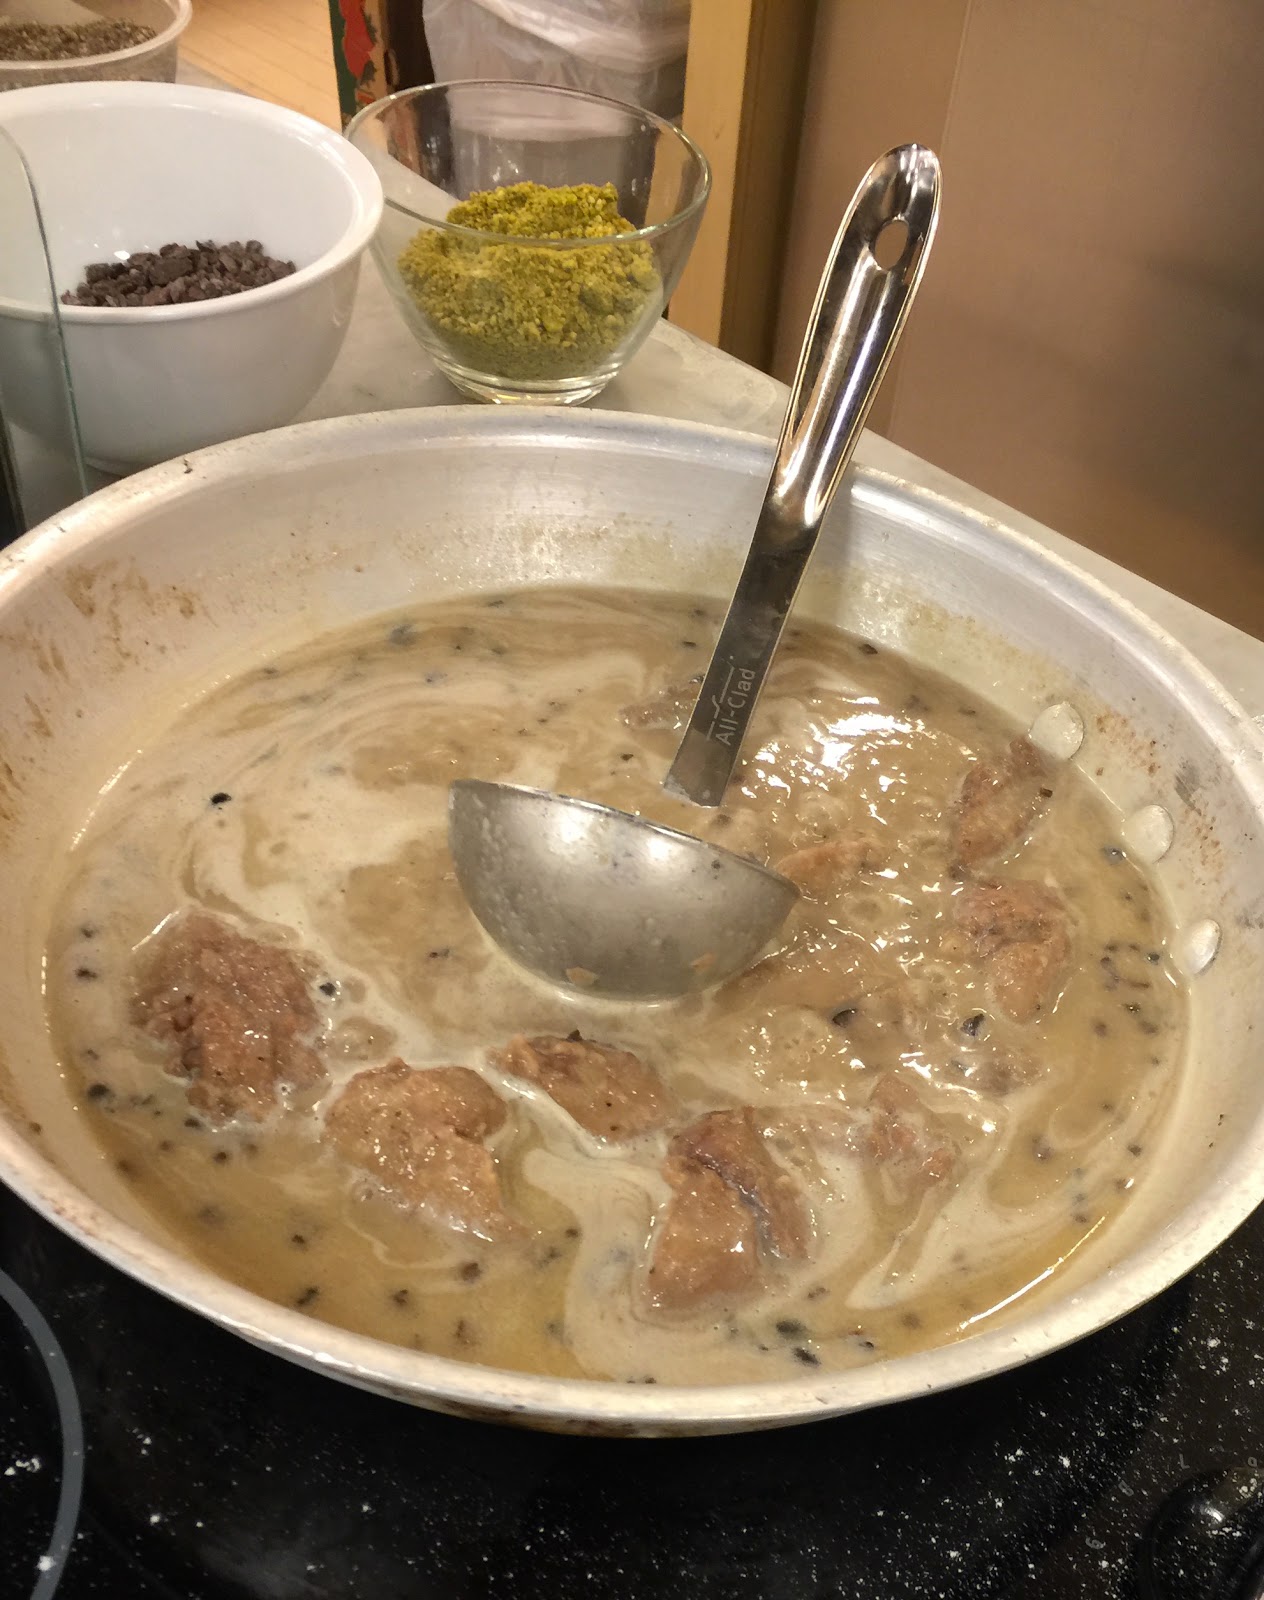
Chef Nick proceeded to make a truly sexy dish of chicken livers from Springer Mountain Farm made with 5 aphrodisiac ingredients. The delicately cooked liver with the luxurious cream sauce definitely aroused the taste buds!

Chicken Livers in Brandy Cacao Cream 
1 lb. chicken livers, rinsed and trimmed
2 cups flour
1 tablespoon Kosher salt
1 tablespoon freshly ground black pepper
1 tablespoon sunflower oil
¼ cup brandy
¼ cup vegetable or chicken stock
¼ cup heavy cream
1/2 tablespoon cacao nibs
½ cup cold butter, diced
3 tablespoons pistachios, finely chopped (optional)

Heat the pan over medium high heat and add oil.

Combine flour, salt and pepper in a mixing bowl. Drain the chicken livers and dredge each in the flour mixture.

Once the oil in the pan has reached the smoking point, sear livers for 2 minutes on each side. Remember to place the livers in the pan with a motion going away from you to avoid splatter burns. Once livers are cooked set aside on a plate.

Remove the pan from the flame and add brandy. Deglaze the pan with the brandy, scraping all the flavorful brown bits from the pan. Add the stock and stir to combine, then add the heavy cream. Bring the pan sauce to a boil and reduce heat. Allow to simmer and thicken for 2 minutes.

Add the cacao nibs and gradually swirl in knobs of butter, piece by piece. The cream sauce with begin to emulsify and look silken. Season the sauce to taste with salt and pepper. Return livers to the pan to coat evenly before serving and garnishing with a sprinkling of chopped pistachios.

Chef Nick recommends serving the livers over polenta, or with a little side salad of bitter lettuces like frisee or chicory, with a light dressing.

Yum

Thursday, February 11, 2016

Junior League of Atlanta's Annual Tour of Kitchens Marks 19th Year

The Junior League of Atlanta is hosting their 19th annual Tour of Kitchens featuring a view into 14 upscale kitchens in Sandy Springs, Dunwoody, Midtown, Chastain, Buckhead and Decatur. During the two-day self-guided tour to be held March 19th and 20th, ticket holders will be captivated by the work of the talented designers and skillful contractors responsible for the awe-inspiring kitchens on the Tour.

Guests will also enjoy culinary demonstrations from some of Atlanta’s top restaurants and food vendors including Batdorf & Bronson, Bulkhead Club, Gunshow, Farm Burger, Nikolai’s Roof, Bar Margot, Eclipse Di Luna, Flip Burger, CouCou Cakes and Beautiful Briny Sea. In addition, one of the kitchens on the tour will host an all-day cookbook sale showcasing Junior League of Atlanta, Inc.’s cookbook, “True Grits” as well as cookbooks from other Junior Leagues around the country.

Since its inception, The Tour of Kitchens has raised nearly $1.8 million to carry out the Junior League of Atlanta’s mission to benefit women and children at risk. Now is your chance to get a look at some of Atlanta’s most gorgeous kitchens, and enjoy some tasty treats while supporting local charities. Purchase tickets in advance and pick them up at the any of the homes during Tour hours Saturday and Sunday. Tickets are valid for both days of the tour.


Kitchen by Lefko Design + Build

Yum

Friday, January 29, 2016

Et Voilà! Classic French Cassoulet

Cassoulet is a rustic, slow-cooked, French dish, which you might deduce from its name, is a cousin to a casserole. Though they are similar, the differences between a cassoulet and a casserole are very distinctive; a cassoulet, pronounced (cass-oo-lay) with a haughty French accent, generally refers to a long-simmering stew from southwest France which includes duck, lamb or pork, and white beans.

A casserole, on the other hand, is a slow-cooked, often baked dish that includes a starch, vegetables, some sort of sauce, frequently involves cheese, and sometimes contains a protein. Classic American casseroles include macaroni and cheese, green bean casserole, chicken pot pie, and lasagna. The French sometimes use the term gratin to refer to homey potluck-style baked dishes that we’d call a casserole.

Cassoulet is a favorite cold weather dish in our house; dish that warms body and soul. The addition of beans to the braised beef adds a creamy depth and hearty broth. Served with a crusty baguette, et voilà, you have a classic French meal.


Beef Cassoulet
1 lb. of stew beef trimmed of fat and cut into 1”-2” cubes
Kosher salt and freshly ground black pepper
1 to 2 tablespoons olive oil
1 ½ cups chopped onions or leeks
1 cup peeled and sliced carrots
3/4 cup sliced celery
4-6 cloves of garlic, minced or squished
1 teaspoon kosher salt
½ teaspoon oregano
¼ teaspoon dried thyme
½ cup white wine
2 cups beef broth
1 tablespoon tomato paste or ketchup
1/2 lb. dried Great Northern beans, (pre-cooked according to package directions)
1 bay leaf
Salt and pepper to taste
Fresh parsley or chives, chopped for garnish (optional)

Pre-heat your stewing pot. Pat the beef dry with paper towels, season with salt and pepper, and then add it to the hot pan. Allow the beef to form a crust before turning it over to brown the other side. Remove seared beef from pot and set aside. Add the diced vegetables and a drizzle of olive oil and allow them to sauté until soft. Stir in spices and then de-glaze the pan with a good glug of white wine or cooking wine (about half a cup) and stir in the ketchup.

Add the seared beef chunks back to the pot and cover with beef stock. Put on the lid, place in a 200oF oven and cook for 3-4 hours until the meat is meltingly tender. Check periodically to make sure that the sauce is not reducing too fast, if it is add some more stock or water to prevent it from drying out.

About 30 minutes before serving, remove the stew from the oven and add cooked beans to the pot. Stir together gently (so as not to break apart meat or smash the beans) and simmer on your stove over low heat until ready to serve. Ladle cassoulet into serving dishes and garnish with chopped parsley or chives and serve with crunchy bread.


Yum

Wednesday, January 20, 2016

Technique of the Week: Broiling

Broiling is a quick, high-heat cooking method that exposes food directly to very high heat. This cooking method works best with tender cuts of meat and less tender vegetables. Basically an upside-down grill, broilers are generally the same device that heats up your oven, often at the top of the oven, though in same cases the heating element is at the bottom of the oven and broiler can be in a separate drawer below the oven.

The single broiling element provides intense, consistent heat over a large surface area without needing to heat the entire. It only takes a few minutes to pre-heat the broiler. The basic idea is to have the item about 3-5 inches from the surface of the broiling element to cook the item to a crusty, caramelized, slightly charred exterior. Broilers often have no heat setting which means controlling the intensity of the heat by moving the oven rack closer or further away from the element.

Tips and tricks:
  • Most broilers have only two settings: on or off. You simply set the oven to broil. If your oven gives you options, you'll have to play with it to see which settings are ideal for which circumstances. 
  • Turn on the broiler 5 or so minutes before cooking to give the oven (or broiler compartment) time to heat up - much like starting the grill and then lowering the lid.
  • Don’t get distracted! Broiling is a quick cooking method. Most foods will be done in 5-10 minutes, after which it can quickly go from nicely seared to completely burned. Watch the pan carefully.
  • You're really only cooking the outer surface of the food, this is why thin cuts of meat and quick-cooking fresh vegetables, are ideal for broiling.
  • If your food isn't done cooking, you can always put it in the oven for a few minutes to finish. And vice versa - you can cook food in the oven and then run it under the broiler at the very end to give it a nice crust or sear on the outside.
  • It's not strictly necessary to cook foods on a grated broiler pan. This pan allows air to circulate under the food, but you can accomplish the same effect by flipping the food partway through cooking. A pre-heated cast-iron skillet works well.
  • Leaving the oven or broiler compartment door partially ajar during cooking can also help. This keeps the cooking environment from getting too hot or steamy. Too steamy and the food won't develop a good caramelized crust. Too hot and the broiler element could automatically shut off. 


Yum

Thursday, January 14, 2016

Tomato Jam with a Kick

To tell the truth, I don’t go to cooking classes very often. Dom and I have been cooking for over 20 years and like to think we are well skilled in the kitchen. The one area, however, that I lack confidence in is canning. I have a mortal fear of poisoning someone with a tainted batch of preserves. When I had the opportunity as a CulinaryLocal Ambassador to take a lesson from seasoned-canner, Lyn Deardorff of Preserving Now, I couldn't resist the offer.

Lyn, who has over 40 years of canning experience, showed us how to cut fresh tomatoes first coring and then cubing them into 2-inch pieces. I was surprised that we were leaving the skins on, but Lyn explained that since they will cook for up to 2 hours the skins will soften and lend a nice texture to the jam. We put the tomatoes in the pot with the remaining ingredients, brought them to a boil and set the pot on a back burner to simmer as she went on to describe the differences between varying types of preserves from butters and jams to jelly, elaborating on the canning processes as well.

5 pounds of fresh ripe tomatoes, finely chopped
3 ½ cups sugar
½ cup freshly-squeezed lime juice
2 teaspoons fresh ginger, grated
1 teaspoon ground cinnamon
½ teaspoon ground cloves
1 tablespoon sea salt
½ tablespoon red pepper flakes

Place jars in a large pot of water. After water reaches boiling point, keep on low heat until needed. Place lids in a small saucepan, cover with water and place on very low heat.

Wash and prepare your tomatoes. Use the ripest tomatoes you can find. It is best to use organic tomatoes when available not only for their healthfulness but also for flavor.

Combine all ingredients in a non-reactive pot. If you do not have access to fresh ginger root, you can use the ginger puree found in tubes in the produce section of your grocery store. Also, the amount of red pepper flakes you should use depends on how fiery you like your food. This recipe will give the jam a nice kick. If you are sensitive to spicy foods start with 1 teaspoon and then taste. You can always add more but it is impossible to take it back out. While Lyn’s recipe doesn't call for black pepper, but I added some to mine. Again, taste as you go and adjust seasonings to your preference.

Bring the mixture to a boil over high heat, then reduce the heat to low.  Simmer the jam, stirring regularly, until it reduces to a a consistency similar to jam. If you wish to test it, drop a teaspoonful onto a saucer.  When cooled, the jam should stay in a mound. If it runs down the saucer when titled, it needs more cooking.  This will take between 1 ½ to 2 hours.

When jam has cooked down sufficiently, remove pot from the heat and ladle jam into the prepared jars, leaving ¼- inch headspace.  Wipe the rims, apply the lids and rings, and process in a water bath for 20 minutes. Remove from the water bath to a towel and let the jars cool. Listen for the lids to pop as they cool. This tells you that you have a good seal on the jars. Place any jar that do not “pop” in the refrigerator and be sure to use these within a few weeks.

Personal tip: Before placing the jar in your pantry, write the type of jam and the date on the lid with a Sharpie marker. Giving the jam as a gift? No worries; the marker can be removed with a little rubbing alcohol.


Yum

Friday, January 8, 2016

College Cooking Series: Chapter 8 - Essential Ingredient: Rice

Rice is an essential ingredient in college cooking because not only is it very inexpensive, it has many health benefits. Eating rice is extremely beneficial for your health, simply because it does not contain harmful fats, cholesterol or sodium. Rice is a great source of energy and is rich in vitamins. Abundant in carbohydrates, rice acts as fuel for the body and aids in the normal functioning of the brain. It is also an excellent source of vitamins and minerals like niacin, vitamin D, calcium, fiber, iron, thiamine and riboflavin which provide the foundation for body metabolism, immune system health, and general functioning of the organ systems.
  1. Rinse the rice: While rinsing isn't strictly necessary, it's a good idea to rinse your rice in a strainer to remove any powdery starch on the surface of the rice along with any leftover chaff or debri. 
  2. Use the correct water-to-rice ratio: For most rice, use one cup of rice to two cups of water (1:2 ratio). Plan for a half cup of uncooked rice per person and scale this ratio up or down depending on how much you're making. 
  3. Some rice varieties will need a little less or a little more water as it cooks, so remember to always read the package instructions before cooking. [Chart below shows ideal ratios for rice varieties].
    Rice Cooking Chart
  4. Boil the water: Rice expands as it cooks, so choose a saucepan large enough to accommodate the water and plumped rice. A 2-quart saucepan for one to two cups of uncooked rice is a good size. Bring the water to boil over medium-high heat.
  5. Then add the rice: When the water has come to a full boil, stir in the rice along with ½ teaspoon salt and 1 tablespoon of butter or olive oil (optional) per cup of uncooked rice.
  6. Bring the rice back to a boil: Continue cooking over medium-high heat until the rice comes back to boiling and lower heat to lowest setting.
  7. Cover and cook: Cover the pot and simmer gently. Don't take off the lid while the rice is cooking to prevent steam from escaping which can affect cooking time and texture.
  8. Rice is done when tender: Start checking the rice around 18 minutes for white rice and 30 minutes for brown rice. When done, the rice will no longer have a crunch. If there is still water left in the pan when the rice is done, you should tilt the pan to drain it off. The rice may be slightly sticky, but it shouldn't be gummy. Remove from heat and let the rice stand a few minutes, covered to steam just a bit more.
  9. Fluff the rice: Using a fork or spoon, gently separate cooked grains of rice, and let it sit for a few moments to release excess moisture.
  10. Serve the rice: This is the fun part! Rice is extremely versatile and is a good match with most meals. Use your imagination.
  11. Keep leftover rice: Leftovers will keep in the fridge for several days, so you can make extra ahead to serve later or to use in other recipes such as fried rice, rice pudding or add to soup.
etoufee

Homework: Think about the numerous dishes you regularly eat. Would rice be a healthy accompaniment? Let us know in the comments, what meal(s) you plan to serve with rice.


Yum

Wednesday, December 30, 2015

Warm Prosperity Dip for the New Year

Those of us that live in the South are accustomed to the tradition of eating collards, black-eyed peas and pork on New Year’s Day to ensure luck, wealth and happiness in the coming year. Yet many do not know the symbolism behind each of the prescribed ingredients for prosperity.

Cooked greens of any sort, including cabbage, collards, kale, and spinach, are eaten on New Year's in different countries because the green leaves look like folded money, and symbolize economic fortune. It's widely believed that the amount of wealth you have is directly proportionate to the amount of greens you eat.

Eating a black-eyed pea for each day of the new year (366 this year because it’s a leap year) is said to bring luck and good fortune. According to Southern folklore this tradition traces back to the Civil War when many ran out of food while under attack. After the Northern troops commandeered Southern food supplies, all that was left was field peas (and greens and salt pork). The Southern residents felt fortunate that they still had food to eat thus making the peas lucky.

Legumes of all sorts are consumed on New Year’s Day in other parts of the world and are believed to be symbolic of money. Their small, round appearance resembles coins that swell when cooked so they are consumed with financial rewards in mind. For some, the tradition also signifies a year’s worth of good health. Black-eyed peas for example are high in nutritional value, containing calcium, fiber and protein, all for less than 200 calories a cup, depending on how you prepare them.

Now pork has an even stranger association: the custom of eating pork on New Year's Day is based on the idea that pigs symbolize progress because pigs root in the ground, pushing forward. Thanks to the rich fat content found in pork, it also signifies wealth and prosperity. For us, pork symbolizes happiness because who isn’t happy eating bacon?!

In planning for our New Year’s Eve festivities, we want to create a dish with these traditional ingredients in mind. And, of course, it isn’t a party without dip, right? So, starting with the idea of the old reliable warm spinach dip, I headed to Sprouts Farmers Market to get fresh collards, where is addition to the gorgeous greens, I also found black-eyed peas in the bulk bins. A plan was forming in my head… beans would be a healthy substitute for cheese in our dip. A package of bacon and we were good to go.

Warm Prosperity Dip
5 bacon slices, cooked & chopped
1 small onion, chopped
2 garlic cloves, chopped
2 cups collard greens, blanched and chopped
2 cups black-eyed peas, cooked
8 ounces cream cheese, room temperature
½ teaspoon black pepper
½ teaspoon salt
Tabasco (optional)
¼ cup freshly grated Parmesan cheese

Prepare collards by bringing a large pot of lightly salted water to a boil. Wash collards greens and remove tough stems. Place collards leaves in the boiling water and boil for approximately 20 minutes. Drain collards and let cool.

Cook bacon over medium-high heat for 5 to 6 minutes or until crisp. Remove bacon from the pan, drain on paper towels and set aside. Using the about 1 tablespoon of the bacon drippings and stirring to loosen particles from bottom, sauté the onion and garlic until the onion is translucent, about 3 to 4 minutes.

Combine the cream cheese, cooked black-eyed peas (soaked overnight and boiled until tender with salt and pepper) sautéed onions, salt, pepper and Tabasco (as desired) in the bowl of a food processor and pulse until fully combined.

Squeeze out the excess liquid from the cooled collards using a kitchen towel and then coarsely chop greens.  In a large mixing bowl fold collards into the black-eyed pea puree until fully incorporated then transfer the dip to a lightly greased 1.5-qt. baking dish or smaller ramekins.

Crumble the reserved bacon pieces and sprinkle the Parmesan cheese and bacon over the top of the dish. Bake in preheated oven until bubbling, about 20 minutes. Garnish as desired. We dusted the top with smoked paprika, but chopped scallions would be a nice addition as well. Serve with toast, assorted crackers, flatbread, crudities or whatever suits your fancy. We know it will be difficult, but leave a smidgen in the dish to guarantee a stocked pantry in the New Year.

And, did you ever wonder if there are foods you should avoid eating on New Year’s Day? Apparently, eating any winged fowl could cause your good luck to fly away. And because chickens have the tendency to scratch backwards, eating yard bird could cause you to dwell on the past and/or could lead to serious setbacks in the coming year.

To encourage everyone to eat healthy, wealthy and wise in 2016, Sprouts Farmers Market has provided us with a $50 gift card to share with one of our lucky readers. (We hope you ate all your black-eyed peas for this one!) Please enter below:


While the gift cards we received were complimentary, no additional remuneration was received. The recipe is our original creation and the opinions included herein are honest and unsolicited. 

Yum

Wednesday, December 16, 2015

Sconies Sure to Please

For those of you who know me well, you know I have a bit of a scone fetish. There are even several recipes on this site for scones. So when a box of sconies (small size scones) from Seven Sisters Scones arrived, I showed remarkable restraint in not devouring them en route from the mailbox!

I was delighted to open the box and find not only 10 individually wrapped sconies in a variety of flavors, but also a bag of mushroom Swiss croutons and cappuccino “bisconnies.” As though I needed an excuse to make a cup of coffee and take a break, the bisconnies (a clever combo of scone and biscotti) were definitely it! A little sturdier than a scone but not the tooth cracking hardness of many biscotti, these treats are positively praise worthy.

And the scones… believe it or not they made it to breakfast the next morning. It was terribly difficult to decide which to try first: apple caramel? Raspberry white chocolate? Lemon poppyseed? How about the fig and goat cheese? In the end, I went for the traditional blueberry to give me a more accurate acid test of these little gems. Yowza! They are fantastic; mildly sweet with a lovely proportion of blueberries, a little moist, but with a nice crumb and a firm almost crunchy outer-crust.


Clearly owner Hala Yassine, with inspiration from her siblings, has mastered the art of sconing. And her sconies may be the next cronut. These half-size scones are actually better than their full-sized predecessors as the ratio of moist interior to caramelized exterior is better balanced with the added bonus of being smaller and less filling. Needless to say, I’m hooked!

While Seven Sisters Scones has a brick and mortar store in the John’s Creek area of Atlanta, their items are also available by online mail order (they even have a Scone of the Month Club!) They also have a catering menu with delivery service (within a reasonable distance, of course). So what are you waiting for? Visit them in person or online and experience their unique pastries baked in house daily from fresh, high-quality ingredients in decadent flavors.

While the products we sampled were complimentary, no additional remuneration was received. The opinions included herein are honest and unsolicited. 


Yum
Powered by Blogger.

footer social

ShareThis