Saturday, November 19, 2011

No-Place-Like-Home Oatmeal Cookies

Dorothy had it right when she clicked her heels and wished her away out of Oz and back to her Kansas farm by repeating the mantra “There’s no place like home, there’s no place like home,  there’s no place like home…“

We are blessed with the gift of warm and cozy home and though I like to complain about doing mundane chores, I am rarely happier than when doing those routine tasks amidst the drone of domestic machinery and a background of football commentary on a chilly Saturday afternoon.

You can imagine then that there is a ripple in the time-space continuum when hubby is out of town especially on a weekend. Having the opportunity to go quail hunting with his buddies, he skedaddled on a Friday with plans to return on Sunday. In an attempt to express that he would be missed (and to remind him of what he would be missing), I made a batch of his favorite cookies for the long drive to his destination to be shared with his travel-mates.

  • 3/4 cup all-purpose flour
  • 1 ½ cups old-fashioned oats
  • 1/4 teaspoon salt
  • 1/4 teaspoon ground cinnamon
  • 1/2 teaspoon baking soda
  • 1/2 cup (1 stick) unsalted butter, room temperature
  • 3/4 cup packed light-brown sugar
  • 1 teaspoon pure vanilla extract
  • 1 tablespoon milk
  • 1 large egg
  • ½ cup raisins

In a medium bowl, combine flour, oatmeal, salt, cinnamon, and baking soda and set aside. In the bowl of an electric mixer, mix together butter and sugar, beating until light and fluffy. Add vanilla, milk, and eggs, and mix well to the mixer, and then add flour mixture. Beat ingredients until just combined; do not over mix. Remove the bowl from the mixer and stir in raisins. Place cookie dough in the refrigerator until firm, about 2 hours or overnight.

Pre-heat oven to 350oF. Line several baking sheets with parchment paper. Scoop out dough using a tablespoon and place on one of the prepared cookie sheets. Repeat with remaining dough, spacing balls 3 inches apart. You can press the dough down with the back of a spoon to flatten into 2-inch diameters if you prefer flatter cookies.

Bake in the pre-heated oven until golden but still soft in center which should take about 16 to 18 minutes. Rotate the pans between oven shelves halfway through baking. When nicely browned, remove from the oven and place on a wire rack to cool completely.

Store in an airtight container at room temperature for up to 1 week. This recipe makes a manageable batch of about 2 dozen small cookies. My family is spoiled and prefers fresh cookies over those that have been frozen thus giving me an excuse to bake more often and them an excuse to stay home because, in the end, there really is no place like it.


Yum

Tuesday, November 15, 2011

Technique of the Week: Trussing

Trussing is a technique used for birds and roasts to keep the meat in a uniform shape to ensure even cooking. Trussing helps the meat keep its shape and holds in natural juices while cooking. 

Trussing a bird:
Trussing a turkey means tying the legs and wings together and closings all cavities to give the bird a nicer and much more presentable appearance. While trussing isn't necessary for cooking, it can actually make the legs and thighs take longer to cook, since the bird is pressed against itself. Trussing also makes the bird easier to carve.

Remove the bird from its packaging. If giblets are available, remove them (they will be wrapped separately and placed in the body cavity) and set them aside to make gravy. Thoroughly wash the bird inside and out under running tap water. Pat skin dry with paper towels and place the bird breast side down on a clean surface.

Fold the wing tips over and secure them behind the shoulder, tucking them neatly under the bird in doing so. This keeps them from cooking too quickly.

Using a trussing needle (or large embroidery needle) and fine cotton string, pull the skin of the neck flap over the neck opening and sew the cavity closed. A toothpick can be used if necessary.

If you are stuffing the bird, fill the body and neck cavities loosely with dressing just before roasting; being careful not to overfill. Pull the skin taut from the breast and fold over stuffing, tucking in the Pope’s nose (fatty tail flap) and sewing the cavity closed with the trussing needle and cotton twine.

Use kitchen string to tie the bird's legs together, pressing the legs close to the turkey body. To secure the legs, press them firmly into the breast, tucking any excess skin between the legs and the breast. Cross the ends of the drumsticks together and tie several loops of string around the drumstick ends and then knot the string.

Trussing a Roast:
The technique is for tying a roast is the same whether you're working with pork, beef, or lamb. Begin with a long piece of standard butcher's twine and bring the string up and around to the top of the roast, forming the letter 'A' with the string being the cross, then pull gently but firmly.

Slowly wrap the string around the feed side again to make another tie, and then pull the string, holding your fingers against the knots to tighten lightly. You want a slight indentation in the meat, but the meat should not be squeezed too tightly. To finish the tie, make the letter 'C', pulling the end of the string through to make another knot. Repeat this process every few inches along the roast.

Yum

Saturday, November 12, 2011

Stuffed Acorn Squash with Moroccan-Style Candy Cap Filling

I have lived on the East Coast my entire life with few regrets until I tried the Candy Cap mushrooms I received from Marx Foods. My introduction started at my mailbox. When I opened it, I was bombarded by the heady aroma of … butterscotch? With startled curiosity, I opened the package and the aroma erupted, filling the whole room with a wonderful nutty-maple scent. Imagine my surprise to find that a small plastic bag filled with dried mushrooms was imparting such an abundance of fragrance! Perhaps the potpourri industry should consider using these little gems.

Candy cap mushrooms (Lactarius rubidus) which are indigenous the West Coast, primarily coastal California, can be used fresh, however, they are primarily harvested for use in dry form because they are far more flavorful when dried, and can keep their flavor for years.

Visions of sugar plums danced through my head while considering a recipe in which to highlight the candy caps. While strolling through the market, my gaze fell upon two gorgeous acorn squash and I knew exactly how I would use the unusual and unique fungi to underscore their unequaled soft, honeyed flavor.

Moroccan Stuffed Acorn Squash
  • 2 medium acorn squashes, halved and seeded
  • 2 teaspoons extra-virgin olive oil
  • ½ ounce dried Candy Cap mushrooms, chopped
  • ½ medium onion, finely chopped
  • ½ lb. ground beef (or lamb)
  • 1-2 teaspoons freshly ground black pepper
  • 1-2 teaspoons Kosher salt, to taste
  • Pinch of ground cinnamon
  • Pinch of ground nutmeg
  • 1 cup white or brown rice, cooked
  • 3 tablespoons pure maple syrup

Preheat oven to 400oF. Wash acorn squash to remove waxy exterior coating and cut them in half horizontally. Using a tablespoon or ice cream scoop, remove seeds and make a nicely shaped hole in each half. If the squash halves will not stand steadily on their bottoms, then cut a small portion of the bottom off to make an even surface. Season the four cavities with salt and pepper, then brush with olive oil before placing them cut side down on a parchment lined cookie sheet or shallow pan. Bake squash until tender which should take about 35 to 40 minutes.

Meanwhile, rehydrate the Candy Cap mushrooms by placing them in a ½ cup of boiling water and allow them to sit until the water is cool. Strain the mushrooms and use the reserved mushroom water to cook the rice according the package instructions. Chop the mushrooms and them set aside.

Heat olive oil in a heavy skillet over medium heat. Add onion, and cook until slightly translucent, about 5 minutes. Then add ground beef, chopped Candy Caps, a pinch of cinnamon and nutmeg, and 1 teaspoon salt. Cook, stirring frequently, until meat is browned and cooked through which should take about 5 to 7 minutes. If there is an excess amount of fat, drain before adding rice. Add rice and sauté until rice is fully coated with pan juices.

Once squash halves are done (a knife inserted through the flesh meets no resistance,) turn upwards and add the rice mixture to the empty cavities, then drizzle the tops with pure maple syrup and place back in the oven for 10 minutes until warmed through and the tops are browned. Allow to cool slightly (they retain heat) and serve with a spoon. Scoop spoonfuls of tender squash with the aromatic filling and prepare your tastebuds for an amazing taste sensation.


As the filling was cooking the whole house smelled of maple and cinnamon! It was like a warm comforting cloud which enveloped us, making us crave the finished creation. We all dove into dinner with reckless abandon. (Even our oldest, who is not a big fan of squash, decimated his portion down to the skin!) The intensity of the candy caps shone through and truly complemented and accentuated the flavors of the filling and squash. I may be willing to consider a move to the West Coast!

Yum

Thursday, November 10, 2011

Simple Satisfying Split Pea Soup

During this Split Pea Soup Week, I am reminded of my first welcoming bowl of this sort of nourishment on a foggy, clammy day in London. You can ask me the name of the pub where I consumed this scrummy sustenance; I have no idea. The creamy, hammy potage served with a piece of dry toast and a shandy* were all that were needed to chase the dampness from my tour-weary bones.

There is a neighborhood pub on every corner, most of which have split pea soup on the luncheon menu alongside ever-present plates of bangers and mash. As a peckish 16-year-old from rural North Georgia, I was so busy absorbing all the sites and scenes I had experienced that morning, that it never occurred to me to look at the sign hanging outside before pushing through the door to immediate warmth and comfort.

Pea soup is highly under-rated and an utter doddle to make. In fact, I chuckle when I walk down the aisle at the grocery and see “instant pea soup” sold in packets. It is an absolutely brilliant dish for a rainy and dank day.

  • 1 lb. (2 1/4 cups) green split peas (soaked overnight)
  • 2 1/2 quarts of water
  • 2-3 tablespoons ham, chopped
  • 1 large carrot, grated
  • 1 large clove of garlic, minced
  • 1 bay leaf
  • Salt and pepper, to taste
  • Oregano-infused olive oil, for drizzling
  • Croutons for garnish

Pick over the peas and remove any stone and soak overnight (if you remember.) Drain and place in a large stock pot with water and bring to a boil. Skim the scum off the top of the soup for several minutes, until the scum ceases to rise, then reduce the heat and allow peas to simmer.

Add grated carrots (you can use a food processor, but a grater is faster and easier to clean), ham, garlic, and bay leaf and cover loosely. Simmer until vegetables are tender, about 1 to 1 ½ hour (less if soaked overnight.) Stir occasionally to prevent peas from sticking to the bottom of the pan.

First, remove the bay leaf. The soup should be fairly smooth with small bits of ham, but if you want a super smooth, you may want to use a blender. An immersion blender works stonking well for this. If you are using a regular blender, take care to work in batches and only fill the blender halfway if the soup is still hot, and hold down the lid while blending.

Return the purée to the pot and heat to serve. Add salt and pepper to taste. Ladle the luvvly-jubbly draught into warm bowls and drizzle with olive oil and garnish with easy-peasy croutons.

Easy-Peasy Crouton Hack:
I love this short cut (probably because I choose to believe that I came up with it myself.) Toast a few slices of day-old bread and rub with a clove of garlic and brush with olive oil (or if you REALLY need them in a jiffy, spray them with cooking spray.) Cut the toasted bread into cubes and Tally-Ho!

*A shandy is beer mixed with “lemonade” which in Great Britain another name for citrus-flavored soda akin to Sprite or 7-Up (just like potato chips are called “crisps” and French fries are called “chips”). The proportion of beer to lemonade is normally half-and-half, but can be adjusted to taste. You should also be aware that European beverages are a tad dodgy in the refrigeration department and are not served icy cold as they are in America, as a result I preferred a greater ratio of lemonade to beer!

Yum

Tuesday, November 8, 2011

Technique of the Week: Stuffing

In cooking, stuffing or filling is an edible concoction used to fill a cavity in another food item. Many foods may be stuffed, including meats, vegetables, egg, and fruits. In addition to stuffing the body cavity of animals, including mammals, birds, and fish, various cuts of meat may be stuffed after they have been deboned or a pouch has been cut into them. Many types of vegetables are also suitable for stuffing after their seeds or flesh has been removed; tomatoes, peppers, and mushrooms are common items for stuffing.

The term stuffing usually refers to the mixture placed into a turkey for the traditional Thanksgiving meal, while dressing denotes the same mixture cooked outside the bird. Turkey stuffing usually consists of bread crumbs or cubed, dried bread, with onion, celery, salt, pepper, and other spices and herbs such as oregano, sage and thyme.

Almost any ingredient may serve as stuffing such as contain bread, rice, vegetables, fruits, nuts, herbs cheese and even tofu. Oysters are a traditional stuffing component for Thanksgiving. In England, a popular stuffing is sausage seasoned with sage, onion and apple. Other types of fruits and dried fruits are often added to stuffing including prunes, apricots and raisins.

The Roman cookbook "De Re Coquinaria" (c. 1498) includes the earliest documented recipes for stuffing for chicken, hare, pig, and even dormouse. Most of the stuffing mixtures described used vegetables, herbs and spices, nuts, and stale bread, and frequently include organ meats such as chopped liver or sweetbreads. Stuffing has been known been several names throughout history including “farce,” “stuffing,” “forcemeat,” and “dressing.”

It should be noted that the United States Department of Agriculture (USDA) cautions that cooking animals with a body cavity that is filled with stuffing can present potential food safety issues. Even when the cooked meat reaches a safe temperature, the stuffing inside may still contain bacteria (and if the meat is cooked until the stuffing reaches a safe temperature, the meat may be overcooked). The USDA recommends cooking stuffing /dressing separately from the bird and not buying pre-stuffed birds. Of course, stuffing is not recommended for turkeys that are to be fried, grilled or smoked.

Recipes using the technique of stuffing:

Yum

Sunday, November 6, 2011

Steaming Hot Bowl of Watergate Reminiscences

Last week, we had the distinct pleasure of attending the lecture of two of the most respected and well known journalists in the country, Robert Woodward and Carl Bernstein. With Election Day this week and the 40th Anniversary of the Watergate Scandal rapidly approaching, the session held at Emory University was quite timely.

These two former Washington Post reporters were the first to uncover information suggesting that knowledge of the Watergate break-in, and attempts to cover it up, led deep into the Justice Department, the FBI, the CIA, and even the White House.

The lecture setting was informal with both journalists cajoling and openly interrupting each other (with previous permission granted). The two waxed nostalgic about the good ‘ole days of typewriter ribbons and old-school, gum-shoe sleuthing. Not surprisingly, they are still bitter about the level of arrogance demonstrated by all involved with the scandal. They encouraged young journalists to always use integrity in seeking the truth and to confirm leads and tips, and cautioned against being drawn in by the immediacy that is created by gossip-driven, internet-based media. 

In preparation for this post, I had planned to post the recipe for the ever popular Watergate Salad to add to the above paragraphs, but found (just as Woodward and Bernstein did all those years ago,) that there was more to the story. As it turns out, the two most popular recipes attributed to the Watergate scandal (Watergate salad and Watergate cake) did not  appear in any of the original Watergate cookbooks printed in the early 1970s. Both were publicized by Kraft Foods and Standard Brands (respectively) well after the Watergate scandal occurred.

In 1973, seven Bostonians referring to themselves as "The Committee to Write the Cookbook" turned a parlor game into a cookbook. The idea for The Watergate Cookbook (subtitled Or Who’s in the Soup?) began when the hostess served chicken in peaches to her dinner guests and one of them dubbed it “Cox’s In-peach Chicken” and others took up the pursuit.

While the cookbook contains real recipes, it is also an interesting read when taken in context. This compilation was just one way for frustrated voter’s to express their anger and shock over the antics of Washington politics during this period of time and is certainly more intriguing when compared with decades of Junior League-esque spiral-bound collections of senators' wives’ recipes for hot crab dip, easy beef burgundy and, yes, Kraft’s Pistachio Delight also known as Watergate salad.

"Nixon's Perfectly Clear Consomme" is the first among the 108 recipes in this tongue-in-cheek cookbook. The recipe for "Ervin’s (referring to Chairman of the Senate Watergate Committee’s Senator Sam J. Ervin, Jr.) Bouillabaisse" says “put a kettle of fish on the front burner and keep the pot boiling; do not put a lid on it.”

Other recipes bring back memories of the Watergate scandal and its players including Ellsberg's Leek Soup, Ehrlichman's Cover-Up Casserole, Kennedy's Contented Sole, McCord's Spilled Beans, Billy Graham's Eggs Benedictine, Hunt's Hush Puppies, Republican Peeking Duck, Mitchell's Cooked Goose with Stuffing, Cox's In-Peach Chicken, Martha's Sweet and Sour Tongue, Liddy's Clam-up Chowder, Magruder's Dandy Ly'in Salad, Sauteed Slippery Eels a la Deanoise, and GOP Cookie Crumbles.

This easy recipe commemorating Judge John Sirica, who presided over the trial of the Watergate burglars and did not believe the claim that they had acted alone (and was  named TIME magazine's Man of the Year in 1973,) makes a quick dinner or appetizer similar to our Linguine with Clam Sauce:

Sirica’s Steamed Clams
4 pounds clams, scrubbed
1 cup water
1 cup dry (inexpensive) white wine

Bring water and wine to a boil in a stockpot. Add clams; cover and return to a boil.

"Keep the heat on them until they open up" which should take about five minutes. Immediately remove open clams with a slotted spoon. Continue cooking remaining the clams for an additional 2 to 3 minutes; they may open. Discard any remaining unopened clams and serve the clams immediately with the clam broth.


Yum

Wednesday, November 2, 2011

Pumpkin Spice Latte Bark

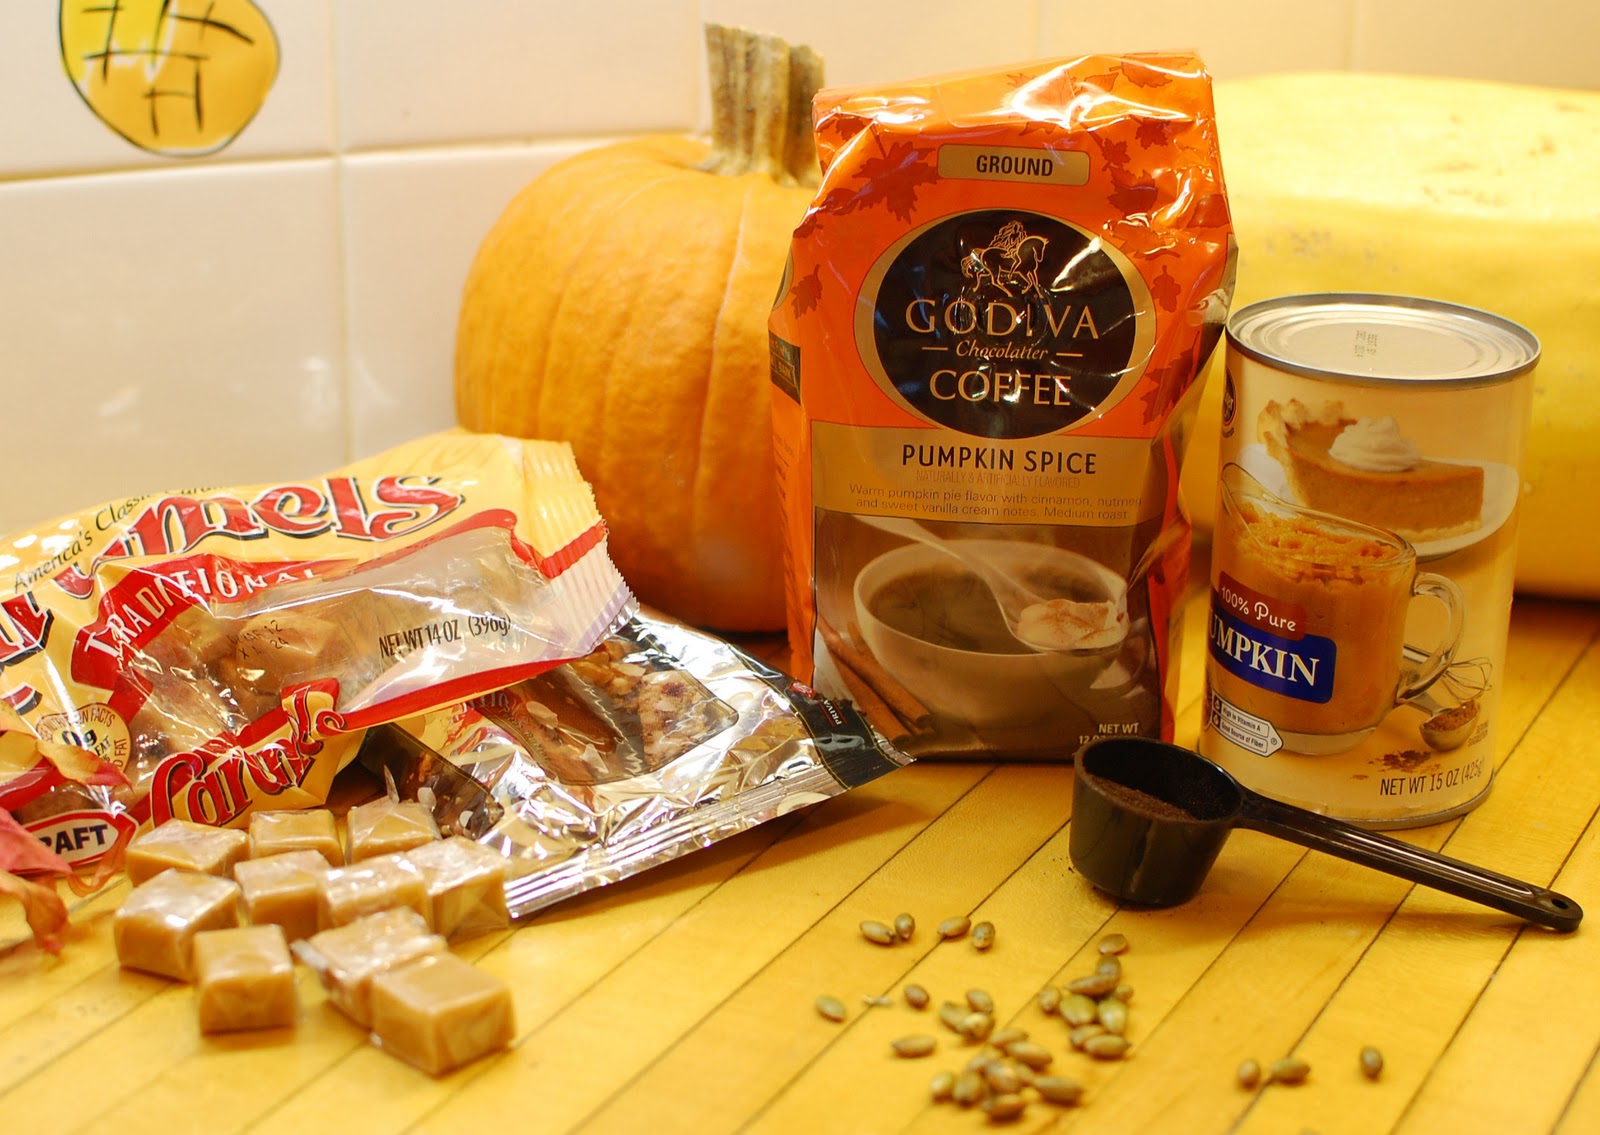
Pumpkin Spice Lattes, the ever-popular caffeinated beverage of the season, have a cult following similar to that of the McRib sandwich. So when I received a sample of Godiva’s new Pumpkin Spice ground coffee as a member of the Foodbuzz Tastemaker program, I couldn’t wait to make my own PSL. What could be better than coffee, milk and pumpkin pie spice topped with whipped cream? Wait, I know – chocolate! Then I had an “Aha” moment. Another seasonal food item popped in my mind and an inspiration was born: Pumpkin Spice Latte Bark! So without further ado, here’s how to make the PSL ultimate treat:

  • 12 ounces white chocolate chips, melted
  • 2 tablespoons pumpkin puree
  • 6 caramel squares, unwrapped and melted
  • 2 teaspoons Godiva Pumpkin Spice coffee 
  • (or 2 teaspoons freshly ground regular coffee and 1/4 teaspoon pumpkin pie spice)
  • 2 teaspoons pepitas (pumpkin seeds), toasted, salted and hand crushed

Line a cookie sheet with parchment paper or silicone mat.
White chocolate & pumpkin swirl

Place the white chocolate chips in the top pan of a double boiler or in a heatproof bowl. Place over simmering water in the lower pan. Turn off the heat and let stand, without stirring, until the chocolate begins to melt. Then stir until just melted and smooth.

In a separate bowl, combine unwrapped caramels and pumpkin puree. Stir in the Godiva Pumpkin Spice coffee and stir until smooth. Then, swirl the caramel pumpkin mixture into the white chocolate, and spread onto the parchment-lined baking sheet and sprinkle with hand-crushed pepitas and an extra pinch of pumpkin spice if desired. Refrigerate, uncovered, until the bark is set.

Gently peel the candy from the waxed paper. Break or cut into pieces. Store in an airtight container in the refrigerator for up to 2 weeks (if it lasts that long.) Try adding a piece to your morning cup of joe for a sumptuous start to your day!


Oh, if you are like us, you never have pumpkin pie spice in the cabinet so here’s how to make your own:

Pumpkin Pie Spice Mix:
  • 1 teaspoon ground cinnamon
  • ½ teaspoon ground ginger
  • ½ teaspoon ground nutmeg
  • ¼ teaspoon ground allspice
  • ¼ teaspoon ground cloves

Keep any extra in an airtight container to keep on hand for the mandatory pumpkin pie for Thanksgiving!


Yum

Tuesday, November 1, 2011

Technique of the Week: Brining

Meats soaked in a brine solution prior to storage last longer without spoilage which is why brining was a method used to preserve meats for prolonged periods of time prior to the introduction of refrigeration. Brining is no longer used to preserve food but rather to tenderize and flavor it. Lean and often mildly flavored meats with a tendency to overcook losing much of their natural moisture like chicken, turkey, and pork making them good candidates for brining. Many types of seafood also take well to brining, especially when they are subjected to cooking methods that cause extreme moisture loss as is the case with most recipes for shrimp and other fleshy crustaceans.

Soaking meat in a salt-saturated solution causes the muscle tissues of the meat to absorb water through osmosis.  Once the water is absorbed, denaturation causes a sticky matrix which forms a moisture barrier that captures and prevents the water from leaking out as the meat cooks. These two processes yield tenderness and a unique flavor.

Some cheeses are also washed in brine to enhance the ripening process. Not only does the brine carry flavor into the cheese, but the salty environment nurtures the growth of the specific bacteria, which impart pronounced odors (Limburger) and unique flavors. The same bacteria can also have some effect on cheeses that are simply ripened in humid conditions, like Camembert. Accumulations of these "smear bacteria" show up as a sticky orange-red layer on some brine-washed cheeses.

Both table salt and kosher salt can be used to make a brine solution. We prefer kosher salt because it dissolves more readily and has a cleaner flavor than table salt. Table Salt contains iodine and anti-caking agents that can affect flavor. Generally, table salt is more “salty” than kosher salt which is why you should use less table salt in a brine than kosher salt.

Basic Brine Solution
½ cup kosher salt or ¼ cup iodized table salt
¼ cup sugar
1 quart cold water

Plan for about 1 quart of brine for each pound of meat. If using a 5-gallon bucket, you will not need more than 4 gallons (16 quarts) of brine.

Combine the salt, sugar, and COLD water in the 5-gallon bucket. We recommend that you line our bucket with a kitchen garbage bag for easy clean-up. Place thawed meat (with any innards removed) in the brine solution. If necessary, weigh down meat (a plate works well) to ensure it is fully immersed. Cover the container set in cool area for up 1 hour per pound (for not less than 30 minutes) up to 8 hours or overnight. Remove meat from brine and pat dry and discard brining solution.

The classic French way to cure pork is to brine it. Typically, brine for curing contains salt, sugar, herbs, and spices. It acts as a marinade and a cure at the same time, producing pork a bit like a mild ham.  Flavored brines can be made from fruit extracts, various herbs, and even alcohol including beer and liquor. One of the most appealing aspects of flavor brining is the freedom to create your very own flavor using the ingredients of your choosing. Examples include: black peppercorns (1 tablespoon); allspice berries (1 teaspoon); fresh rosemary or sage (2 sprigs); or, bay leaf (2 whole) to name a few.

Recipes using the brining technique:

Yum

Sunday, October 30, 2011

Sugar Skulls For Dias De La Muertos


The Mexican Days of the Dead are celebrated on November 1st and 2nd; a two-day celebration of deceased loved ones. In this ritual observance rooted in a bizarre blend of pre-Colombian and Roman Catholic practices, Mexican families make merry with the souls of their dearly departed. Spirits of the dead are welcomed back to their “homes” with beautifully decorated altars made by their loved ones with offerings such as sugar skulls, food, candles and flowers to enjoy a day on earth.

Sugar skulls are a traditional folk art from Southern Mexico and are an integral part of Dias De La Muertos or “Day of the Dead” celebrations. Sugar skulls are exactly what the name implies: skull-shaped sugar made from a granulated white sugar mixture that is pressed into special skull molds. The sugar mixture is allowed to dry and then the sugar skull is decorated with icing, feathers, colored foil and more. While the ingredients of sugar skulls are edible the skulls are generally decorated with non-edible items and used only for decorative purposes.

When considering the origin of Mexican sugar skulls, it's important to remember that sugar is not actually native to Mexico. The making of sugar figures is actually a European tradition as well, and can be traced back to Palermo, Italy, where figurines were made out of sugar as religious decorations.

Sugar was first introduced to the Americas before "Mexico" even existed as a country. The original Spanish settlers quickly discovered that the conditions in the "New World" were perfect for growing sugar. Mexican sugar sculpture dates back to the 17th century when Italian missionaries visited the Americas. Mexicans during that time period had very little money, but had learned from the Catholic friars how to make decorations out of a plentiful resource; sugar. As Spanish Catholic beliefs began to mix with native Mesoamerican beliefs, the Mexicans started making sugar skulls as part of their Dias de los Muertos festivities. These decorated memorials have become more and more creative and extravagant over time. The designs are usually whimsical and brightly colored with stripes, dots, and swirls of icing to enhance the features of the skulls. They are meant to be festive, not morbid or scary.

Sugar Skulls
2 cups granulated sugar
3 tablespoons corn starch
1 egg white

Add the water and mix with your fingers until all the sugar mixture is moistened.   Once the mixture is about the texture of "moist beach sand" it is ready to mold.  You may need a bit of extra water if so just add a few drops at a time. If it is a really humid day, you may choose to try this project on another day!

Once the sugar is evenly moist, pack it into the molds.  We used a “medium-sized” mold which yielded 4 skulls. Make sure to pack the mold very firmly. It was surprising how much sugar dough was needed to pack each mold tightly. Scrape the mold with a straight edge (use the back of a butter knife), then pack again. Check the mold to make sure all the indentations are smoothly filled. Lay a small square of cardboard cut to fit the mold on top of the molded skull and invert onto the cardboard. Gently lift the mold away from the sugar skull and place the sugar skull in a warm, dry space for at least 8 hours to dry. This time will vary depending on room temperature and humidity.

If you are impatient and you try to move the skull before it dries, it will fall crumble apart.   If this happens just place the sugar mixture back in the bowl, add additional moisture if needed and remold the skull. When the skulls are completely dry, brush them off (we used a paint brush) and assemble. Make a batch of Royal Icing (click here for recipe).

Use icing bags and pipe icing and decorate as desired. We named the skulls before we started and relayed memories about the dearly departed we were celebrating as we decorated our skulls. Set the skulls aside to allow the icing to fully dry.


~Research and article written by Sonny Romeo for AP World History project

Yum

Friday, October 28, 2011

Pumpkin & Toasted Chestnut Scone Yumminess

As a general rule, Dom cooks our evening meals and I am the baker in the house. I have been baking cookies, cakes, and bread since I was a teenager, but there is one baked item that has always intimidated me. As a consequence, I find that I crave them excessively: scones. I have tried making them on several occasions each more disastrous than the last resulting in rocks or dusty lumps tasting of baking powder. 

When I came across a recipe for pumpkin scones, I got my nerve up to try it. Pumpkin is such a versatile vegetable perhaps it would make for a more forgiving creation. We had some leftover roasted chestnuts which were screaming to be added.

Imagine my complete surprise when the most gorgeous lightly-browned triangles emerged from the oven. But, as we all know, looks aren’t everything - the “proof is in the pudding” in this case the pumpkin, egg and milk mixture. I brewed some coffee and plucked up the courage to try one. A wonderful spicy steam escaped as I broke open the scone elevating my hopes of success. I took a bite and (insert a drum roll here) YUM! Oh man, these are miraculous scones! Bookmark this page. NOW!

Pumpkin Chestnut Scones
  • 2 cups flour
  • ½ cup sugar
  • 1 tablespoon baking powder
  • ½ teaspoon salt
  • 1 teaspoon cinnamon
  • ½ teaspoon nutmeg
  • ¼ teaspoon ginger
  • ¾ cup (6 tablespoons) cold butter
  • ½ cup canned pumpkin 
  • 1 egg
  • 3 tablespoons milk
  • ½ cup roasted chestnuts, toasted

Preheat oven to 425oF. Place chopped roasted chestnuts on a cookie sheet and toast in the oven while it pre-heats. Shake the pan a few times to evenly distribute heat. Toast them for about ten minutes and then remove from oven and allow to cool before chopping and adding to the dough. They will get crisper as they cool.

Combine flour, sugar, baking powder, salt and spices in a large mixing bowl. Cut in COLD butter. When the mixture is crumbly and no obvious chunks of butter are visible, set aside.


[The purpose of “cutting in” is to create evenly-sized pieces of butter, coated with flour distributed throughout the dough.  When these little pieces of butter melt, they create layers of flakiness. In some recipes it’s the little pockets of steam that are important. (Remember the spicy steam I mentioned above?) It helps to cut the cold butter into small pieces first and then toss them separately into the flour making sure they each get covered in flour before you start “cutting.” There’s several ways to actually cut in the butter. I used a pastry blender made specifically for this purpose. My mom uses two butter knives moving them in opposite directions (kind of like a sharpening motion) actually cutting the butter. A fork works too, but be careful not to over “mash” the butter.]

In a separate bowl, whisk together pumpkin, egg and milk. Then gently fold the wet mixture into the dry ingredients and chopped chestnuts. Do not over mix or you will defeat the purpose of cutting in the butter.

Turn the dough out onto a lightly floured surface, forming a circle that is about 1″ thick. Cut the dough into equally-sized triangles. My dough was a bit wet and sticky, but when I made the triangles they held together with no problems. The recipe says it should make six, but I ended up with 8 generously sized scones.

Transfer dough triangles onto a parchment-lined baking sheet using a spatula. Reshape if needed before baking. (Or, do it the lazy way and drop blobs with a tablespoon that are about the size you want, and then flatten and shape them.) Sprinkle the tops with a bit a sugar for sweet crusty tops.

Bake in a preheated oven for 14-16 minutes. Remove from oven and let cool (if you can wait that long!!)

Yum

Thursday, October 27, 2011

A Healthier Southern Sweet Potato Pie

With cooler weather and Thanksgiving around the corner, ‘tis the season for making pies. It is also the season for sweet potatoes which we enjoy in many different forms; baked, mashed, and as fries or chips. A nutritional superhero, sweet potatoes are one of the best vegetables you can eat. The starchy, tuberous root vegetable is loaded with carotenoids, vitamin C, potassium, and fiber.
In an attempt to maintain the health benefits of the sweet potato, we revamped our decades-old recipe which originally called for sour cream and 6 egg yolks. We replaced the sour cream with 100% natural, low calorie plain Greek yogurt which contains whole milk, cream and cultures, and no added sweeteners, thickeners or preservatives. We also decreased the number of yolks to four to create a healthier version of the traditional Southern classic.

  • 2 cups sweet potatoes, baked and mashed
  • 1 ¼ cups plain yogurt (or sour cream)
  • ¾ cup packed, dark brown sugar
  • ½ teaspoon of cinnamon
  • ¼ teaspoon of nutmeg
  • 4 egg yolks
  • Salt
  • 1 pie crust, deep dish
  • 1 cup chopped pecans, toasted
  • ¼ cup brown sugar
  • 1 tablespoon maple syrup

Preheat the oven to 350 degrees F.

We frequently have leftover mashed sweet potatoes, but you can also bake 2-3 sweet potatoes, allow to cool, and then place them in a mixing bowl and beat with a hand or stand mixer until smooth.

Add yogurt, brown sugar, cinnamon, nutmeg, yolks, and salt to the sweet potatoes and beat until well combined. Pour this batter into the prepared pie shell and then place onto an aluminum foil-lined sheet pan in the event any filling overflows the crust.

Toast the pecans by placing them in the pre-heating oven for 10-15 minutes. When cool to the touch, break into small pieces. Mix chopped pecans with the brown sugar and sprinkle evenly over the top of the pie filling, then drizzle maple syrup over the pecan topping.

Bake the pie for 50 to 55 minutes or until the custard reaches 165oF degrees. Remove from the oven and allow to cool. Because the filling contains eggs it is best to keep the pie refrigerated after cooling. Top with fresh whipped cream for an authentic Southern dessert.


Yum

Tuesday, October 25, 2011

Technique of the Week: Crimping

Crimping is the techniques used to decorate the edges of a pie in order to ensure the edges are well sealed. Begin by trimming the extra dough hanging over the edge with a knife or your fingers. Then, tuck the dough around the edge, creating an even ridge around the circumference of the pie plate. If you find a thin spot, you can add a little bit of dough from the scraps you removed earlier. Once you have an even edge on the way around the pie, pinch the pastry dough with a finger and thumb of one hand and pressing with the fore finger of the other hand to create a triangular pattern all the way around the pie. Once you have gone around the perimeter of the pie, then go back and lightly press down on the top of the crimped edge to even out the height giving the pie a fancy fluted crust.

Crimping can also be done with a fork, but is more common on smaller items such as hand pies, empanadas, or pierogi.

There has been much debate over the centuries as to how to create the flakiest crust. Some recipes call for ice water, cold butter or even vinegar. My Mom (dubbed the Pie Queen by Dom) uses this super simple recipe with nary a complaint from consumers.

2 cups all-purpose flour
1 teaspoon salt
½ cup vegetable oil
5 tablespoons cold water or milk

This recipe makes enough for two regular pies, a top and a bottom or one large pie with a little leftover. Mix ingredients together until well combined creating a large ball. Split ball in half and flatten out the dough beginning with a rolling pin. This dough is not sensitive to the heat from your hands, so once the dough is fairly flat, you can move it to the pie plate and press it out creating an even layer in and around the plate. Using the technique above, crimp the edge of your crust. The finished crust can be refrigerated until the pie is ready to be added.

You can use the scraps of dough to create pretty decorations for your pies using cookie cutters and sprinkling the cut-out shapes with a little sugar before placing them on top of your pie. As a little girl, I loved pie baking day because Mom always had leftover dough scraps that she would roll out and sprinkle with cinnamon sugar. She would bake the little “tarts” until the crust was crispy and the cinnamon sugar melted into a candy topping which was usually still warm as my sister and I came in from the long bus ride home.

Yum

Sunday, October 23, 2011

Taste of Atlanta = Tastes for Every Palate

What a glorious day for the 10th Anniversary of Taste of Atlanta, the annual showcase highlighting the incredible verve and diversity of Atlanta's amazing food scene. Sonny and I started by strolling through looking at all the options, stopping to chat with volunteers at the Community Coffee booth and sampling their coffee with chicory.

With so many amazing choices, Sonny and I had a difficult time selecting from all the delectable morsels available for tasting. Sonny started with a chipotle chocolate chip cookie from Pura Vida, and was then lured by the wonderful scent of St. Louis-style ribs being grilled at the Ribs n' Blues table. I was intrigued by Famous Chuck’s roast beef po’boy and had to see if it rivals our homemade version. We walked through the organic market featuring honeys, preserves, fresh vegetables and other homemade goodies, and sat for a while to listen to Sonya Jones of Sweet Auburn Bread Company describe how to make her famous apple cider pie.

Being a huge fan of sushi, Sonny tried the crab and cheese spring rolls from Tin Drum, and Himalayan rolls from Genki and washed them down with a sample of Razzleberry tea from Peace Tea. Chef Tina Aleandri from Noche and Chef Phillip Strange of Shout (sharing a tent) were having such a grand time bantering with the crowd (and each other) that I had to stop and try their sumptuous “Albondigas” (spanish meatballs in tomato broth,) the most incredible warm chestnut soup, and equally stunning salmon rillettes on crostini that they were offering. By far, the best morsels of the day!

We stopped in the Silent Auction tent which was filled with loads of merchandise and offers for discount deals in the metro area. All proceeds from the Silent Auction will benefit one of our favorite charities; Share our Strength's Cooking Matters™. Cooking Matters™ is cooking-based program that teaches nutrition, cooking, and household budgeting with a focus on teen education.

While the fish and chips from Ri-Ra Irish Pub looked very tasty, the line was longer than a summer day on the equator. We elected instead for free samples of Chobani Champions’ “Honey-nana” Greek-style yogurt, and then while Sonny tried a lamb slider from Max Lager’s, I nibbled on some of their apple-caramel bread pudding.

Feeling satiated and having had our fill of people-watching, we started strolling in the direction of the parking lot when we both did a double-take: Sonny for a slice of oreo cheesecake and I for a freshly made Nutella banana crepe both being offered by Café Intermezzo. Using our last few tickets (and loosening our belts), we indulged in one last treat before passing through the exit gates of the festival.

So much food, so little time (and stomach capacity)! We will have to wait another year to enjoy so many flavor sensations in one metro-Atlanta location. We are counting the days… 365 (it is a leap year!)

Yum

Friday, October 21, 2011

Big Fun at the Big Grill!

Smoked wafted through the air as we approached the tented area that had been cordoned off for Taste of Atlanta’s kick-off party dubbed “The Big Grill” with proceeds benefiting Georgia Organics. The back area was brimming with Big Green eggs and the heady smell of cooking meat filled the air. Inside the atmosphere was very festive with decorated tables, cozy seating areas and ample drink stands (sponsored by Amstel Light). And the food… AH-mazing!

We started at the back with Serpas' crispy pulled duck on a cube of confit, Rathbun’s pork belly taco with banana mayonnaise, and JCT. Kitchen’s grilled quail breast with puffed farro and pomegranate reduction.

Stopping briefly to listen and enjoy the party tunes being sung by Atlanta’s popular Yacht Rock Schooner, we circled back to sample Lamb loin, with chick pea frites and smoked paprika aioli from Briza, mini shrimp and crab burgers with remoulade from Watershed and hanger steak sliders with pickled vegetable slaw and citrus crème fraiche from Ray’s on the River.

We were swooning from all the incredible flavors (and feeling a bit full,) so we avoided lines for samples of seared scallops with pumpkin risotto, braised brisket sliders and hyper-dressed burgers which stretched to Terre Haute. Instead we opted to give in to the temptation of The Barrelhouse’s banana pudding shooters with graham cracker streusel and lingering over pumpkin-chestnut and bourbon-burnt-sugar ice creams, Campari-blood-orange sorbet created by High Road Craft.

It was clear watching the jovial crowd that we were not the only ones who were enjoying indulging our palates with all the marvelous treats offered by Atlanta’s premier restaurants and chefs. And this is just the Kick-Off Party! We can only imagine the delights that await us tomorrow at the 10th Anniversary Taste of Atlanta festival.


Yum

Wednesday, October 19, 2011

Warm Kettle Chips with Marzetti Blue Cheese Sauce

I was very excited when I received an email from Foodbuzz letting me know that we would be given an opportunity to try a bottle of Marzetti Simply Dressed® salad dressing as part of the Tastemaker program. I had a devil of a time deciding which bottle to choose from the enticing assortment which included Champagne, Ginger Sesame, Greek and Pomegranate. I finally selected Blue Cheese with the realization that it would be the most desirable to our teenage boys. I envisioned a “wedge salad” as I placed a head of iceberg lettuce in the cart, knowing full well that any remaining dressing would be used for hot wings and celery.

Alas, the best laid plans of mice and men… During Cross Country season, the guys arrive home in the evening STARVING. A phone call from Dom let me know that dinner would be delayed a while, so in a pinch I found a bag of Kettle potato chips in the pantry. Thinking quickly I turned the oven on 350oF and layed the some of the chips on a parchment lined (oven-safe) plate. I grabbed the bottle of Marzetti Simply Dressed® blue cheese dressing from the fridge and slathered the chips with dressing and popped them in the oven for about 10 minutes (as long as it took 2 boys to finishing showering and pour sodas into glasses.) Once removed from the oven I added a few freshly snipped chives (for Sonny’s benefit) to the plate and crumbled some blue cheese (originally purchased for the wedge salad) over the top.  And, of course, they ate every last chip before I could get a picture!

Needless to say the guys were not disappointed when I made a second plate for Dom’s arrival home. And Dom, who thinks everything tastes better topped with arugula that has been tossed with truffle oil and salt added his garnish to the dish. I guess I need to buy a least one more bottle.

Would you like to try a bottle of Marzetti Simply Dressed® salad dressing? Click here for a $1.00 off coupon.

Yum

Monday, October 17, 2011

Technique of the Week: Sautéing

The French word sauté is a past participle of the verb "to jump." Similar to pan-frying, this cooking method uses a small amount of fat in a shallow pan over relatively high heat. Always heat your pan with oil before adding the ingredients. When ingredients are added to the pre-heated pan, they hop and "jump" around in the pan confirming that you have begun with a sufficient amount of heat. Only enough fat to lightly coat the bottom of the pan is needed for sautéing; too much fat will cause the food to fry rather than just to slide across the surface of the pan. Olive oil or clarified butter are commonly used for sautéing, but most fats will do. Regular butter will produce more flavor, but has a tendency to burn more quickly than other fats due to the presence of milk solids, so clarified butter is more fit for this use.

The most common use of this method is preparing vegetables for stews or casseroles. When sautéing, the vegetables should be stirred constantly because they are usually finely chopped and need to be kept moving to prevent them from burning and sticking in the hot pan. The browned vegetables are fully cooked while preserving its texture, moisture and flavor. If meat, chicken, or fish is sautéed, the sauté is often finished by deglazing the pan's residue to make a sauce. Sautéing differs from searing in that searing only browns the surface of the meat in preparation for other cooking methods.

Tricks and tips:
  • Use a sauté pan. The sauté pan is designed specifically for that little flip that ensures even cooking.
  • Cut your items to a uniform size to ensure even cooking.
  • Choose the right size of pan; overcrowding will cause the food to steam instead of caramelize.
  • Sautéing is versatile in terms of which fat to use. Depending on flavor profile, any number of fats can be used. The idea is to use about 1-2 tablespoons preheated in the pan on medium-high to high heat depending on the oil and the item to be sautéed. Check your recipe or this Whole Foods Guide is an excellent source for determining the best oil to use and their flavor profiles.
  • For veggies and fruits: Once your oil is hot, add your item and toss to evenly coat with oil and allow to brown on one side. Then toss again and allow to brown, until you have even browning on all sides. Don’t toss too often, it will prevent caramelization from happening. When all sides are nice and brown, lower the temperature to avoid scorching and cook to desired crispness.
  • For meats such as fish, chicken, pork and steak: season your meat with salt, pepper on both sides or marinate as instructed by the recipe. If marinated, dry the outside of the meat on paper towels to avoid hot oil spatters. You can lift an edge of your protein to check the color before turning it. You want to only turn it once, especially for delicate items such as fish.
Quick Cooking Guide:
  • Fish: Sauté until outside is golden and fish begins to flake when tested with a fork.
  • Chicken: Sauté until no longer pink and internal temperature is 160° F. For thicker pieces such as legs and thighs, consider a quick sear in an oven-proof pan then moving the item to a pre-heated 350°F oven to reach desired doneness.
  • Steak: Preheat the pan, sear for 1-2minutes per side on high, then reduce temperature to medium and cook to desired doneness. Can be finished in the oven after a quick sear if desired. This method is recommended for thicker cuts of meat.
  • Pork chop (bone-in or boneless): Preheat the pan, sear for 1-2 minutes per side on high, then reduce heat to medium and cook to internal temperature of 145-155°F depending on desired doneness. Can also be finished in the oven.
Some of our recipes that include sautéing include:


Yum
Powered by Blogger.

footer social

ShareThis