Tuesday, October 30, 2012

Hot Deviled Turnovers

These little devils make a perfect nosh before and after trick or treating. They also can be made ahead and frozen and then reheated on a busy evening like Halloween (or anytime you get a devilish craving.)

Each year, for as long as we can remember, our neighbors Margarette and David have hosted an open house the Sunday before Christmas. The entire neighborhood stops by for warm apple cider and a buffet of sweet and savory bites. The one treat we always look forward to are Margarette’s little deviled ham turnovers, so after many years I finally asked for the recipe. I am so glad I did because not only are the ham tartlets wonderful, Margarette’s pastry dough is now my go-to recipe for pies and cookies!

For a novice baker, this is the most forgiving dough to work with. The cream cheese allows this pastry some elasticity, but still produces tender and flaky results.

  • ½ cup (1 stick) unsalted butter, room temperature
  • ½ cup cream cheese, room temperature
  • 1 cup flour, plus more for rolling out the dough
  • Pinch of salt

Process the butter and cream cheese together in a food processor, electric mixer, or by hand to thoroughly combine.
Add the flour and salt. Process just until combined and the dough holds together in a ball. Turn the dough out onto a well-floured surface. Divide into 2 pieces. Flatten into disks and wrap each in plastic wrap. Refrigerate for at least 30 minutes before rolling out.

If the dough is chilled overnight, take it out 15 minutes before rolling out.Rub flour all over a rolling pin. Working with one dough disk at a time, place the disk on a clean, well-floured surface. Applying some pressure with the rolling pin, roll gently from the center of the dough to the top and bottom edges.

Rotate the disk and roll to the top and bottom edges again. Re-flour the work surface and rolling pin, turn the dough over, and continue to roll the dough from the center out to the edges. Turn over and roll again, rotating the disk to ensure even rolling until the dough is about 12 inches in diameter, thin but not transparent. Using a biscuit cutter (or an empty aluminum can or juice glass), cut the dough into rounds for filling.

Devilish Filling:
  • ½ cup (or 4.25 oz. can) deviled ham
  • ½ teaspoon mayonnaise
  • ½ teaspoon Dijon mustard
  • ½ teaspoon hot paprika
  • Pinch dry mustard

Preheat oven to 400 degrees F. In a separate bowl, mix together deviled ham, mayonnaise, mustard and paprika and stir until well blended together. Place ½ to 1 teaspoon of filling on one side of each of the dough rounds cut above.

Moisten the edge of the pastry with a finger dipped in a little water, and then fold the empty half of the dough over the filling. Crimpthe edges together using the tines of a fork. Place on the prepared baking sheet. Refrigerate while you make the remaining turnovers, putting each one on the sheet as it is assembled.

Place a baking rack in the center of the oven. Brush each turnover with a little milk or egg white if desired. Bake on the center oven rack for 10 minutes. Reduce the oven temperature to 375 degrees F, and bake for about 20 more minutes, or until golden brown. For even browning, rotate the sheet from front to back halfway through baking.

Transfer the turnovers to a wire rack, and let them cool slightly. Serve while they’re still warm.

Freezing Instructions: Freeze unbaked turnovers on a baking sheet until they’re firm, then gently transfer them to a resealable freezer bag. Store them in the freezer for up to 1 month. To bake them from frozen, just add a few minutes to the baking time.


Yum

Technique of the Week: Deviling

When the term “Devil” is used as a culinary term, it refers to dishes prepared with hot seasonings, usually mustard or cayenne pepper. The word derives from the connection between the devil and the excessive heat in netherworld in which he dwells.

In a nineteenth century sketchbook, Washington Irving used the word to describe a highly seasoned dish similar to curry. Deviled dishes were very popular throughout the nineteenth and into the twentieth centuries, especially for seafood preparations and some appetizers. Deviled crab and deviled eggs are still very popular applications of this culinary idiom.

Around 1868, the William Underwood Company (which was known originally for its mustard products, began experimenting with a new product created from ground ham blended with special seasonings. The process they dubbed "deviling," for cooking and preparing the ham, was new. Soon thereafter, the "Underwood devil" became synonymous with the processed ham product, and today the Underwood devil is the oldest existing trademark still in use in the United States.

Deviled Ham:
  • 1 pound smoked ham, 1" cubes
  • 1/2 cup mayonnaise
  • 1/4 cup mustard (Creole mustard)
  • 1/2 cup onion, diced
  • 2 tablespoon hot sauce, to taste
  • 1 tablespoon Worcestershire sauce
  • 1 teaspoons hot smoked paprika
  • ¼ teaspoon dry mustard (optional)
  • Salt and pepper to taste

Combine all ingredients in a food processor or blender, and pulse until the desired texture is achieved and all ingredients are well mixed.


Yum

Thursday, October 25, 2012

Holiday Preview Stuffed French Toast

Yesterday morning before most folks had finished their first cup of coffee, seven stalwartly foodies were seated the Cook’s Warehouse indulging in a delicious repast at the Second Annual Blogger Breakfast hosted by owner Mary Moore; Matthew Hott, Manager of the Ansley Mall location; Wendy Allen, director of The Cook’s Warehouse Cooking School; and, Jim Brams, director of public relations.

Chef Jessica Harlan of the About.com Guide to Cooking Equipment  prepared amazing pumpkin-stuffed French toast and a fruit salad with a honey lime dressing and mint in the Miele teaching kitchen.  Chef Jessica is the author of several cookbooks including her most recent title, Tortillas to the Rescue: Scrumptious Snacks, Mouth-Watering Meals and Delicious Desserts - All Made with the Amazing Tortilla.

“When you're looking for something to serve for breakfast or brunch that is even more decadent than French toast, try serving stuffed French toast. It takes a little more preparation, but it's a great way to incorporate seasonal flavors into your meal to impress guests, or to use up a handful of leftover ingredients like fresh fruit or nuts. This recipe gives you the basic concept so that you can get creative with your own ingredients or use one of the variations included below. Pair your flavored stuffed French toast with a syrup or compote in the same flavor or one that complements it, for an even more impressive way to begin the day. Slightly stale, rather than fresh, bread is far better for this recipe as it will better soak up the egg batter.

The night before preparing this recipe, I like to spread the slices of bread out on a baking sheet and leave them sitting out on the counter, so that the slices are slightly hard and dry. If you don't have time, you can also put the slices on a baking sheet and put them in an oven on low heat (200°F) for 5 to 10 minutes, or until the surface of the bread feels a little dry but it hasn't yet started turning toasty.

  • 8 ounces cream cheese, softened
  • 1/3 cup pumpkin puree
  • ½ teaspoon pumpkin pie spice
  • 2 tablespoons sugar, or to taste
  • 1 loaf good, stale bread, sliced
  • 5 eggs
  • 2 cups milk, any kind
  • ½ cup pumpkin puree
  • ½ teaspoon cinnamon
  • 2 teaspoons vanilla extract
  • Pinch salt
  • Butter, for griddle
  • 1 cup maple syrup
  • 1 cup chopped pecans (optional)

In a small bowl using of fork or a spatula, combine the cream cheese, the fruit or flavoring ingredients and the brown sugar, stirring and mashing until it forms a relatively smooth paste and the ingredients are well mixed. Spread the mixture generously on one piece of bread, and then press two pieces of bread together, with the filling facing in to make sandwiches. The filling layer should be thick enough so that it oozes out a little when the sandwich is squeezed. If the slices of bread are very large cut them in half.

Heat an electric griddle (Chef Jessica demonstrated one of TCW’s Hot Holiday Gifts for 2012 - the Cuisinart Griddler with Reversible Grill Plates: $99.99) or a large nonstick pan over medium-high heat, and preheat the oven to 200°F. In a large, shallow bowl, whisk the eggs. Whisk in the milk, ½ cup pumpkin puree, cinnamon, vanilla and salt.

Place two or three of the French toast "sandwiches" in the batter, turning them over with a tongs to let them evenly soak up the batter. Place a pat of butter on the griddle and use a plastic or silicone turning spatula to spread the butter to evenly coat the cooking surface. Using tongs, lift the French toast out of the batter, holding it over the bowl for a moment to let excess batter drip off.

Place the French toast on the griddle. Cook for 4 to 5 minutes, until the underside is browned. Turn the French toast over and cook the other side another 4 to 5 minutes, until browned. Transfer the cooked French toast to a baking sheet and keep warm in the oven until you've cooked all of the pieces. For topping, mix together maple syrup and chopped pecans in a small saucepan. Heat over low heat until warm and serve in a gravy boat or syrup pitcher."

While we cleaned our plates of every morsel, store manager Matthew Hott proved why the Cook’s Warehouse is About.com’s 2012 Reader’s Choice for the Best Kitchenware Retailer as he demonstrated TCW’s “Hot Holiday Gifts for 2012.” Some highlights included:
  • The New Vitamix 750 series $649.99 (used to make smoothies of berries, cherries, pineapple and chard)
  • Le Creuset 5.5-quart round French oven in signature color - Truffle $265
  • Calphalon Accucore 10” skillet with lid $79.99
  • Zwilling (maker of Henckels knives) Spirit 8” non-stick fry pan  $39.99
  • Revolution Molecular Gastronomy Kits $59.99
  • VinOice Wine Chiller $29.99 Extra Chill rods $19.99 
  • Chef’n pinch pour cups $29.99 
  • Joseph Joseph garlic rocker $14.99
  • Lekue push pop mold $9.99
After breakfast, we said our goodbyes and we were invited to wander through the TCW flagship shop before it opened to the public. As we were leaving, we were all presented with another item from the “Hot Gifts” list, a Red Party Cup, indispensable for tailgating and holiday eggnog, as a reminder of a fun morning.


Yum

Harvest Pumpkin Crème Brûlée

The French dessert known as crème brûlée is one of the most popular desserts in American culture. Widely available in restaurants around the country, this caramelized custard was once fit only for kings and queens. Of course any home cook with a set of ceramic ramekins and a hand torch can create this dessert in their own kitchen. This autumnal variation of the classic dessert is enhanced with warming spices that are freshly grated to maximize their flavor. A microplane grater makes fast work of grating whole spices.

Starting with fresh, high quality ingredients is crucial if you want perfect custard. Using the wrong ingredients or trying to rush each step will leave you with a watery, grainy dessert. You really do need to use heavy cream for this dish. While some recipes call for milk or half and half, these custards tend to be too soft and runny when cooked. Recipes that pair milk with extra egg yolks become rubbery and have a consistency more like flan. Double cream is the best choice, but it is not required. Egg yolks are the other key ingredient to create the perfect custard texture. You will need the yolks of five eggs for four servings; the recipe can be doubled or tripled. Look for fresh eggs and separate the yolks gently to avoid breaking them.* The final touch is a single, real vanilla bean. Vanilla extracts can`t provide the perfect flavor of a whole bean.

Once your ingredients are gathered, it is time to create your custard. You will need four ceramic ramekins and a large baking dish that is at least two inches deep and will sit inside the baking dish. This will become your bain marie (the French term for “water bath”), which is filled with hot water. This ensures the custard bakes slowly and evenly to maintain the proper texture and prevents the custard from curdling. The humidity from the steam that rises as the water heats helps keep the top of the custard from drying out and forming a crust.

1 ½ cups heavy cream
1 ½ teaspoon cinnamon, freshly ground
¼ teaspoon allspice, ground
½ teaspoon ginger, freshly grated
¾ teaspoon nutmeg, freshly grated
5 egg yolks
½ teaspoon vanilla extract
Pinch of salt
6 tablespoons pumpkin puree
1/3 cup granulated sugar
1 tablespoon firmly-packed, light brown sugar
Plus 4 teaspoons granulated sugar

Begin by preheating an oven to 300°F. Bring a pot of water to a boil and keep hot in preparation for the bain marie.

Pour the cream into a small saucepan and whisk in the cinnamon, allspice, ginger and nutmeg. Scald the cream by set over medium-low heat and mixture until bubbles form around the edges of the pan and steam begins to rise from the surface, about 3 minutes. Stir the cream mixture regularly to avoid any scorching.  Take the pan off the heat and give it 15 minutes to cool. Adding the milk to the egg yolks before they are cooled may cook the yolks too fast. The vanilla bean should be removed at this point. (If you freeze it, you can use it for future batches of crème brûlée!)

In a large bowl, whisk together the egg yolks, vanilla, salt, pumpkin puree, the 1/3 cup granulated sugar and the brown sugar until smooth and blended. Slowly pour in the cream mixture, stirring until blended. Pour the mixture through a fine-mesh sieve set over a bowl to remove any pumpkin fibers or larger bits of ginger and spices. Divide the mixture among four 8-oz. ramekins and place in a large baking pan. Add the boiling water to fill the pan halfway up the sides of the ramekins. Cover the pan loosely with aluminum foil and bake until the custards are just set, about 45 minutes. The custards should wiggle some, but not slosh. The custards will continue to firm up as they cool.

Remove the ramekins from the water and transfer them to a wire rack and let cool to room temperature. Cover with plastic wrap and refrigerate for at least 2 hours (up to 3 days).

The crisp, brown sugar crust of a crème brûlée is what sets it apart from plain custards. Create the perfect crust by giving the ramekins an hour to warm up after refrigeration. Sprinkle about a teaspoon of sugar over the custards. Use a hand torch to carefully brown the sugar evenly. Move the flame continuously in small circles over the surface until the sugar melts and lightly browns; maintain a steady pace to avoid burnt or blackened spots. Once you achieve a crisp layer of sugar, serve immediately. The caramel crust will not last indefinitely; the moisture from the custard will eventually dissolve the sugar.

* Remember to reserve the egg whites (albumen) for other recipes such as meringue cookies, angel food cake, white cakes, or meringue for pies. Egg whites can be frozen until you are ready to use them. Raw egg whites do not suffer from freezing. When separating eggs, have an ice cube tray at the ready. Pour each egg white into a compartment of the tray. This will work for small to large eggs. Place the ice cube tray in the freezer and freeze the egg whites. When completely frozen, pop the egg whites out and transfer them to a zip-top freezer bag and return them to the freezer. Whenever you need one, just thaw as many cubes, representing one egg white each, as needed in the refrigerator and use. Egg whites will deliver full volume if they are at room temperature. So, once the egg white is completely thawed in the fridge, let it come to room temperature before whipping.


Yum

Saturday, October 20, 2012

Morning Pause Cortado

There are few things better on a brisk Fall morning than the feel of a hot coffee mug cupped in your hands as the aromatic steam drifts upward to gently warm your nose. Dom and I have tried a wide range of coffee makers over the years: Krups, Cuisinart, Keurig, DeLonghi, and Breville… you get the idea. After years of trying a wide range of coffee makers we have determined that we are espresso drinkers. Opting for a cup-at-a-time machine rather than brewing a pot that goes half consumed each day.

Recently our friends at Gevalia Kaffe sent us a sample of their Espresso Roast ground coffee for us to try. An intense, full-bodied, dark roast blend made from East African, South American, and Central American beans, it makes a delicious cortado.

What is a cortado you ask? A cortado is an espresso drink with a small amount of warm milk added to reduce the acidity. The ratio of milk to coffee is between 1:1 and 1:2. The term cortado comes from the Spanish and Portuguese cortar which means “cut." It is popular in both Spain and Portugal, as well as throughout Latin America, where it is drunk in the afternoon. In Cuba, it is called a cortadito, and in Catalan it's known as a tallat.

Midway between a macchiato and a cappuccino, the cortado is simple and balanced; you taste the coffee and the milk. Its size, a mere 4 ounces, is perfect for a morning pause. Small enough to enjoy in one sitting before it gets too cold to drink.

½ cup espresso (2 shots)
¼ cup warm milk, preferably steamed

Using an espresso machine or pot, extract espresso directly into a coffee cup. Cut the espresso with warm milk and serve immediately. Add a spot more milk to reach your desired taste. The espresso can be diluted with milk to an one-to-one ratio, and still be called a cortado.


In accordance with the Federal Trade Commission’s 16 CFR, Part 255, we are disclosing that we received complimentary samples from Gevalia Kaffe in exchange for this post. A favorable review was not required; the review of the product is based solely on our personal opinion and experience and may differ from those of our readers.


Yum

Wednesday, October 17, 2012

Health Benefits of Coffee Smoothie

Coffee has been used for centuries to provide energy and keep workers awake on long shifts. Many people drink it just for the flavor, while others rely on it to get through the day. Recent research into the compounds found in the simple coffee bean has revealed a number of health benefits. While people with certain conditions should avoid acidic drinks with caffeine, most people will find a number of benefits by drinking a cup or two a day. Learning about these health benefits can help you feel better about a morning routine that involves a steaming cup of coffee.

Type 2 Diabetes:
Studies have shown an interesting link between coffee consumption and lowered rates of type 2 diabetes. While there is little research proving the connection, there is a strong correlation. Researchers believe that the antioxidants found in coffee provide this extra layer of protection for drinkers. This is supported by the fact that both caffeinated and decaffeinated coffee were connected to a 7% drop in diabetes development. Drinkers who indulged in up to seven cups a day saw a 35% drop in the likeliness of having diabetes, while four to five cups provides protection of up to 28%.

Stroke and Heart Attacks:
The caffeine or other compounds found in coffee may have effects on the brain and heart. Adults drinking one to two cups of coffee per day were hospitalized for irregular heartbeat about 20% less than patients who don`t drink coffee. Regular episodes of irregular heartbeats can indicate an upcoming heart attack. One study also found a 25% drop in strokes among women drinking at least two cups of coffee per day.

Parkinson`s Disease:
The link between lowered chances of Parkinson`s disease and coffee consumption has been documented for years. Regular consumption of caffeinated coffee may protect the brain, but the exact mechanism is unknown. Some recent studies also show protection against Alzheimer`s disease and dementia. Researchers followed nearly 1,500 people for more than 20 years. The patients drinking at least three cups per day were 65% less likely to develop one of these issues.

Brewing Tips:
Coffee will only benefit your health if you drink it regularly. If you avoid the drink because it tastes bitter, try brewing it the right way for a more palatable beverage. Drip coffee makers have a hard time properly extracting all of the compounds from coffee grounds if the water isn`t hot enough. Buy an inexpensive candy thermometer and check the temperature of the water as it runs through the coffee machine without coffee in it. If it isn`t between 195 and 205 degrees Fahrenheit, you can`t brew coffee that tastes good with that device.

Use bottled water or clean and chlorine-free tap water, but avoid distilled water. The water should be free of flavors or odors if you want a tasty cup of coffee. Store the grounds in the freezer. Seal your coffee in an airtight container and freeze it to preserve the volatile oils that produce complex and exciting flavors.

You don`t have to wait until tomorrow morning for a steaming cup to start the day.  Try this simple coffee smoothie for a quick afternoon pick-me-up.

Coffee Smoothie
2 ripe bananas
2 cups of freshly made coffee
2 teaspoons of sugar, honey or sugar-free sweetener
1/2 cup milk or plain yogurt
1 scoop of protein powder or whey (optional)
A handful of ice


Blend the ingredients in a blender until the banana is smooth and the ice is chopped into small pieces. Any frozen or fresh fruits can be added to create custom flavors. The protein powder or whey makes this an ideal breakfast smoothie.


Yum

Tuesday, October 16, 2012

Technique of the Week: Espressing

The term “espress” is derived from the Italian word for “express” since espresso is made expressly for and served immediately to the customer. As described by Italian food chemist Ernesto Illy, “The distinguishing sensory characteristics of Italian espresso include a rich body, a full fine aroma, and equilibrated bittersweet taste with an acidic note, and a pleasant lingering after-taste, exempt from unpleasant flavor defects."

Espresso is a concentrated coffee beverage of 2.5 ounces or less most often served in a demitasse cup. It is made on a specialized machine that forces hot water through finely ground coffee beans that have been compacted (tamped). It takes approximately 20-30 seconds to percolate the water through the tamped beans. Achieving a good shot of espresso is dependent on several key factors: the quality of the beans which should be dark roasted and finely ground; consistent tamping pressure; clean, preheated brewing equipment; and, good quality filtered water.


Yum

Thursday, October 11, 2012

Love Thy Neighbor’s Peruvian Aji Pepper Sauce

We have lived in the same neighborhood for the last 22 years. When we bought our house, we never imagined we would live in the neighborhood for this long, but time flies when you are having fun. With such great neighbors it would be very difficult to move anyway.

We have seen many neighbors come and go and have met some delightfully interesting people like the United States Ambassador to Côte d'Ivoire (next door), the Hasidic Rebbe (two doors down), Croatian immigrants (three doors down), and the German airline executive (across the street). We all live harmoniously regardless of race, religion, ethnicity or any other life choices.

If you had told us that living just a few miles from downtown Atlanta could feel like small town living, we would have laughed out loud. However, we have come to enjoy all the comforts of small-town-living with the convenience of big-city life. The area hardware store still lets you run a tab, the pharmacist at the local CVS Pharmacy knows you by name and when a tree falls through a neighbor’s house in the middle of the night, everyone on the street shows up to help.

Weekends in the ‘hood begin Friday evening when the sidewalks are filled with tykes on bikes, chatting parents, toddlers toddling and playful puppies. On Saturdays, there are pick up football games, games of chase and hide-and-seek, and on the rare occasion when it snows, tobogganing down driveways. The day often culminates in drinks on a neighbor’s deck or a potluck cookout. The menus for these potluck suppers are as diverse and intriguing as the individuals making the dishes from Pam’s yia-yia’s orzo salad to Margarette’s hot deviled turnovers.

At the most recent gathering, we were treated to mango-marinated ribs and a potato dish with an amazing hot cheese sauce (a specialty of the host’s South American stepmother). We were thrilled to have another recipe to add to our multifarious community arsenal.

Papa a la Huancaina
  • 6 potatoes, boiled
  • 1 small onion, finely chopped
  • 2 cups feta
  • 3 tablespoons Aji Amarillo pepper paste*
  • ½ cup olive oil
  • ½ cup evaporated milk
  • 1 teaspoon lemon juice
  • Salt and pepper

Bring a large stock pot of water to a boil and cook potatoes until fork tender. Drain potatoes and set aside. Reserve a cup or two of the boiling water and use this to rinse the finely diced onions for a minute or two to lightly blanch.

Mash together cheese and hot peppers and place in a food processor. Add evaporated milk and lemon juice, and pulse. Pour in olive oil a little at a time like you would do when making mayonnaise. Lastly, add onion and pulse until the sauce is an even deep yellow/orange. Add more evaporated milk to reach the desired consistency and then season to taste with salt and pepper.

Cut the boiled potatoes into ½” cubes and place in a serving bowl. Cover potatoes with the Aji pepper sauce. Traditional Peruvian garnishes are hard-boiled eggs and black olives. Serve warm and watch your neighbors devour them!

* Native to Peru and fundamental to Peruvian cooking, aji amarillo is a hot chili pepper, in the range of 40,000-50,000 Scoville units (a jalapeño is 2,500 Scoville units). It's easiest to find in paste form, but also available fresh, dried, canned or ground. Chopped Aji peppers make a wonderful addition to peach, mango or tomato salsas. Aji Amarillo Pepper paste is available at many international food markets such as Atlanta's Buford Highway Farmer's Market or on Amazon.com.


Yum

Thursday, October 4, 2012

Grilled Oysters with Chipotle Chermoula

If you have followed on our food adventures for any length of time it should be fairly clear that we have an eclectic interest in ingredients, cuisines (and music.) You will have also noticed that there are several ingredients that appear in blog posts more frequently than others.

There have been many variations on lamb, squash blossoms, and like any good Italian family, tomatoes. An example of another favorite in our house is oysters. Dom rarely visits the DeKalb Farmer’s Market without bringing home a bag of fresh oysters which are most often consumed raw with a drop of Tabasco or a simple Mignonette sauce which has hardly warranted numerous blog posts.

On a recent visit to the market Dom returned with a larger-than-usual quantity of the lumpy mollusks which were originally intended as an appetizer while several slabs of ribs smoked on the grill. However, they soon turned into an appetite quashing refection.

Dom placed 10 or so oysters on the top rack of the grill. Using some stunningly fresh cilantro that he just couldn't pass up at the market, and chipotle sauce originally purchased for the rib sauce, he concocted what has become our new favorite.  Thank goodness the next eight months all have the letter “R” in their names.

To Grill the Oysters:

Place the oysters on the hot grill so that they're resting on their deeply curved halves of their shells, this way their juices don't run. Make sure oysters do not overlap. Lay a wet rag towel over the oysters and cover the grill. Allow the oysters to cook until the oysters open, about 5 minutes. The oysters will pop open slightly (you can usually hear the "pop"). Once they are all open, remove them to a serving plate with tongs trying to keep the liquor inside.

When cool enough to handle, remove the top shells and loosen the oysters from the bottom shells. The subtle smoky flavor and natural saltiness of the brine in the oysters are delicious alone, but a drizzle of chermoula elevates them to the level of nirvana.

Chipotle Cilantro Chermoula
  • Juice of one lime
  • 2 cloves of garlic, minced
  • 2 tablespoons fresh cilantro, finely chopped
  • 1 tablespoon fresh parsley, finely chopped
  • 1 tablespoon Tabasco Chipotle Pepper Sauce
  • 1/2 teaspoon smoked paprika
  • 2 teaspoons olive oil
  • Kosher salt to taste


Yum

Monday, October 1, 2012

Technique of the Week: Shucking

Shucking is a culinary term used to describe the removal of the outer shell or “shucks” from either corn or oysters. Interestingly the term is not used in relation to any other food items, and corn and oysters have very little else in common. While the term dates back to the late 17th century, no one knows exactly how it came to be used.

Removing the husks from corn is an easy process in which an ear of corn is grasped by its stem and the outer leaves are pulled from the top to the bottom. Once the cob with its kernels are exposed the stem and husks are broken off. Often these husks are dried for use in making traditional tamales. During the colonial era, husks were used to make dolls or other toys.

Oyster shucking, on the other hand, is a bit more difficult. You will need an oyster knife which has a short, stubby blade and a strong handle for easy gripping. Since you will need to exert a good deal of pressure to open the oyster shells, pay careful attention to the angle of the knife and the position of the mitt or towel holding the oyster. For extra protection, you should consider wearing a heavy-duty work glove on the hand holding the oyster.

Oyster shells are brittle and can splinter easily; if the shell splinters and the knife isn't angled so that is pointing down toward the cutting surface, you can lose control of the knife and cut yourself badly. Hold the oyster firmly on the cutting board to keep the oyster from sliding away.

Locate the hinge of the oyster and wrap the oyster in a towel placing the hinge side up. Working on a flat, secure cutting surface, place the tip of the knife on either side of the hinge. Using a good deal of pressure, push the knife into the hinge. Twist the knife from side to side in order to pry the shell open.

Once the knife has popped the hinge, pry the lid open wide enough to fit the top of your thumb inside. Slide the tip of the knife inside the oyster and slide it along the roof of the oyster at an angle to sever the muscle that connects the two shells, and then slice through the connective muscle trying not to pierce the oyster.

Next carefully slip the tip of the oyster knife underneath the body of the oyster into the muscle where the muscle meets the shell and slice through it. Because oyster shells are surprisingly fragile, there are often small fragments that break off during shucking. These little bits of shell are very unappetizing, so scrape them away again being careful not to pierce the oyster in the process. At this point the oyster has been dislodged from the shell completely and can be served or cooked.

The oyster should be plump and floating in liquid. This liquid (referred to as liquor) is the natural juice from the oyster and is very desirable to oyster connoisseurs. If you are planning to serve the oysters on the half shell but accidently damaged it in the shucking process, gently turn it over. The flip-side of the oyster may be better looking than the damaged top.

If you are planning to cook them, they can be kept alive until you are ready to use them by wrapping them in a cool, moist towel and storing them in a refrigerator. Shucked oysters can be stored this way for up to two days.


Yum

Friday, September 28, 2012

Bananas Foster Fascination

It is again the season of afternoon practices, extra loads of laundry, wet tennis shoes and ravenous teenagers. This is also the season of bananas; every runners favorite snack. Bananas have vitamins and minerals including calcium, magnesium, protein and vitamins A, B-6, C and E. Eating a banana right before or after a competition or workout can boost energy and athletic performance, as well as muscle activity.

But, bananas are a tricky fruit: one minute they are a perfect yellow with a pale green tint, and the next they are an unpalatable brown. Between the perfect-eating stage and the not-on-a-bet stage, you have what we call “The Foster's stage.”

Dom and I first experienced Bananas Foster at Mr. B’s Bistro in New Orleans in 1990. Watching the blue flames licking the banana portions as the gooey caramel bubbled and formed around them permanently whet our appetites for this Cajun specialty. Once home, Dom perfected the recipe as well as the flambé technique. One memorable evening, in his enthusiasm for the beloved dessert, he mistakenly reached for cayenne pepper instead of cinnamon which resulted in our feverish consumption and an urgent quest for more ice cream to soothe our smoldering mouths.

Our boys first introduction to this scrumptious treat was also in New Orleans at the Ritz Carlton, when after they had accompanied the gorgeous vocalist in the cocktail lounge, she arranged for each to have Bananas Foster made tableside after our meal in the dining room. When Sonny said, "This is pretty good," we both laughed out loud and said in unison, "You think!!"

  • 4 bananas, quartered (first lengthwise, then halved)
  •  ½ stick (¼ cup) butter
  • 1 cup brown sugar
  • ½ teaspoon cinnamon (or cayenne pepper!)
  • ¼ cup banana liqueur
  • ¼ cup dark rum
  • 4 scoops vanilla ice cream

Combine the butter, sugar, and cinnamon in a sauté pan. Place the pan over low heat either on an alcohol burner or on top of the stove, and cook, stirring, until the sugar dissolves. Stir in the banana liqueur, then place the bananas in the pan.


When the banana sections soften and begin to brown, carefully add the rum. Continue to cook the sauce until the rum is hot, then tip the pan slightly to ignite the rum. Swirl the pan until the flames subside, lift the bananas out of the pan and place four pieces over each portion of ice cream. Generously spoon warm sauce over the top of the ice cream and serve immediately.


Yum

Monday, September 24, 2012

Technique of the Week: Flambéing

Flambéing is a cooking technique in which alcohol is added to a hot pan to create a surge of flames. The word flambé means “flamed” in French and is most often associated with tableside presentation of certain liqueur-drenched desserts, such as bananas Foster, Crêpes Suzette or cherries jubilee. It is also a procedure used in making coq au vin and other sauces, using spirits, before they are brought to the table. Although the practice of igniting food for show can be traced to the Moors in the 14th century, modern flambéing became popular in the late 19th century.

By rapidly burning off the volatile alcohol, flambéing can infuse a dish with additional aroma and flavor, and moderates the harshness of raw, high-proof spirits. The flames result from the partial combustion of the flammable alcohol, which is quickly consumed, while some residual flavor remains. Only liquors and liqueurs with a high alcohol content can be used to flame foods, and those with a higher proof will ignite more readily. Beer, champagne, and most table wines will not work. Liquors and liqueurs that are 80-proof are considered the best choices for flambé. Those above 120-proof are highly flammable and considered dangerous. While there is debate as to whether flambéing effects the flavor of dishes, it is an indicator as to when the alcohol has finished vaporizing.

Safety Tips:
  • A sauté pan, large skillet, or large chafing dish with rounded, deep sides and a long handle works best for this technique.
  • Always remove the pan with the sauce from the heat source before adding the liquor to avoid burning yourself. 
  • Never pour liquor from a bottle into a pan that is near an open flame (the flame can follow the stream of alcohol into the bottle and cause it to explode). Pour the alcohol from a fire-proof vessel like a Pyrex measuring cup.
  • Once you add the liquor to the pan, do not delay lighting. You don't want the food to absorb the raw alcohol and retain a harsh flavor. 
  • Always ignite the fumes at the edge of the pan and not the liquid itself. 
  • Ignite with a long match or a long barbecue lighter to avoid burned fingers and hands.
  • When attempting to flambé tableside, light the dish at the table as far away from guests and flammable objects as reasonably possible. 
  • If the dish doesn't light, it's probably not warm enough. Cold/refrigerated liquor will not ignite; if cooler than room temperature, you can heat it briefly in a microwave or in a saucepan, with high sides, just until bubbles begin to form around the edges. Do not let the liquor boil, as the alcohol will burn off and it will not ignite. Bear in mind that the boiling point of alcohol is much lower than water. 
  • Never lean over the dish or pan as you light the fumes. 
  • Let cook until flames disappear (this means all the alcohol has burned off).


Yum

Thursday, September 20, 2012

Taste of Atlanta is Coming Giveaway

It is that time again… Atlanta restaurateurs are preparing their dishes for the 11th Annual Taste of Atlanta! This must-do event will have something for everyone. Vegetarian; no problem. Craving sushi: no problem. Sweet tooth; definitely no problem! So, when we were asked to be promotional partners, you can see why we just couldn't say “No.”

In addition to innovative concepts from your favorite haunts, there will also be cooking demonstrations, a Georgia Specialty Foods market and even a Top Chef Kids Competition. With samples from more than 80 of Atlanta's favorite restaurants, you will certainly have a difficult time selecting from all the delectable morsels available for tasting.


BUT, we are giving you the chance grab a fork and explore the best of the best! Yes, you read that correctly. We are giving away two sets of 2 General Admission tickets on Sunday, October 7, 2012 for the Atlanta Foodie Event of the Year! Getting hungry?


The rules are simple:

1. (Mandatory) Comment below this post telling us which restaurant’s treats you are most excited to try at Taste of Atlanta.

2. (Bonus Entry) Like us on Facebook at http://facebook.com/weliketocook and then come back and leaving a comment letting us know that you did.

3. (Bonus Entry) Share this delicious giveaway on your Facebook timeline and then come back and leaving a comment letting us know that you did.

4. (Bonus Entry) Follow @welike2cook on Twitter and tweet: “I entered the @welike2cook giveaway for 2 tickets to @TasteofAtlanta. You can enter too at http://bit.ly/SJ28oC." Come on back and leave a comment letting us know that you did.

This contest ends on Tuesday, September 25th at 11:59 p.m. EST. Two winners will be chosen at random from all the entries. Entries will be verified, so please ensure that you have read all the rules for valid entry above.


In accordance with the Federal Trade Commission’s 16 CFR, Part 255, we are disclosing that we received complimentary tickets to Taste of Atlanta in exchange for this post and giveaway. A favorable review was not required; the review of the product is based solely on our personal opinion and experience and may differ from those of our readers.

Yum

Tuesday, September 18, 2012

Technique of the Week: Extruding

Extruding is a process by which a mixture of ingredients is forced through a pierced plate or die. After passing through the plate, the mixture can be cut to a specified size by blades (think Cheerios!) The machine which forces the mixture through the die is called an extruder, and the mix is known as the extrudate. The extruder consists of a large, rotating screw tightly fitting within a stationary barrel, at the end of which is the die plate.

Food products manufactured by extrusion usually have a high starch content such as pasta, breakfast cereals and ready-to-eat snack foods. Other food products often produced by extrusion include some breads (croutons, bread sticks, and flat breads), pre-made cookie dough, and some french fries.

Sausages, hotdogs and chicken nuggets are also food items that are manufactured by extruding. These items are often pre-cooked during the extrusion process using steam to heat the extruding equipment. Extrusion is also used to make confectionery products like chewing gum, licorice, and toffee. Home cooks use the process of extrusion when they use a garlic press, potato ricer or a pastry bag to frost a cake.


Yum

Saturday, September 15, 2012

Everyday Was Playdough Day

It is hard to believe that there is actually a national Playdough Day. When our boys were little, everyday was play dough day! We have wonderful memories of them sitting for hours at the kitchen table molding, folding, kneading, pressing, extruding and otherwise manipulating the colorful craft dough. The malleable properties of the dough made it fun to experiment and explore while they secretly developed fine motor skills, eye-hand coordination and general concentration as they squashed, squeezed, rolled, flattened, chopped, cut, scored, raked, punctured, poked and shredded with pure joy.

Poking in straws provided a challenge and a new physical skill. Squeezing it through a garlic press lead to excitement at seeing its shape change while using a gross motor movement to accomplish it. Forming 3-D shapes and sculptures helped self-expression as well as enhanced depth perception. Providing a wide range of “tools”  such as stamps, cutters often lead to sorting, matching, ordering and counting, and cooking play; all naturally and with no pressure to learn.

Play-Doh® Brand Modeling Compound was originally introduced as an educational tool in 1956, when the non-toxic reusable modeling compound was promoted as a substitute for modeling clay. Initially manufactured as Kutol Commercial Wall Cleaner in the 1930s, the plastic modeling compound (similar in texture to bread dough) became obsolete with the introduction of natural gas for home heating and the invention of vinyl (washable) wallpaper. However, the inventors discovered that the putty was being used by school children to make Christmas ornaments. Originally only available in one color and size (off-white in a 1 ½ pound can,) the dough was soon offered in the three primary colors and marketed to pre-schools and kindergartens across the mid-west.

Playdough was so popular with our boys that I made new batches often. That way they didn't need to worry about mixing colors (which eventually all turns to a muddy brown), or throwing it away when it turned gummy and too dry after playing with their creations. The recipe I used was a variation on the “cooked” dough method.

2 cups of plain flour
4 tablespoons of cream of tartar
2 tablespoons of cooking oil
1 cup of salt
2 cups of boiling water
Few drops of food coloring

Instead of using cold water and boiling the mixture, I replaced the cold water with boiling water and stirred the mixture until it was smooth and silky. If it looks as though it is not going to mix correctly, be patient and continue to knead until it reaches the desired texture.

You can substitute a packet of unsweetened Kool-Aid for the food coloring to get really cool colors and great smelling dough. Or you can add a few drops of peppermint oil for a great smell and even longer lasting playdough (peppermint is a natural antibiotic and preservative.)

When stored at room temperature, in an air-tight container (or Ziploc bag), your playdough can last for months. If it starts looking a little dried out, wrap it in a damp paper towel and store in its container overnight. By morning, it should be softened and ready for more modeling fun.


Yum

Thursday, September 13, 2012

"It's A Southern Thing" Boiled Peanuts

Growing up in the north Georgia, the appearance of signs along rural highways advertising “Boiled Peanuts” (pronounced bowled peynuts) signaled the end of summer and the beginning of football season. As the temperature began to drop, we would put away our flip flops, don our flannel shirts and head for the Appalachian Mountains to “see the leaves.” With Larry Munson calling the play-by-play in the background, we would stop at a roadside stall to buy a bushel of Rome Beauties or Arkansas Blacks, and a steaming paper sack of boiled peanuts with a jug of apple cider. The peanuts never made it home, instead they were consumed in a soggy frenzy that resulted in pruney fingers and damp sleeves.

For the record, our friends in the Northeast and Mid-West have never heard of boiling peanuts. In fact, boiled peanuts has even appeared in an episode of the Travel Channel's "Bizarre Foods." Readily available in Southern states, peanuts became a crucial nutritional commodity during the American Civil War. Using the ancient preservation technique, peanuts were boiled in salt water to eliminate impurities and kill bacteria. When troops of the Confederacy were without food, peanuts provided a high-protein ration that could be carried by soldiers and lasted for up to a week.

Peanuts were first brought to the southeastern United States during the late 17th century. Many historians assumed that peanuts were brought to this continent by slaves from Africa, but peanuts actually originated in Brazil and Peru; and, despite their name and appearance, peanuts are not really nuts, but rather members of the bean family.

While it may be difficult to replicate the country ambiance of a local produce stand, boiling up some “goobers” is actually pretty easy. You can use dried unroasted peanuts, but green (freshly harvested) work best and require far less cooking time.

  • 2 to 3 pounds fresh green peanuts
  • 1 cup salt
  • Water
  • 2 tablespoons Cajun spice mix or Old Bay seasoning (optional)

Rinse the peanuts thoroughly to remove dirt and debris and place them in a large stock pot. Cover completely with water and stir to "settle" the peanuts adding more water to cover the peanuts by at least 2 inches. Add salt (and seasoning if desired) and bring to a boil. Once boiling, reduce the heat and let the peanuts simmer, covered, for approximately up to 4 hours, stirring occasionally. Add additional water as needed to keep the peanuts covered.

To check whether they are done, pull 1 or 2 peanuts out of the pot and break them open. If they are still slightly crunchy, they are not done yet. When they are soft, then they are done.

Taste the peanuts, if you would like them to be softer, return them to the water and continue to simmer until they reach the consistency you desire. If they are not salty enough for your taste, add more salt. When they are done, drain and serve immediately.


Yum

Sunday, September 9, 2012

Where There's Smoke There's Brisket

As with most things in life, even smoke, in moderation, has its advantages. The fire fighters of Atlanta’s Station House #29 agree! A brief poll of these everyday heroes revealed that while they most often eat spaghetti at the station house, their favorite thing to do is “fire” up the grill and cook some flavorful red meat. Whether it is steak, burgers or barbeque, nothing beats taste of red meat cooked over a smoky fire.

It comes as no surprise that people tend to take their barbeque very seriously! In the Southeast, barbeque usually refers to pulled pork with a spicy vinegar-based sauce, but in Texas and Kansas City barbeque refers to smoked brisket cooked long and slow served with a sweet and spicy tomato-based sauce.

Over the Labor Day weekend, Dom decided to try his hand at grilling brisket. Barbecuing a whole brisket of roughly 10 pounds for almost six hours sounded very intimidating, but even though the process was time consuming, it was actually pretty easy.

1 9-10 lb. full beef brisket, trimmed
1 cup spicy meat rub
2 cups favorite barbecue sauce

Apply dry rub liberally to all sides of brisket and wrap tightly in plastic wrap. Refrigerate for at least 2 and up to 48 hours.

One hour prior to cooking, remove brisket from refrigerator and unwrap. Ignite about 2 quarts of hardwood charcoal or charcoal briquettes in pile on one side of grill and burn until completely covered with thin coating of light ash.

Meanwhile, assemble a pouch of wood chips by wrapping about 3 cups wood chips (preferably mesquite) in double sheet of heavy-duty aluminum foil and poke 6-8 holes in the top of the pouch with a knife or fork to allow the smoke to escape. Place the pouch on top of the hot coals.

Set grill rack in place over the coals and position brisket, fat side up, on the side of the rack opposite he hot coals. Make sure that grill vents (top and bottom) are open. For optimal smoking, position the brisket directly under the top vent of the grill cover. Allow the brisket to smoke without removing the cover for about 2 hours so that the smoke flavor permeates the meat.

Once the brisket is well smoked, it will need to continue to cook at approximately 300 degrees for another 3 or so hours to allow the collagen in the meat to gelatinize. If you can regulate the temperature of your grill, you can continue to use it for this second phase of cooking, If not, adjust the oven rack to the middle position preheat your oven to 300 degrees.

Seal the brisket completely in heavy duty aluminum foil and place it on a baking sheet. Sealing the brisket in foil creates a moist environment which allowing the meat to cook at a higher temperature without drying out. Bake for about 3 to 3 ½ hours until the meat is fork-tender or an instant-read thermometer inserted into thickest portion of meat registers 210 degrees.

Remove the brisket from oven and loosen foil at one end to release steam. Let the meat rest for 30 minutes. Drain the juices from the foil into a large bowl. Skim the fat from the juices and mix with an equal amount of barbecue sauce.

Unwrap the brisket and place the meat on a cutting board. A full brisket has two “cuts” or sections: the flat end and the point cut. The grain of the meat runs in opposite directions, so these two sections should be separated before slicing. Cut the brisket into thin slices by carving across the grain on a diagonal.

Moistening the sliced brisket with the meat juices adds flavor and moisture. Drench slices with some of the barbecue sauce mixture and transfer to a serving plate or layer on a slice of white bread with slaw and pickles and fold into a neat triangle, Kansas City-style.


Yum

Saturday, September 1, 2012

Labor Day Rule Cantaloupe Sorbet

Growing up, Labor Day always marked the unofficial end of summer when the “Labor Day Rule” went into effect. It was time to pack away white clothes and shoes (until the next Easter), and replace them with the earthy hues of autumn. While most Southerners observe the Labor Day rule out of a sense of antebellum tradition, some historians think the adage originated during the turn of the century when lightweight clothes were a symbol of the affluence. In rural Georgia, however, there was a very practical reason for observing the rule; white clothes turned an indelible rusty-orange when hurricane season brought its heavy autumnal rains.

Labor Day means the beginning of football season, toasted marshmallows over an outdoor fire, and wondering whether the hot apple cider needs more cinnamon. On the other hand, it signals the end of lazy afternoons slurping down freshly picked watermelon and listening to cool jazz classics like Herbie Hancock’s “Cantaloupe Island” or Michael Frank’s “Popsicle Toes,” and time to say goodbye to cucumbers and tomatoes eaten straight from the garden.

Taking advantage of a seasonal favorite, cantaloupe sorbet seems to be a perfect farewell to summer. Egyptians wrote about this sweet melon as far back as 2400 B.C. which was introduced to America when Christopher Columbus brought cantaloupe seeds with him to the New World on his second voyage. The fleshy, orange-yellow cantaloupe hailing from the muskmelon family is a harbinger of health in delectable flavor. This sorbet is simple to make and offers the same taste as biting into a fresh piece of melon, only colder.

  • Small ripe cantaloupe, pureed
  • 1/2 cup sugar
  • 1/4 cup light corn syrup
  • 1/4 cup water
  • 2 tablespoons lime juice
  • 2 tablespoons gin

Choose a ripe cantaloupe by looking for bruise-free skin, and smoothness at the stem-area which should have a slight indent, and a sweet, fruity smell.

Combine sugar, corn syrup, and water in a small saucepan and place over moderate heat.  Bring mixture to a boil and cook until the sugar dissolves (just a few minutes,) then remove from the heat.  Corn syrup is used in this recipe to improve texture (corn syrup has a higher viscosity than sugar so it freezes differently). Pour into a small container and let cool to room temperature, about 30 minutes.

Meanwhile, clean and cube cantaloupe.  Place in a blender and puree until smooth.  Stir in cooled sugar syrup and lime juice and pulse to combine. Cover and place in refrigerator to fully chill, at least 4 hours or preferably overnight.

Once chilled, stir in gin and pour into an ice cream maker (we use a Krups "La Glaciere") and freeze according to the manufacturer’s instructions.  The gin (or any other type of alcohol) is the secret to a soft sorbet. Alcohol itself does not freeze and adding a little bit keeps the sorbet from freezing too hard giving the sorbet a smoother more creamy texture.

Once the sorbet is frozen, place a piece of plastic or parchment over sorbet (to prevent ice crystals from forming on the surface) and freeze at least 4 hours until firm.


Yum

Monday, August 20, 2012

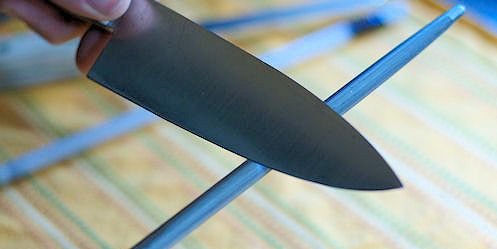
Technique of the Week: Sharpening

Sharpening is the process of creating or refining the sharp edge of a cutting implement. Sharpening is done by grinding away material on the implement with an abrasive substance to remove small mechanical deformations and imperfections.

Most culinary implements have a cutting edge which is essentially straight; knives, cleavers and scissors are good examples. The edge of a quality knife does not wear away; it folds over on itself. A knife edge is unbelievably thin; even thinner than a human hair. The impact of cutting causes the edge to fold over on itself. Pieces of the edge can even break off during food preparation. Anyone who loves to cook knows that working with dull knives is an accident waiting to happen. A sharp knife is a safe knife.

Sharpening straight edges by hand can be divided into three categories: steeling, sharpening and polishing. Edges that are still relatively straight, but need to be refined or touched up may be honed by passing the blade against a hand-held tungsten carbide knife sharpener known as a ”steel." For the record, the steel does not actually sharpen the knife’s edge. It maintains the edge by unfolding it, but the straightened edge can still be weak and quickly fold again. True sharpening removes the old weak edge and reshapes a new stronger edge.

Truly dull or misshapen edges should be sharpened with an abrasive sharpening stone, or a succession of increasingly fine stones, which shape the blade by removing material and reshaping the knife’s edge. The straightened edge is then be polished by “stropping” the edge with a fine abrasive such as jeweler’s rouge or metal polish on a piece of strong leather or canvas. If you have invested in good quality knives, you should consider having your knives professionally sharpened. It extends the life and usefulness of your favorite knives and makes them safer to use, rather than replacing them when the edges are dull or “folded.”


Yum

Friday, August 17, 2012

Japanese Knife Masters Delight

The parking lot behind The Cook’s Warehouse in Decatur was completely packed as a standing-room-only crowd of cooking enthusiasts gathered around three Japanese knife masters demonstrating the hand-forging process used to fashion steel culinary knives.

Kikuichi forging masters Yuso Tani, Akimasa Oe, and Tadashi Enami of Sakai City forged, assembled, sharpened and even engraved their handmade creations. Between them, these artisans have nearly 100 years of experience crafting knives, and each is the second generation in their families to do so.

Sakai City, known for its samurai swords for centuries, has now become Japan’s center for fine kitchen cutlery. “When I visited Sakai City, I was amazed at how the Japanese Forge Masters hand craft one of the most important tools used in the kitchen.  Their expertise and care is incredible.  Through the courtesy of J-CAN and these Japanese Forge Masters, we could see this process right in our stores at these two classes.  It was truly a once in a lifetime experience,” said Mary S. Moore, founder and CEO of The Cook’s Warehouse.

After the class sponsored by Kikuichi knives, attendees had a chance to purchase knives and have them engraved to order. They also had an opportunity to sample Japanese hors d’oeuvres such as hand-rolled sushi and daifuku (soft glutinous rice cake filled with slightly sweetened velvety adzuki bean puree,) and to taste a variety of sakes with Don Hackett, manager of TCW’s Decatur store and resident senior wine educator. Samples of Japanese Ramune sodas, Pocky, and tubes of wasabi were also offered to class attendees.

Even if you missed this informative class, you can still visit The Cook’s Warehouse to see these gorgeous handmade knives. The knowledgeable staff can help you choose just the right knife for you. They even offer knife sharpening services when your knives need a touch-up.

Oh! While you are at The Cook’s Warehouse be sure to purchase your tickets to this year’s Taste of Atlanta, the city’s premier Food+Wine+Beer+Cocktail festival on Saturday, October 6 & Sunday, October 7, 2012. With more than 80 restaurants offering samplings of everything from house-cured BBQ bacon to meatball sliders, there will be plenty of amazing bites to fill your plate. OR buy your tickets online by September 30th to receive $5.00 off by entering the promo code “TASTE”.


Yum
Powered by Blogger.

footer social

ShareThis