Monday, August 20, 2012

Technique of the Week: Sharpening

Sharpening is the process of creating or refining the sharp edge of a cutting implement. Sharpening is done by grinding away material on the implement with an abrasive substance to remove small mechanical deformations and imperfections.

Most culinary implements have a cutting edge which is essentially straight; knives, cleavers and scissors are good examples. The edge of a quality knife does not wear away; it folds over on itself. A knife edge is unbelievably thin; even thinner than a human hair. The impact of cutting causes the edge to fold over on itself. Pieces of the edge can even break off during food preparation. Anyone who loves to cook knows that working with dull knives is an accident waiting to happen. A sharp knife is a safe knife.

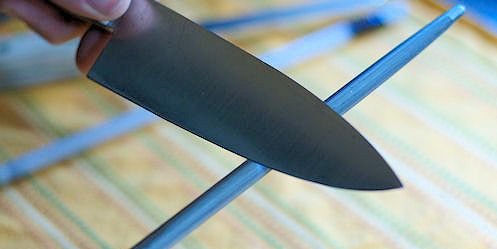
Sharpening straight edges by hand can be divided into three categories: steeling, sharpening and polishing. Edges that are still relatively straight, but need to be refined or touched up may be honed by passing the blade against a hand-held tungsten carbide knife sharpener known as a ”steel." For the record, the steel does not actually sharpen the knife’s edge. It maintains the edge by unfolding it, but the straightened edge can still be weak and quickly fold again. True sharpening removes the old weak edge and reshapes a new stronger edge.

Truly dull or misshapen edges should be sharpened with an abrasive sharpening stone, or a succession of increasingly fine stones, which shape the blade by removing material and reshaping the knife’s edge. The straightened edge is then be polished by “stropping” the edge with a fine abrasive such as jeweler’s rouge or metal polish on a piece of strong leather or canvas. If you have invested in good quality knives, you should consider having your knives professionally sharpened. It extends the life and usefulness of your favorite knives and makes them safer to use, rather than replacing them when the edges are dull or “folded.”


Yum

Friday, August 17, 2012

Japanese Knife Masters Delight

The parking lot behind The Cook’s Warehouse in Decatur was completely packed as a standing-room-only crowd of cooking enthusiasts gathered around three Japanese knife masters demonstrating the hand-forging process used to fashion steel culinary knives.

Kikuichi forging masters Yuso Tani, Akimasa Oe, and Tadashi Enami of Sakai City forged, assembled, sharpened and even engraved their handmade creations. Between them, these artisans have nearly 100 years of experience crafting knives, and each is the second generation in their families to do so.

Sakai City, known for its samurai swords for centuries, has now become Japan’s center for fine kitchen cutlery. “When I visited Sakai City, I was amazed at how the Japanese Forge Masters hand craft one of the most important tools used in the kitchen.  Their expertise and care is incredible.  Through the courtesy of J-CAN and these Japanese Forge Masters, we could see this process right in our stores at these two classes.  It was truly a once in a lifetime experience,” said Mary S. Moore, founder and CEO of The Cook’s Warehouse.

After the class sponsored by Kikuichi knives, attendees had a chance to purchase knives and have them engraved to order. They also had an opportunity to sample Japanese hors d’oeuvres such as hand-rolled sushi and daifuku (soft glutinous rice cake filled with slightly sweetened velvety adzuki bean puree,) and to taste a variety of sakes with Don Hackett, manager of TCW’s Decatur store and resident senior wine educator. Samples of Japanese Ramune sodas, Pocky, and tubes of wasabi were also offered to class attendees.

Even if you missed this informative class, you can still visit The Cook’s Warehouse to see these gorgeous handmade knives. The knowledgeable staff can help you choose just the right knife for you. They even offer knife sharpening services when your knives need a touch-up.

Oh! While you are at The Cook’s Warehouse be sure to purchase your tickets to this year’s Taste of Atlanta, the city’s premier Food+Wine+Beer+Cocktail festival on Saturday, October 6 & Sunday, October 7, 2012. With more than 80 restaurants offering samplings of everything from house-cured BBQ bacon to meatball sliders, there will be plenty of amazing bites to fill your plate. OR buy your tickets online by September 30th to receive $5.00 off by entering the promo code “TASTE”.


Yum

Tuesday, August 14, 2012

Technique of the Week: Coring

Coring is a process that removes the core or center of various fruits, such as apples, pears and pineapple; and vegetables, such as lettuce and cabbage. Coring removes small seeds or tough and fibrous centers from the food items.  While it is not dangerous to eat the core, it is unappetizing.

There are a variety of tools available to remove the core from apples and pears. Only a sharp knife is needed to core an apple in the easiest way. Just slice the apple into four quarters, and use the knife to cut out the core. Just a small V-shaped nick around the central core is all it takes. If the core runs through the slice from stem to bottom, put the slice on end or on its side and use a paring knife to cut the entire core out. Sectioning tools which both core and section the fruit at the same time are also very popular. We prefer an apple corer which slides down through the center of the fruit removing the entire core but leaving the rest of the fruit completely intact. Apples cored in this way are perfect for baking.

Baked Cored Apples:
  • 6 firm-fleshed apples (such as Rome or Arkansas Black)
  • ½ cup brown sugar
  • 1 teaspoon ground cinnamon
  • ¼ teaspoon ground nutmeg
  • ½ teaspoon ground ginger
  • ¼ teaspoon salt
  • 2 tablespoons butter, cut into teaspoon-sized pieces
  • 1 cup apple juice or water

Preheat oven to 350 degrees F. Combine brown sugar, cinnamon, nutmeg, ginger and salt in a small bowl. Set aside.

Core apples with an apple corer or by scooping out the center of each apple with a melon baller. Make sure not to puncture the bottom of the apples so that the juices will remain inside while baking; discard cores. Remove skin from ½” around top of apples at the opening.

Fill each cavity with the cinnamon-sugar mixture and top each apple with a teaspoon of butter. Place apples in casserole dish and pour apple juice or water around them to cover bottoms of apples by about ½ inch. Cover pan with aluminum foil and bake until apples are soft but not mushy; approximately 45 minutes to 1 hour. Remove from heat and serve warm, ice cream optional.


Yum

Friday, August 10, 2012

Back-in-the-Groove Rustic Apple Crostata

It is so hard to get back into a routine! Over the summer months, our schedules are completely upheaved resulting in a serious lack of blog posts. We took full advantage of the stress-free days which included sleeping late, hanging out at the pool, and then staying up late watching stupid movies. We ate loads of delicious food, enjoyed each other’s company, laughed a lot and even took lots of pictures, but the blogging muse was absent from these spontaneous family revelries. Although well intended, blog posts also went unwritten as we managed to sneak in trips to Amelia Island, Raleigh, Iowa City and Charleston where we enjoyed the local attractions (and food.)

School started incredibly early this year which necessitated earlier shopping and preparations. Then the real fun began with scheduling issues, Senior class pictures, sports practices, homework and teenage drama. Today is the last day of the first week of school: while still somewhat chaotic, we have settled into an almost what-is-normal-for-us regime. Thus blog posts should return to their regularly scheduled writing.

When cleaning out the refrigerator this morning (to make room for homemade lunch staples), I happened upon several Granny-smith apples originally purchased to make salad with butter lettuce, blue cheese and pecans. A free-form apple pie (or crostata in the Italian vernacular) prepared by folding the edges of the dough over the top giving it a more "rough" look may be just the thing to complete a first-week-of-school Friday night dinner. Topped with the pecans and blue cheese crumbles, the torta could even be elevated to Saturday date-night status.

  • 1 ½ cups all-purpose flour (plus a bit for flouring your work surface)
  • 1 ½ tablespoons sugar
  • Pinch of salt
  • 1 ½ sticks (6 ounces) very cold unsalted butter, cut into ¼-inch pieces
  • 2 tablespoons ice cold vodka
  • Ice water
  • 3-4 tart, firm apples, peeled, cored and cut into ¼-inch-thick slices
  • 2 tablespoons sugar
  • 2 tablespoons butter, melted
  • Freshly grated cinnamon and nutmeg

Preheat oven to 400˚F. Combine the flour, sugar and salt and then add the chopped, cold butter; the colder the better. Work it with a pastry cutter or 2 knives until all the butter is chopped up into pea sized bits and even distributed throughout the flour mixture. You can use your hands if you wish, but don’t over handle as it will begin to melt the butter. (I have very warm hands and thus use utensils because you really want to avoid melting the butter into the flour as your crust will be chewing instead of flaky and crispy.) Allowing the butter to remain in pieces rather than being fully incorporated into the flour forms air pockets which make for a flaky crust.

Add the cold vodka and mix gently. Vodka in pastry is for crispiness. The biggest factor in creating a crispy crust is drying the dough to, well, a crisp and vodka evaporates quickly; more quickly than water.

Next add ice water in small increments until the dough pulls together into a loose ball. The four should not look at all sticky; just moist. Once it comes together, put it in the refrigerator for at least ½ hour (or more – the longer the better.)

While the dough is cooling, peel, core and slice your apples into ¼-inch slices. Then retrieve your dough and gently roll it out into about a ¼-inch disk. Transfer the rolled dough onto a greased baking pan.

Starting in the center, arrange half the sliced apples in concentric circles on the crust and sprinkle with one tablespoon of sugar. Layer the other half of apples over the first layer and sprinkle with another tablespoon sugar (or two depending on the sweetness of your apples.) Pour the 2 tablespoons of melted butter over the apples and lightly dust the top with cinnamon.

Fold the edges of the pastry over the apples, leaving the middle exposed. Cook at 400˚F for about 45 minutes, or until the crust is golden and the apples are soft and cooked through.  Serve hot, warm or cold with your favorite topping (or not).


Yum

Tuesday, August 7, 2012

Technique of the Week: Grating

In culinary terms, grating is the process of transforming solid, firm food items into small pieces by rubbing the item against a grater. A grater is a hand held metal device that contains numerous raised slots of varying sizes that cut ingredients into small pieces. While applying a bit of pressure, food is scraped along the sharp serrated edges of the grating instrument. This very useful kitchen utensil was invented by François Boullier in the 1540s and is still an essential cooking tool to this day.

There are a dizzying amount of choices of graters available. The basic grater is a flat piece of metal with notches cut in its face and it is the size of the notch that determines the size of the grated threads. Several types of graters feature different sizes of grating slots, and can therefore aid in the preparation of a variety of foods. The standard 4-sided box-grater is commonly used to grate a variety of ingredients like cheese and lemon or orange peel (also known as zesting), and in tropical areas, graters are used to grate coconut meat.

Choose a grate size (the size of the hole in the grater) that works best with the ingredient you will be grating. Smaller grates work well for harder cheeses like Parmesan, and Romano; coarser grates work best with slightly softer cheeses like Cheddar and Jack, vegetables or even chocolate. To reduce the amount of food that sticks to the grater, give the grater a quick spray of oil just prior to grating. Softer cheeses should also be chilled prior to grating to make the process easier.

A food processor fitted with a grating attachment may also be used to grate foods and may be preferred for food items that are difficult to grate on a manual grater or if you need to grate a large quantity of ingredients.

Yum

Friday, August 3, 2012

Glut-No-More Zucchini Bread

Planting sixteen zucchini plants seemed like a good idea at the time… We love having fresh squash blossoms in the early summer, but as the season wears on the proliferation of zucchini squash is truly daunting. For several weeks, we had more zucchini than we could even store in the refrigerator (and we have two of them.)

While there is nothing better than fresh squash simply sautéed with garlic and a little crushed red pepper, we would have to eat it for breakfast, lunch and dinner not to waste any. When searching the internet for new recipes, there seems to be a common thread: all the recipes are meant to deal with a glut of the inexhaustible vegetable.

Since the guys are quite fond of banana bread for breakfast, I thought I should try some zucchini bread. Served toasted with cream cheese; glut no more!

  • 2 cups fresh zucchini squash, grated
  • 3 eggs
  • 1 cup vegetable oil
  • 1 ¾ cups sugar
  • 2 teaspoons vanilla extract
  • 3 cups all-purpose flour
  • 3 teaspoons cinnamon
  • ½ teaspoon nutmeg
  • 1 teaspoon salt
  • 1 teaspoon baking soda
  • ½ teaspoon baking powder
  • ½ cup chopped walnuts or pecans (optional)
  • 1 cup dried cranberries, raisins or chocolate chips or any combination (optional)

Grate the zucchini with a hand grater, and allow to sit over the sink in a strainer to drain access water before use.

Preheat oven to 350°F. Grease and flour two 8×4 inch loaf pans, liberally. Alternately, line 24 muffin cups with paper liners.

In a large bowl, beat the eggs with a whisk. Mix in oil and sugar, then zucchini and vanilla. Combine flour, cinnamon, nutmeg, baking soda, baking powder and salt. Stir dry ingredients into the egg mixture, then add nuts, chocolate chips and/or dried fruit, if using.

Divide the batter into prepared pans. Bake loaves for 50-60 minutes, or until a tester inserted into the center comes out clean. Muffins will bake far more quickly, approximately 20 to 25 minutes. Based on my experience, the loaves and muffins will come out of the pan more easily once allowed to cool completely.


Yum

Monday, July 30, 2012

Technique of the Week: Pickling

Pickling is the process of preserving food by marinating and storing it in an acid solution, usually vinegar (acetic acid) or “anaerobic fermentation” in brine which produces lactic acid. Pickling results in preserved foods with salty or sour flavors.

Pickling began more than 4,000 years ago as a way to preserve food for out-of-season use and for long journeys, especially by sea. Salt pork and salt beef were common staples for sailors before the days of steam engines. Although the process was developed to preserve foods, pickles are also made and eaten because people enjoy the resulting flavors. Pickling may also improve the nutritional value of food by introducing B vitamins produced by bacteria.

Pickling can preserve perishable foods for weeks or months and is a terrific way to ensure that an overabundance of summer produce does not go to waste. In addition to salt or vinegar, antimicrobial herbs and spices, such as mustard seed, garlic, cinnamon or cloves, are often added. If the food contains sufficient moisture, a pickling brine may be produced simply by adding dry salt (similar to maceration). For example, sauerkraut and Korean kimchi are produced by salting the vegetables to draw out excess water.

The term pickle is derived from the Dutch word pekel, meaning brine. In the U.S., the word pickle almost always refers to a pickled cucumber. Other types of pickles are described by name as in the case of as "pickled okra," or "pickled eggs." Interestingly, in the U.K., the term pickle refers to Ploughman's pickle which is a kind of chutney.

Quick Sweet Pickles
  • 2 cups Kirby cucumbers, thinly sliced
  • 2/3 cup white or cider vinegar
  • 1/4 cup sugar
  • 1/8 teaspoon salt
  • 2 red onions, thinly sliced
  • 2 tablespoons dill sprigs, torn
  • 1 teaspoon whole peppercorns
  • 3 tablespoons olive oil

In a medium bowl, mix vinegar, sugar, and salt, stirring occasionally, until sugar dissolves.  Add olive oil to reserved vinegar mixture and stir well.

In a nonreactive bowl, combine cucumbers, onions, dill, and peppercorns. Pour vinegar mixture over vegetables and toss to combine. Cover the bowl and refrigerate for at least 8 hours before serving. Store pickles in a jar or other covered container in the refrigerator for up to 5 days.

(If you need to speed up the maceration process, you can bring the vinegar mixture to a boil before adding olive oil and pour over cucumbers. Once cooled the pickles are ready to eat.)


Yum

Saturday, July 21, 2012

Mango Tango in Key West

Post by Sonny Romeo 
        
Last year, we visited Key West for a lovely day trip. Dad and Mom had always wanted to see the Florida Keys and we were in Palm Beach so they figured why not drag us along for the “experience.”

It was about a 4-hour drive from West Palm which actually went by relatively quickly. The trip included crossing the famous and historic 7-mile bridge which connects the city of Marathon in the Middle Keys to Little Duck Key in the Lower Keys.  It has spectacular views of the Gulf of Mexico and the Atlantic Ocean on either side.  When this bridge was completed in 1982, it was considered the longest segmented bridge in the world and was built to withstand winds of up to 200 miles per hour.  The 65-foot tall bridge is the highest point in the Florida Keys built to allow boats and ships to pass underneath. If you've never made the drive before you have to do it at least once in your lifetime.

When we arrived in Key West, we were all starving so we drove down Duval Street in search of sustenance. We saw several restaurants that looked promising including Jimmy Buffet’s Margaritaville, but Nic and I convinced the folks to go to the Hard Rock Café. I ordered a burger (amazing at every Hard Rock I’ve ever been to) and was about to order a coke when the waitress asked if I wanted a “Mango Tango” which she described as “kind-of like mango lemonade with a kick.” I was parched as well as hungry so I went for it. It was just about the best drink I have ever had!

We spent some time strolling along the notorious Duval Street.  Duval Street is the famous downtown street where all of the restaurants, bars, and shops are located.  The street runs north and south from the Atlantic Ocean to the Gulf of Mexico. We ended up in Mallory Square which is considered the heart of downtown Key West.  On the way back to the car, we walked by the original Sloppy Joe’s Bar (that is now Captain Tony’s Saloon) which is where Ernest Hemingway spent much of his time during his most productive years. (We stopped in Jimmy Buffet’s Margaritaville to get something to drink, but no one would wait on us, so we left.)

Like most people, we did all the normal things tourists do on their first trip to Key West: we took pictures at the 0-mile marker and the southernmost point in the continental United States (while trying to see Cuba which is just 90 miles away.) As a teenager, it is hard to admit when your parents are right, but the trip was truly a memorable experience.  The moral of the story is that sometimes you just have to take a spontaneous trip to Key West. We only spent one day on the island, but we saw a lot and had fun.

We were recently reminiscing about our trip and I decided to try to make a mango tango. Little did I know that it was not a regular item on the Hard Rock menu nor that it was a secret recipe. After extensive research and experimentation, I came up with a recipe that if it isn't exact, it is extremely close!

2 oz. Fresh Mango Puree (Hard Rock uses Finest Call Mango puree)
4 oz. Fresh Orange Juice
4 oz. (half can) Red Bull Energy drink

Mix the mango puree and orange juice together and pour over ice. Add the Red Bull stirring gently so you don’t deflate the carbonation. Drink and imagine clear blue water and ocean breezes!
Hard Rock Cafe on Urbanspoon
Hard Rock Cafe on Foodio54

Yum

Monday, July 16, 2012

Technique of the Week: Macerating

The technique of maceration is used to soften fruits and vegetables using a liquid; often their own natural juices which have been extracted with a simple sprinkling of salt or sugar (or both.) This process makes the food more flavorful and easier to chew and digest. Sometimes oil is added to the macerating liquid, especially olive or other vegetable oil.

Raw, dried or preserved fruit or vegetables are soaked in a liquid to soften and rehydrate the food or absorb the flavor of the liquid into the food. Maceration is also the chief means of producing a flavored alcoholic beverage, such as cordials and liqueurs.

Maceration is often confused with marination, which is the process of soaking foods in an acidic liquid before cooking. Maceration is the process of soaking produce in liquid for extra flavor.

During the summer months, we frequently enjoy a salad of macerated tomatoes with garlic and fresh herbs served with crusty bread; this salad is commonly referred to as bruschetta. This is a marvelous accompaniment to almost any dish especially fish, and regularly serves as the entire meal on particularly hot, muggy evenings.

  • 6 or 7 ripe plum tomatoes (about 1 1/2 lbs), diced
  • 2 cloves garlic, minced
  • 1 tablespoon extra-virgin olive oil
  • 1 teaspoon Kosher salt
  • 1-2 tablespoons fresh herbs (basil, oregano, tarragon, marjoram and/or thyme), chopped
  • Freshly ground black pepper to taste
  • French bread or similar Italian bread

Cut tomatoes in halves or quarters depending on their size, removing the stem area as you go.  If plum tomatoes are not available you can use any fresh ripe tomatoes and chop into ½” cubes. Place tomatoes in a serving bowl and add garlic, salt and herbs, stirring to mix well. Let the salad sit for at least 30 minutes before serving so tomatoes fully release their juices. Serve with bread and a good red wine and experience the true taste of summer.


Yum

Wednesday, July 11, 2012

Advantages of Dining In & Quesadillas

Our friends often ask us if we cook meals from scratch every night. When we answer in the affirmative, several other questions usually follow such as “how do you find the time?” or “isn’t cooking equipment expensive?” Cooking and dining at home has many advantages, here are the biggies:

Time:
Even if you have not planned ahead and must make a quick stop at the grocery store (which you probably need to do anyway to pick up cereal and milk,) eating in takes no more time than eating out. When you consider the amount of time it takes to drive to the restaurant, find a parking place, wait for your table to be ready, wait for your food to be prepared, wait for the bill and drive back home, it may even be far quicker to stay home (and safer since there would be no risk of driving under the influence on the way home.) By thawing frozen foods in advance, chopping or slicing ingredients ahead or even cooking your entire meal in a slow cooker, you can save even more time.

Quality:
The main reason we choose to cook our own dinners is that we have complete control over the ingredients that we cook with. Restaurants can claim to use fresh organic produce and wild-caught fish, free-range chicken or grass-fed beef, but you seldom see the items before they arrive on your plate. There is no way to know if the shrimp gumbo you order today is yesterday’s leftover shrimp cocktail. People with food sensitivities and allergies must be vigilant when reading menus to ensure that all ingredients are safe for them to eat. My allergy to pine nuts is a prime example. A menu may not tell you that the hummus or pesto is made with pine nuts, and if you forget to ask, the evening could end in a trip to the ER. Also, in order to comply with certain health codes, restaurants are required to cook meats and seafood to higher temperatures that may result in them be better done then you prefer. Lastly, restaurants are notorious for their liberal use of salt and butter. When you cook your own meals you control the amount of spice, salt and fats.

Cost:
There is no question that is less expensive to cook your own meals than to eat out. The menu price of an entrée far exceeds the cost of the ingredients used to make it, and it is widely known that restaurants charge double, triple or even quadruple the retail price of a bottle of wine. Instead you are paying for the building rental, utilities, chef’s experience, wait and kitchen staff wages, even the napkins and dishes. In addition, you have the privilege of paying sales tax and the expected 15% gratuity, not to mention the gas to get there and parking or valet fees.

While an initial investment in quality equipment is a good idea, there is nothing that says you must have a Wustof knife or All-Clad cookware to prepare a great meal. Experiment with different shapes and sizes and upgrade over time (with the money you saved by eating at home). Another added benefit of cooking at home is that you can frequently get more than one meal out of a dish: one large batch of tomato sauce can be served with meatballs over pasta one night and used to top homemade pizza another night; pot roast leftovers make hearty “debris” po’boys; and, extra rice becomes rice pudding for dessert.

One of the best examples of an overpriced menu item is the quesadilla. Have you ever wondered why every bar features one on their menus? Because they are incredibly profitable! A simple chicken and cheese quesadilla at Chili’s Restaurant costs upwards of $9.59, when a few low-cost ingredients and a hot pan are all you need to make this fast tasty dish for less than $1.50 per serving:

  • 4 medium-size flour tortillas
  • 2 cups Monterrey Jack, sharp cheddar or cheddar jack cheese, grated
  • 1 cup  meat of choice, cooked and chopped (use leftovers for additional savings)
  • Sour cream and/or Salsa for garnish
  • Cooking Spray


Spray a large skillet with cooking spray and warm on medium heat. Lay one tortilla flat and place ¼ cup of chicken on one half of the tortilla, sprinkle ½ cup cheese over the chicken and fold to close the quesadilla. When pan side is lightly brown and the cheese is melted, flip the quesadilla over and continue heating until browned lightly and crisp on the second side. Remove from pan and serve immediately with sour cream and/or salsa.


Atmosphere:
Even the most elite and exclusive restaurants can be quite loud. And, while a dimly lit dining room can be romantic, the lights are regularly lowered to control noise. And, at times it seems that wait staffers are trained to arrive at your table at the most intimate of moments. In your own home, you set the mood. You can select the background music, the lighting, the table setting, the food and wine. You can speak freely without being overheard or interrupted, manage cantankerous kids, and linger over a glass of wine without pressure to vacate your table. You also gain useful life skills by learning and improving your cooking prowess. Even cleaning up can be rewarding by providing an opportunity for camaraderie and teamwork.


Yum

Tuesday, July 3, 2012

Technique of the Week: Rubbing

The technique of rubbing meat almost always involves the dry heat method of cooking where almost no water based liquid is used in cooking. The most popular cooking method for food prepared using a spice rub is grilling although baking and pan roasting are other dry-heat methods.

A spice rub is any mixture of ground spices that is made for the purpose of coating raw food before cooking. The food can be marinated in the spice rub for some time for the flavors to incorporate into the food or it can be cooked immediately after it is coated. The spices are usually coarsely ground. In addition to spices, salt and sugar may be added to the rub, the salt for flavor and the sugar for caramelization. The simplest rub is just coarsely ground black pepper rubbed on beef most widely known as “steak au poivre.”

In some cultures, spice rubs are highly personal and sometimes a very secret recipe. Grill masters in the southern United States jealously guard their recipe secrets and they will usually have a secret ingredient that they will not reveal to anyone. In some cultures, the recipe for making a spice rub and how to cook with it are passed from mother to daughter and every family will have a slightly different recipe.

There are many varieties of commercial rubs available at grocery and gourmet stores with some brands enjoying a loyal following. However, we have found that many of these versions start with a base of salt which is inexpensive and adds bulk, but not flavor.  

It is easy to build your own special blend comprised of your favorite herbs and spices. In order to make a successful rub, you need to balance flavors. Brown sugar works well with pork as does sage, mustard, and pepper. A milder blend with coriander or thyme is better suited to chicken. Beef and lamb can take stronger-flavored spices such as cumin, chili pepper or even allspice. Paprika is a wonderful spice to start with as it matches well with all types of meat. The following rub mixture is a good all-around mix for any type of meat or even vegetables.

Universal Spice Rub
  • 1 tablespoon salt
  • 1 tablespoon brown sugar
  • 1 tablespoon fennel seed, cracked
  • 2 teaspoons paprika
  • 1 teaspoon dried oregano
  • ½ teaspoon black pepper
  • ½ teaspoon cumin
  • ½ teaspoon red pepper flakes or cayenne

Using a coffee or spice mill or a mortar and pestle, crush fennel seeds to release their flavor. Combine all ingredients in a jar and mix together (shaking works well.)

Pat meat dry before sprinkling liberally with rub mixture. This recipe should fully coat 1 ½ - 2 pounds of meat. For the best results with a spice rub, sprinkle the mixture over the food and then gently massage in the seasonings to make sure they adhere.

Although rubs can be applied right before cooking, we have discovered that a little more time allows the flavor of the spices to penetrate more deeply into the food. Cover and refrigerate rubbed meat for at least 2 hours (or overnight for larger cuts of meat to impart a spicier, more intense flavor). Discard any rub that has come in contact with raw food. You can store unused rub in the mixing jar at room temperature for several weeks (if it lasts that long.)


Yum

Sunday, July 1, 2012

Tabooless Oysters with Mignonette Sauce

The word oyster is used as a common name for a number of distinct groups of bivalve mollusks which live in marine or brackish habitats. Briny, buttery, sweet, metallic, with notes of cucumber or seaweed; an oyster is nothing if not a pure recollection of the water from which it comes. Freshly shucked and eaten straight from its shell, no other food is so true to its origin which is probably why oysters are one of Dom’s and my favorite indulgences. Served on the half shell over ice with a drop of Tabasco or a dribble Mignonette sauce, fewer dishes are simpler or more satiating.

For centuries, oysters have been considered an aphrodisiac. Researchers have found that there may be some truth to this notion. Oysters are rich in all 9 amino acids that trigger increased levels of sex hormones and that their high zinc content aids in the production of testosterone. Oysters are also an excellent source of protein, zinc, iron, calcium, selenium as well as Vitamin A, Vitamin B12 and omega-3 fatty acids. Oysters are low in calories and are considered to be most nutritious when eaten raw.

It was once assumed that oysters were only safe to eat in months whose names contained the letter ‘r’ because oysters were much more likely to spoil in May, June, July, and August. The ‘R’ rule goes all the way back to the 1700s (or earlier) when reliable refrigeration was not available. This is no longer an issue considering advances in coolants and shipping. 

However, shellfish consumption in summer months can still be problematic. Because oysters are filter feeders they are affected by blooms of algae (known as red tides) that collect along coastlines, usually in warm weather. This alga spreads toxins that are soaked up by oysters, clams and mussels.

Oysters continue to top the list of foods high in risk for Listeria contamination for pregnant women, children and the elderly, yet there is a far greater risk of exposure of this bacterial infection from eating raw fruits and vegetables, soft serve ice cream and sliced deli meats.

Lastly, most shellfish spawn in the summer. As any oyster aficionado knows, a fertile oyster turns unpleasantly thin, milky and soft which is far from ideal for eating. While oysters can be genetically modified so they do not spawn, many vendors simply avoid this problem by importing their shellfish from cooler climates.

However, most oysters sold in restaurants and markets are commercially harvested and are subject to regulations intended to prevent such threats. Oysters which are commercially harvested are no more likely to be toxic in summer months than any other month.

  • ¼ cup red wine vinegar
  • 1 tablespoon shallots or sweet onions, finely chopped
  • 1 teaspoon white or black pepper (or more to taste)
  • Salt to taste

Mix all ingredients together in a small serving bowl. That’s it. The sauce does improve if you let the shallots macerate in the vinegar for a bit before using. Hard to believe there is such a fancy name for something so easy to make, eh? The French term "mignonette" originally referred to a bouquet garni of peppercorns, cloves, and spices used to flavor dishes, but now it simply means cracked pepper. Though different mignonette sauces use different types of vinegar, all contain pepper.


Yum

Wednesday, June 27, 2012

Hydrating Agua Fresca

We have all heard the old admonition to drink at least eight glasses of water every day, but few people actually do so. In the summer months, the hot weather serves as a reminder to re-hydrate  but in cooler weather or air-conditioned climates, we don’t feel as thirsty. Because of this, many people can become mildly dehydrated without not even realizing it.

While mild dehydration is not a serious health issue, it can make your daily life a little bit harder. One of the first signs of dehydration is thirst. Unfortunately, your body`s signals for thirst are so similar to its signals for hunger that some people can`t tell the difference. If you are trying to drop a few pounds and they just won`t budge, try drinking at least eight tall glasses of water every day. This will not only quiet false hunger pangs, but staying hydrated also helps to keep your metabolism working properly so that you burn calories more efficiently.

Another sign of mild dehydration is dull skin and hair. All of the exfoliating and moisturizing in the world will not help your skin tone if the cells are not renewing themselves the way they should. Water helps your blood flow more freely, which supports the elasticity and firmness of your skin, giving you a youthful, healthy glow that cannot be duplicated by anything you put on the outside of your skin.

Water also carries nutrients and oxygen through your blood to your organs and to your brain. So, staying well hydrated can improve your mood and help enhance your concentration. Water helps to lubricate your joints, making exercise more efficient and your recovery time a little quicker. Water carries away toxins and waste, which is important for keeping you healthy. The water in your body also helps to regulate your temperature, through your perspiration, which means that it needs to be replaced.

But, not everyone enjoys the taste or lack of taste that plain water has. In many parts of Central and South America the drink of choice is agua fresca. The literal translation is "fresh water", but a true agua fresca is a mixture of water, sugar, fruit, seeds and sometimes rice, oatmeal or other cereals. The simplest way to make agua fresca at home is to choose a fruit such as cantaloupe, pineapple, berries or citrus fruit. Wash the fruit and peel it if necessary. Cut it into chunks, toss them into the blender and whirl until smooth. Strain out the pulp so that you have a clear liquid. Mix your liquid with about twice as much water and 2 to 4 tablespoons of sugar. Serve in a tall glass over ice. Add crushed mint or a cinnamon stick for a little extra spice. A less common, but no less delicious, agua fresca made of cucumbers, lime and mint is a favorite among spa goers in California.

If you are not fond of the tap water in your area and do not want to contribute to the masses of plastic water bottles piling up in landfills, consider purchasing water in refillable containers from an Earth Fare Market close to you.


Yum

Friday, June 22, 2012

Midsummer Nights' Zucchini Fries

The subtle flavor and creamy white flesh of summer squash is a perfect addition to any warm weather meal especially on the longest day of the year. Summer squashes which include zucchini come in many different varieties each with a distinct shape, color, size and flavor. Regardless of variety, all parts of summer squash are edible, including the flesh, seeds, skin and even their flowers.

Recent research studies have underscored just how fantastically healthy summer squash is. While it may not be as rich in the more widely-publicized antioxidants like beta-carotene, summer squashes are a very strong source of other key antioxidant nutrients including the carotenoids lutein and zeaxanthin. Since the outer skin of the squash is particularly antioxidant-rich, it's worth leaving the skin intact.

Summer squashes are considered to be starchy vegetables, but while about 45-50% of the total calories in squashes come from starch-like polysaccharides, the unique polysaccharide composition in summer squash has been linked in studies to protection against diabetes and better regulation of insulin.

Another benefit of summer squash is how easy they are to grow and how singularly productive their plants can be. And, what better way to celebrate the Summer Solstice (from the Latin for sun [sol] and standing still [sistere]) than with the delicious “fruits” (yes, technically they are vegetables) of Summer.


Zucchini Frite
  • 1 medium zucchini, trimmed
  • 1/2 teaspoon salt
  • 1/4 cup olive oil
  • 1 tablespoon all-purpose flour
  • 2 tablespoons cornstarch

Wash the squash before cutting. Trim the ends and halve the zucchini lengthwise, then cut into 1/8-inch-wide slices and cut slices lengthwise into 1/8-inch-thick strips. Degorge the squash by tossing with salt in a large medium-mesh sieve set over a bowl and allow to drain for 30 minutes. Rinse well and dry the squash strips thoroughly.

Heat olive oil in a heavy skillet. Mix flour and cornstarch together in a mixing bowl and toss zucchini to coat. Add coated squash to the heated oil and fry, turning occasionally with a slotted spoon, until zucchini is golden brown, 5 to 6 minutes. Transfer the zucchini fries to paper towels to drain. Sprinkle with salt and serve immediately.


Yum

Tuesday, June 19, 2012

Technique of the Week: Grilling

A well-made fire is the essential first step in the technique of grilling. The right fire makes barbecuing smooth and simple. The temperature of the fire needed depends on the type of meat you are going to cook. For cuts of meat such as steaks, burgers, and kabobs which you intend to cook rapidly, use a relatively hot fire. A moderate fire is fine for roasts and larger pieces of meat. For slower cooking cuts of meat such as pork chops and spareribs, use a slow fire.

Charcoal comes in two forms: lump charcoal and briquets. Lump charcoal is in odd-sized pieces just as they come from the charcoal kiln. It is less uniform in burning quality and more difficult to handle. Briquets are ground, lump charcoal pressed into uniform blocks. They are easier to use, burn evenly, and produce a more uniform heat. They are easier to control and burn longer than lump charcoal.

Pile the charcoal in a pyramid on the firebox of the grill. You don't need much charcoal. Beginner chefs are often too ambitious, build too big a fire. After you've built several barbecue fires, you'll be able to gauge the amount easily. Add liquid lighter to charcoal; wait a minute, then light. Do not use gasoline or kerosene. Let charcoal burn for 15 to 20 minutes until the briquets are about two-thirds covered with gray-ash. Spread the briquets evenly throughout the grill. The bed of coals should be shallow (easy to control) and just a little larger than the area of food you are cooking.

The fastest way to get a bed of cooking coals (about 15 minutes) is with an electric fire starter. Most other methods of fire starting take approximately 45 minutes. A chimney is another secret for fast take off. Make your own from a tall juice can or a 2-pound coffee can. Remove ends from can. Using tin snips, cut out triangles or circles around bottom, 1 inch apart, to allow draft. Or punch triangular holes with a church-key bottle opener and bend down for legs. (While the bottle opener is out, be sure to use it to open an icy cold beverage for Dad while he labors over the hot flames.)

Place a wad of newspaper in the base of the chimney, add 6 to 8 charcoal briquets, and then light the paper from the bottom of the chimney. When the briquets are burning, add more to the top. Allow to burn about 15 minutes, and then lift off chimney (with tongs!) and rake coals where you want them.

Don't start to cook until the fire dies down to glowing coals. Coals are ready for cooking when they look ash-gray by day, and have a red glow after dark. No flames! Don't start cooking too soon. When coals are hot, tap off the gray ash with fire tongs; ashes on the briquets insulate and retard the heat.

An easy way to tell the heat of the fire is to hold your hand over the coals at the height the food will be for cooking. Begin counting "one thousand one, one thousand two", and so on. The number of seconds you can comfortably hold your hand over the fire will tell you how hot the fire is. If you can count to "one thousand two," you have a relatively hot fire; "one thousand three" or "one thousand four" is about a moderate fire, and "one thousand five" or "one thousand six" is a slow fire.

If you are cooking a large piece of meat that requires a long cooking time, plan to replenish the coals from time to time. Add a little extra charcoal around the edges after your fire is ready for cooking. Don't top your cooking fire with cold coals; this will lower the temperature more than you think. To increase heat, add warm coals from the reserve around the fire's edge.

To slow down the fire, move hot coals out to make a larger oval; to increase heat, move hot coals in to make narrower oval. This technique helps maintain the even cooking. Fire is ready only when flames die down. In broad daylight, the coals will look ash-gray and after dark, they'll have a red glow (they burn from outside in).

If drippings do flare up during cooking, sprinkle the fire lightly with water to quench the blaze. Keep handy a clothes sprinkler filled with water close by. Use only enough water to do the trick; don't soak the coals. It will take some time for very wet coals to dry out and begin to burn again. It will also reduce the intensity of the heat of the fire.

Orders for "rare" go on the grill last. When you see little bubbles on top surface of the steaks, they are ready to turn (heat forces the juices to the uncooked surface). Flip steaks with tongs and a spatula; piercing with a fork wastes good meat juices. Cook the second side a few minutes less than the first since the second side has a head start on heating. Turn only once. For 1-inch steaks cooked medium-rare, allow 13 to 15 minutes total grilling time. It is always a good idea to use a meat thermometer when grilling. Insert thermometer so tip is in center of meat. Tip must not touch bone, fat, or the metal spit.


For charred crusty coat, try this: Sear one side by lowering grill top close to coals for 2 to 3 minutes, then raise grill to finish same side. Turn steak, and sear second side; again raise the grill and complete the cooking.

Wait until you turn the meat to salt it. Salt and pepper the browned side and then season the other side as you take it off the grill. If you salt uncooked meat, the juices will be drawn out and you'll lose good flavor. It is also important to let any grilled meat rest for at least 5 minutes before serving to allow the juices to retreat, otherwise all the flavor drains out of the meat when it is cut.


Yum

Friday, June 15, 2012

Minted Eggplant Insalata

Eggplant appears in some form or fashion on almost every antipasti table throughout Italy. Eggplants are members of the nightshade family of plants and are closely related to tomatoes and potatoes. The fruit is botanically classified as a berry and contains numerous small, soft seeds which are edible, but have a bitter taste because they contain nicotinoid alkaloids which is not surprising given its close relation to tobacco.

Native to India, the eggplant made its first appearance in Italy via Sicily and the southern regions. Easy to grow and abundant, eggplant is very versatile when used in cooking. The raw fruit which can be a tad bitter, but becomes tender when cooked and develops a rich, complex flavor. The fruit is capable of absorbing large amounts of fats and sauces, making it a good ingredient for very rich dishes. The combination of flavors in this particular variation is incredible and makes a fabulous addition to an antipasti table or can be served as a delicate Summer salad.

  • 1 medium eggplant, ¼-thick slices, degorged
  • ¾ cup olive oil
  • 1 fresh chili pepper, seeded and chopped (optional)
  • 3 garlic cloves, minced
  • 1 tablespoon capers, drained, rinsed and chopped
  • 10 fresh mint leaves, torn
  • Salt and pepper to taste

Heat a heavy skillet over high heat. Ensure that the eggplant has been patted dry and brush lightly with olive oil. Add the eggplant slices to the skillet in batches and cook over high heat until golden brown on both sides. Remove to a paper towel and let drain until cool.

Combine the chili peppers, garlic, capers and mint in a bowl and season with salt and pepper. Layer eggplant slices on a serving platter and drizzle with a tablespoon of mint dressing and continue making layers until all the ingredients are used.

Sprinkle the remaining olive oil over the top and let the eggplant marinate in a cool place for at least six hours.

Yum

Tuesday, June 12, 2012

Technique of the Week: Degorging

Degorging is a the process of drawing moisture from vegetables before cooking. It is a method used to soften vegetables and to reduce the amount of fat absorbed during cooking. This technique is most often used in preparing eggplant for cooking to remove the bitterness (and a buildup of toxins which can cause stomach upset.) However, the term can also refer to the practice of adding cornmeal to the soaking water of crustaceans to force them to eliminate the sand in their shells.


To degorge vegetables, cut the vegetable into skinned slices or cubes, then sprinkle salt directly onto the vegetable or soak in heavily salted water, and allow them to “sweat” for at least 30 minutes. The eggplant will give off a brownish liquid. Before cooking rinse the vegetables thoroughly. Due to its spongy texture eggplant can actually be gently squeezed to rinse and remove excess water. Drying the eggplant is also a good idea; we lay the slices on a towel and roll them up to extract rinse water.


Yum

Thursday, June 7, 2012

Antipasti 101: Simple Summer Dinners

Antipasti (plural for antipasto) literally means "before the meal" which is contrary to the common belief that it means “not pasta.” The term and tradition dates back to medieval times in Italy, when diners used to mingle over finger foods, both sweet and savory, before sitting down to eat. Much like French hors d'oeuvres or Spanish tapas, antipasti are a beloved combination of small bites of tasty food, usually accompanied by wine and meant to stimulate the appetite before digging into the main meal.

Early recipes included everything from clotted cream to spiced ham. Modern day antipasto offerings are more often simple, colorful plates of marinated vegetables, salty olives, rich cheeses, thinly sliced cured meats served with slices of rustic artisanal breads.

During the hot days of June and July, there are many evenings when a full meal seems too heavy and indigestible to consume. On those nights, a small selection of antipasti makes the perfect dinner fare. With antipasto, it’s always best to keep things simple. Narrow your choices down to one or two cooked items, then incorporate a few fresh, seasonal fruits and vegetables and you’re set.

Try these simple ideas on for size:


Yum

Monday, June 4, 2012

Low Country Shrimp Salad

Without a doubt shrimp are probably the most popular and valuable of all seafood. Most people think of shrimp as the pinkish-hued crescents served as a cocktail with horseradish-infused ketchup. However, there is tremendous variation among species. According to local sources the finest shrimp are whitish and come up from South America, North Carolina, the Gulf of Mexico and Texas.

It's easy to be passionate about these “Low-Country” shrimp. They are considered to be more consistent in quality and flavor. When cooked properly, they are sweet, tender and have the fresh aroma of the sea, with no "fishy" taste or smell. Those who have never eaten wild-caught fresh shrimp before are stunned when they eat them.

Shrimp are born in the ocean and are invisible to the naked eye. They ride on top of the waves, inexorably pulled inland to our local marshes, inlets and tidal creeks where they sink to the bottom to feed and grow until they ride out to the ocean again to breed. As they grow, they develop the flavor of the food they eat, the depth of where they live, and the water itself.

When buying “fresh” shrimp always shop at a reliable market and be sure they are firm in texture and smell fresh (don’t be afraid to put your nose to it.) Shrimp are frequently frozen at the source and carefully defrosted for retail. The amount and size you buy depends on how they are to be used. Shrimp are classified by size; the categories are 12 to 15 per pound for jumbos, 16 to 20 per pound for extra-large, 20 to 24 per pound for large, 25 to 32 for small and so on. About 2 pounds of uncooked shrimp will yield slightly more than a pound cooked after shelling and deveining.

This succulent salad which highlights the flavor of local shrimp, is creamy in texture with crunchy bits of celery and corn, and a nice kick is the ideal way to repurpose leftovers from a Lowcountry boil (even the potatoes and sausage could be added.) Served on a croissant or rolled in lettuce leaves, it makes a mouth-watering quick lunch or light supper.

  • 2 cups medium shrimp, cooked, peeled and deveined
  • ½ cup mayonnaise
  • ½ cup celery, chopped
  • ½ cup corn, cut from cob
  • 1 small onion, chopped
  • 1 teaspoon Old Bay® Seasoning
  • 1 tablespoon lemon juice
  • Hot sauce to taste (optional)

If you are not using leftovers, you will need to cook the shrimp: In a medium saucepan, bring 1 cup water to boil. Add unpeeled shrimp. Cover. Cook about 5 minutes or until shrimp are pink. Drain and allow to cool shrimp, then remove shells, devein and coarsely chop.

Combine all the ingredients, except the shrimp, in a mixing bowl. Add shrimp and toss to coat, then cover bowl. Refrigerate salad for 30 minutes or until ready to serve. Serve on a croissant with lettuce and sliced tomato for lunch time flawlessness!


Yum

Wednesday, May 30, 2012

Best of Baltimore in a Box

This is my second month of participation in Foodie Penpals, a foodie exchange in the spirit of “Secret Santa” hosted by blogger friend Lindsay at The Lean Green Bean.

The Lean Green BeanEarlier in this month, I learned that I would be mailing goodies to Tenecia (of Boobs, Barbells, and Broccoli fame) while somewhere in the foodie universe someone had gotten my name. I couldn’t wait to go shopping! Then a day after I sent my box, one arrived in the mail addressed to me.

I was thrilled to open my box to find all kinds of treats from Baltimore, but even better, the next day I received an email from my penpal Leah at Cupcakes & Race Dates with a blog post explaining all the items she had sent! So, not only did I get a great box of treats but a guest post as well!

Best of Baltimore
authored by Leah Prehn

After reading [Denise’s] original email about the kinds of foods she was interested in, I was inspired to create a “Best of Baltimore” box. I collected all of the foods that my hometown is known for. (Except for the most popular; blue crabs. Unfortunately they aren’t quite in season yet.)

For Mother’s Day, I took my Mom to the third annual Baltimore Foodie Experience where we spent hours sampling foods from local restaurants and food trucks. After we ate ourselves silly, we were treated to a talk and cooking demo from Andrew Zimmern from the Travel Channel’s “Bizarre Foods.” While he was cooking octopus, someone from the audience shouted out (must have been all the free beer & wine!) “Where’s the Old Bay?!” Andrew stopped what he was doing and said something to the effect of  “There aren’t many places that when you hear the name you get a taste in your mouth but if someone says Baltimore you immediately taste Old Bay!” I have lived in the area my whole life and he is right; Old Bay Seasoning is like a religion around here and people put it on everything from popcorn to salads, eggs, fried chicken, French fries, potato chips and my favorite, sweet Maryland corn on the cob. It’s also mandatory in Bloody Marys anywhere in the Chesapeake area.

One example of the Old Bay flavors in use is the crab chips that I included in my penpal package. UTZ chips have been made in nearby Hanover, Pennsylvania since 1921 and sold in Baltimore since the beginning. UTZ chips are so pervasive in Baltimore that a local jeweler used the UTZ girl image in a really cute advertising campaign. She is being proposed to by the Natty Boh’ man, the other favorite local logo. The tagline reads, “Where Baltimore gets engaged.”

This brings me to the beer that I also included in the package. While it is no fancy delicious local micro-brew, in my admittedly biased opinion, it is one of the better cheap beers available in our area. I sent three cans, one for the recipe and one each [Denise and Dom] to drink while enjoying the shrimp; nothing washes down salty Old Bay seasoned dishes better! National Bohemian is the full name but around here it’s known as “Natty Boh” or simply “Boh”. It was first brewed in Baltimore in 1885 and stayed in the area until the 70’s. Although the company has been sold a few times to much larger companies who now make it elsewhere, it is no less celebrated here. The former brewery building displays a glowing neon Boh’ man in the neighborhood now known as Brewers Hill. There are even tourist stores that sell all kinds of merchandise emblazoned with that loveable grinning face.

Because no meal is complete without dessert, I sent Baltimore’s favorite sweet treat, Berger cookies. The recipe was brought from Germany to Baltimore by George and Henry Berger in 1835. The vanilla wafer cookie which is topped with a thick layer of chocolate fudge are still handmade in Baltimore. Aside from the their website, the company only sells the cookies in the Baltimore and Washington D.C. area.

Finally, less culturally important but a favorite of my little furry friend, I included locally baked biscuits from the Baltimore Dog Bakery. They are high quality and all natural with no additives or preservatives. The bakery sells their wide range of dog treats at the wonderful Baltimore farmers market and at many pet stores in the area. 

Sharing all of these goodies with [Denise and Dom] is getting me really excited for the summer where I and the rest of the region will spend countless hours with friends and family picking crabs coated in Old Bay, washing it down it some Boh’s and if we aren’t too stuffed, sharing some Berger cookies.

For those of you who can’t get your hands on REAL blue crabs, (fresh from the Chesapeake Bay which no true Marylander would settle for anything else!) this is a great steamed shrimp recipe that highlights our best local flavors.

Ingredients:
•    1/2 cup vinegar (I use apple cider vinegar)
•    4 teaspoons Old Bay Seasoning
•    6 oz. Natty Boh’
•    1 pound shrimp

Directions:
1.    Combine first 3 ingredients in pot. Bring to a boil.
2.    Add shrimp, stir gently and cover. Simmer until tender, about 5 minutes.
3.    Drain, remove shells and devein.
4.    Enjoy!


Yum
Powered by Blogger.

footer social

ShareThis