Friday, July 29, 2011

Fridays con Vongale

Growing up, our family occasionally had linguini with clam sauce. My mom’s version was always the Ligurian-style white sauce made with a bechamel and canned chopped clams. It was always one of my favorites and one of the few dishes I could actually make when Dom and I were first married that he didn’t feel the need to “improve” before eating it.

Years later, we had the real deal at a tiny little bodega on a tiny little calli near the Rialto Market in Venice. Made with perfect little clams fished straight from the Venetian Canal, simmered in local white wine, and served over freshly made pasta  - Unbelievable!

That one dining experience elevated our love of clam sauce to new heights. Now we buy bales of fresh Manila clams at the DeKalb Farmer’s Market and clean them with flour.  Lately this has been Dom’s meal of choice on Friday evenings (even when eating out at our favorite Italian restaurant, Valenza.) Served with a crisp Gavi or Trebbiano, it is a fabulous way to start the weekend.

  • 6 tablespoons extra-virgin olive oil
  • 1 clove garlic, peeled and chopped
  • ½ bunch fresh Italian parsley, chopped
  • 3 ½ Ibs. Manila clams, scrubbed
  • 2/3 cup dry white wine (like a Friuli)
  • 2 tablespoon good-quality brandy
  • Salt
  • 1 lb. fresh linguine
  • 1 tablespoon grated Parmigiano-Reggiano

Heat 5 tablespoons of the olive oil, along with the minced garlic and half the parsley in a large pan over medium-high heat for about 1 minute. Add the rinsed clams, cover the pan and cook for 1 minute more. Add the wine and brandy and simmer, uncovered, until the alcohol has evaporated which should take about 2 or 3 minutes.

Return the cover to the pan and continue cooking, shaking pan several times to turn clams and stir sauce for about 3 minutes more. The majority of the clam shells should open in this amount of time.  Uncover to pan and allow liquid to reduce slightly.

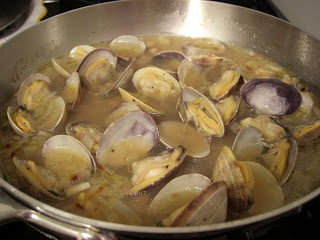
Meanwhile, cook the pasta in a large pot of boiling salted water until just tender, 5-8 minutes (fresh pasta cooks much faster than dried). Drain pasta in a colander and add the pasta to pan with clams and pan juices. Reduce the heat to medium-low, and cook for 1 more minute more, shaking pan until well combined.

Before plating, discard any clams that have unopened shells. Add Parmigiano-Reggiano and remaining 1 tablespoon olive oil and season to taste with salt and pepper. Serve garnished with remaining chopped parsley. You may want to add an empty bowl to the table for the spent clam shells.


Yum

Saturday, July 23, 2011

Writing Home About Iowa Chops

Each July, we sojourn to the Midwest to visit family in Iowa City. This cozy little college town (home to the University of Iowa – Go Hawkeyes!) becomes a mecca for writer’s all over the country who jockey for spaces in the University’s annual Summer Writing Festival. The city, which is home to eleven literary presses, hosts over 180 writing-related events each year, and has attracted countless poets and authors to live and work in the city, has recently been named a City of Literature by the United Nations Educational, Scientific and Cultural Organization (UNESCO). With a population of less than seventy thousand people, Iowa City is the third city to receive the distinction, following Edinburgh, Scotland, and Melbourne, Australia.

Visitors to Iowa City have something write home about when it comes dining given the city's wide range of eating options. This year’s festival attendees were all treated to delicious Mediterranean food catered by Oasis, best known for their falafel and kaftas.  The fresh, never-frozen, locally-farmed, black Angus beef burgers at Short's Burger and Shine are a not-to-be-missed treat for hungry visitors as well. Locavores looking for a more authentic experience may choose a 14 oz. smoked Iowa Pork Chop from Okoboji Grill described the Wall Street Journal’s Raymond Sokolov as a “galumphing chop juicy and pink from the smoking.”

The so-called "Iowa Chop" is a thick center cut; the term was coined in 1976 by the Iowa Pork Producers Association. Iowa chops are the king of all pork chops. They are the traditional, thick-cut pork chops that originated in Iowa, but prepared all over the Midwest. What separates Iowa chops from other pork chops is the cut and the size. Iowa chops, by definition, are bone-in, center-cut loin chops, and they must be between 1 1/4 and 1 1/2 inches thick.

Having the advantage of a kitchen, we chose to grill our own. The wonderful butcher at HyVee East, hand cut eight gorgeous chops for us to work with.

Grilled Iowa Chops
  • Iowa Chops (large bone-in pork chops – 1 to 1 ½ “ thick)
  • ½ cup salt
  • ¼ sugar
  • Water to cover

In a large bowl, place 1 quart water, salt and sugar. Stir to mix and dissolve. Add pork chops to bowl. Add more water to cover and gently stir to distribute salt and sugar. If it is a REALLY big bowl, add more salt and sugar in a 2:1 ratio. Let pork chops brine for 15-30 minutes. Drain chops and pat dry with paper towels.

Place chops on a hot grill, bones toward the center. Cook each side 7-9 minutes. Cooking time depends on thickness of chops and heat of coals. Leave chops on grill until nicely browned (sugar in brine should help a nice crust to form on pork.)

After 15 minutes of total cooking time, check for doneness. The surface of the meat should provide some resistance and the meat juices should run light pink to clear when a small cut is made into a chop.

When pork is nicely crusted and brown and juices are appropriately light, remove to a platter and let rest for about 5 minutes before serving to allow juices to absorb (redistribute from the center of the meat.) Serve with fresh picked and shucked corn on the cob. Enjoy!


Yum

Saturday, July 16, 2011

Patty Melt Craving Replete

Let’s face it, we’ve all been there. You're having a family cookout, the burgers and wieners are ready for the grill and then you are reminded that your Aunt and cousin are vegetarians. Yikes! What to do?

Harmony Valley Foods has a quick and easy solution. Their Vegetarian Hamburger Mix is a soy-based, low-fat, vegan, kosher-certified meat alternative that is a great source of protein and fiber. The dry mix is hydrated with the cold water and results in vegetarian protein with the same consistency and versatility as ground meat and can be substituted into any recipe that calls for hamburger.

We received a sample of the hamburger mix as a sample from Harmony Valley to try. While the guys were off on a fishing excursion, I found myself with an empty refrigerator and a grumbly tummy. The mix was front and center in the pantry and I was hit by a sudden craving for a patty melt.

½ cup Harmony Valley Vegetarian Hamburger mix
½ cup water
1 tablespoon olive oil
1 small red onion, peeled and sliced into rings
¼ cup Monterey Jack cheese, grated
2 slices of bread, toasted
Salt and freshly ground pepper, to taste

Follow the package directions and blend hamburger mix with water and stir well. Allow the dry mix to rehydrate for 15 minutes in the refrigerator.

While patty mixture is resting, put olive oil in a sauté pan and cook onions until caramelized. Remove onions to a plate.

Once the rehydration is complete, (don’t panic if it looks like cat food at this point) form the mixture into a patty and place it in a pan with some olive oil. Now it looks like a burger! Add a little more olive oil to the sauté pan and place the patty in it. Cook patty until golden brown (about 2 minutes per side.)

Place the patty on one piece of toast and top with grated cheese and caramelized onions. Run sandwich under the hot broiler for a few minutes to completely melt cheese and then top the sandwich with the second piece of toast.

While it was obvious that the patty was not beef, it was quite tasty and closely resembled meat in texture and consistency. Served with cheese and sautéed onions on toast, the veggie mix made a sandwich that fully satisfied my patty melt craving.

The one aspect of Harmony Valley’s products that is most appealing is the versatility of the dry mix. It can be kept on hand for emergencies (power outages or surprise guests), packs easily for a camping trip, and is quick and easy to prepare. I will definitely keep a pack in the pantry in case of another cookout revelation or patty melt urge.


Yum

Monday, July 11, 2011

From Rags to Riches: The History of the Dish Towel

The old cliché “everything old is new again” is completely true when it comes to the common dish towel. While every household has a few of these mundane, utilitarian sloggers, dish towels have again achieved popularity with budding foodies and designers. Bon Appetit magazine recently featured actress Gwyneth Paltrow. She describes her Thornback and Peel dish towel as "a standout in the kitchen."

Archeologists believe that towels were closely held as personal items (along with the ever present knife) as early as the Middle Ages. In the early nineteenth century, the "tea towel" became the linen of choice for the ladies of Victorian England who personally used tea towels when caring for their tea services to avoid breakage by careless servants. The tea towel's highly absorbent, lint-free and soft features appealed to ladies requiring the right towel to thoroughly dry their delicate china and serving pieces without scratching or leaving lint behind.

Flour sack towels are the most desirable dish towels because they are super soft, completely lint-free, absorb like a paper towel and dry faster than most kitchen towels, they add unsurpassed sparkle to dishes, glassware and windows. They make superb dusting cloths and have many culinary uses. They are used for dehydrating, straining cloths for stocks and sauces, poaching, cheese making, pastry, proofing bread, herb drying, grabbing warm dishes and they keep salads fresh for hours.

Clever marketing efforts on the part of producers and grocers of the 1800s began packaging flour, sugar and other food stuffs in cotton sacks instead of bulkier wooden barrels. The tightly woven bags that held flour and sugar were coveted for use as dish towels. Flour bags represented 42% of bag production while sugar sacks accounted for 17% of total bags manufactured. Usually, both flour and sugar bags held quantities of only five or ten pounds. Advertising slogans such as, “The best cooks are generous with sugar,” and “Food that is sweet is hard to beat,” could be found on sugar bags. Some of these were embroidered with Outline Stitch designs (sometimes Redwork) and the initials "NRA" (National Recovery Act)  as well as the words "we do our part."

In the mid-1920's, flour sack manufacturers recognized the increasing popularity of these cotton sacks with the nation’s thrifty homemakers, and began printing sackcloth (also known as “chicken linen,” "hen house linen,” or just “pretties”) with artistic patterns. Professional artists and local designers were commissioned to create the most desirable sack cloths on the market. Sellers found that they could influence the type of sugar, rice, cornmeal, flour or seed simply by the style or pattern of cloth the product was contained in. This recycling trend lasted from the mid-1920s through the Great Depression of the 1930s, and the war years of the 1940s until paper and plastic bags began to replace the cloth ones.

In our kitchen, we have an entire drawer dedicated to these venerated workhorses. We refer to them as “mupines” or “mup rags” (sorry Ross!). The term mupine most likely comes from the Italian vernacular; “moppina” (mop). But, author Joanna Clapps Herman in her essay for "Our Roots Are Deep With Passion," asserts that the term originates from the Italian word “mappina” (map) because maps used to be drawn on cloth.

The use of cloth maps is as ancient as (or even older than) the dish towel. Archaeological evidence from ancient Chinese tombs indicates that maps showing trade routes were being drawn on pieces of silk as long ago as the second century AD. In Europe, novelty silk scarves decorated with maps of spa towns were popular during the 18th and 19th centuries. It was with the outbreak of World War II, however, that the idea of printing maps on fabric really came into its own. From early in the war, British airmen were issued 'survival kits' which typically included a small saw blade, needle and thread, currency, phrase cards, a tiny compass, and, most importantly, a silk map. These durable maps were infinitely easy to conceal whether sewn into the lining of a jacket or the hem of an undergarment or hidden in the hollowed-out heel of a boot, a silk map was unlikely to be found during a prisoner search.

The Food Network's Rachel Ray has recently adopted the term "moppine" to mean a towel sewn with hand pockets to be used as a pot holder, but real cooks have been using dish towels as potholders for centuries; no special pockets needed!

No matter what you call them or where they came from, it is abundantly clear that dish towels are a mainstay of our society and are here to stay. Even in these days of computerization and technological advances, cooks and homeowners alike cannot survive with these handy tools. Besides what would we clean the screens of our iPads with otherwise?


Yum

Wednesday, July 6, 2011

Barbecued Ribs a Go-Go!

Everyone knows that great barbecued ribs take time to get the perfect smoky flavor and fall-of-the-bone doneness. With the warmer weather of Spring, we find that we hanker for some saucy, sloppy ribs, but let’s face it with end-of-school schedules, sports practices, and daily errands finding time to grill your own ribs at home is nearly impossible.

Enter Pig Of The Month, a family-run, mail-order company from Dayton, Ohio that ships their homemade barbecue creations nationwide so you can enjoy their BBQ in the comfort of your own home. Their variety of meats (smoked using a technique that was perfected over decades) and different side choices are made with the best of locally sourced ingredients.

It just so happens that the kind folks at POTM sent us a 28 oz. sample of their Cattle King Pork Ribs to try. Our package arrived via FedEx at about 4:30pm, just as I was reaching the panic stage about what to have for dinner. I opened the Styrofoam-lined box to find a fully cooked, vacuum sealed  a slab of ribs that was cold to the touch (not frozen), reheating instructions, an empty (but still damp) pack of dry ice, 2 cute plastic bibs and plenty of moist towelettes – Voila! Dinner dilemma solved!

Following the reheating instructions, we wrapped the (thawed during shipping) in 2 sheets of aluminum foil, with every last tiny droplets of the tangy sauce we could squeeze out of the package, and placed the ribs in a 350 degree F oven for 30 minutes. Just before serving, we opened the aluminum packet (Oh, the delicious smell!) and returned it to the oven for 5 minutes or so to thicken the sauce a bit. We cut the slab into three sections and served with Dom’s amazing corn maque choux (we’ll post the recipe someday!)

Then came the real test! The teenager assessment… Both of our boys dug into the ribs like no one’s business. The oldest had not realized that these were not Dom’s ribs, so when I asked how he liked the ribs, he said they were “perfect as always” which is a high compliment to say the least as in his opinion Dom’s ribs are the best on the face of the Earth. The only admonition that was uttered was that the “Cattle King” Texas-style basting sauce was not spicy enough, but with several different sauce options, we are sure you can find one that suits your taste!

So, the next time you are craving some smoky, grilled ribs, but don’t have time to cook them at home, get the next best thing! Type www.pigofthemonth.com into your computer’s internet browser and take a gander at the selection of goodies (or grab the phone to call 866-416-9190) and place your order.

Yum

Friday, July 1, 2011

Keep Your Fork

The word fork comes from the Latin word 'furca' for "pitch fork." A two-prong twig was perhaps the first fork. One of the earliest dinner forks is attributed to Constantinople in 400 A.D. In 11th century Venice, forks were censured as being an affront to God's intentions for fingers which resulted in the fork’s disappearance from tables for nearly 300 years.

When Catherine de Medici married Henry I in 1533, her dowry included several dozen dinner forks wrought by the great Italian silversmith, Benvenuto Cellini. The fork began to gain acceptance in Italy by the late sixteenth century when upper-class Italians expressed renewed interest in cleanliness.

With Charles I of England’s 1633 declaration, "It is decent to use a fork," civilized table manners became vogue. Because seventeenth century forks had tines were made of case-hardened steel that were quick to wear down, early fork tines were made extra-long in length with sharp pointed tips. Additionally, the number of tines on forks of this period increased from two to four.

By the nineteenth century, mass production and the invention of the electroplating process made silver forks affordable to individuals wishing to emulate the nobility and eat with forks. Long fork tines were no longer needed and tines were shaped to accommodate particular foods. Forks wrought with long tapered tines, such as a dinner fork, are made to spear thick morsels of food, such as steak, and smaller forks were designed for eating salads and desserts.

In addition to their usefulness, forks are also a symbol of friendship, shared meals and good company. We have always enjoyed this anecdotal story:

A young woman diagnosed with a terminal lymphoma was told she had three short months to live. So as she was getting her “affairs in order," she contacted her sister to discuss her final wishes. She told her which outfit she wanted to be buried in and which songs she thought might be appropriate at her memorial.

When the sisters had gone over all the final arrangements, the sister was preparing to leave when the young woman suddenly blurted out, "Oh and there's one more thing!" she said excitedly. "This is very important," the young woman continued. "I want to be buried with a fork in my right hand."

Her sister stood staring at her sibling, not knowing quite what to say. "That surprises you?” she asked. The young woman explained. "Don’t you remember that Grandma always used to say ‘keep your fork’ whenever she cleared the table. It was my favorite part of the meal because I knew that something better was coming, like her velvety chocolate cake or deep dish apple pie. Something wonderful and with substance!” The young woman continued to explain, “I just want people to see me with a fork in my hand and wonder, ‘Hey, what's with the fork?’ Then, I want you to explain to them that I kept my fork because the best is yet to come." Her sister’s eyes welled up with tears of joy as she hugged her sister not knowing if it would be their last visit or not.

At the memorial service, friends and family were walking by the young woman's casket and saw the fork in her hand. Over and over, her sister overheard the question "What's the deal with the fork?" And over and over again she smiled. During her eulogy, the sister spoke of the conversation she had with her sibling shortly before she died. She admitted that she could not stop thinking about the fork and told them that they probably would not be able to stop thinking about it either. She asked that the next time they reached for their forks, that they would remember ever so gently, that the best is yet to come.

And so, cherish the time you have, and the memories you share... Remember that being friends with someone is not an obligation, but a sweet responsibility. Friends are very rare jewels, indeed. They make you smile, and encourage you to succeed. They talk you off the edge of the cliff when you stand too close, they bring chicken soup when you’re sick, and always remind you to keep your fork!


Yum

Sunday, June 26, 2011

Some Like It Hot - Some Not!

In today's Living and Arts section of the Atlanta Journal-Constitution, Food Editor John Kessler poses the question(s): did you grow up in a culture that celebrated spicy food? If so, when did your palate adjust? And, do you have little kids who like hot foods as well as you do or more than you?

Much like Mr. Kessler's youngest daughter (whom he describes as spice intolerant,) growing up, I was the lone holdout in a house of "chile-heads." My father and grandfather would vie to see which could endure the hottest concentration of hot sauce until they both nearly succumbed to a spice-induced coma. This competition was typically followed by an Aquavit drinking contest, but that’s a story for another post!

My husband, Dom, enjoys dishes with the kick. He spent one summer going recipe to recipe through “The Whole Chile Cookbook” experimenting with different types of chilies from both ends of the Scoville scale; Ancho, Serrano, jalapeno, habanero, chipotle, etc. He is also a Cajun food junkie. In the early years of our 21-year marriage, we traveled to New Orleans for our annual visit to the mecca of cayenne and even once trekked to Avery Island to tour McIlhenny’s Tabasco® sauce factory.

Over the years he has learned to moderate the level of heat for my heat-judicious taste, but the dining room table is usually adorned with a dizzying array of hot sauces for himself and our guys. Although both boys admit they were more sensitive to the heat as little kids, both are now fearless when confronted by a plate of chili-laden sustenance. Maybe the spicy gene skips a generation (like the tendency towards having twins), or more likely, they became accustomed to the spices we used in our home cooking as they grew older.

The attraction to spicy foods may lie in the chemical “capsaicin” which is found in the spines of certain peppers and causes your body to release endorphins. Endorphins block pain, but they're also responsible for feelings of pleasure as well. So capsaicin is, in fact, a natural painkiller and anti-inflammatory.

Our friend, Nidhi grew up in Bombay, India where spicy foods and curries reign supreme. Street food vendors in Bombay sell copious amounts of grilled corn on the cob rubbed with lime, chili powder and salt. She describes the flavor saying, “The combination makes a wonderful tingling sensation in your mouth.” At a recent get-together, she patiently taught our oldest the tricks of making this specialty. Over the years she, too, has learned how to tame the spice for more discriminating palates.

While I may not have graduated to the level of a proper chile-head, I have grown to like spicy foods. While I still err on the side of caution when ordering Thai pepper steak, I always order the cheese dip WITH jalapenos at our favorite Mexican restaurant, and need no accommodations when eating Nidhi’s grilled corn!

Nidhi's Chili-Lime Grilled Corn
Fresh ears of corn, on the cob
Kosher salt
Chili pepper of your choice, finely ground (Nidhi uses "lal mirch" available in Indian food markets which is very similar to cayenne pepper)
Limes, cut horizontally

Heat a large pot of water to boiling. While waiting for water to boil, remove husks from the corn. Place the corn in the boiling water for 3-5 minutes. Remove from water, draining slightly, and then place the corn on a hot grill  and cook until lightly browned and nicely charred. Remove the corn from the grill and allow to cool until it can be handled without burning.

On a separate plate, place a mound of salt and a mound of ground chili pepper on opposite sides of the plate. Slowly drag salt and pepper to the center and mix together. It is better to start with more salt and less chili pepper for folks who do not like their corn terribly spicy. Taking a lime half, grind the salt-chili mixture into the lime and then rub (really rub) the spices and lime juice into the corn. The lime will pick up more chili (and thus more heat) each time you return to the plate for more salt-chili and continue to rub down corn cobs.

Enjoy the tingle of the spice and lime juice in contrast to the sweet, caramelized corn. You may want to have a glass of milk close by in the event the chili pepper takes over your taste buds. The lactic acid and fat in milk cuts the heat of capsaicin far better than water or alcohol!

Yum

Thursday, June 23, 2011

Eating Out For Good Karma

Doc Chey’s Noodle House is one of our favorite neighborhood restaurants. Their menu features Asian dishes influenced by China, Japan, Thailand, Korea and Vietnam cuisines, and has something that appeals to every palate. We took the guys there when they were younger because they have kid-friendly menu items (high chairs, boosters, crayons and special kid-friendly chopsticks didn’t hurt either!) We have been regular diners ever since.

Doc Chey’s is the “brainchild” of Rich Chey who set out to “bring noodles to the people” when he opened the first Doc Chey’s in the Virginia Highland area of Atlanta in 1997. Osteria 832 Pizza & Pasta in the Virginia Highland neighborhood is also a member of Chey’s “HomeGrown Restaurant Concepts.” Customers of Chey’s restaurant are familiar with Chey’s concept of karma. In an interview with Creative Loafing’s Cliff Bostock in earlier this year, Chey said, “A big part of what I talk about with my kids and my team is the concept of karma - what goes around comes around. We give back to the communities we serve because it is the right thing to do and we do it with no expectations of receiving something in return. My hope is that nurturing this attitude of ‘being of service’ in my staff and my kids will help them “pay it forward” in every aspect of their lives.”

Chey’s HomeGrown restaurants offer free “Karma cards” which give customers incentives to come back. HomeGrown Restaurant Concepts also gives back to the local community through its charity fund HomeGrown Charities, which has raised over $100,000 for Atlanta non-profit organizations since inception.

In the spirit of good karma, Chey’s HomeGrown Charities has teamed up with the Atlanta Red Cross to sponsor “Dine Out for Red Cross” to help the thousands of families in Georgia and the southeast have been left homeless and suffering in the wake of spring’s natural disasters. Every Wednesday in July, participating Atlanta-area restaurants will donate 15 percent of their dinner sales. “With the recent tragedies across the southeast including our neighbors in Alabama we wanted to do something to help out,” said Chey. “Organizing Dine Out for ARC seems like the best way for our guests to help and give back as well.” Helping is as easy as eating dinner.


You can be assured that we will be there. Regular readers of our blog know that I will be ordering from the “Street Food” section of the menu! The Korean beef tacos are my addiction. Made with flank steak with Korean barbecue sauce, pickled vegetables, napa cabbage, scallions and sesame seeds, they are absolutely irresistible. While I am not sure how they cook the steak to give it such a velvety texture, Rich Chey and his team shared their recipe for their Korean BBQ sauce (just in time for the July 4th weekend of grilling!!)

1 cup sugar
1 cup soy sauce
1/2 cup water
3 tablespoons white vinegar
1 1/2 cups Gochujang (Korean Red Pepper Paste)

Add all of the ingredients into a large mixing bowl and stir together using a whisk. Mix thoroughly to completely dissolve the sugar. Transfer to storage container, label (it's a good idea to date it as well) and refrigerate. To serve, toss the cooked flank steak in the sauce then add to taco shells with the other ingredients.

Don’t forget to mark your calendar for Wednesdays in July to Dine Out for Red Cross and good karma!

*Gochujang is a fermented (and pungent) Korean condiment. Gochujang is available in Asian grocery stores. (Click here for a recipe for a homemade version if you are feeling brave.)
Doc Chey's Noodle House on Urbanspoon


Yum

Sunday, June 19, 2011

What Dad Really Wants: Steak

Thanks to the nagging of the greeting-card, flower and candy industries, Mother's Day has become etched in our collective consciousness as a holiday not to be forgotten; the guilt would be too excruciating. But Father's Day, which falls several weeks later, is often commemorated with only a card and perhaps a ubiquitous (and most likely hideous) tie (that he will never wear) to celebrate the occasion. Given all that our fathers have endured over the child-rearing years; endless gamesof catch, Christmas Eves spent sweating over the assembly a variety of gifts (with instructions in German), forced politeness toward dates with odd hairdos, and teaching us how to parallel park, Dad clearly deserves better.

So on his day, let's give him what he really wants: the chance to relax, have fun and, to top it all off, enjoy a great dinner. According to an informal poll conducted by Chef Nancy Waldeck, Dads want a big juicy steak that they cook themselves (to ensure that it is cooked to his exact taste.) So in honor of all Dads on Father’s Day, we are including grilling tips and advice for Dads everywhere to enjoy their meaty treasures:

Grilled steaks require glowing coals. No flame. Let the fire burn down till a gray-ash film covers the charcoal. If fire's too hot, you dry the meat, lose good juices. A well-made fire is the essential first step in outdoor cooking. The right fire makes barbecuing smooth and simple.

The temperature of the fire needed depends on the type of meat you are going to cook. For cuts of meat such as steaks, burgers, and kabobs which you intend to cook rapidly, use a relatively hot fire. A moderate fire is fine for roasts and larger pieces of meat. For slower cooking cuts of meat such as pork chops and spareribs, use a slow fire.

Charcoal comes in two forms: lump charcoal and briquets. Lump charcoal is in odd-sized pieces just as they come from the charcoal kiln. It is less uniform in burning quality and more difficult to handle. Briquets are ground, lump charcoal pressed into uniform blocks. They are easier to use, burn evenly, and produce a more uniform heat. They are easier to control and burn longer than lump charcoal.

Pile the charcoal in a pyramid on the firebox of the grill. You don't need much charcoal. Beginner chefs are often too ambitious, build too big a fire. After you've built several barbecue fires, you'll be able to gauge the amount easily. Add liquid lighter to charcoal; wait a minute, then light. Do not use gasoline or kerosene. Let charcoal burn for 15 to 20 minutes until the briquets are about two-thirds covered with gray-ash. Spread the briquets evenly throughout the grill. The bed of coals should be shallow (easy to control) and just a little larger than the area of food you are cooking.

The fastest way to get a bed of cooking coals (about 15 minutes) is with an electric fire starter. Most other methods of fire starting take approximately 45 minutes. A chimney is another secret for fast take off. Make your own from a tall juice can or a 2-pound coffee can. Remove ends from can. Using tin snips, cut out triangles or circles around bottom, 1 inch apart, to allow draft. Or punch triangular holes with a church-key bottle opener and bend down for legs. (While the bottle opener is out, be sure to use it to open an icy cold beverage for Dad while he labors over the hot flames.)

Place a wad of newspaper in the base of the chimney, add 6 to 8 charcoal briquets, and then light the paper from the bottom of the chimney. When the briquets are burning, add more to the top. Allow to burn about 15 minutes, and then lift off chimney (with tongs!) and rake coals where you want them.

Don't start to cook until the fire dies down to glowing coals. Coals are ready for cooking when they look ash-gray by day, and have a red glow after dark. No flames! Don't start cooking too soon. When coals are hot, tap off the gray ash with fire tongs; ashes on the briquets insulate and retard the heat.

An easy way to tell the heat of the fire is to hold your hand over the coals at the height the food will be for cooking. Begin counting "one thousand one, one thousand two", and so on. The number of seconds you can comfortably hold your hand over the fire will tell you how hot the fire is. If you can count to "one thousand two," you have a relatively hot fire; "one thousand three" or "one thousand four" is about a moderate fire, and "one thousand five" or "one thousand six" is a slow fire.

If you are cooking a large piece of meat that requires a long cooking time, plan to replenish the coals from time to time. Add a little extra charcoal around the edges after your fire is ready for cooking. Don't top your cooking fire with cold coals; this will lower the temperature more than you think. To increase heat, add warm coals from the reserve around the fire's edge.

To slow down the fire, move hot coals out to make a larger oval; to increase heat, move hot coals in to make narrower oval. This technique helps maintain the even cooking. Fire is ready only when flames die down. In broad daylight, the coals will look ash-gray and after dark, they'll have a red glow (they burn from outside in).

If drippings do flare up during cooking, sprinkle the fire lightly with water to quench the blaze. Keep handy a clothes sprinkler filled with water close by. Use only enough water to do the trick; don't soak the coals. It will take some time for very wet coals to dry out and begin to burn again. It will also reduce the intensity of the heat of the fire.

Orders for "rare" go on the grill last. When you see little bubbles on top surface of the steaks, they are ready to turn (heat forces the juices to the uncooked surface). Flip steaks with tongs and a spatula; piercing with a fork wastes good meat juices. Cook the second side a few minutes less than the first since the second side has a head start on heating. Turn only once. For 1-inch steaks cooked medium-rare, allow 13 to 15 min¬utes total grilling time. It is always a good idea to use a meat thermometer when grilling. Insert thermometer so tip is in center of meat. Tip must not touch bone, fat, or the metal spit.

For charred crusty coat, try this: Sear one side by lowering grill top close to coals for 2 to 3 minutes, then raise grill to finish same side. Turn steak, and sear second side; again raise grill and complete the cooking.

Wait until you turn steak to salt it (same for burgers and chops.) Salt and pepper the browned side and then season the other side as you take it off the grill. If you salt uncooked meat, the juices will be drawn out and you'll lose good flavor.

It is important to know how to carve a big steak, like a porterhouse or a sirloin, so that one person doesn't rate most of the choice portions, and another person get the tag ends. First remove the bone, cutting very close to it. Now cut across the full width of the steak, making 1-inch slices and narrowing them a little on the tenderloin side. Be sure everyone gets a section of the tenderloin. If steak has a tail piece slice it last to serve for second helpings.

When the steaks are grilled to perfection, serve them sputtering hot with a pat of butter and a squeeze of lemon. With the grill already “fired” up, it's a cinch to grill a few ears of fresh corn and some thick slices of red onion that have been brushed with olive oil. With some of Dom's potato salad, peach and mozzarella salad, and delicious grilled watermelon for dessert, you will have well-rounded and must-deserved treat for Dad on his big day!

Yum

Friday, June 17, 2011

Hobnobbing With Baked French Toast

We have all heard the expression that “breakfast is the most important meal of the day.” According to the American Institute for Cancer Research it happens to be true. This morning, I was privileged to start my day with 11 Atlanta food bloggers at a Blogger breakfast hosted by Mary Moore and her amazing staff at The Cook’s Warehouse in Ansley Mall. We were treated to a delicious, healthy meal prepared by Chef Nancy Waldeck, food blogger, author of “Taste and Savor” and 3-year cancer survivor.

Introductions were made before Chef Nancy began her cooking demonstration. She started with a light version of shrimp and cheese grits made using chicken broth in lieu of cream. Chef recommends using colorful vegetables not only because they help dishes look more appetizing but because they contain more nutrients. Chef also shared several of her favorite cooking tips that I intend to use in the near future. For instance; after cooking bacon you should let it cool on a cooling rack rather than letting it sit in its own grease on a paper towel.

Chef sang the praises of stone-ground grits from Nora Mill in Helen, Georgia. One taste of the end result was proof that she was right. The grits were creamy with a terrific texture. The addition of grated Parmigiano Reggiano from the Murray’s Cheese Shop located in the Ansley Mall Kroger didn’t hurt either!

Next, Chef Nancy prepared a baked French toast which was as delectable as it was easy. The fact that it can be made the night before and popped in the oven the next morning makes this recipe even more appealing.

Baked Maple and Cinnamon French Toast
6 (1 Inch-thick) slices of whole wheat bread
4 eggs (or the equivalent egg substitute)
2 cups skim milk
½ cup pure maple syrup
2 teaspoons Pure Vanilla Extract
½ teaspoon ground cinnamon

Preheat your oven to 425 degrees F. Spray a 9" X 12" baking pan or dish with non-stick butter spray and arrange the bread slices in a single layer. (The bread should fit into the pan, side by side, snugly.)

In a medium sized bowl, combine the eggs, milk, maple syrup, vanilla and ground cinnamon. Beat to blend and then pour mixture over the bread. Let soak until all the egg mixture is absorbed, turning the bread after about 10 minutes. Bake in your preheated oven for 15 minutes, then flip the bread and bake for about 10 more minutes or until golden brown. Serve with maple cinnamon syrup.

Maple Cinnamon Syrup
1 cup pure maple syrup
1/2 teaspoon ground cinnamon

Combine the maple syrup and ground cinnamon in a heavy, small saucepan. Bring the syrup to a simmer. Remove from the heat, place the baked French toast on heated plates, top with the warm maple cinnamon syrup and serve.

After the wonderful meal, we had the opportunity to mingle with fellow bloggers, many of whose paths I had crossed in the ever-growing blogosphere. There is amazing talent in this group, and I was thrilled (and intimidated) to meet them. I am truly looking forward to pursuing their blogs and to working with them to promote great food in the Atlanta area (and beyond!) Special thanks to The Cook’s Warehouse for bringing us together to break our fasts!


Yum

Monday, June 13, 2011

Easy, Pleasing (Myers-Appeasing) Grilled Vegetables

We interrupt the normally scheduled blog post to bring you this important response to the growing anti-foodie movement. Mindy Kaling, the actress who plays Kelly Kapoor on NBC's The Office reopened a festering wound last Thursday when she tweeted “I’m over foodies.” The brouhaha reached its peak in February when The Atlantic's B.R. Myers posted the polarizing article "The Moral Crusade Against Foodies." Myers’ article was followed by another writer for The Atlantic,  James McWilliams who took up the cause in his article "Foodies vs. Darwin: How Meat Eaters Ignore Science."

My initial reaction to the accusation that all foodies are elitist jerks and are morally corrupt if they eat meat, was one of indignation, but I was willing to let it go. While Myers’ excessive ranting about Anthony Bourdain and his dinner guests eating ortolan (endangered songbirds fattened up in pitch-dark cages) was annoying, I was willing to let it slide. But then Myers went and did it! Oh yes, he made me angry. The kind of irritation that rankles until you feel you must retort. On page 5 of his anti-foodie diatribe, Myers says “Of course, the bulk of foodie writing falls between the extremes of Pollan-esque sanctimony and Bourdainian oafishness,” and then goes on to lambast Texas food blogger, Robb Walsh for his award-winning description of his visit to Bentley’s Oyster Bar in London.

Dom's reaction to the hullabaloo was "Really, a crusade over semantics? Given the other significant problems of the world, someone has time to write FIVE pages about the morality of foodies with such comments as 'littleness of soul' - really? Perhaps he should consider trying a slice of bacon, he might feel better."

I believe that Mr. Myers (a) has confused followers of extreme cuisine with “foodies,” and (b) has confused “foodies” with food writers. On the first count I would like to point out that there are always humans on opposing ends of any spectrum (our entire political system in the U.S. should be proof-positive of this occurrence). Sports are another perfect example. There are people who are perfectly happy climbing rocky surfaces for exercise or sightseeing, and then there are those reckless folks who prefer to compete in “extreme rock climbing” where the danger-seeker climbs to the top of a tremendously high cliff with his or her hands and feet and a bit of rope attached to a harness that (they hope) has been properly anchored to the rock face.

Although according to CNN Eatocracy’s Jennifer Wolfe the term ”foodie” is out of vogue at the moment, generally speaking, foodies are people who enjoy good food and want to learn more about the foods they eat. Good ingredients seasoned properly, cooked correctly and served nicely for the sustenance and enjoyment of the diner. Conversely, extreme cuisine challenges the “athlete” to dine on the wildest, most bizarre ingredients, seasoned with the most exotic spices, cooked using the most obscure methods and served for the entertainment of the challengers. New found interest in “extreme cuisine” is evidenced by the onslaught of new television shows on the topic. In addition to the Travel Channel's Anthony Bourdain: No Reservations, the Food Network has teamed up with Jeff Corwin, animal and nature conservationist, to explore human culture through regional cuisine in the primetime series Extreme Cuisine with Jeff Corwin. The National Geographic series Taboo features episodes of which focus on Extreme Eats.

As for Myer’s second misconception all food writers are sanctimonious and are oafish; not all food writers are foodies (or vice versa) and seldom are they priggish or stupid. Actually most foodies that write, in my acquaintanceship, are pretty cool and groovy; they just want to hang out, drink a little bit, eat something tasty and then share the experience (and recipes) with their friends. They don’t feign piety or righteousness in their blog posts, are not hypocritically devout to the recipes they share, and do not seem high-minded in the stories they include in their posts.  Food critics (that write) and opinion columnists (that eat) on the other hand, are far more likely to be holier-than-thou and dim-witted, but that’s an entirely different issue, (and one I do not feel inclined to address until another contributor to The Atlantic irks me to the point of rebuke.)

In the meantime, here is an easy (even a food writer could make it), vegan recipe for grilled vegetables. For the record, in the event there is any confusion as to my interpretation of the word grilled, I mean vegetables that have been “tormented with heat” which is exactly how I hope that B. R. Myers (and his misguided followers) feels in the wake of his silly tirade.

ANY fresh vegetable (we like fennel, zucchini, eggplant, tomatoes and even beets)
Olive Oil (NOT butter)
Salt and pepper

Prepare and light grill. Rinse vegetables and trim off ends and leaves. Cut larger veggies in to ½” slices or pieces (tomatoes in half) and brush with olive oil (we use cheap Home Depot disposable brushes) and sprinkle with salt and pepper. When the coals are ready, lay vegetables on the grill surface (tomatoes should go cut side down) and cook until they are soft and tender, turning occasionally. Depending on the temperature of your grill and the size of your vegetables this will take about 3-7 minutes per side.

When they are charred and brown to your liking, remove them from the grill and drizzle with additional olive oil and another sprinkling of salt and pepper. Savor the caramelized flavors with some crusty bread and a glass of crisp white wine, and then feel free to write about it and share with your foodie friends!

Yum

Thursday, June 9, 2011

Crab Cakes of the Chesapeake Bay

Recently, we had dinner with a friend from Virginia at the impeccable Bistro Niko. An order of fresh raw oysters for the table turned the conversation toward the Chesapeake Bay and the sustainability of its marine life which is in fact the subject of an interstate summit just this week.

Blue crab on oyster reef in the Chesapeake Bay
Due to over-fishing and pollution, the Chesapeake Bay oyster and blue crab populations have significantly decreased over the last decade. Bay oysters create 50 times the hard habitat surface (reef) of a mudflat of the same size which provides needed habitats for sponges, sea squirts, and small crabs and fishes. Oysters are also critical to the Bay biome as filter feeders. Blue crabs are major predators of benthic communities and serve as food for many other types of fish. Both species are necessary for the unique brackish ecosystem. Beginning in 2007, the harvesting of oysters and blue crabs was limited on the Bay. Thanks to these limitations, experts from the Virginia Institute of Marine Science have announced that Chesapeake Bay blue crabs have made a remarkable recovery and restrictions on the capture of these delicious crustaceans have been lessened. Scientists are cautiously optimistic about the restoration of the oyster population as well. (To help "Save the Bay", click here!)

Talk of the Chesapeake Bay reminded me of the wonderful summers that I spent there with my grandparents as a teenager. The mornings consisted of helping my grandfather in the garden weeding, deadheading, and appreciating his gardening masterpiece. He considered himself the "Degas of dirt." I must give Gramps his due props; he was ahead of the curve in the home horticultural arena. While his neighbors were planting ubiquitous crops like okra and watermelon, he had rows of fennel, arugula, and spaghetti squash.

As a reward for taking her place in the daily garden appreciation ritual, Grams would put together a picnic lunch consisting of a Strawberry Shastas, apples, New England-style crab rolls filled with chucks of fresh blue crabmeat mixed with aioli (homemade garlic mayonnaise,) finely minced celery and a pinch of Old Bay* seasoning in top-loading buns, and a bag of Lay’s potato chips layered over ice in a galvanized fishing pail (which could later be used to bail water if necessary) and covered with a couple of ratty old dish cloths that doubled as a place mats. We would grab the pail and steer the dingy dinghy out to a sandbar that we pretended was our own private island.

Ian McShane as Blackbeard
in Disney's Piratres of the Caribbean:
On Stranger Tides
It is well known that the Chesapeake Bay was a popular hiding place for pirates seeking seclusion. Even Edward Teach, better known as Blackbeard, sometimes used the shelter of the Eastern Shore to prepare his ship Queen Anne's Revenge for sea. Though he traveled far and wide, the Virginia cape area proved to be fertile pirating grounds in the off-season. This made for the fantastical adventuring on our sandbar. I wonder if the ratty old dish towel that we embedded as a flag to mark our conquering of the island still stands today or if our haven was surmounted by a subsequent crew of scurvy scallywags.

When the allure of plundering had worn off, we would “sail” back across the Bay and spend the rest of the hot lazy afternoon teasing crabs with chicken necks and a piece of string. Those we caught were added to the collection.

When we had enough for the whole family, we would steam them and put them out on a newspaper covered table top with corn on the cob which had been boiled in the Old Bay*-spiked water. The following morning it was my job to pick all the leftover decapods and amass a quantity of intraskeletal meat large enough for Grams to make her famous crab meat quiche or succulent crab cakes. It was well worth bleeding from the numerous minute cuts and the mild swelling from the continued contact with the chitin-ladened shells.

From those summer experiences, I developed a serious penchant for all things crabby. Not for uncooperative people with the disagreeable tendency to complain bitterly or the acid-red imitation crabmeat typically found in grocery store sushi rolls (which is made from an artificially-flavored paste of minced and rinsed Alaskan Pollock called “surimi”), but for any food item that contains the succulent real crabmeat. For instance, gazpacho goes from flavorsome to luxurious when garnished with a dollop of crab meat. Over the years, Dom has perfected his crab cake recipe which rivals any I have had past or present (including Gram’s.) And while SpongeBob's boss, Mr. Krabs is obsessed with keeping his formula for “Krabby Patties” a secret, Dom is allowing me to share his recipe here:

  • 1 pound jumbo lump crabmeat, picked over
  • 4 scallions, green part only, minced (about ½ cup)
  • 1 tablespoon fresh herbs (dill, basil or parsley), chopped
  • 1½ teaspoons Old Bay seasoning*
  • 2-4 tablespoons bread crumbs (Dom likes Panko)
  • ¼ cup mayonnaise
  • Salt and ground white pepper
  • 1 large egg, lightly beaten
  • ½ cup flour
  • 4 tablespoons vegetable oil

Gently mix together crabmeat, scallions, herbs, Old Bay*, bread crumbs, and mayonnaise in a large mixing bowl. Be careful not to break up the crab. Big lumps of crabmeat are what make these cakes SO good. Season with salt and pepper and then carefully fold in the egg with crab mixture until it just clings together. The amount of bread crumbs you add will depend on the juiciness of the crabmeat. Start with the smallest amount, and then add the egg. If the cakes won’t bind together at this point, then add some more bread crumbs, one tablespoon at a time.

Divide the crab mixture into six portions and shape each into a fat, round cake, about 2 inches across and 1½ inches high. Arrange the chubby little cakes on a baking sheet lined with waxed paper, cover with plastic wrap and chill for at least 30 minutes. As little as a half an hour in the refrigerator will make an ocean of difference. The cold firms the cakes so that they fried into perfect plump rounds without falling apart.

Put the flour on a plate or in a pie tin and lightly dredge the crab cakes in the flour. Heat the vegetable oil in large non-stick skillet over medium-high heat until hot but not smoking. Vegetable oil creates a crisp crust, and never obstructs the crab flavor. Gently lay the chilled crab cakes in the skillet and sauté about 4 to 5 minutes per side (until the surfaces are crisp and brown). Drain quickly on paper towels and serve hot drizzled with:

Creamy Mustard Sauce
  • ½ cup dry white wine
  • ½ cup shallots, finely chopped
  • 1 cup whipping cream
  • 2 tablespoons Dijon mustard
  • 1 tablespoon fresh dill, finely chopped
  • 1 tablespoon fresh basil, finely chopped

Heat the wine and shallots in a saucepan over heat and cook until the liquid evaporates (about 4 minutes). Reduce the heat to medium and add the whipping cream and cook until the mixture is reduced to about 1 cup (about 2 minutes). Add mustard and herbs,  and simmer for another 2 or so minutes to blend flavors. Season to taste with salt and pepper. Drizzle over crab cakes or serve on the side.

*Old Bay Seasoning is produced in the Chesapeake Bay area and marketed by McCormick & Company. It was originally created by Gustav Brunn (a German immigrant) in the 1940s when crabs were so plentiful that bars in Baltimore, Maryland offered spicy crabs for free to encourage patrons to purchase more beverages. 


Yum

Sunday, June 5, 2011

On Being Green and Watermelon Pickles

We just bought a used truck which necessitated a trip to North Georgia to pick up the Pick-up. As the city sprawl dissipated into the rear-view mirror, my mind wandered to my years of rural living.

My father became intrigued by the “back-to-the-land movement” that began in the early 1970s. As a result, we packed up and moved 1,000 miles (almost exactly) from the suburbs of Boston to the foot hills of the Appalachian Mountains. We lived on a 30-acre would-be farm complete with three acres of blueberry bushes and a small flock of sheep. A Mother Earth News subscriber, my father embraced the revived interest in the ecology movement and self-sufficiency.

Mother Earth News magazine was a campy, utilitarian publication which concentrated on do-it-yourself and how-to articles such as gardening, food preservation, home brewing your own beer, geodesic domes, and distilling your own ethanol for fuel. My favorite article explained how to use a rain poncho to pitch a tent, make a hammock, protect your food from bears, catch fish and use it as a sail for your escape raft.

I get tickled when I read articles about “going green.” If you truly turned green with every earth-friendly deed then I would be a lovely shade of Cal-Poly-Pomona green. While I would like to claim that my motives have always been purely altruistic, that is not the case. We were green because we couldn’t afford to be anything else.

In the spirit of self-sufficiency and  necessary thriftiness, absolutely nothing went to waste. My mother was the original "frugal gourmet.” Like the poncho, she could finagle several meals from one chuck roast. Necessity is not the only mother of invention, so is hunger. I read recipes for Brunswick stew made with ingredients specifically purchased for that purpose and chuckle out loud. Growing up it was an afterthought - all the left overs (or the edible remnants of the last butchering project) thrown in a pot with whatever seasonings you could rustle up. (I hope you are not looking for a recipe here because no batch was ever the same.)

Nowadays we pay more for organic produce. In my youth organic meant “home grown” and we ate it not to be healthy but because it was cheap or free.  We also ate anything we could forage; in other words, bird fodder, scavenged blackberries, dandelion and poke (weed) salad, crab apples, and scuppernong juice. We bartered blueberries for venison and traded zucchini for homemade sausage.

Nothing went to waste; ever! Take for example a watermelon; the quintessential symbol for the opening day of the Summer season. Eaten fresh, the lycopene-rich red flesh is refreshing and elemental. A spiked watermelon?  How blasphemous! Not that I am a watermelon purist, but I actually like the flavor of watermelon. (Why did you buy the watermelon if you wanted it to taste like something else?) Amazingly versatile, frozen watermelon makes delicious granitas, as well as an invigorating mojito (courtesy of Ina Garten). But wait, there’s more. With a coating of sugar and black pepper, watermelon grilled for 5 or so minutes on the grill is divine.

Then of course there is the rind. Before committing them to the obligatory compost pile, consider a batch of watermelon rind pickles. (My husband and children call me the Princess of Pickles or the Duchess of Dill because if it can't be frozen, I make it into pickles.) Possibly the earliest published recipe for watermelon pickles appears in the first known cookbook written by an American, Amelia Simmons’ American Cookery published in 1796. Since, her recipe for pickled melon bears very little resemblance to today’s pickled fruit recipes, here is my mine instead:

  • 6 cups peeled watermelon rind, cut into 1″ pieces
  • 3 cups sugar
  • 1 1/2 cups distilled white vinegar
  • 1 lemon, cut into slices
  • 3 whole cloves
  • 1 cinnamon stick

Trim the pink flesh and peel the green outer skin from the rind. Be careful not to cut yourself because the outer layer is harder than you think. I used a vegetable peeler and patience. Once peeled, cut the rind into small 1” cubes. Cover the cubes with a brine made in the proportion of 1/4 cup salt for each 1 quart of water. Refrigerate for five hours or overnight.

Bring a large pot of water to a boil, drain rind from the brine and place in boiling water. Cook until just tender which should take about 15-20 minutes or until watermelon rind is translucent. In a separate saucepan bring sugar, vinegar, cloves, cinnamon, and lemon to a boil over high heat. 

Pack the cooked watermelon rinds loosely into clean, hot jars. Cover with boiling pickle syrup, leaving 1/2 inch headspace. Remember to remove air bubbles and adjust headspace if needed. Wipe the rims of jars with a dampened paper towel and secure lids. Let cool. Check seals and wait a day or two before opening to let the rind fully absorb the syrup. These are best served with grilled meats and Summer picnic fare.

A little bit more about watermelons:

Watermelon is thought to have originated in the Kalahari Desert of Africa. The first recorded watermelon harvest nearly 5,000 years ago is depicted in Egyptian hieroglyphics. Southern food historians believe that watermelon made its way to the United States with African slaves.

Like other members of the squash family, watermelons don’t continue to ripen once they’ve been picked, so this is an important clue to watch for. Since watermelons are 92% water, you want a watermelon that is symmetrical and evenly heavy. The outside rind should be firm and blemish free with a deep green shell. Look for the tell-tale “ripe spot”. It will be on the bottom of the watermelon and a light yellow or creamy color. This spot develops as the melon grows on the soil. If the spot is greenish or white in color, it’s not ripe yet. Conversely, soft spots are a sign it’s starting to turn bad. Best chilled at least 12 hours before eating. Be sure to scrub the outside down well with soap and water so that you do not drag the germs down into the fruit as you cut it open with your knife.


Yum

Wednesday, June 1, 2011

Tortured Peach Salad

Iconic Georgia Peach,
Scarlett O'Hara*

Below the Mason-Dixon Line in the late 1800s, it was desirable for a woman to be considered a “Southern Belle” or “Georgia Peach.” A kind lady who was polite to everyone she met and never raised her voice lest she be accused of being a tomboy. While the requirements became more relaxed during World War II, ladies were still expected to act like, well, ladies. Growing up in the South during the late 1970s, I can attest to the fact that “unlady-like” behavior (climbing trees, rolling down dirt heaps, catching frogs) was still frowned upon. And, while I have never been afraid to get dirty (which worked out well since we lived on a farm,) I am probably what most of my Southern brethren would consider a “peach" (many with obvious sarcasm.)

That said, I am quite content to be the mother of two very active teenage boys. I have always been more comfortable around men than women. I like the way men think. You always know where they stand. They are not skilled (nor do they want to be) at the fine art of understatement which usually results in unbridled (often brutal) honesty. Their inability to candy-coat their thoughts or opinions is refreshing (except when it is directed at items in your wardrobe,) and preferable to the passive-aggressive, fibbing-to-preserve-your-feelings approach often employed by the gentler gender of the species.

Men take this same direct approach with food. In a restaurant, a woman might deliberate and fuss over a menu; asking for substitutions and sauce on the side, and then demurely pick at the dish to illustrate how dainty she is. Even the most sophisticated man, on the other hand, would order a huge T-bone, and then as politely as possible devour every morsel that could be civilly cut from the bone. This same refined man would then look across the table over the disseminated T-bone at his also-male dining companion and they would give each other imperceptible-to-all-others-approval to pick up their bones and ravage the remaining carnage like a lions on the savannah.

Conversely, I do not like big fat muddy boot prints all over my house. Men really have no patience or sensitivity for all things frilly and their concept of cleanliness does not quite jive with my own. So perhaps you can imagine my dismay to have contractors working in the house this week. It should be noted that all of these contractors are top-notch and I realize that some mess and disruption is inevitable. I even anticipated the extra use of water and power.

Nonetheless, my senses were assaulted by less-than-pleasant smells (weird chemical odors, cigarette smoke and something musty that I hope wasn’t sweat), loud noises (hammering, banging, pounding, dropping and the ever-present, too-loud radio half-tuned to a country station), piles of materials far and wide, wheelbarrows, drop cloths, and dirt; gritty, grime everywhere. To quote Cusco (of Disney fame) they “threw off my groove.” I dislike the invasion of my personal space and the feeling that I can’t be myself in my own home. Like George Carlin often said, “we like our own stuff and want to keep our stuff safe and keep others away from our stuff, don't we?” 
   
Once everyone left and the floors had been vacuumed, I was pleasantly surprised by the sweet scent of peaches. Dom had found gorgeous peaches at DeKalb Farmer’s Market that had been ripening on the counter and I knew at that moment that a salad of ripe peaches, fresh mozzarella and basil would be just the treat to reward myself for my patience and tolerance. Adapted from Jamie Oliver’s Naked Chef Cookbook, this salad (with its torn peaches and cheese ripped into bit-sized shreds) seemed oddly appropriate after a torturous day of refurbishments. Jamie's recipe includes a few thin slices of prosciutto or Iberico ham (again shredded into strips), but I think I will go without any manly embellishments this evening.

  • 2 ripe peaches, pitted, torn
  • ½ cup fresh mozzarella cheese, torn
  • 2 cups fresh arugula, mache, or cress
  • 1 tablespoon lemon juice
  • 2 tablespoons extra virgin olive oil
  • salt and fresh ground pepper
  • dried red pepper flakes (optional)
  • fresh basil leaves

Tear peaches into bite-sized pieces, capturing all juices! Whisk peach and lemon juice, olive oil, and salt and pepper together. Toss the salad with half the dressing and add more only as needed so as not to drown the salad greens. Drain the fresh mozzarella and tear into chunks. Arrange the peach wedges and ripped mozzarella on top of the dressed greens. Top with basil leaves and a sprinkling of red pepper flakes to taste.

Now for the obligatory lesson on how to select the perfect peach:

Peaches fall into two major categories; clingstone and freestone. Clingstone peaches have a firm flesh that “clings” to the pit and can be removed by slicing with a knife. Clingstone peaches are the first peaches offered every summer and are known to hold their shape. Freestone peaches are available later in the growing season and have juicy, soft flesh that is easily separated from the pit. These peaches taste great eaten out of hand and make a cook’s work easier in the kitchen. There is no discernible taste difference between freestone and clingstone peaches.

I know you are also wondering what the difference between a white peach and a traditional yellow peach? White peaches have a pearl, pink blushed skin, white flesh and pink seed. White peaches are less acidic resulting in a sweet fruit with essences of honey and vanilla and without the familiar tang of yellow peaches.

The key to choosing the best peaches (whether clingstone, freestone, white or yellow) is to feel and smell the fruit. Look for peaches that are somewhat firm yet yield lightly to pressure when applied. When you can smell the sweetness of a peach without even taking a bite, then you know that fruit is ready to eat.  Color is rarely a good indicator of the readiness of a peach.

*June 2011, Atlanta celebrates the 75th Anniversary of Margaret Mitchell's classic novel "Gone with the Wind.


Yum
Powered by Blogger.

footer social

ShareThis