Saturday, February 11, 2012

The Great Grissini

Bread sticks are one of those items you can walk right by in the grocery store without giving them a second thought, but if they are included on the dinner table or buffet they are simply irresistible!

In the process of cleaning out the basement, I uncovered a box of old magazines (Bon Appetit, Gourmet, Country Living, MS Living, etc.). Wondering why I had kept them in the first place, I snuggled down on the couch and began going through them. I came across several recipes that I will save for future reference including (not one, but) two recipes for “grissini.” Grissini, originally thought to have been created in the 14th century, are pencil-sized breadsticks of crisp, dry bread from in Turin and the surrounding area in Italy.

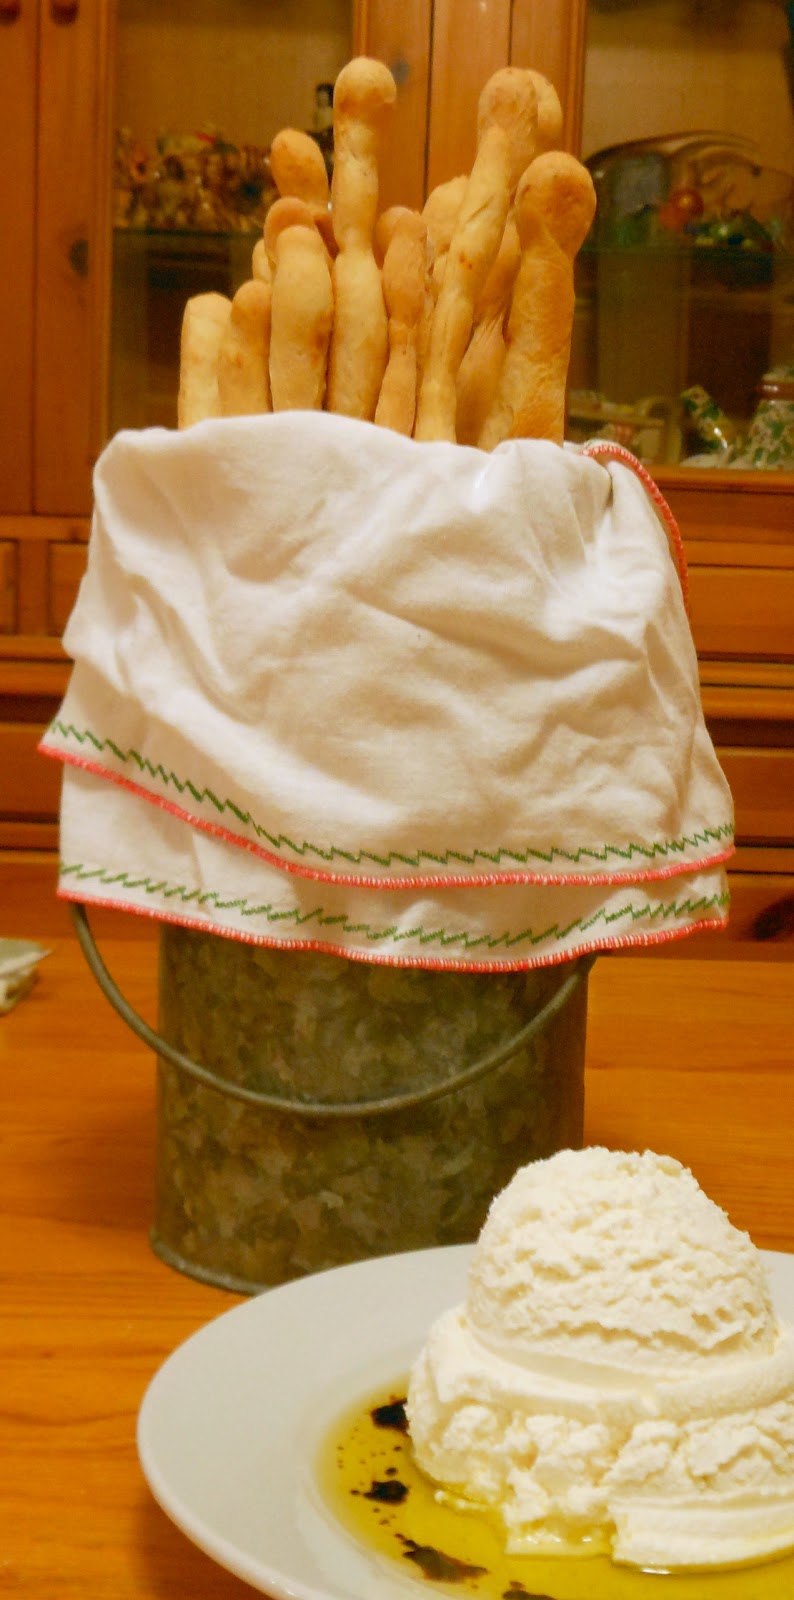
Reading the recipes, I began yearning for the crispy crunch of a good breadstick. Being a bit familiar with bread recipes, I took my favorite aspects of both recipes (and adding a few of my own) and came up with the following recipe. The result was magnificent! I even enjoyed the few leftover from dinner with black coffee the next morning – Molto Bene!


  • 1 cup warm water
  • 1 teaspoon sugar
  • 3 teaspoons active dry yeast
  • 2 2/3 cups bread or all-purpose flour   
  • 1 teaspoon sea salt
  • 1 teaspoon fennel seeds, crushed
  • 1/4 teaspoon crushed red pepper
  • 3 tablespoons olive oil
  • 1/4 cup finely grated Parmesan

Add sugar to the warm water to dissolve. Water should be warm to the touch; not hot. Hot water will “kill the yeast.” Add the yeast to the sugar water to proof. If the yeast does not start to bubble within five minutes, discard the yeast and start over with cooler water. Once proofed, add the olive oil to the yeast water.

Mix together dry ingredients and add slowly to yeast mixture. Stir together until a dough starts to form, then add to your KitchenAid with the dough hook and allow to mix and knead until smooth and elastic. If you do not have a bread mixer, turn the dough onto a floured surface and knead by hand until smooth and elastic which should take about 5 minutes.

Shape dough into a ball, return to mixing bowl and cover with plastic wrap. (I spray the top of the plastic wrap with cooking spray so the dough doesn’t stick.) Set the bowl in a warm, draft-free place and let rise until doubled in size; about 1 hour.

Lightly flour your work surface again and gently deflate dough before beginning to shape into long thin rolls; grissini. Lightly flour hands and pinch off nobs of dough approximately the size of a ping-pong ball and knead gently for about 1 minute. Roll each nob into a long thin roll about the diameter of a pencil.

Transfer grissini to a parchment-lined baking sheet, making sure to leave space between each strip. Once the tray is full, set aside and allow to rise again for about 15 to 20 minutes. Meanwhile, preheat oven to 400 degrees F. Bake the bread sticks in batches on middle shelf until golden brown which should take about 15 to 20 minutes depending on your oven. Rotate trays halfway through baking. Let cool completely before serving.

This recipe makes a generous number of grissini which is fine at our house because they get eaten fairly quickly. The grissini can be frozen after baking and kept in the freezer for a month or two. To reheat, simply wrap them in aluminum foil and heat in the oven until heated through (5-10 minutes depending on how many are in the foil packet.)


Yum

Tuesday, February 7, 2012

Technique of the Week: Sprinkling

Okay, you caught us! Sprinkling may not be considered as an officially recognized cooking technique, however, you might be surprised to learn that renowned chef; Jacques Pepin refers to “sprinkling” no less than four times in his cookbook, Jacques Pepin's COMPLETE Techniques.

The dictionary definition of sprinkling is: a small quantity of an ingredient scattered or sparsely distributed at random and falling in scattered drops or particles. Baking “sprinkles” were actually named for the action used to dispense them onto cakes, donuts, cupcakes and ice cream. Powered and granulated products such as salt, sugar and flour lend themselves best to being sprinkled. Other ingredients that are often sprinkled include grated cheese, chopped herbs, spices and seeds.

Spanish Chef José Andrés (host of the PBS television show "Made in Spain,") recommends always sprinkling from above. He says, “if you sprinkle very close the salt goes all in one place, but if you sprinkle very high the salt goes very spread out.”

Previous recipes that include the technique of sprinkling:

Bravo Patatas Bravas
Brussels Sprout Love
Peppy Peppers of Padrón
Pumpkin Chestnut Scone Yumminess
Ritzy Lavash


Yum

Saturday, February 4, 2012

Duritos & Churritos - Laughably Fun Snacks

While at Super H Mart, I nabbed a new food item that really is just fun to make. In fact, I burst into laughter when I made the last batch, but I’m getting ahead of myself. I had seen small bags of these pasta-looking dealies before, but never had a clue how they were to be used. Recently, I stumbled onto a post by our fellow bloggers at Knuckle Salad and couldn’t wait to grab a bag and give them a whirl.

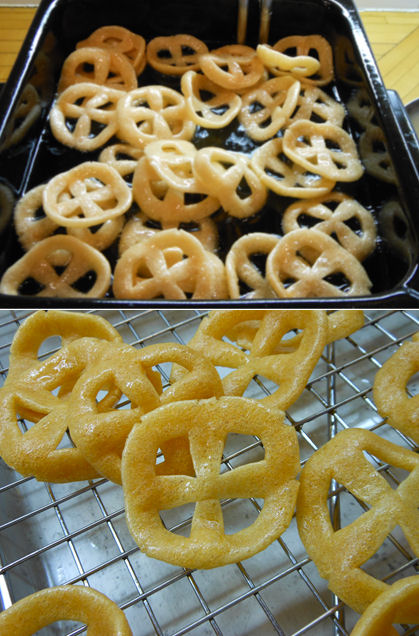
They are called pasta para duros (hard paste), a Mexican snack made from wheat flour, corn starch, bicarbonate of soda and food coloring. Uncooked, they are about the size of a quarter, are a reddish-orange color, and they are very hard (which may be why they are called duros after the Spanish word for hard.) Once cooked these little colored wheels puff up to about 2 -3 times their size and have a light, airy consistency similar to cheese puffs without the orange-flavored powder. Others have compared the taste and texture to that of pork rinds.
 
In Mexico, wagon wheel duros sprinkled with salt, lime juice and hot sauce shaken together in a bag, are sold by street vendors. The larger sheets are served with shredded lettuce and onions again with lime and hot sauce. Duros can be found in grocery stores which carry Latin foods in their uncooked pasta-like form. The most common shape is round wagon wheels, but they also come in tiny worm shapes as well as sheets and small 1-inch squares.

To cook them, heat 2 inches of oil (we used peanut oil) in a heavy pan or skillet to about 300 degrees F. When the oil the hot, place about 10 wagon-wheel-shaped duros in the oil and watch (and giggle) as the bubbles form and the potato chip-sized duritos float to the surface. Once they are puffed and floating, they are done. Remove them to a wire rack over paper towels to drain, and serve with salt, lime and hot sauce. (According to a quick poll of H-Mart employees, Valentina brand is the preferred hot sauce for duritos with Tapatio a close second choice.)

After serving a plateful as an appetizer, we had a fairly large portion left. Not being ones to waste food, we decided to toss the extras in a paper bag with cinnamon sugar like you would do with churros, and ¡aquí está! – churritos! These are my new favorite treat any time of day. Just try to tear that paper bag out of the grasp!


Supposedly, you can also cook the duros in the microwave with no water or oil by placing a few of the pasta wheels on a paper towel and microwaving for 30 - 35 seconds until they puff up into cute and crunchy doo-dads. We have tried this with limited success. Ours do not seem to puff completely and are much smaller than the fried versions.

Either way, these new additions to our repertoire are here to stay. Incredibly easy and wonderfully unique, I can’t wait to break these out at the next dinner party or potluck!


Yum

Super H Mart Impresses

It is easy to get stuck in your usual routine which includes going to the same stores for the same items time after time. We go to DeKalb Farmer’s Market for produce and spices, Costco for meats and staples, Whole Foods for seafood… you get the drift. Occasionally, we head out to the Buford Highway Farmer’s Market (BHFM) for a different selection of produce or for a wider variety of Asian products.

It had been a while since we had been to BHFM and we had accumulated a list of items we were looking for to restock the pantry or to try in new recipes. As I was headed to the market, I remembered reading that several new Super H Marts had opened in the Atlanta area. The supermarket chain which began in 1982 in Queens, New York City as a corner store, is operated by the Hanahreum Group. "Han Ah Reum" is a Korean phrase meaning "arm full of groceries.”

So, instead of exiting Interstate-285 at Buford Highway, I continued west for two more exits to visit the new Doraville H-Mart. I walked into a well-lit, hyper-clean store with neatly-stacked, super-fresh produce and rows and rows of tidily arranged packages. One aisle had every kind of tea from every region of the world, while another had a massive variety of grains and pastas. While the Asian staples were somewhat mixed (e.g. Korean, Chinese, and Japanese chili pastes or seaweeds), the Hispanic items tended to be shelved separately. The large refrigerated cases and freezers had a plentiful selection of meats.

I was euphoric! I roamed the aisles marveling at all the wondrous food stuffs and chatted with other shoppers. One shopper who drove from Marietta to buy items for Lemongrass Thai Restaurant, helped me select from the dizzying array of soy sauces. I had found everything on my list with the help of several very helpful and friendly employees. I then headed to check out which again was clean and well organized. A cheery clerk explained the benefits of joining the free shoppers’ reward program and waited patiently while I filled out the forms being sure to ask for my receipt so I would be credited for that day’s purchases. Needless to say, I will be using my frequent shopper card, as I will definitely be returning to H-Mart very soon!

Ahhh! What did I buy you ask...
  • Gochujang (for Korean Beef tacos)
  • Yakisushi Nori (for making sushi)
  • Soy Sauce (for Sonny’s fried rice)
  • Bonito for soup (for Dashi broth)
  • Rice noodles (to serve with stir fry)
  • Cactus Honey Powder (for everything)
  • Pasta para Duros (for duritos and churitos)
  • Valentina hot sauce (for duritos)
  • Instant Miso soup (for lunches)
  • Yummy-looking little melon (to eat)
  • Bento-ish lunch box (for Sonny, the King of Leftovers)

For our readers who do not live near an H-Mart location, they offer free shipping for new on-line customers for orders over $50 and free shipping on many bulk items. Click here for more details!


Yum

Thursday, February 2, 2012

Bravo Patatas Bravas

Patatas bravas is a popular dish native to the cuisine of Spain where they are commonly served in bars accompanied by a glass of local wine. They can be found on most tapas menus throughout the U.S. In fact, it is always the first item we order at our favorite tapas restaurant, Eclipse di Luna.

The dish is made with white potatoes that have been cut into about 1-inch cubes, fried in oil and served warm with a spicy sauce sauce. However, the preparation of the accompanying sauce varies by city. In Burgos, the sauce is tomato-based and includes a variety of spices which give it bite, while in Catalonia and Valencia, the potatoes are served with an alioli made with olive oil, red pepper, paprika, chili, and vinegar.

All variations, however, include Spanish paprika. We recently received samples of hot smoked paprika and (picante) and sweet smoked paprika (dulce) from La Chinata and what better way to enjoy the flavor than with this traditional Spanish dish.

Patatas:
  • 1 cup peanut oil
  • 4 large Russet potatoes, peeled, and cut to 1-inch cubes
  • 2 tablespoons hot Spanish paprika (La Chinta Picante)
  • 2 tablespoons kosher salt
  • Chopped parsley, to garnish

In a large skillet, heat the peanut oil. Rinse the potatoes in cold water and pat dry. Test oil by placing one potato cube in the skillet, if it sizzles and forms tiny bubbles around it, the oil is ready. Take care when adding the potatoes to the saucepan because the oil will splatter (which is part of the reason you patted them dry.) Fry the potatoes in oil working in batches until they are halfway done. Yes, halfway! When the potatoes start to look white and opaque (about 7 minutes) remove them to a rack to drain and cool.

Once completely cooled, re-fry the potatoes (working in batches again) until they are golden brown and crispy. Again remove potatoes to a cooling rack to drain.

Mix together paprika and salt. Placing the fried potatoes in a bowl, sprinkle paprika salt over the potatoes and toss to ensure that all the potatoes are well coated. You can place them in a 200oF oven until ready to serve if needed.

Bravas:
  • ½ cup mayonnaise
  • 1 tablespoon ketchup
  • 1 teaspoon lemon juice
  • 1 teaspoon hot sauce
  • ½ teaspoon garlic powder
  • ¼ teaspoon ground oregano
  • Salt and freshly ground black pepper

This can be made ahead and actually improves the longer it sits. Mix all ingredients together until completely combined and smooth. Add salt and pepper to taste. Place (covered) in the refrigerator until ready to serve.

Serve patatas in a shallow bowl and garnish with chopped fresh parsley and the bravas sauce on the side for dipping. We suggest making extras because one tapa serving is never enough!


Yum

Tuesday, January 31, 2012

Technique of the Week: Infusing

Mint Tea
In cooking terms, infusing is the simple chemical process by which a liquid is permeated with the flavor of another ingredient, usually botanic components like herbs, berries, fruit or even flowers. The botanicals release their natural oils and essence in water, vinegar, oil or alcohol.

The liquid to be infused is typically boiled and then poured over the botanic, which is then allowed to steep in the liquid for a period of time. The liquid is then strained (or the herbs otherwise removed from the liquid) before use. A common example of an infusion is tea; lemon, chamomile, ginger and a great many other plants are used in infusions with water to create herbal remedies.

Plants with desirable flavors can also be steeped in olive oil or vinegar and used to add flavor to salads or used in cooking. Fruits and herbs can be steeped in alcohol to create delicious infusions for use in specialty cocktails. One popular alcohol infusion involves soaking crisped bacon in bourbon to create “Bacon Bourbon.”

Sugar can be infused with natural flavors as well. Sugar can be easily infused with vanilla by simply adding a vanilla bean to a jar of sugar and allowing it to sit until the sugar absorbs the aroma and flavor of the vanilla bean. Vanilla sugar is a delightful accompaniment to fresh fruit, coffee drinks and herbal tea infusions.

Sun-dried citrus salt and peels
Salt is another good candidate for infusion. We infuse salt with citrus by peeling the zest from lemons, limes and or oranges and adding it to kosher salt. We place the salt and peels in the refrigerator for 2 days and then lay the salt and zest on a parchment lined baking sheet and allow the salt and peels to dry in the sun. The salt is then ready to use to add “brightness” to salads and seafood dishes or rim margarita glasses. The salted zest can be used as a substitute for preserved lemons or in recipes calling for citrus zest (reducing the salt in the recipe by a bit.)


Yum

Friday, January 27, 2012

Sausage, Peppers & Onions Worth Craving

Rarely a week goes by that sausage with sauteed peppers and onions doesn't grace our dinner table. Of all the different meals we cook, this dish is easily the most popular with our family and friends. Sausage and peppers seems to be one of those quintessentially Italian dishes that everyone craves. For this reason, it remains a perennial favorite at most ball parks throughout the country.

Perhaps it is the vibrant colors, rustic simplicity, and rich, lusty flavors that together speak to something primal in the Italian character and cuisine. The appeal of the dish probably lies in the simple combination of the spices of good Italian sausages, the sweetness of caramelized peppers and onions, and the subtle tang of tomatoes. What ever the reason, it will remain a mainstay of our repertoire.

  • 6 links Italian sausage (we like the Hot variety)
  • 2 tablespoons olive oil
  • 1 yellow onion, sliced
  • 4 cloves garlic, minced
  • 2 bell peppers (green, red or yellow), sliced
  • 2 tomatoes, roughly diced OR 1 14.5-oz. can of (Red Gold*) petite diced tomatoes
  • ½ teaspoon dried oregano

Place the sausage in a large skillet over medium heat, and brown on all sides. Remove from the skillet and set aside.  Add olive oil to the drippings in the skillet and stir in the onion and garlic, and then cook for 2 to 3 minutes. Mix in bell peppers, tomatoes and oregano and continue to cook and stir until peppers and onions are tender.

Return sausage to skillet with the vegetables. Reduce heat to low, cover, and simmer 15 minutes, or until sausage is heated through. Add a little water as needed to keep moist and not overcook vegetables.

Transfer to a serving platter and serve along with crusty french-style bread (in case anyone wants to turn theirs into a hoagie!

*The kind folks at Red Gold® sent us a variety pack of 6 cans of their tomatoes for us to sample which we used in this recipe. As you can see from the picture they added a gorgeous red color to the dish and a tangy sweetness that would stand up to any San Marzano tomato product on the market.


Yum

Tuesday, January 24, 2012

Technique of the Week: Marinating

Marinating is the technique of soaking food, especially meats, in a seasoned liquid before cooking. Like brining, it is commonly used to flavor foods and to tenderize tougher cuts of meat. The liquid used is a 'marinade' is often acidic with ingredients such as vinegar, lemon juice, or wine or an enzymatic such as pineapple or papaya juices. The acidic ingredient softens the food, allowing it to absorb the flavors of the sauce.

Along with an acidic liquid, a marinade often contains oils, herbs, and spices to further flavor the food items. Marinating works on all kinds of meat, fish, tofu and even vegetables. Different cuisines utilize varying marinades. For example, yogurt-based marinades with a mixture of spices are used in Middle-Eastern dishes and a teriyaki marinade is common for Asian dishes.

Generally speaking, most meats (beef, pork and chicken) should be marinated for at least 2 hours (up to 24 hours), while fish should only be marinated for 30 or so minutes before it starts to turn “mushy.”Foods should be marinated in the refrigerator, rather than at room temperature. Re-sealable plastic bags are the most convenient and safest vessels for marinating rather than bowls or other containers. They cut down on cleanup and allow you to evenly distribute the marinade. You should not use an aluminum container or foil for marinating because a chemical reaction could spoil the food.

If you plan to use your marinade as a finishing sauce or for basting, it should be boiled for several minutes before using to kill any bacteria from the raw meat or vegetables. You should ever reuse the marinade for another recipe or meal.


Mint Marinade for Lamb:
¼ cup olive oil
1 tablespoon lemon juice
½ cup fresh mint leaves, cleaned
2 teaspoons kosher salt
2 teaspoons sugar
2 teaspoons freshly ground black pepper

Combine all items in food processor and pulse several times until all ingredients are well chopped and combined. Pour marinade over lamb in a plastic bag and mix well to ensure that all meat is well coated. Allow to sit in the refrigerator for up to 24 hours before cooking. Periodically “massage” the bag to re-distribute marinade over the meat.

When ready to cook, remove meat from bag and cook to preferred doneness and toss marinating bag away.

Yum

Saturday, January 21, 2012

National Soup Month Seafood Chowder

Soup is one of the oldest forms of food right up there with bread.  Although it was not until the invention of waterproof containers, about 9,000 years ago, that soup came into existence, the fact that an entire month is devoted to celebrating soup is a testament to its continued universal popularity.

Soup can be dated back to about 6,000 B.C. and was first made of hippopotamus. Soup is made by combining ingredients, such as meat, vegetables or beans in stock or hot water, until the flavor is extracted, forming a liquid meal. There are lots of variations on the basic theme of soup, each offering a wide range of nutritional benefits.

Soup, first known as "sop," was originally a piece of bread served with some type of broth. People used to pour sop over a piece of bread or over broken off chunks of bread in a platter allowing it to soak up all the broth and then they would eat it.  As time went by sop was placed in deeper bowls and the liquid became the focal point instead of the bread. In modern day, the word sop is used to define the act of sopping up food. 

Every country in the world has soup recipes and family traditions from long ago so it comes as no surprise that soup is a favorite in most households. We have all been nursed back to health with chicken noodle soup, warmed on a frigid day by a hot bowl of tomato soup with grilled cheese sandwiches and celebrated holidays with green bean casserole with cream of mushroom soup.

New England-style chowder is a favorite in our family with the ingredients varying depending on what is fresh at the market and what we have on hand.  This is the basic formula, but don’t be afraid to experiment to create a chowder that will become your own family recipe to be handed down to the next generation.

  • 2 teaspoons olive oil
  • ¼ lb. country ham or bacon, cut into 1/8-inch cubes
  • 1 large onion, finely chopped
  • 1 cup celery, chopped
  • 6 cups fish or vegetable stock
  • 4 cups russet potatoes, cut into 1/4-inch cubes
  • 2 bay leaves
  • 1 lb. (30 count) shrimp, shelled and deveined
  • 1 lb. clams (and juice), chopped
  • 1 lb. cod, skin and bones removed, cut into bite-sized pieces
  • ½ cup heavy cream
  • 1/8 teaspoon cayenne pepper
  • Kosher salt and ground white pepper
  • Old Bay seasoning (optional)
  • Fresh parsley, chopped for garnish (optional)

Heat a medium skillet over low heat adding enough olive oil to coat the bottom of the pan. Add ham and cook for 5 minutes and then add onion and celery and cook, stirring, until soft.

In a separate stock pot, bring stock and bay leaves to a simmer. Add diced potatoes and cook for about 15-20 minutes, until just tender. Add ham and vegetable mixture to the stock pot and stir to mix well. Then add shrimp, clams, and fish, and simmer for 5 more minutes. Add cream and season chowder with cayenne, salt, and white pepper. Remove bay leaves and serve hot with parsley and Old Bay seasoning.

Yum

Tuesday, January 17, 2012

Technique of the Week: Stirring

Those of us that have been cooking for many years, “stir” our ingredients with little or no consideration for the actual act of stirring. In reality, there is more to it than just sticking a spoon in the bowl and wiggling it around a bit.

Stirring is the technique of mixing together ingredients of before or during cooking.  Stirring is a simple concept, but it does require that you know when and where to stir.

Before sitting down to write this post, I stumbled upon a very instructive little video on the à la carte cooking website. The video was made by Peter Hertzmann who is the author of Knife Skills Illustrated and an instructor at Sur La Table is titled “Stirring Conclusions.” According to Hertzmann, there are three main reasons to stir: to create a homogenous mixture; to evenly disperse temperature; and, to alter the viscosity of a liquid (thicker or thinner). These reasons may seem to be common sense, but many cooks stir only because the recipe tells them to without considering the reason.
   
When stirring, for example, you should always make sure that the utensil you’re stirring with touches the bottom and all corners of the pan. For thin liquids without any solids mixed in, stirring in the middle of the pot or pan may be adequate. You should select your stirring utensil on purpose rather than just grabbing the first thing at your fingertips. And, when a recipe says, “stir occasionally” or “stir frequently,” you should have a clear understanding of what the intended result is to ensure you are stirring properly.

Hertzmann’s video is broken down into chapters and answers all basic questions about stirring and has tips and tricks for even the most advanced ”stirrers.” So without further ado, CLICK HERE to view his video for your edification.


Yum

Saturday, January 14, 2012

Conquering the Elusive Cavatelli

The art of cavatelli manufacture has evaded Dom for many years. He has fond memories of his Grandma’s handmade pasta: “She and my Aunt Mary would sit for hours drinking coffee and casually shaping and flicking the ‘cavatells’ into a huge pile on the kitchen table. Later all the family would show up to eat the delicious little nuggets of joy.” Several earlier attempts at making these at home failed miserably resulting rather in “little blobs of sadness.”

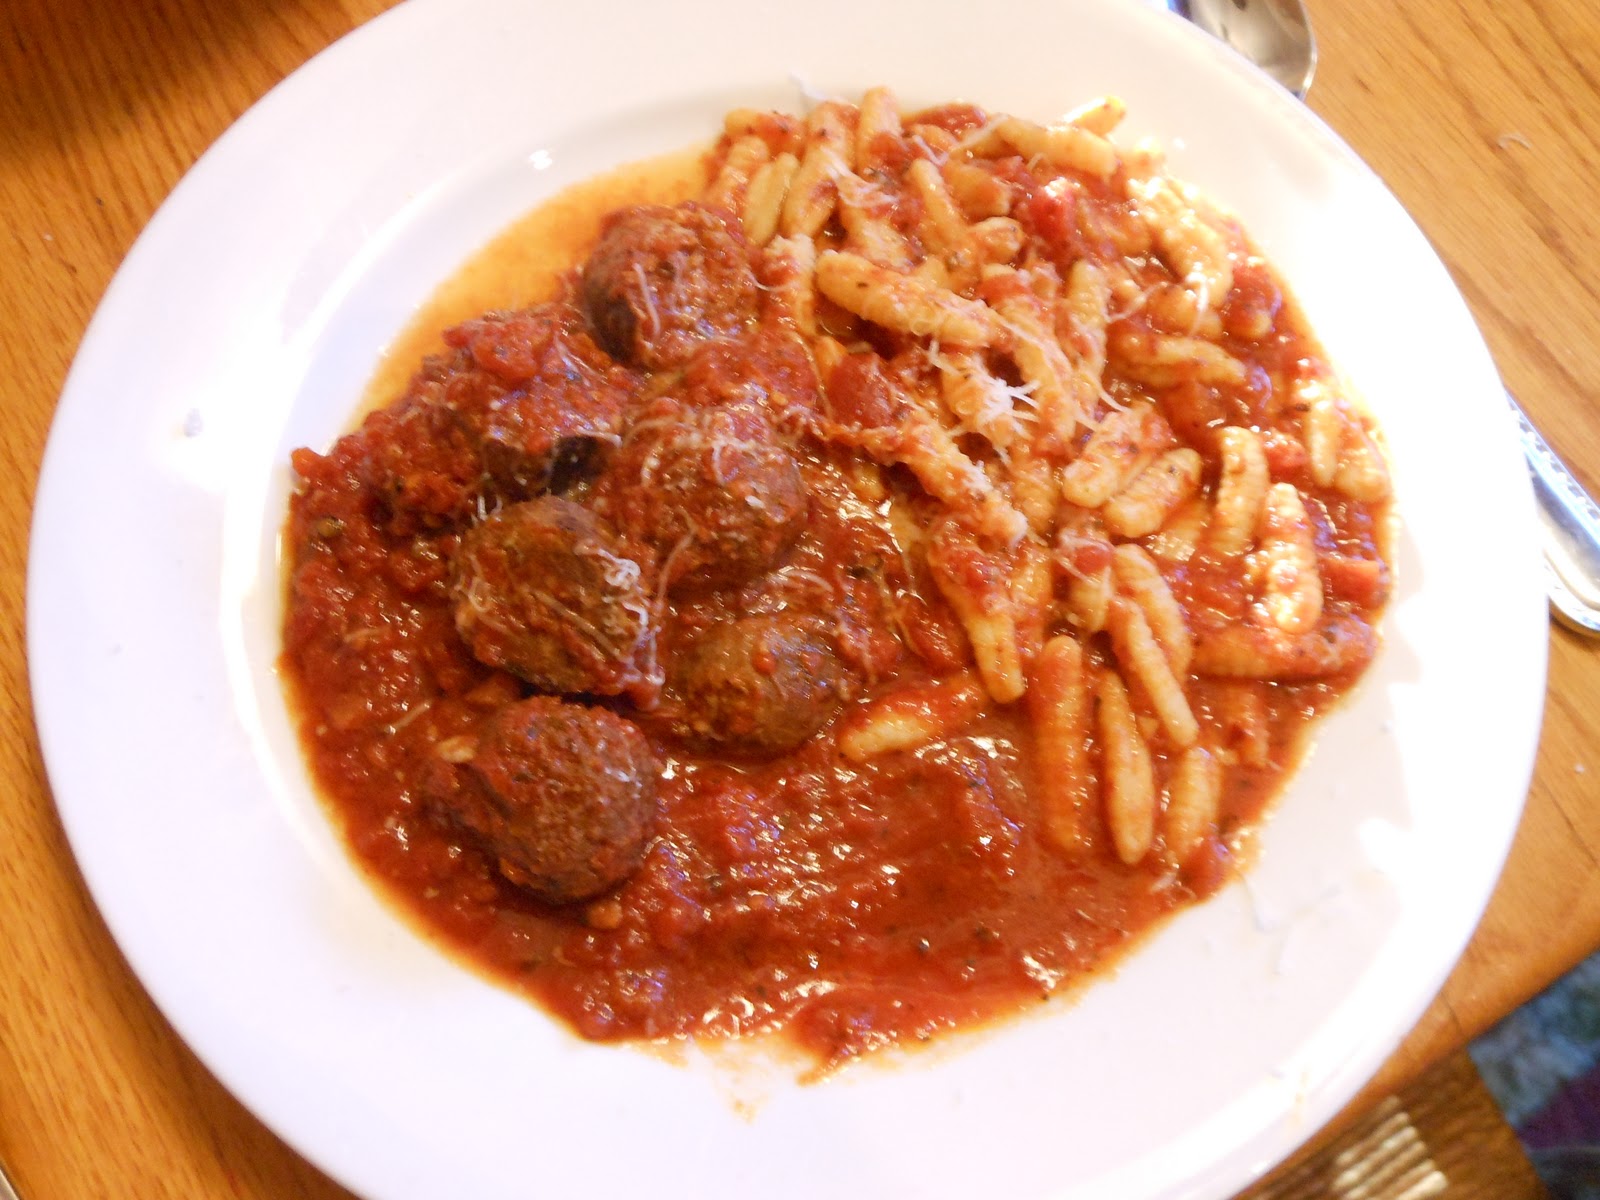
Dom received a cavatelli maker for his birthday. The metal device looks like a clunky can opener with wooden knobs. After scouring cookbooks to find the perfect recipe and a series of trials (and errors,) we got the proper consistency of dough and the correct technique with the apparatus. Lo and behold! – We had achieved cavatelli perfection.

If you do not have a handy-dandy mechanism for shaping your cavatelli, you can use a butter/gnocchi paddle, hair comb or even a putty knife along with a “smearing motion,” however, creating uniform macaroni in nearly impossible.


  • 3-4 cups all-purpose flour
  • 2 cups ricotta cheese
  • 2 eggs
  • pinch of salt
  • Cake flour for dusting

Put 2 1/2 cups of the flour into a bowl and make a well in the middle. Add 2 eggs and the ricotta cheese and incorporate the flour into the eggs and cheese, and then knead the dough adding more flour as needed until dough is soft but not at all sticky.

Cover the dough with plastic wrap and let it rest for at least 30 minutes (believe us, it makes a big difference.) Roll out on board dusted with flour and make long ropes. Add more flour to the board as needed.

Flatten ropes a bit before feeding them into the cavatelli maker. If they start to glob together rather than falling freely from the machine, then you will need to incorporate more flour into your dough. Another trick we learned is to place a teaspoon of flour on top of the cavatelli maker, so that a tad falls between the two wooden rollers with each turn of the crank.

If you are hand forming dough: cut into one-inch pieces, rolling them individually into “worms.” Then using a butter paddle or wide-toothed comb with your thumb“smear” each piece away from you rolling the pasta as you smear. Alternatively, you can use a flat surface (a plastic putty knife works best or butter knife) held at a 45-degree angle. Press on each “worm” of dough and “smear” the length of it.  You find that the motion causes the dough to curl up the edge of your implement.  Both of these techniques take practice!

Place finished cavatelli on a cookie sheet dusted with cake flour. As you fill up in the cookie sheets, place the whole pan in the freezer for about a half hour (until the pasta is completely frozen and does not stick together.) Then you can easily transfer the frozen cavatelli to a freezer bag and refreeze until you are ready to use them.

To cook, bring a large pot of salted water to a boil and then place frozen cavatelli in the water. They should float to the surface of the water when they are done. It is best to taste one or two before draining. Once drained, immediately add olive oil or pasta sauce to prevent them from sticking together. Serve in plentiful portions and watch them disappear!


Yum

Tuesday, January 10, 2012

Technique of the Week: Stewing

On a cold, damp day, few things are more pleasing than a rich and steaming bowl of stew. But, what exactly is “stew”? Stew is not only the name of a dish, but it is also its cooking method.

Stewing is the process of cooking ingredients slowly in a flavorful simmering liquid in a closed container which obviously requires a leak-proof vessel for cooking. Cooking by boiling has occurred for literally tens of thousands of years. In fact, primitive tribes are thought to have used conch or turtle shells to boil water. The development of pottery some 10,000 years ago was the impetus for the development of several dishes named for the container used to prepare them including (but not limited to) tagines, casseroles, and stews. The technique was refined over the years with references to more modern stews found throughout recorded history, from the lentil stew in the Biblical story of Cain and Abel to Hungarian Goulash with paprika in the 1700’s and Lord Byron’s reference to Irish Stew in “The Devil’s Drive” in 1814.

Types of stews exist all over the world which are referred to by a variety of names: French Cassoulet, Italian Cioppino, Beef Bourguignon, Pot au Feu, Kentucky’s burgoo, Louisiana’s gumbo, and even Chili con Carne. While stewing is easily confused with braising, there are a few distinctions between the two. In a stew, the meat is generally cut into smaller pieces rather than left whole and in a braise, the liquid might only come halfway up the sides of the meat whereas the meat is immersed in cooking liquid when stewed.

The best cuts of meat for stewing are the toughest cuts. Prime stewing candidates include shank, brisket, chuck, oxtail and beef round. Stewing meats are not limited to beef, though. Irish stew shines because of lamb or mutton, dark meat chicken is the base for Coq au Vin, fleshy fish stars in Caldeirada de Peixe and French Ratatouille is just stewed vegetables.

The general method of preparing a stew is to sear meat on all sides in a little oil in a Dutch oven (or whatever pan you’ll be stewing in) until deep brown and then setting the meat aside. In the same pan, chopped mirepoix (onions, carrots and celery) or trinity (onions, celery and green pepper) are cooked until golden brown. Dried herbs and spices are added at this point. The pan is deglazed with liquid (stock, water, wine, beer, etc.) The meat is added back to the pan and liquid is added to cover the meat, and bring it to a simmer. Frequently, a starchy ingredient is added to thicken the stew before serving. Examples of these include potatoes, beans, corn, and rice, or in the case of gumbo and burgoo, fresh cut okra.

Tips and Tricks:
  • Make sure you cut your items to the same size to ensure even cooking. If you are cooking small pieces of meat as well as vegetables, make sure they will all cook at the same time, which may mean the vegetables are cut to a larger size than the meat.
  • Searing the meat and vegetables and deglazing the pan are recommended as it will provide more flavor. 
  • Use a heavy gauge stockpot or cast iron pan with a tight cover.
  • Cooking temperatures are very low with stewing, usually keeping the liquid at a simmer (about 180-200°F).
  • The best test for doneness is using a fork to pull the meat or vegetables apart, if it comes apart easily with little resistance, it’s done.
  • Use at least one acidic liquid when stewing. Tomatoes, vinegar or wine help break down connective tissue and tenderize tougher meats.
  • Season your liquid with salt at the end ONLY. The liquid will reduce and can lead to a very high concentration of salt at the end.


Yum

Saturday, January 7, 2012

Wakey Wakey Eggie Weggie

Perhaps you have heard the expression “Wakey, wakey  - rise and shine." The expression began as a reveille for British “squadies” to rise and shine (as in shine their boots before roll call.) It was later cheerily broadcast at Butlins’ UK Holiday Camps during the 1960’s to get vacationers up in the mornings. A variation of the saying "wakey, wakey eggs and bakey," was popularized by Michael Madsen in the 2004 movie "Kill Bill: Volume 2." We use this phrase quite often in the Romeo house to beckon one another to the breakfast table.

Several years ago Dom came home from a trip where he had enjoyed a perfect plate of Eggs Benedict. He started out to duplicate the dish at home, but none of us truly like Canadian bacon. We did, however, have smoked salmon in the fridge (which would normally accompany bagels and cream cheese with finely sliced shallot and tomato.) Being a huge fan of Ernest Hemingway and of smoked salmon, Dom replaced the Canadian bacon in the recipe with smoked salmon to make Eggs Hemingway.  Another adaptation was the use of a fried egg (or “eggiweg” in the UK vernacular) prepared sunny-side-up rather than poached eggs (fried eggs are faster and easier) which lead to the creation of the Romeo “eggie-weggie!” Needless to say, our morning wake-up call has been changed to reflect this addition to our family repertoire!

Homemade Hollandaise
  • 4 egg yolks
  • 1 tablespoon freshly squeezed lemon juice
  • 1/2 cup unsalted butter, melted (1 stick)
  • Pinch cayenne
  • Pinch salt

Whisk the egg yolks and lemon juice together in a stainless steel bowl until the mixture is thick and has doubled in volume. Place the bowl over a saucepan containing barely simmering water (you can use a double boiler if you have one,) the water should not touch the bottom of the bowl. Continue to whip egg mixture rapidly; an immersion blender works beautifully for this task! Be careful not to let the eggs get too hot or they will scramble. Slowly drizzle in the melted butter and continue to whisk until the sauce is thickened and again doubled. Remove from the heat and whisk in cayenne and salt. Cover and place in a warm spot until ready to use for the eggs benedict. The sauce will continue to thicken as it cools. If the sauce gets too thick, whisk in a few drops of warm water before serving.

Eggs Hemingway
  • 4 English muffins, split and toasted
  • 8 slices of smoked salmon
  • Butter for pan
  • 8 eggs
  • Salt and pepper, to taste
  • Hollandaise sauce
  • Fresh chopped chives or scallions (optional)

Gently break eggs into a non-stick pan coated with butter and cook on medium heat until whites are set but yolks are still translucent. You may need to work in batches.

To assemble the eggie weggies, lay a slice of smoked salmon on top of each toasted muffin half, followed by a sunny-side-up egg. Season with salt and pepper and then spoon hollandaise sauce over the eggs. Garnish the plates with chopped chives or scallions. Lastly, prepare your taste buds for a flavor sensation you won’t soon forget!


Yum

Tuesday, January 3, 2012

Technique of the Week: Whipping

Whipping is the process of beating an ingredient vigorously to incorporate air, which makes the ingredient foamy. Whipping transforms heavy cream into whipped cream. Egg whites when whipped form stiff peaks which can be used to make meringue for pies, pavlova, or nougats. Whipped egg whites are also used in mousses, soufflés, and angel food cake. Potatoes and squash are also good candidates for whipping.

One item we use frequently in our house is whipped cream cheese. While it is an obvious accompaniment to bagels, we love it on banana bread! Interestingly, whipped cream cheese is more expensive than regular cream cheese (especially if you prefer the flavored varieties) even though what you are paying for is added air. You can save up to 60% by making your own and the flavor possibilities are endless…

Whipped Cream Cheese
1 - 8 oz. block of cream cheese (or Neufchatel)
3 - 4 tablespoons of milk

Allow cream cheese to come to room temperature. Place cream cheese and milk in a food processor or blender and blitz for a few seconds until smooth and “fluffy.”

Flavor Variations (added to the above ingredients):
  • Fruit - add 3 tablespoons of your favorite jam or preserves;
  • Maple Nut - omit milk and add 3 tablespoons maple syrup and chopped nuts of your choice;
  • Cinnamon - add 3 tablespoons of brown sugar and 1 teaspoon cinnamon;
  • Hot pepper - add 1 fresh jalapeño pepper, seeded and chopped, 2 tablespoons chopped green onions or chives, and a pinch of salt;
  • Herb - add 1 teaspoon chopped fresh parsley (or herb of choice,) 1 tablespoon chopped green onions and 1/2 teaspoon paprika;
  • Roasted Red Pepper - add 1 red bell pepper, roasted, seeded and peeled and ¼ cup freshly grated Parmesan cheese;
  • Smoked Salmon {shown above and at left} - add 3 oz. smoked salmon or lox bits an (optionally) 2 tablespoons chopped red onion and 1 teaspoon capers.

Yum

Saturday, December 31, 2011

Don't Pop Your Cork: Opening Champagne Correctly

You have splurged on a nice bottle of champagne (or sparkling wine)* and opening the bottle seems a bit intimidating. The correct method for opening a bottle is probably not the way you think; the cork should not go soaring through the air spewing the golden elixir everywhere. Instead, here are a few tips to ensure safety and optimum enjoyment:

1. Make sure your bottle is well chilled (42°F to 50°F) for at least 30 minutes in a bucket with ice and water before opening.

2. Remove the foil surrounding the cage and cork.

3. Keeping one hand firmly on the cage and cork, use your other hand to unwind and loosen the cage. Leave the cage on for a better grip on the cork.

4. Hold the bottle at a 45-degree angle, pointing away from anyone or anything breakable. The amount of pressure in a champagne bottle is very high, and it can easily send the cork flying unexpectedly.

5. With one hand still firmly holding the cage and cork, grip the bottom of the bottle with your other hand. Gently twist the bottle from the bottom while keeping a firm grip on the cage and cork. At the same time, rock the cork very slightly to get it moving. You are turning the bottle, not the cork.

6. You'll feel the cork begin to move and press up against your hand. Keep a firm grip on it. The amount of pressure you use determines how loud the pop is when the cork finally comes out. You should actually rock the cork slowly while twisting to ease it out so the bottle releases a small sigh. This way the pressure is taken off and you keep the sparkling wine from spilling everywhere.

However, if you must make a big production of opening your bottle, then you'll want to saber your champagne. Sabrage (the method of opening a bottle with a saber) became popular in France during the time of Napoleon who preferred to celebrate his victories by having his bottles of champagne sabered open. Sabrage involves swinging a specialized sword over the tip of the bottle; this method cleanly removes the glass lip along with the cork. This method is not recommended for home use (Duh!)

Regardless of the way you open your champagne or sparkling wine, please enjoy it responsibly. If you are not celebrating in your own home, please designate a sober driver or take a taxi cab to get home safely.

*True French champagne blends three grapes―Chardonnay (white), Pinot Noir (red), and Pinot Meunier (red) from the Champagne region of northern France. However, sparkling wine is made all over the world. As a general rule, méthode champenoise (Champagne method) is the phrase you're looking for on the sparkling wine's label. This means that among other things, the wine has undergone a second fermentation in the bottle, producing millions of tiny bubbles.


Yum

Wednesday, December 28, 2011

Sweet Potato Gnocchi with Sage and Pecans

Sweet potatoes are readily available during the cooler months and are a delicious accompaniment to all sorts of dishes. Sweet potatoes are low in calories and contain no saturated fats or cholesterol. They are a rich source of dietary fiber. They are also an excellent source of the powerful natural antioxidants beta-carotene and vitamin A. Vitamin A is also required by the body to maintain integrity of healthy mucus membranes and skin and is a vital nutrient for vision. These amazing tubers are jam-packed with essential vitamins such as pantothenic acid (vitamin B5), pyridoxine (vitamin B-6) and thiamin (vitamin B-1), niacin, and riboflavin as well as gracious amounts of minerals like iron, calcium, magnesium, manganese, and potassium that are essential for metabolism.

We always seem to have sweet potato leftovers. Perhaps we subconsciously make extras as an excuse to make gnocchi (or pie!) This recipe has it ALL: sweet, savory, cheesy... (need we say more?) The wonderful flavors and textures of this dish will make you a sweet potato enthusiast too. 

Gnocchi Dough:
  • 2 cups sweet potatoes, mashed
  • 1 1/2 to 2 cups wheat flour
  • 1 egg
  • 1/4 cup Parmesan cheese
  • 1 teaspoon kosher salt

  • Sauce & Serving:
  • 20 large fresh sage leaves
  • 2 tablespoons olive oil
  • 1 teaspoon kosher salt
  • 1/3 cup pecans (or walnuts), chopped
  • Grated Parmesan for serving

If you are not using leftover sweet potatoes, first you must cook some sweet potatoes. We normally have leftovers so this step is not usually part of the recipe for us. The microwave works wonderfully for the potatoes in this recipe. Prick the sweet potatoes with a fork and then microwave until cooked all the way through. In our microwave this takes about 20 minutes on high. In our microwave this takes about 20 minutes on high. They are done when a knife inserted into the center goes through with little resistance. Alternatively, you can bake them in a 450°F oven for 40 minutes.

Once the potatoes are cool enough to handle, scoop the flesh from the skins and place in a mixing bowl. Mash the potatoes until smooth, and then add egg, 1/4 cup Parmesan cheese, 1 teaspoon kosher salt, and about 1 1/2 cups wheat flour. All-purpose flour works just fine as a substitute if wheat flour is not available. Mix with a spoon and then kneed until a soft dough forms. Then gradually add additional flour until the dough is not sticky.  Depending of the moisture level of your potatoes and egg, you may have to add a fair amount more flour to get the dough to a workable condition. If it’s too sticky to roll out, add more flour. Don’t overcompensate though; the dough should be soft – not dense.

Now for the fun part! Divide the dough in four parts, and using your hands, roll out each piece into a very long, skinny roll (our boys call them “snakes.”) Then cut off small parts of the dough to form little pillows. Each “snake” makes about 20 gnocchi. If you want them to look fancy, you can use a fork to make indentations on the top of each piece. Place the gnocchi on a parchment lined baking sheet.

Bring large pot of salted water to boil and working in batches, boil gnocchi for 3-5 minutes until tender. The gnocchi will float on the surface when done. Don’t over- boil or they turn to a gluey mush!

While there are lots of sauces that go well with gnocchi, the simplest is the best. In a large saucepan, heat a tablespoon or two of olive oil. Add chopped sage and a bit of kosher salt and heat for about a minute before adding gnocchi to pan. Transfer gnocchi from the boiling pot with a slotted spoon directly into the pan with the sage-infused olive oil. Toss gnocchi to coat well and cook for several minutes until slightly browned. Cook remaining gnocchi in same fashion, transferring to the pan once boiled.

Serve immediately, topped with chopped pecans (or walnuts), freshly grated Parmesan and a bit of fresh ground pepper.

Note: Any uncooked gnocchi can be frozen for up to 1 month. We freeze them in a single layer on a cookie sheet and then store them in a freezer bag. Do not thaw before cooking; simply boil them right out of the freezer so that they thaw as they cook.

Yum

Friday, December 23, 2011

Meet the Original Tom & Jerry

This very potent variant of eggnog which is served hot with brandy and rum was a popular drink in the U.S. and England from the mid-1800s until the Eisenhower administration. “Thomas and Jeremiah” was a jokingly-highfalutin’ name for the frothy hot drink once every bit of piece of American Christmas iconography as mistletoe and roasted chestnuts. In the 1880’s, the New York Sun reported that the most fashionable barrooms would place a huge ornamental and costly punchbowl midway on the bar at Christmas time. It was vulgarly called “dope.” The stylish martinis and “wallbangers” of the swinging 60’s instigated the demise of the Tom and Jerry craze. We first encountered this heady libation at a neighbor’s home several years B.K. (before kids.) We were very excited to find the recipe in our first cookbook “The Joy of Cooking” copyrighted in 1975 (which has been adapted below.) We’ve been told that later versions of the cookbook do not include this recipe, so truly it must be an outdated concoction.

Contrary to popular belief, the drink’s name is not related to the popular MGM cartoon nor was it the brain-child of famous bartender "Professor" Jerry Thomas who authored of one of the first bartender's guides “How to Mix Drinks” in 1862 either. Instead, it is a reference to Pierce Egan's book, “Life in London” and the subsequent stage play “Life in London” (“Tom and Jerry”) circa 1821. To publicize the book and the play, Egan introduced a variation of eggnog by adding ½ fluid ounce of brandy and rum calling it a "Tom and Jerry." The additional fortification helped popularize the drink.

The drink also features prominently in Damon Runyon's 1932 short story "Dancing Dan's Christmas" beginning with the passage: “This hot Tom and Jerry is an old time drink that is once used by one and all in this country to celebrate Christmas with, and in fact it is once so popular that many people think Christmas is invented only to furnish an excuse for hot Tom and Jerry, although of course this is by no means true.” Runyon’s story, which inspired the Broadway musical “Guys & Dolls,” introduces the drink and a group of New York street characters who, after having a few “cracks” of Hot Tom and Jerry, embark on a goofy adventure to spread holiday cheer while tarnishing the image of Santa Claus in the process.


Tom & Jerry Batter:
  • 3 eggs
  • Pinch of cream of tartar
  • 1/4 cup powdered sugar
  • 1/4 teaspoon ground allspice
  • 1/4 teaspoon ground cinnamon
  • 1/4 teaspoon ground cloves

Wash the eggs in their shells with mild dish soap before cracking* and separate the egg whites from the yolks. In a large bowl, beat the egg whites with cream of tartar until they are stiff but not dry. In another bowl, beat the egg yolks with sugar, allspice, sugar, cinnamon, and cloves. Gently fold the yolk into the egg whites trying not to deflate the whites. This is the batter which can be stored in the refrigerator for up to a week or it can be frozen.

For each drink:
2 tablespoons of Tom & Jerry batter
½ jigger (3/4 ounce) of brandy
1 jigger (1½ ounces) of dark rum

Dollop batter into a mug and add brandy and rum. Top off the mug with the hot water, milk or coffee and gently stir to mix thoroughly and dust each mug with freshly grated nutmeg. To quote Dancing Dan, “you will never taste anything so soothing in your life.”


*The original recipe in “The Joy,” the eggs are used raw. To avoid the threat of salmonella, use the freshest eggs possible and wash the shells before using. You can use pasteurized eggs or you can prepare the batter over a double-boiler if you wish to be extremely cautious.


Yum

Sunday, December 18, 2011

Busy Hands Cinnamon Dough

Busy hands are happy hands (and make happy Moms!) While this dough is not comestible in the true sense of the word, it is made from edible ingredients to form non-toxic, kid-friendly craft dough is undeniably perfect for the holidays. It gives the kiddles something to do while you work, makes the house smell wonderful and makes adorable holiday gifts and tree ornaments. This was always a great way for the kids to experiment with shapes using cookie cutters and plastic utensils to create their own masterpieces. One year we used alphabet cutters to make gift tags for packages. They were almost as well received as the actual presents!

Cinnamon Dough
  • 3 cups (25 oz. jar) of unsweetened applesauce
  • 1 cup ground cinnamon
  • ½ cup ground clove
  • ½ cup ground nutmeg
  • 1 tablespoon corn starch (or non-toxic school glue)

Pour applesauce into a sieve and place over a bowl. Drain overnight. Mix together ingredients and roll out dough on adding more cinnamon if needed to roll out dough without it sticking to your work surface.

Roll the dough between waxed paper until it's between 1/4" thick and 1/2" thick. And then cut out desired shapes. Gently place the shapes on a piece of clean wax paper or parchment paper. You can use a straw to punch a hole for the ribbon to hang. The circle of dough will pull out with the straw.

The ornaments will take about 4 days to dry completely depending on their thickness. You should plan to turn them over a couple of times or the edges will curl. (The thicker they are the longer it takes for them to dry, but the less they will curl.) Don't be surprised if the ornaments shrink a bit during the drying process. You may wish to keep this in mind when picking out the cookie cutters for your designs.

When dry, thread a piece of ribbon or yarn through the hole to hang. Enjoy the wonderful scent all season long.

Yum
Powered by Blogger.

footer social

ShareThis