Tuesday, October 25, 2011

Technique of the Week: Crimping

Crimping is the techniques used to decorate the edges of a pie in order to ensure the edges are well sealed. Begin by trimming the extra dough hanging over the edge with a knife or your fingers. Then, tuck the dough around the edge, creating an even ridge around the circumference of the pie plate. If you find a thin spot, you can add a little bit of dough from the scraps you removed earlier. Once you have an even edge on the way around the pie, pinch the pastry dough with a finger and thumb of one hand and pressing with the fore finger of the other hand to create a triangular pattern all the way around the pie. Once you have gone around the perimeter of the pie, then go back and lightly press down on the top of the crimped edge to even out the height giving the pie a fancy fluted crust.

Crimping can also be done with a fork, but is more common on smaller items such as hand pies, empanadas, or pierogi.

There has been much debate over the centuries as to how to create the flakiest crust. Some recipes call for ice water, cold butter or even vinegar. My Mom (dubbed the Pie Queen by Dom) uses this super simple recipe with nary a complaint from consumers.

2 cups all-purpose flour
1 teaspoon salt
½ cup vegetable oil
5 tablespoons cold water or milk

This recipe makes enough for two regular pies, a top and a bottom or one large pie with a little leftover. Mix ingredients together until well combined creating a large ball. Split ball in half and flatten out the dough beginning with a rolling pin. This dough is not sensitive to the heat from your hands, so once the dough is fairly flat, you can move it to the pie plate and press it out creating an even layer in and around the plate. Using the technique above, crimp the edge of your crust. The finished crust can be refrigerated until the pie is ready to be added.

You can use the scraps of dough to create pretty decorations for your pies using cookie cutters and sprinkling the cut-out shapes with a little sugar before placing them on top of your pie. As a little girl, I loved pie baking day because Mom always had leftover dough scraps that she would roll out and sprinkle with cinnamon sugar. She would bake the little “tarts” until the crust was crispy and the cinnamon sugar melted into a candy topping which was usually still warm as my sister and I came in from the long bus ride home.

Yum

Sunday, October 23, 2011

Taste of Atlanta = Tastes for Every Palate

What a glorious day for the 10th Anniversary of Taste of Atlanta, the annual showcase highlighting the incredible verve and diversity of Atlanta's amazing food scene. Sonny and I started by strolling through looking at all the options, stopping to chat with volunteers at the Community Coffee booth and sampling their coffee with chicory.

With so many amazing choices, Sonny and I had a difficult time selecting from all the delectable morsels available for tasting. Sonny started with a chipotle chocolate chip cookie from Pura Vida, and was then lured by the wonderful scent of St. Louis-style ribs being grilled at the Ribs n' Blues table. I was intrigued by Famous Chuck’s roast beef po’boy and had to see if it rivals our homemade version. We walked through the organic market featuring honeys, preserves, fresh vegetables and other homemade goodies, and sat for a while to listen to Sonya Jones of Sweet Auburn Bread Company describe how to make her famous apple cider pie.

Being a huge fan of sushi, Sonny tried the crab and cheese spring rolls from Tin Drum, and Himalayan rolls from Genki and washed them down with a sample of Razzleberry tea from Peace Tea. Chef Tina Aleandri from Noche and Chef Phillip Strange of Shout (sharing a tent) were having such a grand time bantering with the crowd (and each other) that I had to stop and try their sumptuous “Albondigas” (spanish meatballs in tomato broth,) the most incredible warm chestnut soup, and equally stunning salmon rillettes on crostini that they were offering. By far, the best morsels of the day!

We stopped in the Silent Auction tent which was filled with loads of merchandise and offers for discount deals in the metro area. All proceeds from the Silent Auction will benefit one of our favorite charities; Share our Strength's Cooking Matters™. Cooking Matters™ is cooking-based program that teaches nutrition, cooking, and household budgeting with a focus on teen education.

While the fish and chips from Ri-Ra Irish Pub looked very tasty, the line was longer than a summer day on the equator. We elected instead for free samples of Chobani Champions’ “Honey-nana” Greek-style yogurt, and then while Sonny tried a lamb slider from Max Lager’s, I nibbled on some of their apple-caramel bread pudding.

Feeling satiated and having had our fill of people-watching, we started strolling in the direction of the parking lot when we both did a double-take: Sonny for a slice of oreo cheesecake and I for a freshly made Nutella banana crepe both being offered by Café Intermezzo. Using our last few tickets (and loosening our belts), we indulged in one last treat before passing through the exit gates of the festival.

So much food, so little time (and stomach capacity)! We will have to wait another year to enjoy so many flavor sensations in one metro-Atlanta location. We are counting the days… 365 (it is a leap year!)

Yum

Friday, October 21, 2011

Big Fun at the Big Grill!

Smoked wafted through the air as we approached the tented area that had been cordoned off for Taste of Atlanta’s kick-off party dubbed “The Big Grill” with proceeds benefiting Georgia Organics. The back area was brimming with Big Green eggs and the heady smell of cooking meat filled the air. Inside the atmosphere was very festive with decorated tables, cozy seating areas and ample drink stands (sponsored by Amstel Light). And the food… AH-mazing!

We started at the back with Serpas' crispy pulled duck on a cube of confit, Rathbun’s pork belly taco with banana mayonnaise, and JCT. Kitchen’s grilled quail breast with puffed farro and pomegranate reduction.

Stopping briefly to listen and enjoy the party tunes being sung by Atlanta’s popular Yacht Rock Schooner, we circled back to sample Lamb loin, with chick pea frites and smoked paprika aioli from Briza, mini shrimp and crab burgers with remoulade from Watershed and hanger steak sliders with pickled vegetable slaw and citrus crème fraiche from Ray’s on the River.

We were swooning from all the incredible flavors (and feeling a bit full,) so we avoided lines for samples of seared scallops with pumpkin risotto, braised brisket sliders and hyper-dressed burgers which stretched to Terre Haute. Instead we opted to give in to the temptation of The Barrelhouse’s banana pudding shooters with graham cracker streusel and lingering over pumpkin-chestnut and bourbon-burnt-sugar ice creams, Campari-blood-orange sorbet created by High Road Craft.

It was clear watching the jovial crowd that we were not the only ones who were enjoying indulging our palates with all the marvelous treats offered by Atlanta’s premier restaurants and chefs. And this is just the Kick-Off Party! We can only imagine the delights that await us tomorrow at the 10th Anniversary Taste of Atlanta festival.


Yum

Wednesday, October 19, 2011

Warm Kettle Chips with Marzetti Blue Cheese Sauce

I was very excited when I received an email from Foodbuzz letting me know that we would be given an opportunity to try a bottle of Marzetti Simply Dressed® salad dressing as part of the Tastemaker program. I had a devil of a time deciding which bottle to choose from the enticing assortment which included Champagne, Ginger Sesame, Greek and Pomegranate. I finally selected Blue Cheese with the realization that it would be the most desirable to our teenage boys. I envisioned a “wedge salad” as I placed a head of iceberg lettuce in the cart, knowing full well that any remaining dressing would be used for hot wings and celery.

Alas, the best laid plans of mice and men… During Cross Country season, the guys arrive home in the evening STARVING. A phone call from Dom let me know that dinner would be delayed a while, so in a pinch I found a bag of Kettle potato chips in the pantry. Thinking quickly I turned the oven on 350oF and layed the some of the chips on a parchment lined (oven-safe) plate. I grabbed the bottle of Marzetti Simply Dressed® blue cheese dressing from the fridge and slathered the chips with dressing and popped them in the oven for about 10 minutes (as long as it took 2 boys to finishing showering and pour sodas into glasses.) Once removed from the oven I added a few freshly snipped chives (for Sonny’s benefit) to the plate and crumbled some blue cheese (originally purchased for the wedge salad) over the top.  And, of course, they ate every last chip before I could get a picture!

Needless to say the guys were not disappointed when I made a second plate for Dom’s arrival home. And Dom, who thinks everything tastes better topped with arugula that has been tossed with truffle oil and salt added his garnish to the dish. I guess I need to buy a least one more bottle.

Would you like to try a bottle of Marzetti Simply Dressed® salad dressing? Click here for a $1.00 off coupon.

Yum

Monday, October 17, 2011

Technique of the Week: Sautéing

The French word sauté is a past participle of the verb "to jump." Similar to pan-frying, this cooking method uses a small amount of fat in a shallow pan over relatively high heat. Always heat your pan with oil before adding the ingredients. When ingredients are added to the pre-heated pan, they hop and "jump" around in the pan confirming that you have begun with a sufficient amount of heat. Only enough fat to lightly coat the bottom of the pan is needed for sautéing; too much fat will cause the food to fry rather than just to slide across the surface of the pan. Olive oil or clarified butter are commonly used for sautéing, but most fats will do. Regular butter will produce more flavor, but has a tendency to burn more quickly than other fats due to the presence of milk solids, so clarified butter is more fit for this use.

The most common use of this method is preparing vegetables for stews or casseroles. When sautéing, the vegetables should be stirred constantly because they are usually finely chopped and need to be kept moving to prevent them from burning and sticking in the hot pan. The browned vegetables are fully cooked while preserving its texture, moisture and flavor. If meat, chicken, or fish is sautéed, the sauté is often finished by deglazing the pan's residue to make a sauce. Sautéing differs from searing in that searing only browns the surface of the meat in preparation for other cooking methods.

Tricks and tips:
  • Use a sauté pan. The sauté pan is designed specifically for that little flip that ensures even cooking.
  • Cut your items to a uniform size to ensure even cooking.
  • Choose the right size of pan; overcrowding will cause the food to steam instead of caramelize.
  • Sautéing is versatile in terms of which fat to use. Depending on flavor profile, any number of fats can be used. The idea is to use about 1-2 tablespoons preheated in the pan on medium-high to high heat depending on the oil and the item to be sautéed. Check your recipe or this Whole Foods Guide is an excellent source for determining the best oil to use and their flavor profiles.
  • For veggies and fruits: Once your oil is hot, add your item and toss to evenly coat with oil and allow to brown on one side. Then toss again and allow to brown, until you have even browning on all sides. Don’t toss too often, it will prevent caramelization from happening. When all sides are nice and brown, lower the temperature to avoid scorching and cook to desired crispness.
  • For meats such as fish, chicken, pork and steak: season your meat with salt, pepper on both sides or marinate as instructed by the recipe. If marinated, dry the outside of the meat on paper towels to avoid hot oil spatters. You can lift an edge of your protein to check the color before turning it. You want to only turn it once, especially for delicate items such as fish.
Quick Cooking Guide:
  • Fish: Sauté until outside is golden and fish begins to flake when tested with a fork.
  • Chicken: Sauté until no longer pink and internal temperature is 160° F. For thicker pieces such as legs and thighs, consider a quick sear in an oven-proof pan then moving the item to a pre-heated 350°F oven to reach desired doneness.
  • Steak: Preheat the pan, sear for 1-2minutes per side on high, then reduce temperature to medium and cook to desired doneness. Can be finished in the oven after a quick sear if desired. This method is recommended for thicker cuts of meat.
  • Pork chop (bone-in or boneless): Preheat the pan, sear for 1-2 minutes per side on high, then reduce heat to medium and cook to internal temperature of 145-155°F depending on desired doneness. Can also be finished in the oven.
Some of our recipes that include sautéing include:


Yum

Saturday, October 15, 2011

Randomly Awesome Auburn Rice with Chanterelles & Chilies

Imagine the excitement when we saw that Marx Foods was having another of its infamous foodie challenges! This time it was the Random Sample Challenge. We received a goodie box that included an Auburn rice mix, dried wild chanterelle mushrooms, Cascabel chilies, granulated dried New Mexican chilies and coarse smoked salt of which 2 of the 5 ingredients must be used in an original recipe creation. The contemplation began. It has been our experience that in most recipe competitions, the most “creative” (read outrageous here) concoctions win. So, we were all set to experiment with a smoke-salted, chocolate molé rice pudding, when Sonny (who could survive on buttered rice with black pepper alone) pointed out that we would not be able to enjoy the natural flavors of the rice mix once smothered in chocolate and chili pepper. So…

Changing gears, we decided to develop a recipe that would accentuate the natural flavors of the random goodies we had received starting (at Sonny’s request) with the Auburn rice blend of short grain brown rice and Himalayan red rice. The rice seed is the most important grain with regard to nutrition and caloric intake, providing more than one fifth of the calories consumed by the world's human population, since a large portion of the corn crops are grown for purposes other than human consumption. Most types of rice can be eaten as brown or white rice. When only the outer shell of a grain of rice (the husk) is removed, brown rice is produced. White rice is produced by further removing the next two layers (bran and germ) leaving the starchy endosperm exposed. Brown rice is more nutritious than white rice and has a chewy texture and mild nutty flavor.

Being huge fans of chanterelle mushrooms, we decided to reconstitute and use them even though it is recommended that dried chanterelles be used in dishes where the mushrooms are to be pureed because they can be woody and tough. For the record, this was not true at all. When re-hydrated these high quality mushrooms were rich and complex with fruity undertones.

Next, we decided to grind and add in both types of chili pepper to add depth and zing. Realizing the resulting dish was an overindulgence in earthy, elemental essences; we went all the way and finished the plate with a light sprinkling of the coarse smoked salt. The deep natural flavors of each ingredient were accentuated by one another yet fused into the perfect combination of tastes and toothsome textures which made a wonderful accompaniment to roasted chicken. Of course, Sonny commandeered the leftovers, adding a splash of soy sauce for lunch the next day.

¾ cup Marx Foods’ Auburn Rice Mix
1 ½ cup water
2 tablespoons extra-virgin olive oil
1 small onion, chopped
5-6 (about 2 oz.) Marx Foods’ dried chanterelle mushrooms, re-hydrated and chopped
1 Marx Foods’ dried Cascabel chili pepper, toasted and ground
¼ teaspoon Marx Foods’ granulated New Mexican chili pepper
Marx Foods’ coarse smoked salt to taste
White Truffle oil for drizzling (optional, but REALLY good!)
¼ cup toasted pine nuts (optional)
Ground black pepper to taste

Rehydrate chanterelles by placing them in a cup of boiling water and allow to sit until the water is cool. (We soaked them overnight, but only because we remembered to do so.) Strain the mushrooms and reserve the water for cooking the rice.

Rinse the rice blend before cooking and add the rice and water to a pot.  Bring the water (and rice) to a boil, cover the pot, and reduce the temperature to low.  Let the rice simmer for about 20 minutes, then turn the heat off leaving pot covered to allow rice to steam for another 15 or so minutes until grains are plump and tender.

Toast dried chilies and allow to cool before grinding as this restores the fresh flavor and texture. Remove stems and grind the pepper using a coffee grinder. (You can use a mortar and pestle or pepper mill if you don’t have a coffee grinder.)

Meanwhile, heat olive oil in a skillet over medium heat. Sauté onion until soft then add chopped reconstituted Chanterelle mushrooms, continue to sauté until golden brown. Add ground chili peppers and mix well. Then carefully add the cooked Auburn rice and fold together completely coating the rice and cooking of any remaining liquid. Turn rice out into a bowl and finish by drizzling with truffle oil and finishing with smoked sea salt and freshly ground pepper.

Toast pine nuts in a pan on the stove, shaking the pan continually. When the nuts start to turn a light brown, remove from the pan and let cool on a plate until ready to use as a garnish. (Note: the pictures do not show the pine nuts, because of allergies.)


Yum

Tuesday, October 11, 2011

Technique of the Week: Boiling

Following the adage, you must walk before you can run, this week’s technique is boiling. This, however, occurred to me after last week’s segment of blanching, which of course requires the use of boiled water. In the 1940’s, it was not uncommon to hear someone say, “she’s such a poor cook, she can’t even boil water,” as women began enjoying professional advancement in the workplace. In fact, this was the premise of several classic movies including Katharine Hepburn’s Woman of the Year and Barbara Stanwyck’s Christmas in Connecticut. While the advent of microwave ovens has made boiling water as simple as pressing a button, it is still wise to have an understanding of the basic principles. Who knows, it might even come in handy if the power goes out.

Boiling is cooking food in a liquid (water, stock, or milk) at the boiling point of 212oF. The boiling point can vary with the atmospheric pressure affected by altitude or weather. Dissolved solids (like salt or sugar) will increase the boiling point of water as well, but the effect is minimal. The amount normally used in cooking will effect less than a 1 degree change. In order to make any significant difference, you would need to add it in vast quantities.

As the liquid heats in the process of boiling, tiny bubbles appear on the bottom of the pot and rise to the surface. Gradually, the bubbles increase in size until large ones form, rise rapidly and break which produces a constant agitation of the liquid. There are several factors that influence the rapidity with which water may be brought to the boiling point; namely, the kind of vessel used, the amount of surface exposed, and the quantity of heat applied.

While water that is hot from the tap obviously boils faster than cold water, it is better to use cold water instead because hot tap water will contain more dissolved minerals from your pipes, which can give your food an off-flavor. A good point to bear in mind in preparing foods by boiling is that slowly boiling water has the same temperature as rapidly boiling water and is therefore able to do exactly the same work.

Liquid boils faster when the pot it’s in is covered. A cover placed on the saucepan increases the pressure inside the pot which in turn increases the boiling point of the liquid. Because the liquid is in a confined area, the molecules are constantly bombarding into one another creating greater kinetic energy. A lid also prevents a loss of water by condensing the steam as it rises against the cover; as water boils, some of the steam flows back down in the form of liquid.

The main foods that are cooked using this method are eggs (toughening the albumin,) vegetables (softening the cellulose fibers) and pasta (rehydrating and cooking the dough). Meats are sometimes placed in boiling liquid to relax the tissue and dissolve the fat, and then the heat is reduced to allow the meat to simmer as in stews. Boiling most foods until done typically renders them shrunken and tasteless (this is where blanching comes in.)

In addition to cooking, boiling renders water safe since it destroys any germs that may be present. However, boiled water is known to lose flavor. As this change is brought about by the loss of air during boiling, the flavor can be restored by shaking it in a partly filled jar or bottle to add air.

Boiled Water
Water
Heavy saucepan or pot

Fill pot about 2/3 to the top with cold water leaving room for expansion and agitation of the water’s surface. Cover pot and place on the stove top over high heat. The appearance tiny bubbles on the bottom of the pot indicate the water is close to the boiling point. Once water reaches a rolling boil (i.e., turbulently churning with large bubbles,) the heat can be reduced as extra heat is not necessary to maintain the boiling temperature. The boiling water is now ready for use in one of its many applications.


Yum

TOW Addendum: Sous Vide

A friend pointed out that I had neglected to include a very important aspect of the technique of boiling food: Sous Vide - a method in which food sealed in airtight plastic bags is cooked in a water bath for a long time (72 hours is not unusual) at a temperature much lower than normally used for cooking, typically around 140 °F.

The term sous vide (pronounced soo-VEED) is French for "under vacuum" and was developed in the mid-1970s by chef Georges Pralus for the Restaurant Troisgros in Rouen, France.

Pralus initially applied the sous vide method to cooking foie gras (goose or duck liver), as a way to retain the fat content and improve texture.  Other gastronomy pioneers soon began experimenting with this technique, applying it to all manners of food to boost flavor and appearance, maintaining the integrity of ingredients by heating them for an extended period at relatively low temperatures.
Atlantan and Chef Richard Blais is one of those pioneers, whose mission is to introduce sous vide to a wider audience.  Sous vide is a well-respected cooking method among gourmet chefs and can routinely be found in upscale restaurants.  In addition, many large-scale restaurant and institutional kitchens use the method in order to prepare perfectly cooked and consistent dishes that eliminate guesswork, Chef Blais explains.

Because of the expensive equipment costs, upwards of several thousand dollars, until recently sous vide was largely been inaccessible to home cooks.  However, the technique has recently gained traction among foodies and has made the leap into home kitchens with the Sous Vide Supreme. It is a restaurant secret for your gourmet kitchen!


contributed by Jim Brams of The Cook’s Warehouse

Yum

Saturday, October 8, 2011

Be Safe this Month

The U.S. has become prolific at creating "national month" and “national day” events to promote business and social interests. October is a particularly popular month to raise awareness for a variety of causes* including National Emergency Care and National Fire Safety Month. The below infographic from J.E.S. Restaurant Equipment shows some statistics and safety tips to help “celebrate” these two important issues. October is the perfect time to practice kitchen safety as we start spending more time in the kitchen preparing for the upcoming holiday season (and the knife safety images are perfect for Halloween!)

*And for the record, we really think that Vegetarians and Pork Lovers should consider celebrating in different months.

Yum

Tuesday, October 4, 2011

Technique of the Week: Blanching

This is the first of a new series posts which will feature a different cooking technique each week. We chose blanching because we seem to be doing quite a bit of it lately with the gorgeous greens that are coming into season. I recently mentioned to a friend that we were having our favorite Swiss chard gratin for dinner. When she politely asked how to make it, I started the explanation with "first you clean the chard and blanch it." Her eyes immediately glazed over and she said, "I'll never make it - I don't even know what blanching is."

Blanching is the process of plunging raw food items into boiling water for a few minutes typically to soften, partly cook, or to remove a strong flavor. After a brief time in the boiling water, the food is then plunged into cold or iced water (shocked) to immediately stop the cooking process.

The term blanch used to mean "to whiten" and was used to whiten meats like veal. Today this method is more often used to remove the skins from certain fruits and nuts including tomatoes, peaches, pistachios and almonds or to destroy enzymes that will spoil the flavor and texture of vegetables when frozen. Blanching cleanses the surface of dirt and organisms, preserves the color and retards the loss of vitamins of vegetables, especially leafy greens such as broccoli rabe or kale.

In the case of asparagus, the technique of blanching is actually the preferred method of cooking the tender-stalked perennial. To cook asparagus using the blanching method, the shoots are boiled for 30 seconds, and then to stop the cooking instantly they are dipped into cold or ice water.

It is not uncommon for home cooks to blanch raw eggs before using them in recipes such as a traditional Caesar salad dressing, fresh pasta dough or homemade cookie dough (especially if children are helping in the kitchen.)

To pasteurize large eggs, place them (whole-still in the shell) in a saucepan filled with water and fitted with a digital thermometer. Turn on the heat and bring the water temperature up to 140 degrees F and cook eggs for 3 minutes. Remove eggs from hot water and rinse thoroughly with cold water to stop the cooking process. Pasteurized eggs will keep in the fridge the same length of time as unpasteurized eggs and can be used just as any raw egg would be used. We mark the shells with a Sharpie marker to make them easy to identify.

Yum

Sunday, October 2, 2011

Party At Ponce To Restore Building And Hope

The Party at Ponce will most definitely be dubbed Atlanta’s party of the year! To kick-off the re-development of the 2.1 million square-foot property that was the first Sears retail store in Atlanta (which later became Atlanta City Hall East in 1991,) Jamestown Properties celebrated plans to transform the historic site once an amusement park called “the Coney Island of Atlanta,” and the original home to the “Atlanta Crackers” baseball team into an urban mixed-use “destination” named Ponce City Market.

The huge venue featured a stage in the back lot bordered by food trucks parked along the perimeter, and a multitude of tables laden with food samples prepared by the chefs of Atlanta’s most popular restaurants inside the building’s massive loading area. Attendees enjoyed the musical talents of the Party’s headliners the Indigo Girls, Shawn Mullins and Francine Reed as they snacked on treats from Atlanta's most celebrated chefs including:

  • Kevin Rathbun of Rathbun’s; Szechuan-peppered Pork Belly Tacos with Orange Hoisin Sauce, Sake Pickled Onions
  • Joshua Hopkins of Abattoir; Brisket Salad
  • Anne Quatrano of Bacchanalia; Radishes with butter, Cheese Straws and Ginger-Molasses Cookies
  • Shaun Doty of Yeah! Burger; Free-Range Turkey Burger with Pickle and Alabama White BBQ sauce
  • Jay Swift of 4th & Swift; Braised Lamb with Pomegranate Couscous topped with Spiced Yogurt
  • Hugh Acheson of Empire State South; She Crab Soup with Sherry Gelee with Mace Whipped Cream and Crisp Rice
  • Scott Serpas of Serpas; House-Smoked Salmon with Chipotle Cream Cheese, Red Onions And Capers
  • Ford Fry of JCT Kitchen; Sweet Onion and Fontina Tortelloni
  • Duane Nutter of One Flew South; Blueberry Mountain Chicken over Waffles
  • Ron Eyester of Rosebud; Marinated Shrimp and Late-Summer Peppers with Mustard Sorghum Vinaigrette
  • Pano Karatassos of Buckhead Life Restaurant Group & Eric Cutillo of Kyma; Grilled Octopus over Quinoa Salad
  • Frederico Castellucci of Iberian Pig; Iberico Ham and Artisanal Salads
Food truck offerings included frozen treats from Westside Creamery and Honeysuckle, Korean-style tacos from Yumbii, a selection of tamales from the Tamale Queen and jambalaya, crawfish dip and beignets from Just Loaf’n. Party goers also had the opportunity to try a "Cat's Meow," the PAP signature drink created by a master mixologist from Rosebud made with lemon-&-lavendar-infused Cathead Vodka, agave nectar and ginger beer.

Overall, the evening was an enormous success with all proceeds from the “Party” benefiting and the Atlanta BeltLine Partnership and Georgia Organics. The future “Ponce City Market,” on land previously populated with natural springs known for their restorative properties, is certain to "restore" the building's usefulness and become the nexus of the four established neighborhoods and the future Atlanta BeltLine transit corridor.

Yum

Friday, September 30, 2011

Cookbook Signing Salad With A Southern Twist

Dom and I joined a crowd of Southern foodies at The Cook’s Warehouse in Ansley Mall to congratulate Virginia Willis on the national release of her new cookbook, Basic to Brilliant, Y’all; 150 Refined Southern Recipes and Ways to Dress Them Up for Company. Atlanta-based celebrity chef Virginia Willis is a classically trained French chef with a Southern accent to her recipes and cooking. Beginning at her home teaching kitchen, the book signing fundraiser for the Atlanta Community Food Bank was the first stop on the Chef’s 10-city tour.

Guests were treated to samples from Chef Willis’ new collection of recipes served by Les Dames d’Escoffier International. Nibbles included fried pork skins, fennel flat bread, garlic-stuffed prime rib sliders, skewered okra, accompanied by Woodford Reserve, super-premium, small-batch Kentucky bourbon mixed with Coca-Cola Classic.
Fried pork rind in a pork rind serving bowl
The freshly made brownies were also difficult to resist as the gracious Cook’s Warehouse servers passed through the crowd. The arugula salad with quintessential Southern ingredients of country ham, and pecans was the stand-out preview of the evening. The zesty cider vinegar dressing and aged white cheddar crumbles completed the ensemble of regional flavors.

Arugula Salad with Country Ham and Pecans
8 cups (about 6 oz.) arugula, dandelion, or frisee
3 tablespoons apple cider vinegar
1/2 teaspoon firmly packed light brown sugar
Coarse salt and freshly ground black pepper
2 tablespoons canola oil
3 thin slices country ham, cut into lardons
1/2 onion, preferably Vidalia, thinly sliced
1 small clove garlic, finely chopped
1/2 cup (about 2 oz.) crumbled aged white Cheddar cheese
1/4 cup chopped pecans

Place the greens in large bowl. Set aside. Stir together the vinegar, brown sugar, salt, and pepper in small bowl until the sugar dissolves. Set aside.

Heat the oil in a skillet over medium-high heat. Add the ham and cook, stirring occasionally, until crisp, 5 to 7 minutes. Using a slotted spoon, transfer the ham to a plate lined with paper towels.

Add the onion to the skillet and cook over medium heat, stirring frequently, until translucent, 3 to 5 minutes; add the garlic and cook until fragrant, 45 to 60 seconds. Add the vinegar mixture, then remove from the heat. Working quickly, scrape the bottom of the skillet with a wooden spoon to loosen any yummy browned bits. Set aside to cool just slightly.

Pour the warm dressing over the reserved greens, add the ham, and toss gently with tongs until the arugula is slightly wilted. Taste and adjust for seasoning with salt and pepper. Divide among chilled serving plates. Sprinkle over the cheese and pecans. Season with freshly ground black pepper and serve immediately. Wonderful crisp arugula with seasonal Southern flavors - Yum Y'all!


Yum

Wednesday, September 28, 2011

Pleasantly Bitter & Spicy Wherewithal

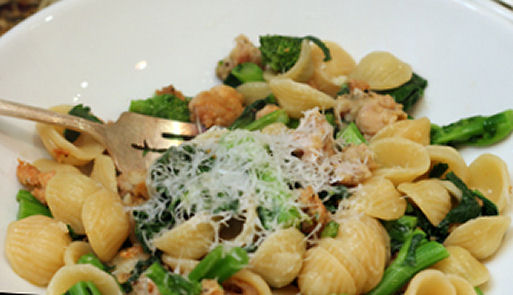
This classic Italian recipe is a perfect seasonal dish for the cooler weather of fall through late winter when broccoli rabe, or rapini, is at its best. This is a regular meal at our house, made with readily available ingredients; it has a mild bitter tang that is an appealing contrast to the spicy pork sausage served with carb-loaded pasta that is  a hit with always-starving teenagers.

Broccoli rabe, which is not technically related to broccoli at all, is an unusual and healthy addition to any meal. When young and tender you can eat it all, from stems to the florets and even the delicate yellow blossoms. We blanch the rabe to tenderize the stalks (with the added benefit of enhancing the brilliant green color.)

This dish is a masterpiece of textures and flavors with crisp spicy meaty, earthy pleasantly bitter greens, and piquant creamy cheese. As you toss the ingredients with the orecchiette (Italian for "little ears,") the juices and flavors are captured in the hollows of the concave pasta. It’s a forgiving recipe which can withstand variations in ingredients and types of pasta; a successful compilation on all levels which explains its long-standing popularity in Italian cuisine.

  • 2 Ibs. broccoli rabe, stems removed
  • 1 lb. hot Italian sausage
  • 1 Ib. orecchiette pasta (or penne)
  • ¼ cup extra-virgin olive oil
  • 7 cloves garlic, peeled and minced
  • 1-2 teaspoons crushed red pepper flakes (optional)
  • Salt and freshly ground black pepper
  • Pecorino-Romano, grated

Bring a deep saucepan of salted water to a boil, and then place broccoli rabe in the boiling water. Allow water (and rabe) to return to a boil and simmer until bubbles appear. Remove from the pot from the heat and drain water from greens. Plunge broccoli rabe into cold water to stop the cooking process and drain again. Extract as much water as possible by patting rabe dry. We use a towel to roll greens and blot dry and then and set them aside.

Cook orecchiette in a large pot of boiling salted water until al dente which should take about 10-12 minutes. We use the blanching water whenever feasible to retain the flavor and nutrients of the rabe. Remember to save some of pasta water to help hydrate the sauce if needed.

Remove sausage from casings and cook in a large sauté pan until done (about ten minutes) turning every few minutes and breaking into bite-sized pieces while cooking. When the sausage is cooked through, remove meat to a plate leaving juices and crispy bits in the sauté pan.

Add olive oil to the reserved sausage juices and heat over medium heat. Add garlic and sauté until fragrant and just golden, (about 3 minutes.) Then add broccoli rabe and sausage back to the pan and season to taste with salt, and red and black peppers. Cook together until warmed through, about 5 minutes. Reduce the heat to low and keep warm until pasta is ready.

Drain pasta in a colander, then add to broccoli rabe and sausage, and toss to mix well. Add reserved pasta water as needed to allow the sauces to fully coat the pasta giving it a creamy, smooth consistency.  Transfer to a large serving plate and top with grated Pecorino-Romano. Remember to stop and savor the aroma and flavors that have been satisfying Italian appetites for centuries.


Yum

Friday, September 23, 2011

Fabulous Favas of Fall

Nothing says Autumn like… fava beans? It is true that most people associate favas (also known as broad beans) with Spring, but in reality these legumes are most widely available in the late Summer and fall in most parts of the U.S. When we see favas available at the market, we load the basket and prepare to feast.

Fava beans were eaten in ancient Greece and Rome and are one of the oldest plants under cultivation. Despite the name, fava beans (from the Italian word fava, meaning "broad bean") are actually a member of the pea family. Fava beans have a distinct flavor and creamy texture that makes them a great addition to a wide variety of dishes.

Favas are high in fiber and iron, and low in sodium and fat. They have no cholesterol but so much protein that they are called the” meat of the poor.” As a matter of fact, Italians credit the fava bean as the key factor in saving the Sicilians from starvation during a great famine. Since then, the fava has been considered good luck; in fact some people believe that if you carry a fava bean, you will never be without life’s essentials.

Fava beans should be shelled and peeled before eating. The outer peel on the beans, while technically edible, is very woody in texture and detracts from the buttery taste of the inner bean. Fava beans can be served fried and salted, mashed, or added to hearty stews and soups. We love to eat them simply boiled and tossed with olive oil, mint and cheese. Sometimes the guys don’t even wait for the >mint and cheese, popping them down like beer nuts.

  • 4 cups shucked fresh fava beans
  • 1/4 cup olive oil
  • 2 tablespoons finely chopped mint
  • ½ cup Parm or Romano cheese, shaved
  • Salt and pepper to taste

Start by removing the beans from the large green pods. Then blanch beans in a large saucepan in plenty of salted boiling water until tender, about 3 to 5 minutes, depending on the size of the beans and number in the pot. This will soften the outer shell for easy removal.  Drain well and rinse with cold water to cool. This prevents overcooking and mushiness, as well as makes the skin easier to remove from the favas.

Once cool enough to handle, use a paring knife to pierce and peel away the outer grayish-white, waxy shells of beans revealing the bright green bean inside. Place shelled peeled beans in a bowl. Drizzle beans with olive oil, season with salt and pepper, add mint and toss gently to mix.  Place beans in a serving dish and top with the grated cheese. You can also use a vegetable peeler to shave slices of Parmesan-Reggiano cheese making large “curls” to garnish the salad in place of the grated cheese. These dress the dish up for company!

Favas are also delicious served mashed. Following the instructions above blanch and peel favas, and mash beans adding butter and a splash of cream. We also add one boiled potato to the bean mash to improve the consistency (and stretch the beans!)

Thanks for reading our 200th post! We hope you will keep coming back for 200 more.

Yum

Sunday, September 18, 2011

Nitty Gritty Start To The Day

The season of sniffles is upon us and few things offer morning comfort like a bowl of creamy, steamy grits. Grits* are historically known as a food of the South, but they’ve been around much longer in one form or another. Grits are a traditional breakfast food made of ground dried corn kernels. In consistency, they are rather like the “Cream of Wheat” which is more popular in Northern states.

Rockahominie (hominy) dates back at least 5,000 years, and was one of the first foods that Native Americans shared with European colonists. This sturdy staple of dried corn kept many settlers alive during those first cold winters. Hominy is the dried kernel of corn that has been threshed to remove the hull and germ and soaked in a weak lye solution to make the kernels swell. To make grits, the dried hominy is ground to one of three grinds, fine, medium or coarse and is simmered with water until a thick porridge is formed. “Quick grits” (a very fine grind that has been pre-steamed) are available in supermarkets, but to quote the famous line from the movie My Cousin Vinny, No self-respectin’ Southerner uses instant grits.”

It should also be noted that the Italians, got their corn meal for polenta by way of these same Native Americans, so contrary to Dom’s theory that all foods originated in Italy, grits has at least a 4,500-year head start on polenta.

Grits were also a vital part of the Southern diet during the Great Depression since they were inexpensive and required only water and lard or butter to make. During the same time period, the equally Southern expression, "nitty-gritty," originated as a derogatory term and was used as secret slang by segregationists. Southern politicians and campaigners adopted the phrase to refer to "back to basics" campaigns based around fundamentalist values and beliefs.

A proper bowl of grits has butter, salt and black pepper for seasoning. They are more savory than sweet. People have their individual tastes in grits. Some prefer a thinner consistency like polenta, while others like their grits thick and creamy.

  • 3 cups water
  • 1 teaspoon salt
  • 1 cup regular grits (we prefer stone-ground, white)
  • 2 tablespoons butter

Bring water to a boil in a saucepan and add grits to water reducing heat to medium. The grits will be very watery at this point, but they will thicken nicely in a few minutes as the water is absorbed.

Grits should be allowed to simmer slowly so they don’t get lumpy. If they appear to be boiling excessively, turn the heat to medium-low. Stir consistently to ensure they cook evenly and do not stick to the sides of pan. Continue cooking and stirring until the grits thicken to just a littler thinner than your desired consistency as they will continue to thicken as they cool. Stir in the butter until completely incorporated. The grits should have a creamy, silky texture. Serve with freshly ground black pepper. For cheese grits, add ¼ - ½ cup of your favorite grated cheese.

To make grit cakes (great for leftovers), layer grits in a moistened baking dish, cover with plastic wrap and refrigerate. When the grits are chilled and firm, cut them into desired pieces, (moistened cookie/ biscuit cutters work wonderfully.) Fry in a lightly greased pan until both sides have a crispy brown crust.

*GRITS is also the acronym for "Girls Raised In The South."


Yum

Tuesday, September 13, 2011

Milk Blanket and Nutmeg Dreams

I know it sounds so smarmy, but the bed is too big when my sweetie (Dom) is out-of-town. So after tossing and turning, I am warming some milk and wondering whether there is a scientific reason it makes me sleepy…

Most of us have heard of tryptophan, the essential amino acid responsible for that unavoidable nap after a big turkey dinner on Thanksgiving day. As it turns out, there are traces of tryptophan in milk too. The human body converts tryptophan to the sleep-inducing hormones serotonin and melatonin. However, the amount of tryptophan in any food, turkey and milk included, is not great enough to boost hormone levels to a level that would induce sleep.

So, am I wasting my time waiting to see the little bubbles that mean the milk is perfectly heated and not on its way to being scorched, making the pan impossible to clean? Maybe it is the psychological association with warm milk and infancy; reminiscent of the times "I slept like a baby." Obviously, we associate milk with our mothers and their love and care. These comforting feelings and remembrances can produce serotonin in the brain that actually create a sensation of well-being and relaxation which promotes drowsiness.

Milk also coats and soothes the stomach. Most people sleep best when their tummies are full.  Milk can also calm heartburn or digestive pangs caused by stress and may provide sense of relief for these symptoms.

Or perhaps, it is because a nice glass of warm milk warms the body. People sleep better when they are warm because their muscles tend to relax more. The few degrees that the drink might raise your body temperature are often enough to trigger the slowdown response. This slowing of bodily responses normally precedes sleep.

It is quite possible that it is not the milk at all, but the fresh nutmeg grated on top. Nutmeg is known to calm anxiety and muscles spasms. It can eliminate nausea (unless taken in large amounts in which case it can actually cause nausea.) Nutmeg can also lower blood pressure, reduce diarrhea, and has even been cited as an effective anti-inflammatory for joint pain and gout.

No, it definitely has something to do with the way the hot mug feels in my palms, the way the light aroma of nutmeg wafts past my cheek, and the way the warmth wraps around me like a toasty blanket. Not quite like a snuggly hubby, but it will do for tonight.

1 cup milk (I used 2%, but I like whole best!)
1 dash freshly grated nutmeg

Scald milk in a saucepan by heating over medium heat. Watch for tiny bubbles to form on along the sides of the pan and stir while simmering another minute or two. Do not let the milk scortch or it will taste weird and the "skin" will be very difficult to remove from the pot.

Pour the magical elixir into your favorite mug and grate (or sprinkle) nutmeg over the top. Sweet dreams!

ZZzzzzzzzzzzzz.............

Yum

Tuesday, September 6, 2011

SALT: The Flavor of Necessity

For many families, Labor Day weekend is the last chance to get away for a visit to the beach; a last opportunity to enjoy the salty sea air and surf. But, few people realize the importance of salt and water to their everyday lives.

Water and salt are essential for maintaining extra cellular and intracellular cell growth in all plant and animal life. Cells may endure periods of lack of food, but without salt and water, the cells would perish from dehydration. Sodium chloride maintains the electrolyte balance within and around our cells. The human body contains approximately 6 ounces of salt to maintain the correct the balance of water in cells and tissues. Salt comprises about 1% of a human’s blood volume which is also the concentration used in saline solutions to clean wounds.  The body’s nerves and muscles need salt for proper functioning.
 
Active Salt Mine, Cardona, Spain
Since our bodies cannot manufacture salt, we must consume it daily because it is quickly eliminated by the kidneys. Salt is so important to human survival that our tongues are sensitive to its taste. While salt enhances the flavor of our food, it triggers the production of saliva and gastric juices required for food digestion.

Salt (most commonly the chemical compound of sodium chloride.) Salt naturally occurs in many parts of the world as a mineral or is mixed in bodies of water. All culinary salts are produced by evaporation. Table salt is made by driving water into a salt deposit (like a mine). This process forms a brine which is then evaporated leaving dried cubical crystals similar to granulated sugar. Kosher salt is made in a similar fashion except that the brine is raked continually during the evaporation process. The resulting product has a light and flaky texture. Sea salt is evaporated from sea water. Even though sea salt has trace amounts of minerals not found in mined salt, all salts are nutritionally the same.

Sodium chloride has been important in the history of just about every culture since Adam and Eve.  The Bible mentions it at least 30 times. Salt is still an important compound in all parts of the world. From preservation, to seasoning salt is used in most things we use today.

Evidence of salt usage goes back more than 8,000 years ago. While Neolithic tribes strategically settled near salt springs, it is believed that the Assyrians were the first to truly harvest it. In China, a major portion of writing in the Peng-Tzao-Kan-Mu, the earliest known document on pharmacology, was devoted to more than 40 uses of salt. It also had descriptions on extracting and putting it into usable forms that are similar to the way we process it today.

Salt was equally important to the Egyptians who used salt for mummification and preservation of food. In Europe it is well documented that salt was of great importance to the economy. Markets in Greece involved the exchange of salt for slaves which gave rise to the expression, "not worth his weight in salt."

In the Roman times, salt symbolized spiritual health, because it was a major ingredient in many medications including use as a coagulating agent. Special salt rations given to the Roman legion were known as "salarium argentum," or "salary." In the Roman Coliseum, salt was put in the floor so that when the gladiators would fall to the ground it would “encourage” them to get back up.

It was recorded that thousands of Napoleon’s troops died in his retreat from Moscow because their wounds would not heal because they lacked sufficient salt for good health and convalescence.

American colonists refused to pay inflated prices and taxes for tea and salt from Great Britain which resulted in them being tossed in the Boston Harbor. Some historians believe that salt was the true cause of the protest, but that “The Boston Tea Party” just sounded better.

Not only do our bodies need salt, but salt has many amazing uses. In cooking it seasons, cures, preserves, and whip cream faster. It is also used for getting more heat out of boiled water so you can boil things like pasta and vegetables more easily. In medicine it cleans, treating sprains, sore throats, earaches and acts as an antiseptic. It also can glaze the outside of pottery, remove rust, seal cracks, remove spots on clothes, put out grease fires, melt ice, and kills poison ivy. It is claimed that there are 14,000 different ways for salt to be used.

Salt comes in many different types and colors including Alaea (red salt enriched with  iron oxide from Alaea clay), Hiwa Kai (black, solar-evaporated Pacific sea salt with activated charcoal), and Bolivian Rose (pink, highly-mineralized salt from volcanic deposits of the Andes Mountain range in Bolivia). Also, because salt is derived from an evaporation process, it is very easy to infuse with a variety of flavors.

On our recent trip to Amelia Island, I had the distinct pleasure of touring the kitchens of the Ritz- Carlton on Amelia Island including Salt, an entire restaurant devoted to seasonal menus (created by Chef de Cuisine Rick Laughlin) that showcase brilliantly-flavorful foods paired with a variety of salts. They have also perfected the art of infusing salts and have a wide-variety of infused salts. A last stop in the Salt Gift shop provided the opportunity to taste their amazing salinized creations that are truly wonderful enhancements to any dish, as well as Chef Shelton’s luscious handmade salted caramels.


Crisp roasted potatoes are the perfect vehicle for adding flavorful salt just before serving. These delicious potatoes are a faultless accompaniment to almost any roasted meat. Salt draws the moisture from potatoes, so they should not be salted before cooking as it will prevent the potatoes from developing a nice crispy crust. Try this recipe with fleur de sel, smoked sea salt, or any finishing salt you like.

4-6 large potatoes (we use Idaho), peeled and cut into chunks
2 tablespoons olive oil
½ cup of Kalamata olives, pitted and sliced lengthwise (optional, but SO good!)
Finishing salt, to taste (We used Mediterranean black garlic)

Preheat oven to 350°F (convection preferred). In a large roasting pan, toss potatoes with olive oil and then spread out in a single layer. Roast potatoes, stirring every 15 minutes or so, until potatoes are crispy, browned and tender. This usually takes about 1 hour to 1 ½ hours. If you are adding olives, add them to the roasting pan and toss with potatoes about 15-25 minutes before potatoes are done. Transfer potatoes to a serving dish, sprinkle with finishing salt (and pepper) and serve.

And what better meal than crispy roasted potatoes with grilled leg of lamb! This is one of our favorite Sunday dinners. Homey, earthy comfort food: a perfect meal for the beginning of the Autumnal season.

5 lb. boneless leg of lamb
Olive oil
Salt and pepper
Finishing salt (we used rosemary-infused)

Carefully trim the lamb removing the layer of tough connective tissue and fat. Be sure to remove all visible fat and silver skin (the thin, grayish membrane). Use a thin utility or carving knife for this job. You may be tempted to skip this step, but poorly trimmed meat can develop a gamey flavor. Allow lamb to come to room temperature. Lamb may be cut into smaller "chunks" to hasten cooking time. It also allows for more crispy outside pieces! Rub lamb leg with olive oil and season with salt and pepper.

Prepare a charcoal grill with hot coals. If using charcoal, light 50 briquettes and let them burn until they are covered with gray ash. Push them into 2 banks on either side of the grate. Place a drip pan between the coals and replace the grill grate. Brush the grill with oil to keep the lamb from sticking. Grill lamb, turning and grilling evenly on both sides until an instant-read thermometer inserted into the meat registers 120 to 125 degrees for warm red center or 140 degrees for medium. This will take 40 minutes to 1 hour, depending on how hot the coals are.

Rainy-day method: Trim the lamb as above, and then set the leg of lamb on a rack in a roasting pan and place in a 325° F oven for 1 1/2 to 2 hours or until the internal temperature reaches 125 degrees for rare.

Remove the roasted lamb to a cutting board and tent with aluminum foil. Allow the meat to rest for 15 minutes before slicing. Before serving, sprinkle with a bit of finishing salt to enhance the delicious flavor of the meat. This allows the meat to relax and the juices to redistribute, ensuring you won't lose the flavor and moisture on your cutting board.


Yum
Powered by Blogger.

footer social

ShareThis