Friday, September 23, 2011

Fabulous Favas of Fall

Nothing says Autumn like… fava beans? It is true that most people associate favas (also known as broad beans) with Spring, but in reality these legumes are most widely available in the late Summer and fall in most parts of the U.S. When we see favas available at the market, we load the basket and prepare to feast.

Fava beans were eaten in ancient Greece and Rome and are one of the oldest plants under cultivation. Despite the name, fava beans (from the Italian word fava, meaning "broad bean") are actually a member of the pea family. Fava beans have a distinct flavor and creamy texture that makes them a great addition to a wide variety of dishes.

Favas are high in fiber and iron, and low in sodium and fat. They have no cholesterol but so much protein that they are called the” meat of the poor.” As a matter of fact, Italians credit the fava bean as the key factor in saving the Sicilians from starvation during a great famine. Since then, the fava has been considered good luck; in fact some people believe that if you carry a fava bean, you will never be without life’s essentials.

Fava beans should be shelled and peeled before eating. The outer peel on the beans, while technically edible, is very woody in texture and detracts from the buttery taste of the inner bean. Fava beans can be served fried and salted, mashed, or added to hearty stews and soups. We love to eat them simply boiled and tossed with olive oil, mint and cheese. Sometimes the guys don’t even wait for the >mint and cheese, popping them down like beer nuts.

  • 4 cups shucked fresh fava beans
  • 1/4 cup olive oil
  • 2 tablespoons finely chopped mint
  • ½ cup Parm or Romano cheese, shaved
  • Salt and pepper to taste

Start by removing the beans from the large green pods. Then blanch beans in a large saucepan in plenty of salted boiling water until tender, about 3 to 5 minutes, depending on the size of the beans and number in the pot. This will soften the outer shell for easy removal.  Drain well and rinse with cold water to cool. This prevents overcooking and mushiness, as well as makes the skin easier to remove from the favas.

Once cool enough to handle, use a paring knife to pierce and peel away the outer grayish-white, waxy shells of beans revealing the bright green bean inside. Place shelled peeled beans in a bowl. Drizzle beans with olive oil, season with salt and pepper, add mint and toss gently to mix.  Place beans in a serving dish and top with the grated cheese. You can also use a vegetable peeler to shave slices of Parmesan-Reggiano cheese making large “curls” to garnish the salad in place of the grated cheese. These dress the dish up for company!

Favas are also delicious served mashed. Following the instructions above blanch and peel favas, and mash beans adding butter and a splash of cream. We also add one boiled potato to the bean mash to improve the consistency (and stretch the beans!)

Thanks for reading our 200th post! We hope you will keep coming back for 200 more.

Yum

Sunday, September 18, 2011

Nitty Gritty Start To The Day

The season of sniffles is upon us and few things offer morning comfort like a bowl of creamy, steamy grits. Grits* are historically known as a food of the South, but they’ve been around much longer in one form or another. Grits are a traditional breakfast food made of ground dried corn kernels. In consistency, they are rather like the “Cream of Wheat” which is more popular in Northern states.

Rockahominie (hominy) dates back at least 5,000 years, and was one of the first foods that Native Americans shared with European colonists. This sturdy staple of dried corn kept many settlers alive during those first cold winters. Hominy is the dried kernel of corn that has been threshed to remove the hull and germ and soaked in a weak lye solution to make the kernels swell. To make grits, the dried hominy is ground to one of three grinds, fine, medium or coarse and is simmered with water until a thick porridge is formed. “Quick grits” (a very fine grind that has been pre-steamed) are available in supermarkets, but to quote the famous line from the movie My Cousin Vinny, “No self-respectin’ Southerner uses instant grits.”

It should also be noted that the Italians, got their corn meal for polenta by way of these same Native Americans, so contrary to Dom’s theory that all foods originated in Italy, grits has at least a 4,500-year head start on polenta.

Grits were also a vital part of the Southern diet during the Great Depression since they were inexpensive and required only water and lard or butter to make. During the same time period, the equally Southern expression, "nitty-gritty," originated as a derogatory term and was used as secret slang by segregationists. Southern politicians and campaigners adopted the phrase to refer to "back to basics" campaigns based around fundamentalist values and beliefs.

A proper bowl of grits has butter, salt and black pepper for seasoning. They are more savory than sweet. People have their individual tastes in grits. Some prefer a thinner consistency like polenta, while others like their grits thick and creamy.

  • 3 cups water
  • 1 teaspoon salt
  • 1 cup regular grits (we prefer stone-ground, white)
  • 2 tablespoons butter

Bring water to a boil in a saucepan and add grits to water reducing heat to medium. The grits will be very watery at this point, but they will thicken nicely in a few minutes as the water is absorbed.

Grits should be allowed to simmer slowly so they don’t get lumpy. If they appear to be boiling excessively, turn the heat to medium-low. Stir consistently to ensure they cook evenly and do not stick to the sides of pan. Continue cooking and stirring until the grits thicken to just a littler thinner than your desired consistency as they will continue to thicken as they cool. Stir in the butter until completely incorporated. The grits should have a creamy, silky texture. Serve with freshly ground black pepper. For cheese grits, add ¼ - ½ cup of your favorite grated cheese.

To make grit cakes (great for leftovers), layer grits in a moistened baking dish, cover with plastic wrap and refrigerate. When the grits are chilled and firm, cut them into desired pieces, (moistened cookie/ biscuit cutters work wonderfully.) Fry in a lightly greased pan until both sides have a crispy brown crust.

*GRITS is also the acronym for "Girls Raised In The South."


Yum

Tuesday, September 13, 2011

Milk Blanket and Nutmeg Dreams

I know it sounds so smarmy, but the bed is too big when my sweetie (Dom) is out-of-town. So after tossing and turning, I am warming some milk and wondering whether there is a scientific reason it makes me sleepy…

Most of us have heard of tryptophan, the essential amino acid responsible for that unavoidable nap after a big turkey dinner on Thanksgiving day. As it turns out, there are traces of tryptophan in milk too. The human body converts tryptophan to the sleep-inducing hormones serotonin and melatonin. However, the amount of tryptophan in any food, turkey and milk included, is not great enough to boost hormone levels to a level that would induce sleep.

So, am I wasting my time waiting to see the little bubbles that mean the milk is perfectly heated and not on its way to being scorched, making the pan impossible to clean? Maybe it is the psychological association with warm milk and infancy; reminiscent of the times "I slept like a baby." Obviously, we associate milk with our mothers and their love and care. These comforting feelings and remembrances can produce serotonin in the brain that actually create a sensation of well-being and relaxation which promotes drowsiness.

Milk also coats and soothes the stomach. Most people sleep best when their tummies are full.  Milk can also calm heartburn or digestive pangs caused by stress and may provide sense of relief for these symptoms.

Or perhaps, it is because a nice glass of warm milk warms the body. People sleep better when they are warm because their muscles tend to relax more. The few degrees that the drink might raise your body temperature are often enough to trigger the slowdown response. This slowing of bodily responses normally precedes sleep.

It is quite possible that it is not the milk at all, but the fresh nutmeg grated on top. Nutmeg is known to calm anxiety and muscles spasms. It can eliminate nausea (unless taken in large amounts in which case it can actually cause nausea.) Nutmeg can also lower blood pressure, reduce diarrhea, and has even been cited as an effective anti-inflammatory for joint pain and gout.

No, it definitely has something to do with the way the hot mug feels in my palms, the way the light aroma of nutmeg wafts past my cheek, and the way the warmth wraps around me like a toasty blanket. Not quite like a snuggly hubby, but it will do for tonight.

1 cup milk (I used 2%, but I like whole best!)
1 dash freshly grated nutmeg

Scald milk in a saucepan by heating over medium heat. Watch for tiny bubbles to form on along the sides of the pan and stir while simmering another minute or two. Do not let the milk scortch or it will taste weird and the "skin" will be very difficult to remove from the pot.

Pour the magical elixir into your favorite mug and grate (or sprinkle) nutmeg over the top. Sweet dreams!

ZZzzzzzzzzzzzz.............

Yum

Tuesday, September 6, 2011

SALT: The Flavor of Necessity

For many families, Labor Day weekend is the last chance to get away for a visit to the beach; a last opportunity to enjoy the salty sea air and surf. But, few people realize the importance of salt and water to their everyday lives.

Water and salt are essential for maintaining extra cellular and intracellular cell growth in all plant and animal life. Cells may endure periods of lack of food, but without salt and water, the cells would perish from dehydration. Sodium chloride maintains the electrolyte balance within and around our cells. The human body contains approximately 6 ounces of salt to maintain the correct the balance of water in cells and tissues. Salt comprises about 1% of a human’s blood volume which is also the concentration used in saline solutions to clean wounds.  The body’s nerves and muscles need salt for proper functioning.
 
Active Salt Mine, Cardona, Spain
Since our bodies cannot manufacture salt, we must consume it daily because it is quickly eliminated by the kidneys. Salt is so important to human survival that our tongues are sensitive to its taste. While salt enhances the flavor of our food, it triggers the production of saliva and gastric juices required for food digestion.

Salt (most commonly the chemical compound of sodium chloride.) Salt naturally occurs in many parts of the world as a mineral or is mixed in bodies of water. All culinary salts are produced by evaporation. Table salt is made by driving water into a salt deposit (like a mine). This process forms a brine which is then evaporated leaving dried cubical crystals similar to granulated sugar. Kosher salt is made in a similar fashion except that the brine is raked continually during the evaporation process. The resulting product has a light and flaky texture. Sea salt is evaporated from sea water. Even though sea salt has trace amounts of minerals not found in mined salt, all salts are nutritionally the same.

Sodium chloride has been important in the history of just about every culture since Adam and Eve.  The Bible mentions it at least 30 times. Salt is still an important compound in all parts of the world. From preservation, to seasoning salt is used in most things we use today.

Evidence of salt usage goes back more than 8,000 years ago. While Neolithic tribes strategically settled near salt springs, it is believed that the Assyrians were the first to truly harvest it. In China, a major portion of writing in the Peng-Tzao-Kan-Mu, the earliest known document on pharmacology, was devoted to more than 40 uses of salt. It also had descriptions on extracting and putting it into usable forms that are similar to the way we process it today.

Salt was equally important to the Egyptians who used salt for mummification and preservation of food. In Europe it is well documented that salt was of great importance to the economy. Markets in Greece involved the exchange of salt for slaves which gave rise to the expression, "not worth his weight in salt."

In the Roman times, salt symbolized spiritual health, because it was a major ingredient in many medications including use as a coagulating agent. Special salt rations given to the Roman legion were known as "salarium argentum," or "salary." In the Roman Coliseum, salt was put in the floor so that when the gladiators would fall to the ground it would “encourage” them to get back up.

It was recorded that thousands of Napoleon’s troops died in his retreat from Moscow because their wounds would not heal because they lacked sufficient salt for good health and convalescence.

American colonists refused to pay inflated prices and taxes for tea and salt from Great Britain which resulted in them being tossed in the Boston Harbor. Some historians believe that salt was the true cause of the protest, but that “The Boston Tea Party” just sounded better.

Not only do our bodies need salt, but salt has many amazing uses. In cooking it seasons, cures, preserves, and whip cream faster. It is also used for getting more heat out of boiled water so you can boil things like pasta and vegetables more easily. In medicine it cleans, treating sprains, sore throats, earaches and acts as an antiseptic. It also can glaze the outside of pottery, remove rust, seal cracks, remove spots on clothes, put out grease fires, melt ice, and kills poison ivy. It is claimed that there are 14,000 different ways for salt to be used.

Salt comes in many different types and colors including Alaea (red salt enriched with  iron oxide from Alaea clay), Hiwa Kai (black, solar-evaporated Pacific sea salt with activated charcoal), and Bolivian Rose (pink, highly-mineralized salt from volcanic deposits of the Andes Mountain range in Bolivia). Also, because salt is derived from an evaporation process, it is very easy to infuse with a variety of flavors.

On our recent trip to Amelia Island, I had the distinct pleasure of touring the kitchens of the Ritz- Carlton on Amelia Island including Salt, an entire restaurant devoted to seasonal menus (created by Chef de Cuisine Rick Laughlin) that showcase brilliantly-flavorful foods paired with a variety of salts. They have also perfected the art of infusing salts and have a wide-variety of infused salts. A last stop in the Salt Gift shop provided the opportunity to taste their amazing salinized creations that are truly wonderful enhancements to any dish, as well as Chef Shelton’s luscious handmade salted caramels.


Crisp roasted potatoes are the perfect vehicle for adding flavorful salt just before serving. These delicious potatoes are a faultless accompaniment to almost any roasted meat. Salt draws the moisture from potatoes, so they should not be salted before cooking as it will prevent the potatoes from developing a nice crispy crust. Try this recipe with fleur de sel, smoked sea salt, or any finishing salt you like.

4-6 large potatoes (we use Idaho), peeled and cut into chunks
2 tablespoons olive oil
½ cup of Kalamata olives, pitted and sliced lengthwise (optional, but SO good!)
Finishing salt, to taste (We used Mediterranean black garlic)

Preheat oven to 350°F (convection preferred). In a large roasting pan, toss potatoes with olive oil and then spread out in a single layer. Roast potatoes, stirring every 15 minutes or so, until potatoes are crispy, browned and tender. This usually takes about 1 hour to 1 ½ hours. If you are adding olives, add them to the roasting pan and toss with potatoes about 15-25 minutes before potatoes are done. Transfer potatoes to a serving dish, sprinkle with finishing salt (and pepper) and serve.

And what better meal than crispy roasted potatoes with grilled leg of lamb! This is one of our favorite Sunday dinners. Homey, earthy comfort food: a perfect meal for the beginning of the Autumnal season.

5 lb. boneless leg of lamb
Olive oil
Salt and pepper
Finishing salt (we used rosemary-infused)

Carefully trim the lamb removing the layer of tough connective tissue and fat. Be sure to remove all visible fat and silver skin (the thin, grayish membrane). Use a thin utility or carving knife for this job. You may be tempted to skip this step, but poorly trimmed meat can develop a gamey flavor. Allow lamb to come to room temperature. Lamb may be cut into smaller "chunks" to hasten cooking time. It also allows for more crispy outside pieces! Rub lamb leg with olive oil and season with salt and pepper.

Prepare a charcoal grill with hot coals. If using charcoal, light 50 briquettes and let them burn until they are covered with gray ash. Push them into 2 banks on either side of the grate. Place a drip pan between the coals and replace the grill grate. Brush the grill with oil to keep the lamb from sticking. Grill lamb, turning and grilling evenly on both sides until an instant-read thermometer inserted into the meat registers 120 to 125 degrees for warm red center or 140 degrees for medium. This will take 40 minutes to 1 hour, depending on how hot the coals are.

Rainy-day method: Trim the lamb as above, and then set the leg of lamb on a rack in a roasting pan and place in a 325° F oven for 1 1/2 to 2 hours or until the internal temperature reaches 125 degrees for rare.

Remove the roasted lamb to a cutting board and tent with aluminum foil. Allow the meat to rest for 15 minutes before slicing. Before serving, sprinkle with a bit of finishing salt to enhance the delicious flavor of the meat. This allows the meat to relax and the juices to redistribute, ensuring you won't lose the flavor and moisture on your cutting board.


Yum

Tuesday, August 30, 2011

Roasted Beets Perfect for Salads

Beets are a high-fiber food that have been found to increase the production of special immune cells that destroy cancer cells in the colon. They also contain antioxidants and help the liver to produce additional natural antioxidants. Eating beets on a regular basis can lower LDL cholesterol by as much as 30 percent. Furthermore, beets contain a compound known as betaine that can reduce inflammation in joints, bones, the throat and blood vessels by 20 percent which helps people who suffer from ailments such as osteoporosis and asthma, and beets are high in folate, a type of B vitamin that helps with natural tissue growth, which is especially beneficial to children and pregnant women.

Roasting beets intensifies their flavor, brings out their earthy sweetness, and makes them as easy to peel as a banana while maintaining their high nutrient content. Roasted beets are delicious eaten plain with olive oil, salt and pepper, and are particularly tasty in a variety of Spring salads.

3 medium beets (about 1 1/2 pounds)
1 tablespoon olive oil
Salt
Freshly ground black pepper

Heat the oven to 375°F and arrange a rack in the middle. Select beets that are firm and heavy for their size. Rinse the beets thoroughly some beets may need to be scrubbed clean.

Place the beets in a small roasting or baking dish in one layer. Drizzle with the olive oil, salt and pepper. Toss to coat. Roast until tender and easily pierced with a knife, about 45-60 minutes. Remove from the oven and let cool. When the beets are cool enough to handle, peel using a paring knife or by pushing the skin with your fingers. Slice the beets and serve over fresh arugula that has been tossed with olive oil and red wine vinegar and then sprinkle with crumbled feta cheese for a refreshing Spring salad.  We also like to serve the roasted beets with grated ricotta salata (dried and aged ricotta). Toasted or candied walnuts are also a wonderful accompaniment.

Yum

Thursday, August 25, 2011

Packing List for Mother Nature

With the tremors and pending hurricane season, we thought it might be time to do a little preparedness planning. With an old backpack in hand, we went through the house and placed a few items inside, just in case.
The initial pass was easy. We tossed in a pre-paid credit card, disposable rain ponchos, emergency heat blankets, a small plastic tarp, flashlight, candles, a lighter, Swiss army knife, duct tape, travel toothbrushes and paste, soap & shampoo samples. We also packed a small first aid kit with bandages, pain relievers, alcohol pads and tweezers. I considered adding some games, but decided the guys could play Morra* or thumb wrestle; on second thought... I threw in a deck of cards (no batteries required).

Then we stopped at the pantry where the choices proved more difficult. Olive oil? How could we possibly live without that? Denise’s peppers? No, the jars could break. Cans tuna, beans, and corn seemed like good ideas. Then again, pop-top” cans might leak or explode. Not to mention that canned goods are heavy and bulky. Dry items appeared to be the way to go; lightweight and easy to pack. Rice, pasta, dried beans, dried fruits and nuts, crackers, flavored drink mix, granola bars were all added to the list. I checked the expiration date on all items to be included. Storm season only lasts a few months and these dry items will be fine for that time.

These things were all fine in concept, but how to make a meal out of these things? Cajun spice, now we could make red beans and rice. With some olive oil the possibilities would open up immensely. Aha! We had a small can of olive oil, so olive oil was added back to the stash. Salt, black pepper and a small wedge of Parmesan or Romano (which don’t need refrigeration because they are hard, aged cheeses) and we could make Cacio e Pepe. Some anchovies (we could pack in a Ziploc in case of leakage), and crushed red pepper and we had the makings of Spaghetti con Acciughe. This would give us the 3-day supply recommended by 72hours.org. The backpack was filled and set aside with the Coleman camp stove, L.L. Bean emergency weather radio (Thanks Mom!) and a few jugs of water.

Spaghetti con Acciughe
  • 1 lb. spaghetti
  • 2 large garlic cloves, sliced
  • 3 tablespoons of good quality extra-virgin olive oil
  • 1 4-oz. can anchovy filets, chopped
  • ½ - 1 teaspoon crushed red pepper (to taste)
  • Parmigiano Reggiano, grated

Cook pasta in salted water following package instructions. While the spaghetti cooks, heat the olive oil in a pan on a medium heat. Add garlic and cook until fragrant and just starting to turn brown. Remove garlic pieces from oil and add chopped anchovies and with a wooden spoon, mash them until they are dissolved into the oil, then add the crushed red pepper reduce the heat and cook for another two minutes.

Drain pasta and dress it with the anchovy sauce. Serve with a light drizzle of olive oil and the grated Parmesan or Romano cheese.

We need to remember to pack some forks!! And, maybe a box (unbreakable) of wine and some cups?

______________________________________________________________________________________
*Morra is a hand game that goes back thousands of years to ancient Roman times and is still popular in Italy today. In the Bible, it may have been referred to as "casting lots." In ancient Rome, it was called micatio, and playing it was referred to as micare digitis; literally, "to flash with fingers." As time passed, the game became Morra. The game was so common in Rome that a proverb used to describe an honest person: "Dignus est quicum in tenebris mices," which means, "He is a worthy man with whom you could play micatio in the dark." There are two styles of play. Northern Italians play sitting while Southern Italian players stand and use their whole body and extend their arms to flash their fingers. The purpose of the game is to sharpen the mind while enjoying the company of friends. In the most popular version, players throw out a single hand, each showing zero to five fingers, and call out loud their guess at what the sum of all fingers shown will be. If one player guesses the sum, that player earns one point. In another version one person is designated the "evens" player while the other is labeled "odds". Players hold one hand out in front and count together to three (sometimes chanting "Once, twice, thrice, SHOOT!" or "One, two, three, SHOOT!") On three, both players hold out either one or two fingers. If the sum of fingers shown by both players is an even number, then the "evens" player wins; otherwise the "odds" player is the winner. Since there are two possible ways to add up to three, both players have an equal chance of winning.

Yum

Saturday, August 20, 2011

Godiva Coffee Granita - Icy Pick-Me-Up

During these dog days of Summer, nothing is more welcome than an icy refreshment; something frozen with caffeine to ward off the lethargy that accompanies hot, muggy afternoons.

On our family trips to Rome, we became quite enamored of the Tazza d'Oro Café  in the Piazza della Rotonda adjacent to the Pantheon. Tazza d’Oro, founded by the Fiocchetto family in 1946, is world famous for its granita di caffe: sugary espresso (strong and undiluted) frozen into a crystalline slush and served with a generous dollop of unsweetened whipped cream so cold it freezes where it touches the coffee, turning into little bits of solid cream.

Tazza d'Oro imports and roasts its own coffee beans to create its secret house blend of top Arabicas called "La Regina dei Caffe." Since their proprietary blend is not readily available in the U.S., we decided to try Godiva Coffee which we received as members of the Foodbuzz Tastemaker Program. Godiva Coffees contains 100% Arabica coffee and in its natural and unadulterated state has no measurable sugar.

For an even more delectable treat we selected Godiva’s Chocolate Truffle coffee. Godiva’s Chocolate Truffle coffee is rich and decadent with deep chocolately undertones. Just opening the bag filled the entire kitchen with its scrumptious aroma.

We made our granita using an espresso machine with the Godiva ground coffee, and it worked perfectly. Remember, just don't stint on the quantity you use.

Coffee Granita
I cup freshly-brewed, strong (espresso-style) Godiva coffee (about 8 shots)
4 teaspoons sugar
½ cup whipping cream

Stir sugar into the hot coffee and stir well to dissolve. Then pour the coffee into a freezer-proof container or dish and freeze for 30 to 40 minutes, until the coffee starts to form crystals.

Remove the dish from the freezer and scrape with a fork to break apart the crystals. Return the coffee to the freezer, removing and stirring it vigorously every 15 minutes or so, until the coffee is thoroughly frozen and splintery like sorbet. This should take about I hour in total. If made well in advance just keep scraping periodically to keep crystals separated otherwise they will solidify into a block of coffee ice.

Using an electric hand mixer or a standing mixer fitted with a whisk attachment (you can use a hand whisk, but it will take a good bit longer) beat whipping cream. Start slowly, gently increasing the speed as you go. If you set the mixer on high at first, you'll have cream all over the place. Set the mixer so it goes as fast as possible without splashing. Whip the cream until soft peaks form making sure not to over-beat else the cream will then become lumpy and butter-like.

Spoon the granite into the bottom of each serving glass and finish off each glass with 1 heaping tablespoon of whipped cream. Serve immediately garnished with cinnamon or shaved chocolate, if desired.


Yum

Wednesday, August 17, 2011

Pizza Swirls Perfect for Picnics

How time flies – it’s nearly the beginning of September which means Labor Day is approaching us and the end of summer is officially coming to an end. The Labor Day holiday began as a way to honor workers for their hard work and effort, so why not relax and make your holiday weekend as stress free as possible by making something easy to share.

Whether you are throwing a party, having a picnic, celebrating with a back yard BBQ or joining in with a street party, Labor Day is a great way to spend time with family, friends or neighbors. Pizza Swirls are great for sharing and can be eaten hot or cold and are easy to make at home.

2 packets of pizza base (or bread mix)
Tomato sauce or puree
Mixed herbs
Grated cheese 
Toppings of your choice (e.g. sausage, onions, peppers, ham, salami, chopped mushrooms)

To make a firm dough which is not sticky, make up the pizza base mix (or your favorite bread mix), knead and leave to rise for around 30-60 minutes.

Preheat oven to 400 °F, then roll out onto a floured board until you have a rectangle about 8 inches by 12 inches. Spread 2-3 tablespoons of tomato puree over the dough leaving the top and bottom 1 /12" free of sauce.

Sprinkle the dough with toppings of your choice and top with grated cheese, again leaving the top and bottom 1 /12" free of toppings. Next, roll the pizza up tightly (long ways) and stick the outside edge down with a little water if needed. Then cut the roll with a sharp knife (be careful of your fingers!) into 2-inch rolls. Place on a greased cookie sheet, leaving a gap of about an inch between each one. Then leave to rise for another 10 minutes. Bake in pre-heated for around 10-15 minutes, or until they are lightly browned.

Other ideas of finger food to bring along on your picnic include, carrot and cucumber batons, crisps, hard boiled eggs, olives, grapes, berries, cheese blocks, bread sticks, ham, salami or cherry tomatoes – the list goes on! Remember if you take meat, remember to keep it cold as food hanging around in the sunshine can be a cause of food poisoning.


We have been so busy getting back in the school routine that we haven't had time to post, so the kind folks at QuoteSearcher (UK) contributed this guest post for our readers.


Yum

Thursday, August 11, 2011

Tully's Favorite Rice-Stuffed Tomatoes

Stuffed vegetables appear on nearly every antipasto table in Italy. These rice-filled tomatoes are a regular entry on the extensive antipasti buffet at Ristorante Il Casale on the via Flaminia outside of Rome which we had the immense pleasure of visiting on our last trip to Rome. The restaurant is cut into a rock out-cropping giving the restaurant a rustic and unassuming atmosphere as does the huge outdoor rotisserie spit with giant trays of potatoes roasting under the rotating skewered meat. The cats* roaming the property added to the ambiance and authenticity of the experience.

These particular Pomodori a Riso are a favorite of our friend and neighbor, Tully. His contention is that any dish with “stuffed” in its name is bound to be delicious and thus irresistible. He has, on occasion, been known to take leftover tomatoes home and eat them cold for breakfast!

What better way to celebrate the bounty of garden-fresh tomatoes than with this traditional Italian preparation. We recently served these at a back-to-school soiree and watched as a passel of teens mowed through a dozen or so (always a ringing endorsement) along with squash blossom frittatas, homemade sausage with peppers and onions, and grilled lamb sandwiches; not your typical post-summer cookout fare!

  • 8 firm, ripe medium tomatoes
  • ½ cup risotto rice (Arborio), uncooked 
  • 2 tablespoons Italian parsley, chopped
  • 2 tablespoon fresh basil, finely chopped
  • 2 cloves garlic, minced
  • ½ cup extra-virgin olive oil 
  • Salt and freshly ground black pepper

Position oven rack in top third of oven, then preheat oven to 400°F. Pull stems off tomato tops. Do not core! Turn the tomato over and then trim about 3/4" from the bottom of each tomato and set ends aside.

Working over a medium bowl, use a small spoon or melon-baller to carefully scoop out inner pulp without puncturing the side walls of the tomatoes. Reserve scooped-out tomato pulp.

Arrange scooped-out tomatoes open end up in a medium baking dish. Pass tomato pulp through a food mill or pulse in the bowl of a food processor to a chunky puree, and then transfer back into a mixing bowl adding rice, parsley, basil, garlic, and olive oil, and season generously with salt and pepper. Mix well.

Spoon rice filling into prepared tomatoes (It’s Okay if there is a little filling left over.) Place one of the reserved tomato ends loosely on top of each stuffed tomato to look like a little hat. Drizzle a little more olive oil (we used oregano-infused) over the tomatoes and bake until rice is swollen and tender and tomatoes are soft and well browned. This will take about 50 or so minutes. Remove from oven and set aside to let cool before serving. The rice retains the heat for quite some time and are quite tasty even at room temperature. Or as Tully likes them, cold with a cup of hot coffee.

*In our experience, we have found that the best restaurants in Italy always have cats!


Yum

Saturday, August 6, 2011

Peppy Peppers of Padrón

We cook with a lot of peppers which is no secret to our regular readers. There are more than thirty different known species of chili pepper with an even wider variety of peppers worldwide. All varieties of peppers are differing species of the genus Capsicum and are members of the plant family Solanaceae along with eggplants and tomatoes. The range of shades, flavors, shapes & sizes, and heat levels makes them wonderfully versatile for adding diverse flavors and colors to almost any dish.

Padrón peppers or pimientos de Padrón have received a good deal of attention lately. These delicious little green morsels are the most famous produce of Padrón, a town in the Galician Province of Spain. The first of these pepper seeds were transported from Mexico in the 16th century. Today, approximately 16 ½ tons are grown in Padrón each year.

The most-often-sweet, occasionally-hot-&-spicy peppers are usually served fried in olive oil and sprinkled with coarse kosher or sea salt. The level of heat varies according to the amount capsaicin of each pepper. Measured on the Scoville heat index, most Padrón peppers rate about 500-1,000 heat units although the odd one will stun you with up to 25,000 heat units! Eating these little devils is rather like playing “Spanish Roulette” because one in five peppers may be exceptionally hot.

While several growers are now selling Padrón pepper seeds for use in the U.S., finding fresh peppers at food shops or farmer’s markets is no easy feat. So, imagine my excitement when I met a man at Kroger looking for Tetilla cheese (also from Galacia, Spain) to use in stuffing his Padrón peppers! After a charming conversation, we agreed to a trade: some fresh Padrón peppers for a jar of “Denise’s peppers.”

He recommended following the method used by Spanish chef, José Andrés (shown in this video from his PBS show "Made in Spain.") Since we had no luck in finding the Tetilla cheese, we opted for Mahon, another Spanish cheese which is made from cow's milk and originated on the island of Minorca.

Stuffed Fried Padrón Peppers
1/2 lb. (about 12) Padrón peppers, cut with “windows”
2 oz. of Mahon* cheese, cut into ¼” x 1” pieces
2 tablespoons olive oil
Sea salt

Pick through the peppers removing any that have wrinkled skins or dark greenish-black blemishes. Carefully wash and dry Padrón peppers, trimming stems that are longer than 1 inch. Using a sharp paring knife, “open a window” in each pepper and stuff each with a rectangle of cheese. Don’t worry about removing the seeds, they add to the flavor experience.

Once the peppers are stuffed, heat a skillet or heavy pan over high heat and add olive oil. Heat oil to its smoking point, and then gently slide stuffed peppers into the hot oil. Cook over high heat until all sides are nicely charred and brown.

Drain briefly on a paper towel and place on serving plate. Sprinkle generously with salt.

Like all fried foods, these Padrón peppers are best eaten hot, especially with a chilly glass of Txakoli or Verdejo - ¡Salud!

*If you cannot find Tetilla or Mahon cheeses, a mild white cheese such as Manchego or Monterey Jack makes for a reasonable substitute.


Yum

Friday, July 29, 2011

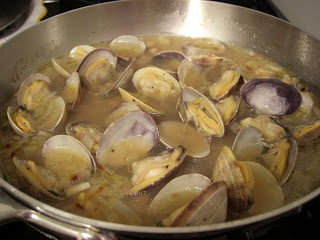
Fridays con Vongale

Growing up, our family occasionally had linguini with clam sauce. My mom’s version was always the Ligurian-style white sauce made with a bechamel and canned chopped clams. It was always one of my favorites and one of the few dishes I could actually make when Dom and I were first married that he didn’t feel the need to “improve” before eating it.

Years later, we had the real deal at a tiny little bodega on a tiny little calli near the Rialto Market in Venice. Made with perfect little clams fished straight from the Venetian Canal, simmered in local white wine, and served over freshly made pasta  - Unbelievable!

That one dining experience elevated our love of clam sauce to new heights. Now we buy bales of fresh Manila clams at the DeKalb Farmer’s Market and clean them with flour.  Lately this has been Dom’s meal of choice on Friday evenings (even when eating out at our favorite Italian restaurant, Valenza.) Served with a crisp Gavi or Trebbiano, it is a fabulous way to start the weekend.

  • 6 tablespoons extra-virgin olive oil
  • 1 clove garlic, peeled and chopped
  • ½ bunch fresh Italian parsley, chopped
  • 3 ½ Ibs. Manila clams, scrubbed
  • 2/3 cup dry white wine (like a Friuli)
  • 2 tablespoon good-quality brandy
  • Salt
  • 1 lb. fresh linguine
  • 1 tablespoon grated Parmigiano-Reggiano

Heat 5 tablespoons of the olive oil, along with the minced garlic and half the parsley in a large pan over medium-high heat for about 1 minute. Add the rinsed clams, cover the pan and cook for 1 minute more. Add the wine and brandy and simmer, uncovered, until the alcohol has evaporated which should take about 2 or 3 minutes.

Return the cover to the pan and continue cooking, shaking pan several times to turn clams and stir sauce for about 3 minutes more. The majority of the clam shells should open in this amount of time.  Uncover to pan and allow liquid to reduce slightly.

Meanwhile, cook the pasta in a large pot of boiling salted water until just tender, 5-8 minutes (fresh pasta cooks much faster than dried). Drain pasta in a colander and add the pasta to pan with clams and pan juices. Reduce the heat to medium-low, and cook for 1 more minute more, shaking pan until well combined.

Before plating, discard any clams that have unopened shells. Add Parmigiano-Reggiano and remaining 1 tablespoon olive oil and season to taste with salt and pepper. Serve garnished with remaining chopped parsley. You may want to add an empty bowl to the table for the spent clam shells.


Yum

Saturday, July 23, 2011

Writing Home About Iowa Chops

Each July, we sojourn to the Midwest to visit family in Iowa City. This cozy little college town (home to the University of Iowa – Go Hawkeyes!) becomes a mecca for writer’s all over the country who jockey for spaces in the University’s annual Summer Writing Festival. The city, which is home to eleven literary presses, hosts over 180 writing-related events each year, and has attracted countless poets and authors to live and work in the city, has recently been named a City of Literature by the United Nations Educational, Scientific and Cultural Organization (UNESCO). With a population of less than seventy thousand people, Iowa City is the third city to receive the distinction, following Edinburgh, Scotland, and Melbourne, Australia.

Visitors to Iowa City have something write home about when it comes dining given the city's wide range of eating options. This year’s festival attendees were all treated to delicious Mediterranean food catered by Oasis, best known for their falafel and kaftas.  The fresh, never-frozen, locally-farmed, black Angus beef burgers at Short's Burger and Shine are a not-to-be-missed treat for hungry visitors as well. Locavores looking for a more authentic experience may choose a 14 oz. smoked Iowa Pork Chop from Okoboji Grill described the Wall Street Journal’s Raymond Sokolov as a “galumphing chop juicy and pink from the smoking.”

The so-called "Iowa Chop" is a thick center cut; the term was coined in 1976 by the Iowa Pork Producers Association. Iowa chops are the king of all pork chops. They are the traditional, thick-cut pork chops that originated in Iowa, but prepared all over the Midwest. What separates Iowa chops from other pork chops is the cut and the size. Iowa chops, by definition, are bone-in, center-cut loin chops, and they must be between 1 1/4 and 1 1/2 inches thick.

Having the advantage of a kitchen, we chose to grill our own. The wonderful butcher at HyVee East, hand cut eight gorgeous chops for us to work with.

Grilled Iowa Chops
  • Iowa Chops (large bone-in pork chops – 1 to 1 ½ “ thick)
  • ½ cup salt
  • ¼ sugar
  • Water to cover

In a large bowl, place 1 quart water, salt and sugar. Stir to mix and dissolve. Add pork chops to bowl. Add more water to cover and gently stir to distribute salt and sugar. If it is a REALLY big bowl, add more salt and sugar in a 2:1 ratio. Let pork chops brine for 15-30 minutes. Drain chops and pat dry with paper towels.

Place chops on a hot grill, bones toward the center. Cook each side 7-9 minutes. Cooking time depends on thickness of chops and heat of coals. Leave chops on grill until nicely browned (sugar in brine should help a nice crust to form on pork.)

After 15 minutes of total cooking time, check for doneness. The surface of the meat should provide some resistance and the meat juices should run light pink to clear when a small cut is made into a chop.

When pork is nicely crusted and brown and juices are appropriately light, remove to a platter and let rest for about 5 minutes before serving to allow juices to absorb (redistribute from the center of the meat.) Serve with fresh picked and shucked corn on the cob. Enjoy!


Yum

Saturday, July 16, 2011

Patty Melt Craving Replete

Let’s face it, we’ve all been there. You're having a family cookout, the burgers and wieners are ready for the grill and then you are reminded that your Aunt and cousin are vegetarians. Yikes! What to do?

Harmony Valley Foods has a quick and easy solution. Their Vegetarian Hamburger Mix is a soy-based, low-fat, vegan, kosher-certified meat alternative that is a great source of protein and fiber. The dry mix is hydrated with the cold water and results in vegetarian protein with the same consistency and versatility as ground meat and can be substituted into any recipe that calls for hamburger.

We received a sample of the hamburger mix as a sample from Harmony Valley to try. While the guys were off on a fishing excursion, I found myself with an empty refrigerator and a grumbly tummy. The mix was front and center in the pantry and I was hit by a sudden craving for a patty melt.

½ cup Harmony Valley Vegetarian Hamburger mix
½ cup water
1 tablespoon olive oil
1 small red onion, peeled and sliced into rings
¼ cup Monterey Jack cheese, grated
2 slices of bread, toasted
Salt and freshly ground pepper, to taste

Follow the package directions and blend hamburger mix with water and stir well. Allow the dry mix to rehydrate for 15 minutes in the refrigerator.

While patty mixture is resting, put olive oil in a sauté pan and cook onions until caramelized. Remove onions to a plate.

Once the rehydration is complete, (don’t panic if it looks like cat food at this point) form the mixture into a patty and place it in a pan with some olive oil. Now it looks like a burger! Add a little more olive oil to the sauté pan and place the patty in it. Cook patty until golden brown (about 2 minutes per side.)

Place the patty on one piece of toast and top with grated cheese and caramelized onions. Run sandwich under the hot broiler for a few minutes to completely melt cheese and then top the sandwich with the second piece of toast.

While it was obvious that the patty was not beef, it was quite tasty and closely resembled meat in texture and consistency. Served with cheese and sautéed onions on toast, the veggie mix made a sandwich that fully satisfied my patty melt craving.

The one aspect of Harmony Valley’s products that is most appealing is the versatility of the dry mix. It can be kept on hand for emergencies (power outages or surprise guests), packs easily for a camping trip, and is quick and easy to prepare. I will definitely keep a pack in the pantry in case of another cookout revelation or patty melt urge.


Yum

Monday, July 11, 2011

From Rags to Riches: The History of the Dish Towel

The old cliché “everything old is new again” is completely true when it comes to the common dish towel. While every household has a few of these mundane, utilitarian sloggers, dish towels have again achieved popularity with budding foodies and designers. Bon Appetit magazine recently featured actress Gwyneth Paltrow. She describes her Thornback and Peel dish towel as "a standout in the kitchen."

Archeologists believe that towels were closely held as personal items (along with the ever present knife) as early as the Middle Ages. In the early nineteenth century, the "tea towel" became the linen of choice for the ladies of Victorian England who personally used tea towels when caring for their tea services to avoid breakage by careless servants. The tea towel's highly absorbent, lint-free and soft features appealed to ladies requiring the right towel to thoroughly dry their delicate china and serving pieces without scratching or leaving lint behind.

Flour sack towels are the most desirable dish towels because they are super soft, completely lint-free, absorb like a paper towel and dry faster than most kitchen towels, they add unsurpassed sparkle to dishes, glassware and windows. They make superb dusting cloths and have many culinary uses. They are used for dehydrating, straining cloths for stocks and sauces, poaching, cheese making, pastry, proofing bread, herb drying, grabbing warm dishes and they keep salads fresh for hours.

Clever marketing efforts on the part of producers and grocers of the 1800s began packaging flour, sugar and other food stuffs in cotton sacks instead of bulkier wooden barrels. The tightly woven bags that held flour and sugar were coveted for use as dish towels. Flour bags represented 42% of bag production while sugar sacks accounted for 17% of total bags manufactured. Usually, both flour and sugar bags held quantities of only five or ten pounds. Advertising slogans such as, “The best cooks are generous with sugar,” and “Food that is sweet is hard to beat,” could be found on sugar bags. Some of these were embroidered with Outline Stitch designs (sometimes Redwork) and the initials "NRA" (National Recovery Act)  as well as the words "we do our part."

In the mid-1920's, flour sack manufacturers recognized the increasing popularity of these cotton sacks with the nation’s thrifty homemakers, and began printing sackcloth (also known as “chicken linen,” "hen house linen,” or just “pretties”) with artistic patterns. Professional artists and local designers were commissioned to create the most desirable sack cloths on the market. Sellers found that they could influence the type of sugar, rice, cornmeal, flour or seed simply by the style or pattern of cloth the product was contained in. This recycling trend lasted from the mid-1920s through the Great Depression of the 1930s, and the war years of the 1940s until paper and plastic bags began to replace the cloth ones.

In our kitchen, we have an entire drawer dedicated to these venerated workhorses. We refer to them as “mupines” or “mup rags” (sorry Ross!). The term mupine most likely comes from the Italian vernacular; “moppina” (mop). But, author Joanna Clapps Herman in her essay for "Our Roots Are Deep With Passion," asserts that the term originates from the Italian word “mappina” (map) because maps used to be drawn on cloth.

The use of cloth maps is as ancient as (or even older than) the dish towel. Archaeological evidence from ancient Chinese tombs indicates that maps showing trade routes were being drawn on pieces of silk as long ago as the second century AD. In Europe, novelty silk scarves decorated with maps of spa towns were popular during the 18th and 19th centuries. It was with the outbreak of World War II, however, that the idea of printing maps on fabric really came into its own. From early in the war, British airmen were issued 'survival kits' which typically included a small saw blade, needle and thread, currency, phrase cards, a tiny compass, and, most importantly, a silk map. These durable maps were infinitely easy to conceal whether sewn into the lining of a jacket or the hem of an undergarment or hidden in the hollowed-out heel of a boot, a silk map was unlikely to be found during a prisoner search.

The Food Network's Rachel Ray has recently adopted the term "moppine" to mean a towel sewn with hand pockets to be used as a pot holder, but real cooks have been using dish towels as potholders for centuries; no special pockets needed!

No matter what you call them or where they came from, it is abundantly clear that dish towels are a mainstay of our society and are here to stay. Even in these days of computerization and technological advances, cooks and homeowners alike cannot survive with these handy tools. Besides what would we clean the screens of our iPads with otherwise?


Yum

Wednesday, July 6, 2011

Barbecued Ribs a Go-Go!

Everyone knows that great barbecued ribs take time to get the perfect smoky flavor and fall-of-the-bone doneness. With the warmer weather of Spring, we find that we hanker for some saucy, sloppy ribs, but let’s face it with end-of-school schedules, sports practices, and daily errands finding time to grill your own ribs at home is nearly impossible.

Enter Pig Of The Month, a family-run, mail-order company from Dayton, Ohio that ships their homemade barbecue creations nationwide so you can enjoy their BBQ in the comfort of your own home. Their variety of meats (smoked using a technique that was perfected over decades) and different side choices are made with the best of locally sourced ingredients.

It just so happens that the kind folks at POTM sent us a 28 oz. sample of their Cattle King Pork Ribs to try. Our package arrived via FedEx at about 4:30pm, just as I was reaching the panic stage about what to have for dinner. I opened the Styrofoam-lined box to find a fully cooked, vacuum sealed  a slab of ribs that was cold to the touch (not frozen), reheating instructions, an empty (but still damp) pack of dry ice, 2 cute plastic bibs and plenty of moist towelettes – Voila! Dinner dilemma solved!

Following the reheating instructions, we wrapped the (thawed during shipping) in 2 sheets of aluminum foil, with every last tiny droplets of the tangy sauce we could squeeze out of the package, and placed the ribs in a 350 degree F oven for 30 minutes. Just before serving, we opened the aluminum packet (Oh, the delicious smell!) and returned it to the oven for 5 minutes or so to thicken the sauce a bit. We cut the slab into three sections and served with Dom’s amazing corn maque choux (we’ll post the recipe someday!)

Then came the real test! The teenager assessment… Both of our boys dug into the ribs like no one’s business. The oldest had not realized that these were not Dom’s ribs, so when I asked how he liked the ribs, he said they were “perfect as always” which is a high compliment to say the least as in his opinion Dom’s ribs are the best on the face of the Earth. The only admonition that was uttered was that the “Cattle King” Texas-style basting sauce was not spicy enough, but with several different sauce options, we are sure you can find one that suits your taste!

So, the next time you are craving some smoky, grilled ribs, but don’t have time to cook them at home, get the next best thing! Type www.pigofthemonth.com into your computer’s internet browser and take a gander at the selection of goodies (or grab the phone to call 866-416-9190) and place your order.

Yum

Friday, July 1, 2011

Keep Your Fork

The word fork comes from the Latin word 'furca' for "pitch fork." A two-prong twig was perhaps the first fork. One of the earliest dinner forks is attributed to Constantinople in 400 A.D. In 11th century Venice, forks were censured as being an affront to God's intentions for fingers which resulted in the fork’s disappearance from tables for nearly 300 years.

When Catherine de Medici married Henry I in 1533, her dowry included several dozen dinner forks wrought by the great Italian silversmith, Benvenuto Cellini. The fork began to gain acceptance in Italy by the late sixteenth century when upper-class Italians expressed renewed interest in cleanliness.

With Charles I of England’s 1633 declaration, "It is decent to use a fork," civilized table manners became vogue. Because seventeenth century forks had tines were made of case-hardened steel that were quick to wear down, early fork tines were made extra-long in length with sharp pointed tips. Additionally, the number of tines on forks of this period increased from two to four.

By the nineteenth century, mass production and the invention of the electroplating process made silver forks affordable to individuals wishing to emulate the nobility and eat with forks. Long fork tines were no longer needed and tines were shaped to accommodate particular foods. Forks wrought with long tapered tines, such as a dinner fork, are made to spear thick morsels of food, such as steak, and smaller forks were designed for eating salads and desserts.

In addition to their usefulness, forks are also a symbol of friendship, shared meals and good company. We have always enjoyed this anecdotal story:

A young woman diagnosed with a terminal lymphoma was told she had three short months to live. So as she was getting her “affairs in order," she contacted her sister to discuss her final wishes. She told her which outfit she wanted to be buried in and which songs she thought might be appropriate at her memorial.

When the sisters had gone over all the final arrangements, the sister was preparing to leave when the young woman suddenly blurted out, "Oh and there's one more thing!" she said excitedly. "This is very important," the young woman continued. "I want to be buried with a fork in my right hand."

Her sister stood staring at her sibling, not knowing quite what to say. "That surprises you?” she asked. The young woman explained. "Don’t you remember that Grandma always used to say ‘keep your fork’ whenever she cleared the table. It was my favorite part of the meal because I knew that something better was coming, like her velvety chocolate cake or deep dish apple pie. Something wonderful and with substance!” The young woman continued to explain, “I just want people to see me with a fork in my hand and wonder, ‘Hey, what's with the fork?’ Then, I want you to explain to them that I kept my fork because the best is yet to come." Her sister’s eyes welled up with tears of joy as she hugged her sister not knowing if it would be their last visit or not.

At the memorial service, friends and family were walking by the young woman's casket and saw the fork in her hand. Over and over, her sister overheard the question "What's the deal with the fork?" And over and over again she smiled. During her eulogy, the sister spoke of the conversation she had with her sibling shortly before she died. She admitted that she could not stop thinking about the fork and told them that they probably would not be able to stop thinking about it either. She asked that the next time they reached for their forks, that they would remember ever so gently, that the best is yet to come.

And so, cherish the time you have, and the memories you share... Remember that being friends with someone is not an obligation, but a sweet responsibility. Friends are very rare jewels, indeed. They make you smile, and encourage you to succeed. They talk you off the edge of the cliff when you stand too close, they bring chicken soup when you’re sick, and always remind you to keep your fork!


Yum
Powered by Blogger.

footer social

ShareThis