Tuesday, November 9, 2010

Pesto Genovese

As the temperatures start getting close to freezing in the South, we find that we use more basil before the plants die out. Fresh leaves in Caprese salad and on pizza Margherita, and fresh pesto for pasta, bruschetta and sandwiches are all delicious. And the spicy aroma doesn't hurt!

When my grandmother made this recipe, she used a mortar and pestle and hand ground all the ingredients together which makes a chunkier, more rustic sauce. For a smoother, more consistent pesto I use a food processor. We use walnuts  since I am allergic to pine nuts.


1 cup fresh basil leaves (packed)
2 tablespoons fresh parsley
1/2 cup extra-virgin olive oil
1/3 cup pine nuts (or substitute walnuts)
2 cloves of garlic
¼ cup freshly grated Parmigiano-Reggiano
pinch of salt and pepper

Place the basil, parsley, salt, and pepper in the bowl of a food processor and pulse for a few seconds until the basil is chopped. Add walnuts (I'm allergic to pine nuts!) and garlic and then add the olive oil in a thin, steady stream until a smooth sauce is formed. Add grated cheese and pulse to mix. Add to the cooked pasta of your choice and toss gently to coat pasta completely. If the sauce is too thick, add ¼ cup of the pasta water to the mixture. Additional olive oil may be added as well. Serve and sprinkle top with additional grated Parmigiano-Reggiano.

Pesto may be made 1 day in advance and kept, refrigerated, in an airtight container, until ready to use. If making in advance, be sure to cover the top of the pesto with a thin layer of olive oil to prevent the pesto from darkening. Pesto may also be frozen in the same manner in small quantities for use at a later date, but it as never as good as using it right out of the garden.

Yum

Friday, November 5, 2010

Iron Foodie 2010 - A Family Challenge

This post is our submission to the Iron Foodie Challenge being sponsored by Foodie Blogroll and Marx Foods. Why do we want to compete in this “Iron Foodie” challenge? The name of our blog answers sums it up quite well! We have been cooking together since we met 23 years ago. We love to and experiment with new ingredients and have tried to instill a love for food and exploration in our children. This challenge would give us an opportunity to try new ingredients as a family, work together to create new dishes, and most importantly to spend time together doing what we all love best: cooking and eating!

We are huge fans of Frank Oz and the Swedish Chef (Bort, bort, bort!), but if we could spend one day in the kitchen of the legendary Thomas Keller, it would be nothing short of culinary nirvana. Merely having access to the impeccable ingredients he uses would be a blissful experience. To gain insight into his attention to detail and his passion for new gastronomic achievements would be both educational and enlightening!

The morsel most likely to be plucked from a dish in our house is a dill pickle. Whether it is a Kosher “full sour” dill or a Polish “ogórek kiszony,” watch your plate or it may disappear!

As we have mentioned before, Dom grew up in an Italian community. Every Sunday his grandmother would open their house to a multitude of aunts, uncles, cousins and friends to enjoy handmade cavatelli with a meaty pomodoro sauce (made from tomatoes canned from the garden,) homemade bread with peppers in oil, and even homemade wine. It was unbelievably noisy and messy, but entirely enjoyable and memorable.

When we discussed which one mainstream food we couldn’t abide as a family, there was a heated debate which finally ended in a tie. Dom and Sonny (who could survive on tapas alone) feel that “heat and eat” hors d'œuvres are the sacrilege of the century, while Nic and I decided that instant mashed potatoes are the work of the devil and should be avoided at all costs.

Thanks for taking time to read this post, and thank you for giving us the prompts for a lively and animated conversation about food and life!

Yum

Wednesday, November 3, 2010

Old School Baked Custard

Another treat from my grandmother's recipe box! Perfect comfort food for a cold rainy day. I made this yesterday and had forgotten how incredibly easy it is to make!

Unlike its cousins, creme brûlée and flan, this custard is very soft and delicate with a lighter texture. The plump raisins are a sweet surprise at the bottom of the cup. If you can resist eating it all as it comes out of the oven, it is actually even better served cold.

2 eggs
2 cups milk
1/2 cup sugar (scant)
1 tsp. of vanilla
Raisins (optional)

Preheat oven to 325oF. In a mixing bowl, combine all ingredients and mix until sugar is dissolved. Place raisins in bottom of ramekins or cups, and then pour the custard mix on top. Sprinkle cinnamon on top after you have filled cups.

Place ramekins/cups in a pan which can be used as a bain-marie (water bath). Place baking dish on the oven rack and then fill dish with enough hot water to keep the bottoms of your custard cups wet (approximately 1 inch). Bake on middle rack for 1 hour. Remove from bain-marie to cool. If you plan to refrigerate, cover lightly with plastic wrap.

Yum

Sunday, October 31, 2010

Homemade Halloween Face Paint

While this is not a traditional food recipe, it is a good idea to keep these ingredients on hand so that when your child decides (at the very last minute) what costume to wear to trick or treat, you can paint a face to match. All ingredients are non-toxic. Using face paints instead of masks is preferred to keep children's vision from being obstructed in the dark. Costumes should always fit comfortably and kids should wear shoes that fit and won't cause trips and falls.


1 teaspoon corn starch
½ teaspoon water
½ teaspoon shortening or cold cream
food coloring

Mix cold cream and corn starch, and then add water and food coloring. We use baby powder over the cold cream to create a pale face. Powder helps to set and reduce the sheen of the cream as well. Use corn syrup as “face glue” to attach cotton balls, cloth scraps, etc. to create your alter-ego. Face paints can be removed with soap and water. Additional cold cream maybe used also.


Yum

Wednesday, October 27, 2010

Oh, What a Tangled Web We Weave…

Every year at Halloween, I set aside a day to make my signature spider web cookies. I use a handmade cookie cutter (I never could find one big enough for sale,) and my grandmother’s sugar cookie recipe. The trick is the icing technique. You make two batches of icing one plain white and one chocolate. After the cookies are cooled, put the chocolate icing in a pastry bag with a small round (I use a #2) tip. Spread white icing on one cookie to the edge with small spatula or the back of a teaspoon. Repeat with a second cookie, giving the first cookie time to set.

On the first cookie, using the chocolate icing in the pastry bag, pipe a spiral starting at the center and working outward. It helps to wipe the tip of the toothpick each time you drag the icing. Next, use the same dragging technique and position tip at the outside edge of the cookie, halfway between the outward spokes and drag icing inward to center to create another line. Repeat the dragging process with second iced cookie. Continue working in batches of 2 cookies.

When you have finished icing all the cookies, let them dry at room temperature. Add spiders when the icing has hardened. For the spider bodies you can make tiny chocolate cookies with the scraps of sugar cookie dough, or use M&Ms or nonpareils. Add eyes and legs using the chocolate icing.

Grammie’s Sugar Cookies
Use flour on utensils to keep dough from sticking: Dip the cookie cutters, and dust the spatula before transferring uncooked dough to a sheet. Rolling dough between two sheets of floured parchment will keep it from sticking to the rolling pin. You can store cookies in airtight containers at room temperature, up to 1 week.

2 cups all-purpose flour, plus more for rolling
½ teaspoon baking powder
¼ teaspoon salt
½ cup (1 stick) unsalted butter, room temperature
1 cup granulated sugar
1 large egg
1 teaspoon vanilla extract

In large bowl, whisk flour, baking powder, and salt. With an electric mixer, cream butter and sugar until light and fluffy. Beat in egg and vanilla. With mixer on low, gradually add flour mixture; beat until combined. Divide dough in half; flatten into disks. Wrap each in plastic; freeze until firm, at least 20 minutes, or place in a resealable plastic bag, and freeze up to 3 months (thaw in refrigerator overnight).

Preheat oven to 325°F. Line baking sheets with parchment. Remove one dough disk; let stand 5 to 10 minutes. Roll out ¼ - ½ inch thick between two sheets of floured parchment, dusting dough with flour as needed. Cut shapes with cookie cutters. Using a spatula, transfer to prepared baking sheets. (If dough gets soft, chill 10 minutes.) Re-roll scraps; cut shapes. Repeat with remaining dough. Bake, rotating halfway through, until edges are golden, 10 to 18 minutes (depending on size). Cool completely on wire racks.

Royal Icing
This smooth, hard-drying icing is perfect for cookies. It is also useful as a "cement" to fasten decorations together like gingerbread houses.

4 tablespoons Meringue Powder (or 2 egg whites plus 1 teaspoon lemon juice)
1 box (about 4 cups) confectioners' sugar
6 tablespoons warm water

You know you have the proper consistency when you lift the beater the ribbon of icing that falls back into the mixing bowl lays on the surface of the icing for a few seconds before disappearing. Because royal icing hardens when it is exposed to air, the icing needs to be used immediately or transferred to an airtight container. Cover icing with plastic wrap when not in use.

“Oh what a tangled web we weave, When first we practice to deceive.” ~Sir Walter Scott


Yum

Sunday, October 24, 2010

Pepperoni Eggs

Pepperoni eggs have been a Romeo signature breakfast since the boys were tiny. Served with a piece of buttered toast… breakfast heaven! This is the first recipe both boys learned to cook by themselves!

1 Tablespoon Butter
2 Large eggs
¼ cup pepperoni, diced into small pieces
2 Tablespoons grated cheese (optional)

Melt butter in a small frying pan. Add pepperoni and cook until hot. Break eggs into a cup or bowl and beat well. Then add to frying pan with pepperoni. Stir eggs with pepperoni until desired doneness. Sprinkle cheese on top and cover pan with a lid until cheese melts. Fold out onto plate and serve with buttered toast.


Yum

Thursday, October 21, 2010

Veal Cutlets with Lemon Caper Sauce

This is my absolute favorite dinner. The tender veal with the lemon and capers is a perfect combination. Served with mashed potatoes - Nirvana!

2 Ibs. veal scaloppini, pounded thin
2 Tablespoons olive oil for pan
½ cup chicken stock
Juice of 1 lemon
1 teaspoon corn starch
1 anchovy, mashed into paste
3 tablespoons capers
1/2 stick butter

Heat oil in a large skillet over medium heat until hot, but not smoking. Add veal cutlets to the pan in a single layer (work in batches, if necessary) and sauté until veal is lightly browned, about 2 minutes. Turn and brown other side for 1 minute. As each cutlet is cooked, transfer to a warm platter. Pour off and discard fat from skillet. Return skillet to medium-high heat and add broth and scraping browned bits stuck to bottom of skillet. Reduce heat again to low. Add corn starch to lemon juice and then add lemon juice, anchovy and capers to the broth in the pan. Gradually whisk in butter, whipping in to create a creamy sauce. The sauce will thicken quickly after corn starch is added. Return cutlets to skillet just long enough to heat through, and then transfer to a serving platter, spooning sauce over the top.

Yum

Tuesday, October 19, 2010

Tiramisu Issimo

Tiramisu, whose name means "pick me up" (perhaps a reference to its caffeine content,) is Sonny’s godmother’s favorite dessert. Whenever we go to their home, we take the ingredients to make this dessert and the Illy Issismo Caffé will be a permanent addition to our tiramisu go-kit!

2 eggs, separated
½ cup sugar
½ cup mascarpone
1 6.8 oz.-can of Illy Issismo Caffé
1/4 cup brandy (Kahlua works well too!)
12 lady finger cookies
Cocoa powder

Beat egg yolks with a whisk in a medium bowl. Gradually add sugar, continuing to whisk until mixture is thick, smooth, and pale yellow. Gently fold mascarpone into mixture with a rubber spatula, and then set aside. Put egg whites into a clean, dry mixing bowl and beat with a whisk until they form stiff but not dry peaks.

Fold egg whites into mascarpone mixture and set aside. Pour Illy Issismo Caffé  into a wide, shallow bowl. Dip 4 of the lady finger cookies into the caffé just long enough to moisten them without making them soggy, and then arrange them side by side in a single layer on a serving platter. Spread one-third of the mascarpone mixture over the cookies, then dust with a little cocoa powder. Repeat the entire process twice, dipping the lady finger cookies in caffé and layering them with mascarpone and cocoa. The dessert can be made ahead and refrigerated, but in our experience it rarely makes to the fridge!

Yum

Illy Issimo - Coffee on the Go

When I walked out on my porch to find a box with a Foodbuzz label on it, I was so excited. I immediately opened it and found cans of Illy Issimo: Caffé, Cappuccino, and Latte Macchiato. The cans state they are best served chilled, so I wasted no time putting them in the fridge!

Since 1933, the Illy family of Trieste, Italy has been dedicated to creating the perfect espresso and now they have found a way for their customers to take it with them anywhere. Illy Issimo is made of 100% Arabica Coffee and other natural ingredients. We all tried the Latte Macchiato first. The first thing we noticed was that the coffee flavor was wonderful and was not hidden by the sugar or milk. Then we tried the Cappuccino and had the same reaction; great coffee flavor which was not overridden by sugar or milk. The additional cocoa was a good complement to the coffee and did not overpower the taste of the coffee either. Illy Issimo gets a high ranking from the Romeo family!

Yum

Friday, October 15, 2010

Mashed Potatoes with Love

Our boys take their own lunch to school every day. Both of our boys are now in high school (time truly flies by!) and I can still count on one hand the number of times they have had to eat a “tray lunch” as they call them. Two of those times came in 2004, when Hurricane Frances left us without power for several days.

The first day, we asked the guys what they had for lunch. Our youngest responded with “turkey, dressing, mashed potatoes, and a roll.” Dom asked how it tasted, to which he replied, “the turkey was dry, the dressing was gooey and the mashed potatoes were terrible.” We commented that it was kind of difficult to mess up mashed potatoes and Sonny said, “they weren’t made with love.” Dom and I looked at each other and said in unison, “Butter!” Today in our house, the word love is synonymous with butter (at least in the kitchen.)

3 large potatoes (Idaho or Yukon Gold), peeled and cubed
Water to boil
1 stick butter
1 cup milk
Salt to taste

Cut your peeled potatoes into 3-4” cubes and place them into a saucepan. Add water until potatoes are covered. Bring to boil, reduce heat to medium and cook covered for 20 minutes or until a fork can easily be poked through their center. Drain water from the potatoes and return them to the hot pan, cover tightly and let steam for 5 minutes. This allows the potatoes to dry a bit so they'll soak up the butter and cream more easily and mash to a better texture. Add the butter and milk to the pot. Using a potato masher, mash potatoes to the desired texture. Add more milk if needed to get the consistency you would like. We sometimes use a hand-mixer which mixes the potatoes well. {Beware: a food processor will turn your potatoes into library paste!} Add salt and pepper to taste before serving.

Yum

Mashed Potatoes Addendum #1: Smashed Potatoes

Occasionally, a rustic meal calls for a more rustic side dish. Smashed potatoes fits the bill. The recipe is basically the same as that of mashed potatoes with love with one obvious exception: the potatoes are not peeled prior to being boiled. We like using red-skinned potatoes for this recipe. The only other advice we would give is to not use the hand mixer as the skins get caught in the beaters! Enjoy!


Yum

Mashed Potatoes Addendum #2: Flavored Potatoes

You can always add ingredients to mashed potatoes to enhance the flavor and complement your main dish. Everyone in our house has a favorite: I prefer horseradish, Sonny likes chive, Dom favors caramelized onion, and Nic enjoys parsley scattered on top.

Horseradish: add 1/4 cup prepared horseradish, drained
Chive: add 1/2 cup fresh chives, chopped
Caramelized Onion: add 2 medium onions, caramelized
Parsley: 1 Tablespoon fresh parsley, finely chopped

Yum

Thursday, October 14, 2010

Sweet and Sour Glazed Pork Tenderloin

This dish is called “Maiale in Agrodolce” in Italy and is a traditional preparation for pork chops and tenderloin. The sweet tanginess complements the meat and is a good autumnal recipe. We served this pork with home fries and a beet & arugula salad, but it could be served with a variety of harvest vegetables.

  • 2 lbs. (approximately) pork loin or chops
  • 3 tablespoon extra-virgin olive oil
  • Kosher salt
  • Freshly ground black pepper
  • 1/3 cup balsamic vinegar
  • 2 tablespoon honey
  • 4 tablespoon unsalted butter
  • Sprig of fresh rosemary (optional)

Put pork on a plate and rub with olive oil and season generously with salt and pepper. Place pork chops in a pre-heated sauté pan and brown pork on all sides (approximately 8-10 minutes.)

Remove pork from the pan and set aside on a plate. Add vinegar to pan, stirring to scrape any cooked tidbits of meat from pan, and then add honey, butter and rosemary to the pan. Bring to a boil and let liquid reduce for 1-2 minutes, then add browned pork back to the pan and coat evenly. Continue cooking over medium heat for about 10-15 minutes until cooked through turning and basting frequently.

Place the pork under your broiler on high for a few minutes to obtain a crust on the pork. Remove immediately and let pork rest for 5 minutes before slicing into medallions and serving on warm plates with a drizzling of basting sauce.


Yum

Tuesday, October 12, 2010

Classic Peanut Butter Cookies

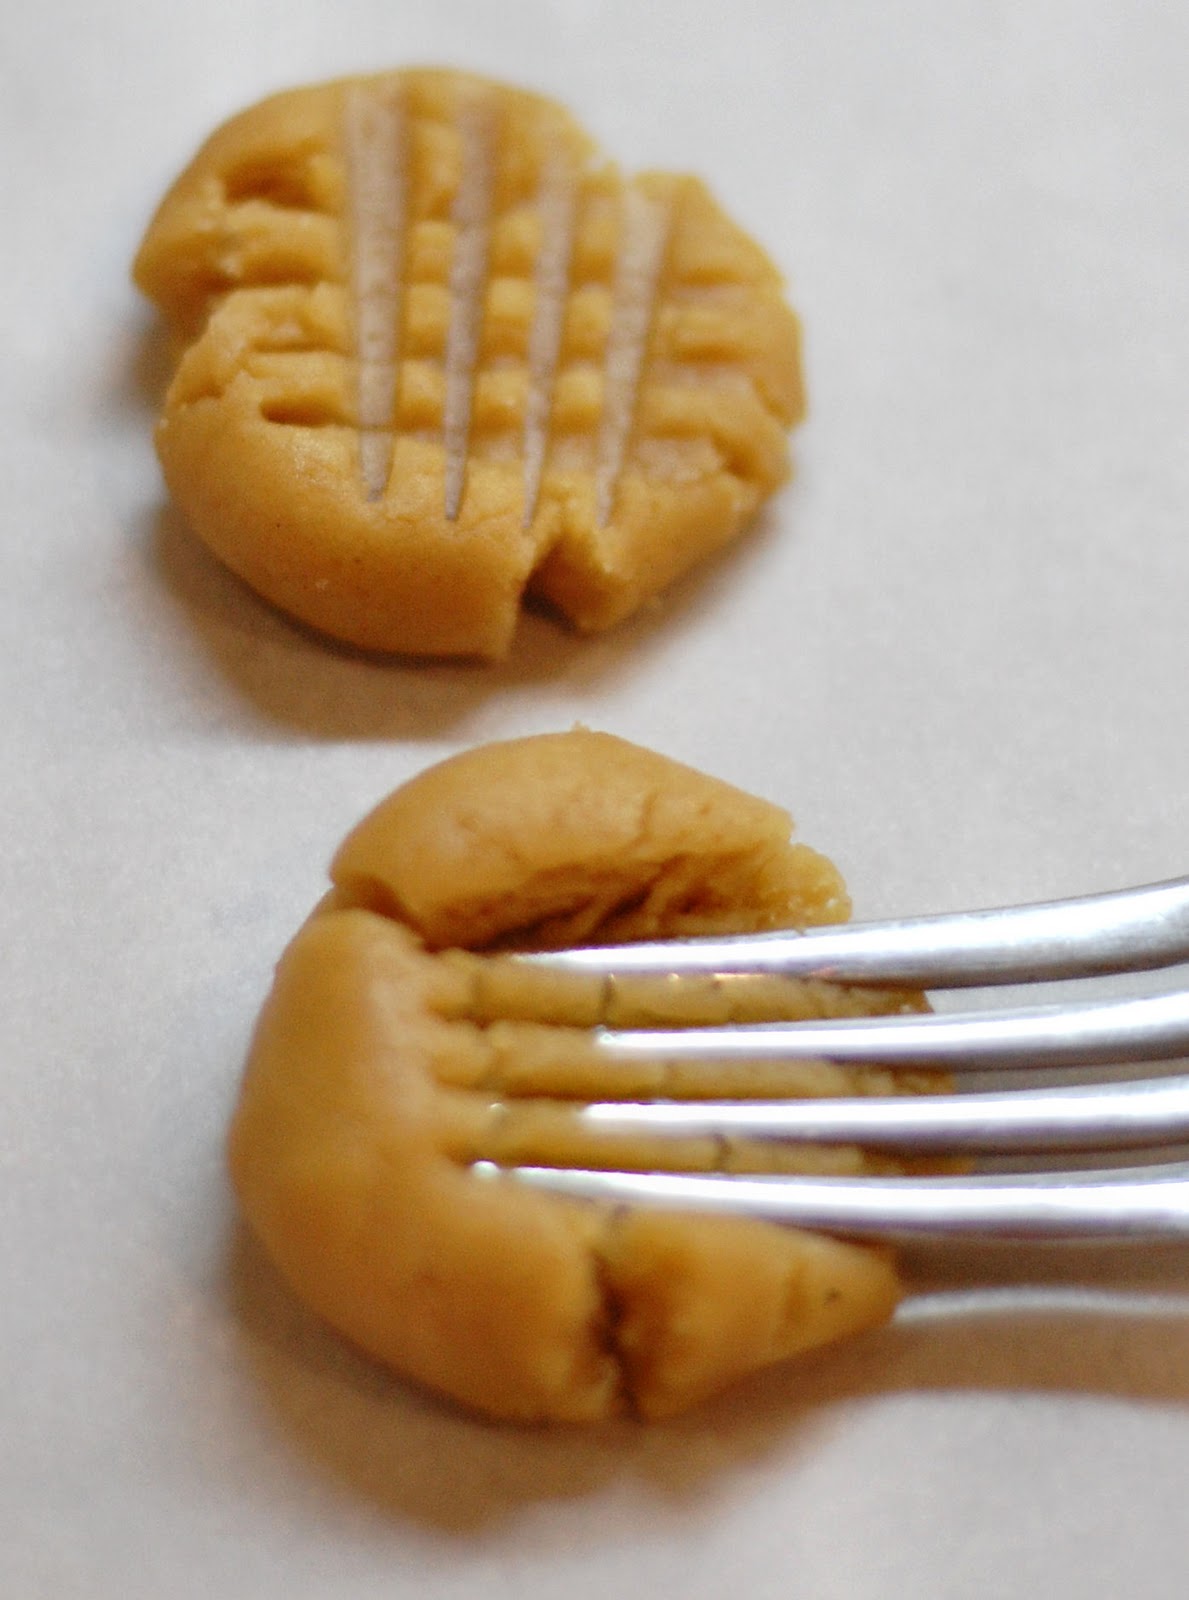
The criss cross pattern on these yummy cookies makes me nostalgic for the times my Mom and I made these cookies together as I was growing up. They are crispy and light. With chocolate ice cream, they make delicious ice cream sandwiches! 

1 1/2 cups peanut butter
1 cup packed light-brown sugar
1 stick (1/2 cup) softened unsalted butter
1 large egg
1 teaspoon vanilla extract
1 1/2 cups all-purpose flour
1 teaspoon baking powder

Preheat oven to 350oF. In a large bowl, beat together peanut butter, sugar, and butter until smooth. Beat in egg and vanilla. Slowly add flour and baking powder and mix to combine. Scoop out dough with a tablespoon and roll into balls.

Place balls 2 inches apart on a parchment-lined baking sheet. Using a fork, press balls with a crisscross pattern and flatten balls to ½-inch thickness. Bake cookies until lightly golden for about 10 to 14 minutes. Cool the cookies on a wire rack and then store in an airtight container for up to 1 week.

Yum

Sunday, October 10, 2010

Smokey Summer Spareribs

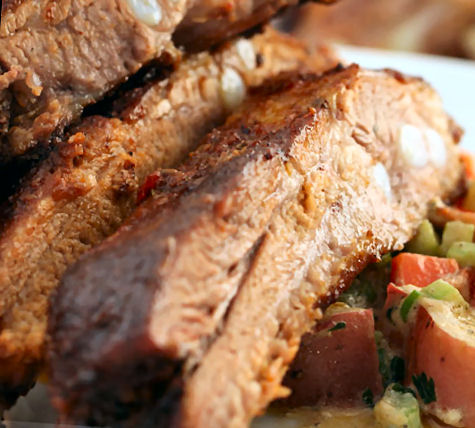
The crisp Fall air always puts us in the mood for some smokey barbecued spareribs (or "meatsicles" as the boys always called them.). Spareribs are pork ribs that have been cut from the bottom section of the ribs and breastbone of the pig, just above the belly. A full rack of ribs is known as a "slab" and usually weighs between 2-4 pounds.

The term "sparerib" may refer to the traditional German method of roasting ribs on a spit or a spear (spear ribs) or to the lack of meat on the rib bones. Either way, they are delicious when cooked slowly and lightly smoked. Because the heat of a grill is difficult to control and maintain, we have found that the optimal cooking method is to roast ribs in the oven and then smoke them toward the end of the cooking process. Dom applies a rib rub at least 30 minutes before cooking.

4 Tablespoons paprika
3 Tablespoons garlic powder
2 Tablespoons salt
2 Tablespoons mild chili pepper (like Ancho)
2 Tablespoons dark brown sugar
1 Tablespoon ground black pepper
1 Tablespoon white sugar
1 Tablespoon cumin
1 Tablespoon oregano
1 teaspoon ground cayenne pepper
1 teaspoon ground white pepper

Mix all ingredients together with a fork. Sprinkle ribs with enough rub to cover and massage into meat. Don’t put too much rub on the ribs - just use enough to cover. Store leftover rub in a glass jar for future use.

Place ribs, meat side down, in baking dish(es). Cover the baking dishes with aluminum foil and place in an oven which has been preheated to 225oF.  A regular rack of ribs takes about after 4 hours to cook. Flip the ribs over (we use using two spatulas or grilling forks) at least once during roasting.

While the ribs are roasting in the oven, prepare a charcoal grill so that ribs can smoke when roasting period is over. Place briquettes to one side of grill, so that the ribs do not have to sit directly over the flame. Prepare a packet of wood chips by placing dampened wood chips (we prefer hickory) in aluminum foil and wrapping tightly then gently poke holes in the aluminum with a fork. Place wood chip packet on the coals.

Remove ribs from the oven and place on the cool side of the grill. Place the lid on the grill; you should see smoke start to billow from under the lid of the grill. Let the ribs smoke for about 45 minutes turning occasionally. If the smoke completely recedes, prepare another wood chip packet and place on the coals.

When ribs are done smoking, tightly wrap each slab individually in aluminum foil and place covered slabs in a paper bag. The ribs should be securely tucked back into the now-cooled oven to rest for approximately one hour before serving.

Put a layer of BBQ sauce on the ribs and serve them up with a side of potato salad and some baked beans.

Yum

Grammy Lou’s Bar-B-Que Sauce

My Mom has been making this BBQ sauce for years. It works well on beef and chicken, and is the perfect tangy sauce to slather on your smokey spareribs. It is so good our boys dip corn on the cob, carrots (and fingers) in their servings long after the meat has been devoured.

½ cup ketchup
¼ cup cider vinegar
¼ cup brown sugar
¼ cup Worcestershire sauce
2 tablespoons instant coffee crystals
2 tablespoons water
1 tablespoon honey
1 teaspoon dry mustard
1 teaspoon black pepper, freshly ground
Crushed red pepper flakes, to suit your taste

Mix all ingredients together. That's it! If you plan to baste with this sauce, as well as use it on the table, remember to set some aside. It Is not a good idea to serve basting sauce that has been exposed to raw meat.


Yum

Saturday, October 9, 2010

Focaccia

The Camaldoli yeast is amazingly active at this point. We have tried making rustic loaves and pizza bianca, but on Saturday we decided to try using the starter for focaccia. We used the recipe for pizza dough and let it rise in a half-sheet pan coated with olive oil. It filled the pan and we baked it at 350oF for about 40 minutes. Once removed from the oven, we drizzled the bread with rosemary-infused olive oil. It was spongy and airy and really delicious.We served the focaccia with a simple homemade chicken liver pâté, and then put the bread on the table with the main course of ragù alla Bolognese. We will definitely be making more focaccia this winter!

Yum

Thursday, October 7, 2010

Olive Tapenade

This dish is also called “poor man’s caviar” because of its color and texture. This olive spread is a perfect addition to pizza bianca!

1/2 pound pitted mixed olives
2 anchovy fillets, rinsed
1 small clove garlic, minced
2 tablespoons capers
2-3 fresh basil leaves (or sprigs of parsley)
1 tablespoon freshly squeezed lemon juice
2 tablespoons extra-virgin olive oil

Thoroughly rinse the olives in cool water. Place all ingredients in the bowl of a food processor and chop, stopping to scrape down the sides of the bowl, until the mixture becomes a coarse paste. This should take about 1 to 2 minutes in total. Transfer to a bowl and serve with crusty bread (or pizza bianca)!


Yum

Wednesday, October 6, 2010

Pizza Bianca

The Camaldoli yeast can also used to make traditional Neapolitan pizza. The word "pizza" is believed to have come from the Latin word pinsa, meaning flatbread. By the Middle Ages, these early pizzas started to take on a more modern look and taste being topped with olive oil and sea salt. Originating in Naples, Italy, pizza became a household word throughout Italy by the late 1700's. Pizzerias advertised pizza as the "yeast of life."

3/4 cup of yeast culture
3 ½ cups unbleached bread flour
1 ¼ cups warm water
1 teaspoon sea salt

All the ingredients are mixed together and kneaded thoroughly, and then placed in a large bowl covered with plastic wrap. The bowl was placed in a warm corner for 4 hours to proof and rise. After the first proofing period, the dough is “punched” down and allowed to rise for another 4 hours. To form pizzas, divide the dough into 2-3 balls. Flour your counter or board and flatten each ball by pressing on the center with the heel of your hand and working outward to form a circle. Keep working from the center outward to increase the size of the pizza. Transfer to a pizza peel and allow to rest for 20 minutes to one hour.

If you are making traditional Pizza Bianca, place the untopped pizza on a pizza stone and bake at 500oF for 7-10 minutes. The pizza should be light to medium brown. Remove from the oven and coat with extra-virgin olive oil and sprinkle with sea salt.

If you choose to top your pizza with other ingredients, this should be done after the pizza has rested, but before being baked.

Yum

Tuesday, October 5, 2010

Day Four: Bread Baking

After dividing and feeding the Camaldoli starter for three days, the yeast culture is ready for use.

1 cup of yeast culture
3 ½ cups unbleached bread flour
1 cup warm water
2 teaspoons sea salt

All the ingredients are mixed together and kneaded thoroughly, and then placed in a large bowl covered with plastic wrap. The bowl was placed in a warm corner for 8 hours to proof and rise. After the proofing period, the dough is “punched” down and formed into a loaf. I placed the loaf on a piece of parchment paper and put the parchment directly on a bread peel to rise for another 2 hours.

The bread was placed on a baking stone in an oven preheated to 450oF, and cooked for 15 minutes. After the first 15 minutes, the oven temperature is dropped to 350oF and the bread baked for another 45 minutes. I turned the bread once during baking to make sure it baked evenly. The loaf cooled for 10 minutes before cutting and serving.

The bread had a crisp crust and a soft center. It had a mild sourness and a nice spongy texture. Overall, a successful experiment and a perfect addition to Sunday dinner!

Yum
Powered by Blogger.

footer social

ShareThis